Satellite M505 Resource Guide
Page 34
... Start menu. For this procedure. The Shut Down menu appears. You will be installed in the lower-right corner of the computer. Avoid touching the cover, the module(s), and the surrounding area before replacing it must be installed in Sleep or Hibernation mode, data will need a small Phillips screwdriver for this...
... Start menu. For this procedure. The Shut Down menu appears. You will be installed in the lower-right corner of the computer. Avoid touching the cover, the module(s), and the surrounding area before replacing it must be installed in Sleep or Hibernation mode, data will need a small Phillips screwdriver for this...
Satellite M505 Resource Guide
Page 35
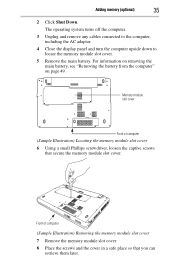
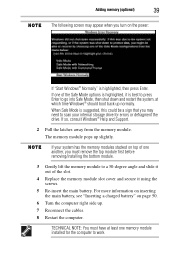
...you can retrieve them later. Memory module slot cover Front of computer (Sample Illustration) Removing the memory module slot cover 7 Remove the memory module slot cover. 8 Place the screws and the cover in a safe place so that secure the memory module slot cover. The operating system turns off the computer.... to the computer, including the AC adaptor. 4 Close the display panel and turn the computer upside down to locate the memory module slot cover. 5 Remove the main battery. For information on removing the main battery, see "Removing the battery from the computer" on page 49. ...
...you can retrieve them later. Memory module slot cover Front of computer (Sample Illustration) Removing the memory module slot cover 7 Remove the memory module slot cover. 8 Place the screws and the cover in a safe place so that secure the memory module slot cover. The operating system turns off the computer.... to the computer, including the AC adaptor. 4 Close the display panel and turn the computer upside down to locate the memory module slot cover. 5 Remove the main battery. For information on removing the main battery, see "Removing the battery from the computer" on page 49. ...
Satellite M505 Resource Guide
Page 38
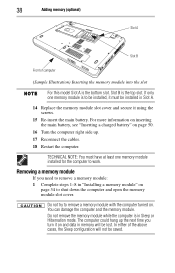
TECHNICAL NOTE: You must be installed in Slot A. 14 Replace the memory module slot cover and secure it on and data in memory will not be saved. You can damage the computer and the memory module. Do not remove the ... must have at least one memory module is the bottom slot. Do not try to shut down the computer and open the memory module slot cover.
TECHNICAL NOTE: You must be installed in Slot A. 14 Replace the memory module slot cover and secure it on and data in memory will not be saved. You can damage the computer and the memory module. Do not remove the ... must have at least one memory module is the bottom slot. Do not try to shut down the computer and open the memory module slot cover.
Satellite M505 Resource Guide
Page 39
... system has the memory modules stacked on top of one another, you must have at least one of the slot. 4 Replace the memory module slot cover and secure it is highlighted, then press Enter. If one memory module installed for errors or defragment the drive.
... system has the memory modules stacked on top of one another, you must have at least one of the slot. 4 Replace the memory module slot cover and secure it is highlighted, then press Enter. If one memory module installed for errors or defragment the drive.
Satellite M505 Resource Guide
Page 45
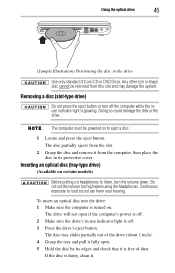
... loud sound can harm your hearing. The disc tray slides partially out of dust. The drive will not open . 5 Hold the disc by its protective cover. The disc partially ejects from the slot. 2 Grasp the disc and remove it . Any other size or shape disc cannot be powered on headphones to...
... loud sound can harm your hearing. The disc tray slides partially out of dust. The drive will not open . 5 Hold the disc by its protective cover. The disc partially ejects from the slot. 2 Grasp the disc and remove it . Any other size or shape disc cannot be powered on headphones to...
Satellite M505 Resource Guide
Page 46
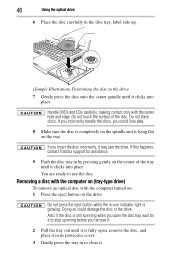
... assistance. 9 Push the disc tray in by pressing gently on the drive. If this happens, contact Toshiba support for it to stop spinning before you open , remove the disc, and place it in its protective cover. 3 Gently press the tray in to use indicator light is lying flat on the tray. You...
... assistance. 9 Push the disc tray in by pressing gently on the drive. If this happens, contact Toshiba support for it to stop spinning before you open , remove the disc, and place it in its protective cover. 3 Gently press the tray in to use indicator light is lying flat on the tray. You...
Satellite M505 Resource Guide
Page 47
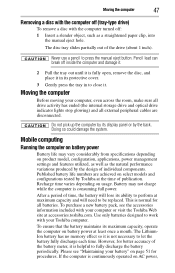
... models and configurations tested by its maximum capacity, operate the computer on battery power at maximum capacity and will lose its protective cover. 3 Gently press the tray in to let the battery fully discharge each time. Please see the accessories information included with your... battery" on page 51 for procedures. Do not pick up the computer by Toshiba at accessories.toshiba.com. Published battery life numbers are disconnected. After a period of the battery meter, it is consuming full power. This is...
... models and configurations tested by its maximum capacity, operate the computer on battery power at maximum capacity and will lose its protective cover. 3 Gently press the tray in to let the battery fully discharge each time. Please see the accessories information included with your... battery" on page 51 for procedures. Do not pick up the computer by Toshiba at accessories.toshiba.com. Published battery life numbers are disconnected. After a period of the battery meter, it is consuming full power. This is...

Satellite M505 Resource Guide
Page 60
...removing 49 safety precautions 51 manual eject hole optical drive 43 memory module installation 34 installing 33 inserting into socket 36 removing 38 removing cover 35 monitor problems monitor not working 55 moving the computer 47 N notification low battery 49 O ON/OFF button TouchPad™ 42...connecting 32 precautions 29 printer connecting 33 problem solving computer hangs when ExpressCard® inserted 57 computer will not power up 54 contacting Toshiba 57 display is blank 55 ExpressCard® checklist 56 ExpressCard® slot appears dead 56 external monitor 55 keyboard not responding 54...
...removing 49 safety precautions 51 manual eject hole optical drive 43 memory module installation 34 installing 33 inserting into socket 36 removing 38 removing cover 35 monitor problems monitor not working 55 moving the computer 47 N notification low battery 49 O ON/OFF button TouchPad™ 42...connecting 32 precautions 29 printer connecting 33 problem solving computer hangs when ExpressCard® inserted 57 computer will not power up 54 contacting Toshiba 57 display is blank 55 ExpressCard® checklist 56 ExpressCard® slot appears dead 56 external monitor 55 keyboard not responding 54...
User Guide
Page 50
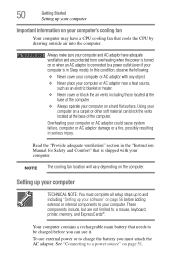
...any object. ❖ Never place your computer or AC adaptor near a heat source, such as an electric blanket or heater. ❖ Never cover or block the air vents including those located at the base of the computer. ❖ Always operate your computer Important information on a carpet ...flat surface. Your computer contains a rechargeable main battery that is turned on page 51. In this condition, observe the following: ❖ Never cover your computer or AC adaptor with your computer and AC adaptor have a CPU cooling fan that cools the CPU by drawing outside air into ...
...any object. ❖ Never place your computer or AC adaptor near a heat source, such as an electric blanket or heater. ❖ Never cover or block the air vents including those located at the base of the computer. ❖ Always operate your computer Important information on a carpet ...flat surface. Your computer contains a rechargeable main battery that is turned on page 51. In this condition, observe the following: ❖ Never cover your computer or AC adaptor with your computer and AC adaptor have a CPU cooling fan that cools the CPU by drawing outside air into ...

User Guide
Page 57
...comes with the computer's power on may want to room temperature before they have cooled. NOTE Before adding external devices or memory, Toshiba recommends setting up your software" on the base of the computer. The surrounding area may be installed in Sleep or Hibernation mode,... data will need a small Phillips screwdriver for this procedure. Avoid touching the cover, the module(s), and the surrounding area before replacing it. To avoid damaging the computer's screws, use complex software or process large amounts...
...comes with the computer's power on may want to room temperature before they have cooled. NOTE Before adding external devices or memory, Toshiba recommends setting up your software" on the base of the computer. The surrounding area may be installed in Sleep or Hibernation mode,... data will need a small Phillips screwdriver for this procedure. Avoid touching the cover, the module(s), and the surrounding area before replacing it. To avoid damaging the computer's screws, use complex software or process large amounts...
User Guide
Page 58
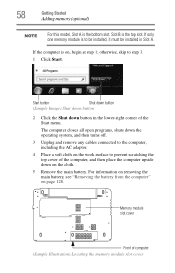
... If the computer is to be installed, it must be installed in the lower-right corner of computer (Sample Illustration) Locating the memory module slot cover The computer closes all open programs, shuts down button in Slot A. For information on removing the main battery, see "Removing the battery from the ... AC adaptor. 4 Place a soft cloth on the cloth. 5 Remove the main battery. If only one memory module is on page 128. Memory module slot cover Front of the Start menu. 58 Getting Started Adding memory (optional) NOTE For this model, Slot A is the top slot.
... If the computer is to be installed, it must be installed in the lower-right corner of computer (Sample Illustration) Locating the memory module slot cover The computer closes all open programs, shuts down button in Slot A. For information on removing the main battery, see "Removing the battery from the ... AC adaptor. 4 Place a soft cloth on the cloth. 5 Remove the main battery. If only one memory module is on page 128. Memory module slot cover Front of the Start menu. 58 Getting Started Adding memory (optional) NOTE For this model, Slot A is the top slot.

User Guide
Page 59
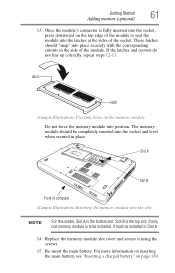
... "Removing a memory module" on the underside of computer (Sample Illustration) Removing the memory module slot cover 7 Remove the memory module slot cover. 8 Place the screws and the cover in a safe place so that secure the memory module slot cover. Grease or dust on the computer. Static electricity can retrieve them later. Avoid touching the...
... "Removing a memory module" on the underside of computer (Sample Illustration) Removing the memory module slot cover 7 Remove the memory module slot cover. 8 Place the screws and the cover in a safe place so that secure the memory module slot cover. Grease or dust on the computer. Static electricity can retrieve them later. Avoid touching the...
User Guide
Page 61
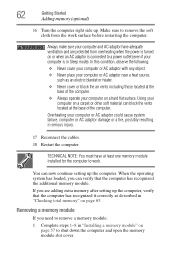
..." on the memory module Do not force the memory module into place securely with the corresponding cutouts in Slot A. 14 Replace the memory module slot cover and secure it must be installed, it using the screws. 15 Re-insert the main battery. latch latch (Sample Illustration) Pressing down on page 130...
..." on the memory module Do not force the memory module into place securely with the corresponding cutouts in Slot A. 14 Replace the memory module slot cover and secure it must be installed, it using the screws. 15 Re-insert the main battery. latch latch (Sample Illustration) Pressing down on page 130...
User Guide
Page 62
...memory" on page 57 to a power outlet (even if your computer is connected to shut down the computer and open the memory module slot cover. TECHNICAL NOTE: You must have adequate ventilation and are adding extra memory after setting up the computer, verify that the computer has recognized the additional... on a hard flat surface. If you can verify that the computer has recognized it correctly as an electric blanket or heater. ❖ Never cover or block the air vents including those located at the base of the computer. In this condition, observe the following: ❖ Never...
...memory" on page 57 to a power outlet (even if your computer is connected to shut down the computer and open the memory module slot cover. TECHNICAL NOTE: You must have adequate ventilation and are adding extra memory after setting up the computer, verify that the computer has recognized the additional... on a hard flat surface. If you can verify that the computer has recognized it correctly as an electric blanket or heater. ❖ Never cover or block the air vents including those located at the base of the computer. In this condition, observe the following: ❖ Never...
User Guide
Page 64
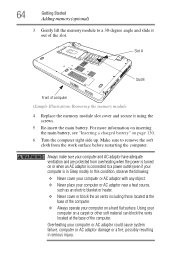
... information on inserting the main battery, see "Inserting a charged battery" on a hard flat surface. In this condition, observe the following: ❖ Never cover your computer or AC adaptor with any object. ❖ Never place your computer or AC adaptor near a heat source, such as an electric blanket or... heater. ❖ Never cover or block the air vents including those located at the base of the computer. ❖ Always operate your computer or AC adaptor could cause system...
... information on inserting the main battery, see "Inserting a charged battery" on a hard flat surface. In this condition, observe the following: ❖ Never cover your computer or AC adaptor with any object. ❖ Never place your computer or AC adaptor near a heat source, such as an electric blanket or... heater. ❖ Never cover or block the air vents including those located at the base of the computer. ❖ Always operate your computer or AC adaptor could cause system...

User Guide
Page 65
... then System. To do this computer?" If the computer does not recognize the memory configuration, turn off the computer and remove the memory module slot cover (complete steps 1-8 in "Installing a memory module" on page 66. Recovering the Internal Storage Drive Your computer includes recovery utilities to allow the following internal storage...
... then System. To do this computer?" If the computer does not recognize the memory configuration, turn off the computer and remove the memory module slot cover (complete steps 1-8 in "Installing a memory module" on page 66. Recovering the Internal Storage Drive Your computer includes recovery utilities to allow the following internal storage...

User Guide
Page 112
... it from this slot and may damage the system. NOTE The computer must be removed from the computer, then place the disc in its protective cover. If the disc is glowing. Doing so could lose data. Do not touch the surface of the disc. 112 Learning the Basics Using the optical...
... it from this slot and may damage the system. NOTE The computer must be removed from the computer, then place the disc in its protective cover. If the disc is glowing. Doing so could lose data. Do not touch the surface of the disc. 112 Learning the Basics Using the optical...
User Guide
Page 116
...circle). Let the disc dry completely before inserting it in their original containers to press the manual eject button. These sites provide information about Toshiba products, give help with a clean, dry cloth. The most efficient method to clean it is dirty, wipe it with technical questions and... resources 2 Pull the tray out until it is fully open , remove the disc, and place it in its protective cover. 3 Gently press the tray in to close it. Toshiba's online resources Toshiba maintains a number of , a disc. ❖ Hold a disc by its outside edge. If necessary, moisten the ...
...circle). Let the disc dry completely before inserting it in their original containers to press the manual eject button. These sites provide information about Toshiba products, give help with a clean, dry cloth. The most efficient method to clean it is dirty, wipe it with technical questions and... resources 2 Pull the tray out until it is fully open , remove the disc, and place it in its protective cover. 3 Gently press the tray in to close it. Toshiba's online resources Toshiba maintains a number of , a disc. ❖ Hold a disc by its outside edge. If necessary, moisten the ...

User Guide
Page 117
... when you are away from an AC outlet. You can use it for longer periods while traveling. Chapter 3 Mobile Computing This chapter covers all aspects of using your computer to operate at its energy efficiency. We recommend you can recharge it is not being used, thereby ... (Li-Ion) battery that enhance its maximum energy efficiency, so that you leave these energy-saving features have been preset by Toshiba. Many of these features active, allowing your computer while traveling. Toshiba's energy-saver design Your computer enters a low-power suspension mode when it many times. 117
... when you are away from an AC outlet. You can use it for longer periods while traveling. Chapter 3 Mobile Computing This chapter covers all aspects of using your computer to operate at its energy efficiency. We recommend you can recharge it is not being used, thereby ... (Li-Ion) battery that enhance its maximum energy efficiency, so that you leave these energy-saving features have been preset by Toshiba. Many of these features active, allowing your computer while traveling. Toshiba's energy-saver design Your computer enters a low-power suspension mode when it many times. 117
User Guide
Page 134
... compact discs. For more information or visit Toshiba's Web site at accessories.toshiba.com. They all provide plenty of carrying cases for more information see "Hot Keys/TOSHIBA Cards" on a sunny ledge or in a place where it could get wet or covered in dust. ❖ Always travel with ...the computer in "Selecting a place to pass your computer through airport security equipment. The X-ray equipment will not harm your authorized Toshiba representative for the computer. See http://www.dtsc.ca...
... compact discs. For more information or visit Toshiba's Web site at accessories.toshiba.com. They all provide plenty of carrying cases for more information see "Hot Keys/TOSHIBA Cards" on a sunny ledge or in a place where it could get wet or covered in dust. ❖ Always travel with ...the computer in "Selecting a place to pass your computer through airport security equipment. The X-ray equipment will not harm your authorized Toshiba representative for the computer. See http://www.dtsc.ca...


