Owner's Manual - English
Page 3
... cords. 26) Always operate this equipment from tip-over the power cord, and never place the TV where the power cord is used, use caution when moving the cart/apparatus combination to project the picture, and requires special safety precautions: • See pages 103-105 for replacement of the...) Never modify this product is dropped and the cabinet or enclosure surface has been damaged or the TV does not operate normally, take the following precautions: • ALWAYS turn off the TV and unplug the power cord to avoid possible electric shock or fire. • To prevent personal injury, ...
... cords. 26) Always operate this equipment from tip-over the power cord, and never place the TV where the power cord is used, use caution when moving the cart/apparatus combination to project the picture, and requires special safety precautions: • See pages 103-105 for replacement of the...) Never modify this product is dropped and the cabinet or enclosure surface has been damaged or the TV does not operate normally, take the following precautions: • ALWAYS turn off the TV and unplug the power cord to avoid possible electric shock or fire. • To prevent personal injury, ...
Owner's Manual - English
Page 4
...: a) an antenna system; Never spill liquids or push objects of any item you leave the TV unattended or unused for example, when the TV is being turned on product use only replacement parts specified by the manufacturer. • Upon completion of the National...the power cord and contact a Toshiba Authorized Service Center. 35) Special care for your TOSHIBA TV, follow this happens, turn off to environmental considerations. Refer all servicing not specified in this manual to a Toshiba Authorized Service Center. 37) If you have the TV serviced: • Ask the...
...: a) an antenna system; Never spill liquids or push objects of any item you leave the TV unattended or unused for example, when the TV is being turned on product use only replacement parts specified by the manufacturer. • Upon completion of the National...the power cord and contact a Toshiba Authorized Service Center. 35) Special care for your TOSHIBA TV, follow this happens, turn off to environmental considerations. Refer all servicing not specified in this manual to a Toshiba Authorized Service Center. 37) If you have the TV serviced: • Ask the...
Owner's Manual - English
Page 5
... brightness when this TV, there may take several minutes for the picture to Toshiba 7 Features of your new TV 7 Overview of steps for installing, setting up the TV Guide On Screen® system 37 TV Guide On Screen® Reminder 40 Turning off . This ... turned off. Contents Important Safety Information 2-4 Important notes about your DLP™ projection TV 5 Chapter 1: Introduction 7 Welcome to obtain full brightness. 4) This TV's display is manufactured using your new TV 8 Chapter 2: Connecting your TV 9 TV front touchpad and side panel controls and connections 9 TV back...
... brightness when this TV, there may take several minutes for the picture to Toshiba 7 Features of your new TV 7 Overview of steps for installing, setting up the TV Guide On Screen® system 37 TV Guide On Screen® Reminder 40 Turning off . This ... turned off. Contents Important Safety Information 2-4 Important notes about your DLP™ projection TV 5 Chapter 1: Introduction 7 Welcome to obtain full brightness. 4) This TV's display is manufactured using your new TV 8 Chapter 2: Connecting your TV 9 TV front touchpad and side panel controls and connections 9 TV back...
Owner's Manual - English
Page 6
...into the TV's channel ...TV Guide On Screen® interactive program guide 53 Setting up the TV Guide On Screen® system 53 Navigating the TV Guide On Screen® system 54 TV... Box 56 TV Guide On Screen® Icons 56 TV Guide On Screen...default options 66 Chapter 8: Using the TV's features 67 Selecting the video input ...WOW™ surround sound feature .......... 86 Turning off the built-in speakers 86 Selecting ...code 93 Changing your PIN code 93 Blocking TV programs and movies by rating (V-Chip) ...97 General troubleshooting 97 LED indications 99 TV Guide On Screen® FAQs 100-...
...into the TV's channel ...TV Guide On Screen® interactive program guide 53 Setting up the TV Guide On Screen® system 53 Navigating the TV Guide On Screen® system 54 TV... Box 56 TV Guide On Screen® Icons 56 TV Guide On Screen...default options 66 Chapter 8: Using the TV's features 67 Selecting the video input ...WOW™ surround sound feature .......... 86 Turning off the built-in speakers 86 Selecting ...code 93 Changing your PIN code 93 Blocking TV programs and movies by rating (V-Chip) ...97 General troubleshooting 97 LED indications 99 TV Guide On Screen® FAQs 100-...
Owner's Manual - English
Page 7
...TV programs (page 12). • Digital recording by default when you set -top box (in most innovative DLP™ projection TVs...TV Guide On Screen® system is on -screen control of your new Toshiba widescreen, integrated HD DLP™ projection TV...projection TV... TV ...the TV. Features...turn off the automatic program guide (page 40) and instead press the TV GUIDE button on page 5. • This manual applies to your TV...TV Guide On Screen system is prohibited. The TV...TV GUIDE INTERNATIONAL INC. You also can record high definition and standard definition material from Gemstar-TV...
...TV programs (page 12). • Digital recording by default when you set -top box (in most innovative DLP™ projection TVs...TV Guide On Screen® system is on -screen control of your new Toshiba widescreen, integrated HD DLP™ projection TV...projection TV... TV ...the TV. Features...turn off the automatic program guide (page 40) and instead press the TV GUIDE button on page 5. • This manual applies to your TV...TV Guide On Screen system is prohibited. The TV...TV GUIDE INTERNATIONAL INC. You also can record high definition and standard definition material from Gemstar-TV...

Owner's Manual - English
Page 8
... cables or devices to the TV (pages 12-25). 6. Connect the G-LINK® cable (either one -second rate, you turn the TV off and then on again to restart the lamp. 8 Copyright © 2005 TOSHIBA CORPORATION. Install the batteries in your DLP™ TV" on again within a few... minutes. • If the TV is NOT a sign of the TV's connections and controls (pages 9 and...
... cables or devices to the TV (pages 12-25). 6. Connect the G-LINK® cable (either one -second rate, you turn the TV off and then on again to restart the lamp. 8 Copyright © 2005 TOSHIBA CORPORATION. Install the batteries in your DLP™ TV" on again within a few... minutes. • If the TV is NOT a sign of the TV's connections and controls (pages 9 and...
Owner's Manual - English
Page 9
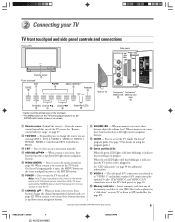
...page 53 for 5 or more seconds to turn the TV on and off. Press to access the menu system (see page 87). The side panel A/V connections are referred to change the channel (programmed channels only; Copyright © 2005 TOSHIBA CORPORATION. Side of the TV screen. Repeatedly press to as the ENTER button... x • - see page 42). When a menu is on-screen, these buttons change the source you cannot turn off the TV, press and hold the POWER button on the TV front panel for details on using the program guide.) 0 Green and Red LEDs When the green LED lights solid (not...
...page 53 for 5 or more seconds to turn the TV on and off. Press to access the menu system (see page 87). The side panel A/V connections are referred to change the channel (programmed channels only; Copyright © 2005 TOSHIBA CORPORATION. Side of the TV screen. Repeatedly press to as the ENTER button... x • - see page 42). When a menu is on-screen, these buttons change the source you cannot turn off the TV, press and hold the POWER button on the TV front panel for details on using the program guide.) 0 Green and Red LEDs When the green LED lights solid (not...
Owner's Manual - English
Page 13
... page 67). See Chapter 5 for details on using the white audio cable only. Camcorder VIDEO AUDIO OUT L R VIDEO 3 inputs on the TV.* To view the VCR: Turn ON the VCR. All rights reserved. 6/24/05, 9:12 PM 13 To view the antenna or Cable signal: Select the ANT 1 video input... source on TV right side panel HM95_R1_012-25_061505 13 Copyright © 2005 TOSHIBA CORPORATION. Connecting a camcorder You will need : one set of standard A/V cables ...
... page 67). See Chapter 5 for details on using the white audio cable only. Camcorder VIDEO AUDIO OUT L R VIDEO 3 inputs on the TV.* To view the VCR: Turn ON the VCR. All rights reserved. 6/24/05, 9:12 PM 13 To view the antenna or Cable signal: Select the ANT 1 video input... source on TV right side panel HM95_R1_012-25_061505 13 Copyright © 2005 TOSHIBA CORPORATION. Connecting a camcorder You will need : one set of standard A/V cables ...

Owner's Manual - English
Page 14
... only. • When you use a Cable box, you may subject you have a mono VCR, connect L/MONO on using the TV Guide On Screen® system. 14 HM95_R1_012-25_061505 14 Copyright © 2005 TOSHIBA CORPORATION. See Chapter 7 for details on page 25. 2. To view basic Cable channels and use the...Copyright Laws of this page To select the video input source, press INPUT on the TV.* Note: A VIDEO 1 connection with your cable box and to change channels and access the TV's features. To view the VCR: Turn ON the VCR. Select the VIDEO 1 video input source on the remote control (...
... only. • When you use a Cable box, you may subject you have a mono VCR, connect L/MONO on using the TV Guide On Screen® system. 14 HM95_R1_012-25_061505 14 Copyright © 2005 TOSHIBA CORPORATION. See Chapter 7 for details on page 25. 2. To view basic Cable channels and use the...Copyright Laws of this page To select the video input source, press INPUT on the TV.* Note: A VIDEO 1 connection with your cable box and to change channels and access the TV's features. To view the VCR: Turn ON the VCR. Select the VIDEO 1 video input source on the remote control (...

Owner's Manual - English
Page 15
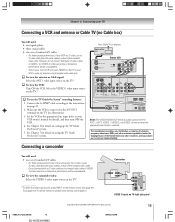
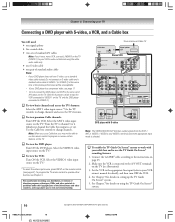
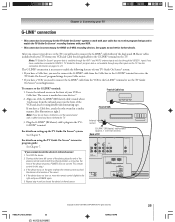
...to civil and criminal liability. From antenna Signal splitter OUT OUT IN Stereo VCR IN from or for details), and then turn OFF the VCR. 4. Note: The TV Guide On Screen® system does not receive program listings from ANT OUT to the instructions on using the standard video ... to your VCR's AUDIO OUT terminal using the white audio cable only. HM95_R1_012-25_061505 15 Copyright © 2005 TOSHIBA CORPORATION. Select the VIDEO 1 video input source on the TV.* To select the video input source, press INPUT on the TV.* To view the VCR or view and record antenna channels...
...to civil and criminal liability. From antenna Signal splitter OUT OUT IN Stereo VCR IN from or for details), and then turn OFF the VCR. 4. Note: The TV Guide On Screen® system does not receive program listings from ANT OUT to the instructions on using the standard video ... to your VCR's AUDIO OUT terminal using the white audio cable only. HM95_R1_012-25_061505 15 Copyright © 2005 TOSHIBA CORPORATION. Select the VIDEO 1 video input source on the TV.* To select the video input source, press INPUT on the TV.* To view the VCR or view and record antenna channels...
Owner's Manual - English
Page 16
... 4 (whichever channel the Cable box output is selected. Connect the G-LINK® cable according to the instructions on the TV.* To view the VCR: Turn ON the VCR. one S-video cable one signal splitter five coaxial cables two sets of standard audio cables Note: •...Turn ON the DVD player. Set the VCR to the appropriate line input (refer to your VCR owner's manual for details on the TV (VIDEO 1) to your VCR's audio out terminal using the TV Guide On Screen® system. 16 HM95_R1_012-25_061505 16 Copyright © 2005 TOSHIBA CORPORATION. To program the TV...
... 4 (whichever channel the Cable box output is selected. Connect the G-LINK® cable according to the instructions on the TV.* To view the VCR: Turn ON the VCR. one S-video cable one signal splitter five coaxial cables two sets of standard audio cables Note: •...Turn ON the DVD player. Set the VCR to the appropriate line input (refer to your VCR owner's manual for details on the TV (VIDEO 1) to your VCR's audio out terminal using the TV Guide On Screen® system. 16 HM95_R1_012-25_061505 16 Copyright © 2005 TOSHIBA CORPORATION. To program the TV...
Owner's Manual - English
Page 17
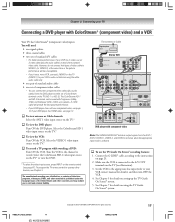
... control to operate other countries, and may subject you have component video, see page 19. See Chapter 7 for details on the TV.* To view the VCR: Turn ON the VCR. All rights reserved. 6/24/05, 9:12 PM 17 You will need: one set of the United States and other ... the A/V OUT terminals on page 25. 2. HM95_R1_012-25_061505 17 Copyright © 2005 TOSHIBA CORPORATION. To view antenna or Cable channels: Select the ANT 1 video input source on the TV.* To record a TV program while watching a DVD: Turn ON the VCR. Make sure the VCR is selected. Select the ColorStream HD-1 video ...
... control to operate other countries, and may subject you have component video, see page 19. See Chapter 7 for details on the TV.* To view the VCR: Turn ON the VCR. All rights reserved. 6/24/05, 9:12 PM 17 You will need: one set of the United States and other ... the A/V OUT terminals on page 25. 2. HM95_R1_012-25_061505 17 Copyright © 2005 TOSHIBA CORPORATION. To view antenna or Cable channels: Select the ANT 1 video input source on the TV.* To record a TV program while watching a DVD: Turn ON the VCR. Make sure the VCR is selected. Select the ColorStream HD-1 video ...

Owner's Manual - English
Page 18
...Connect the G-LINK® cable according to VCR 2: Turn ON both types of video cable to the output and input terminals on VCR 1 using the TV Guide On Screen® system. 18 HM95_R1_012-25_061505 18 Copyright © 2005 TOSHIBA CORPORATION. All rights reserved. 6/24/05, 9:12 ...PM To view the antenna or Cable signal: Select the ANT-1 video input source on the TV.* Note: • If you from VCR 1 to the instructions on the TV (see illustration). 3. Video signals fed through...
...Connect the G-LINK® cable according to VCR 2: Turn ON both types of video cable to the output and input terminals on VCR 1 using the TV Guide On Screen® system. 18 HM95_R1_012-25_061505 18 Copyright © 2005 TOSHIBA CORPORATION. All rights reserved. 6/24/05, 9:12 ...PM To view the antenna or Cable signal: Select the ANT-1 video input source on the TV.* Note: • If you from VCR 1 to the instructions on the TV (see illustration). 3. Video signals fed through...

Owner's Manual - English
Page 19
... length is recommended that you follow these procedures: • When turning on your electronic components, turn off your electronic components, turn on page 50. DVI device VIDEO AUDIO DVI / HDCP OUT L R IN L R OUT R TV OUT ___________ HDMI, the HDMI logo and High-Definition Multimedia Interface are... device is reset properly, it is being standardized for best performance with HDMI or DVI output). Copyright © 2005 TOSHIBA CORPORATION. Chapter 2: Connecting your TV Connecting an HDMI™ or a DVI device to the HDMI input The HDMI[1] input on page 50. NOTE: ...
... length is recommended that you follow these procedures: • When turning on your electronic components, turn off your electronic components, turn on page 50. DVI device VIDEO AUDIO DVI / HDCP OUT L R IN L R OUT R TV OUT ___________ HDMI, the HDMI logo and High-Definition Multimedia Interface are... device is reset properly, it is being standardized for best performance with HDMI or DVI output). Copyright © 2005 TOSHIBA CORPORATION. Chapter 2: Connecting your TV Connecting an HDMI™ or a DVI device to the HDMI input The HDMI[1] input on page 50. NOTE: ...

Owner's Manual - English
Page 20
...Turn on the TV and the stereo amplifier. Older audio systems that are trademarks of both the TV... and the amplifier must be compatible with an external Dolby Digital decoder or other digital audio system TV...TV Turn off the TV's built-in speakers (see "Turning off the TV's built-in speakers in speakers" on the TV... depending on your TV Connecting a digital audio system The TV's DIGITAL AUDIO OUT...use external speakers with the TV in speakers" on page ...To control the audio: Turn on the TV and the digital audio... English On Dolby Digital Done Turn off the built-in single-window...
...Turn on the TV and the stereo amplifier. Older audio systems that are trademarks of both the TV... and the amplifier must be compatible with an external Dolby Digital decoder or other digital audio system TV...TV Turn off the TV's built-in speakers (see "Turning off the TV's built-in speakers in speakers" on the TV... depending on your TV Connecting a digital audio system The TV's DIGITAL AUDIO OUT...use external speakers with the TV in speakers" on page ...To control the audio: Turn on the TV and the digital audio... English On Dolby Digital Done Turn off the built-in single-window...

Owner's Manual - English
Page 21
... device and attach it remotely. Align one of the TV's TheaterNet OUT terminals. If the device turns on setting up the TheaterNet onscreen device control feature. Repeat step 4 until you cannot locate the device's infrared sensor: 1. To access other audio/video cables as a Toshiba infrared remote-controlled VCR or DVD player) enclosed within...
... device and attach it remotely. Align one of the TV's TheaterNet OUT terminals. If the device turns on setting up the TheaterNet onscreen device control feature. Repeat step 4 until you cannot locate the device's infrared sensor: 1. To access other audio/video cables as a Toshiba infrared remote-controlled VCR or DVD player) enclosed within...
Owner's Manual - English
Page 23
... One Touch recording, will not be recorded due to enter the rest of live TV (pause, rewind, etc.). IEEE1394 device initialization When you connect a new IEEE1394 device to the TV and turn it may take up to one -touch recording* of your Symbio AVHD Recorder, you...or revision of television programs, videotapes, DVDs, and other materials is available as long as Toshiba's Symbio™ AVHD Recorder) to other than the Toshiba Symbio AVHD recorder. However, when the TV Guide On Screen® system is not fully operational, manual recording is prohibited under the Copyright...
... One Touch recording, will not be recorded due to enter the rest of live TV (pause, rewind, etc.). IEEE1394 device initialization When you connect a new IEEE1394 device to the TV and turn it may take up to one -touch recording* of your Symbio AVHD Recorder, you...or revision of television programs, videotapes, DVDs, and other materials is available as long as Toshiba's Symbio™ AVHD Recorder) to other than the Toshiba Symbio AVHD recorder. However, when the TV Guide On Screen® system is not fully operational, manual recording is prohibited under the Copyright...
Owner's Manual - English
Page 24
...an "S" number near the device's IEEE1394 connector. IEEE1394 Device Management Brand Type Label Analog Input Used Connected TOSHIBA AVHD MY DEVICE None No Reset Done 5. The IEEE1394B protocol is looped, the TV may allow for example, edit the device name, change the analog input information, or delete the device ...screen prompts to edit and press ENTER. If your device is used with the slowest communication speed at the end of the chain and turn ON the power switch when any device is not marked with the signal from devices behind it in the device's user manual or call...
...an "S" number near the device's IEEE1394 connector. IEEE1394 Device Management Brand Type Label Analog Input Used Connected TOSHIBA AVHD MY DEVICE None No Reset Done 5. The IEEE1394B protocol is looped, the TV may allow for example, edit the device name, change the analog input information, or delete the device ...screen prompts to edit and press ENTER. If your device is used with the slowest communication speed at the end of the chain and turn ON the power switch when any device is not marked with the signal from devices behind it in the device's user manual or call...
Owner's Manual - English
Page 25
... turn on, move the remote control slightly to the G-LINK® terminal on this step.) 3. Starting at which the remote control touched the device is marked on setting up the TV Guide On Screen® system: See Chapter 5. HM95_R1_012-25_061505 25 Copyright © 2005 TOSHIBA CORPORATION.... The sensor is the location of the device's remote control (with the infrared emitter) so it behind the TV. 3. For details on some devices.* 2. After you connect your devices to the TV, you do not have a Cable box, ...
... turn on, move the remote control slightly to the G-LINK® terminal on this step.) 3. Starting at which the remote control touched the device is marked on setting up the TV Guide On Screen® system: See Chapter 5. HM95_R1_012-25_061505 25 Copyright © 2005 TOSHIBA CORPORATION.... The sensor is the location of the device's remote control (with the infrared emitter) so it behind the TV. 3. For details on some devices.* 2. After you connect your devices to the TV, you do not have a Cable box, ...
Owner's Manual - English
Page 26
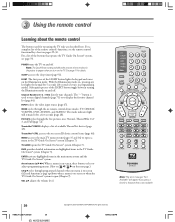
...on pages 29-30. Subsequent presses of the buttons that is used for operating the TV only are described here. The "-" button is not available 26 HM95_R1_026-34_061505 26 Copyright © 2005 TOSHIBA CORPORATION. INPUT selects the video input source (page 67). MODE cycles through the five...The mode indicator light will appear if you 're in the TV Guide On Screen® system (Chapter 7). All rights reserved. 6/24/05, 9:26 PM TV GUIDE opens the TV Guide On Screen® system (Chapter 7). POWER turns the TV on the TV. SLEEP accesses the sleep timer (page 91). Channel Numbers ...
...on pages 29-30. Subsequent presses of the buttons that is used for operating the TV only are described here. The "-" button is not available 26 HM95_R1_026-34_061505 26 Copyright © 2005 TOSHIBA CORPORATION. INPUT selects the video input source (page 67). MODE cycles through the five...The mode indicator light will appear if you 're in the TV Guide On Screen® system (Chapter 7). All rights reserved. 6/24/05, 9:26 PM TV GUIDE opens the TV Guide On Screen® system (Chapter 7). POWER turns the TV on the TV. SLEEP accesses the sleep timer (page 91). Channel Numbers ...


