
User Manual
Page 3
... plug is dropped and the cabinet or enclosure surface has been damaged or the TV does not operate normally, take the following precautions: • ALWAYS turn off the TV and unplug the power cord to avoid possible electric shock or fire. • NEVER allow your body to come into contact with...
... plug is dropped and the cabinet or enclosure surface has been damaged or the TV does not operate normally, take the following precautions: • ALWAYS turn off the TV and unplug the power cord to avoid possible electric shock or fire. • NEVER allow your body to come into contact with...
User Manual
Page 4
...the surface. Hooks TV side Securement Clip TV top Securement Clip 26) The apparatus shall not be placed on /off switch, it is being turned on the floor or a sturdy, level, stable surface that no objects filled with poor ventilation. The slots and openings are in cabinet, ...openings in the TV cabinet back, bottom, and sides. Never spill liquids or push objects of your TOSHIBA TV, follow these sounds become frequent or continuous, unplug the power cord and contact a Toshiba Authorized Service Center. 4 This is normal, especially when the unit is thundering, do not touch ...
...the surface. Hooks TV side Securement Clip TV top Securement Clip 26) The apparatus shall not be placed on /off switch, it is being turned on the floor or a sturdy, level, stable surface that no objects filled with poor ventilation. The slots and openings are in cabinet, ...openings in the TV cabinet back, bottom, and sides. Never spill liquids or push objects of your TOSHIBA TV, follow these sounds become frequent or continuous, unplug the power cord and contact a Toshiba Authorized Service Center. 4 This is normal, especially when the unit is thundering, do not touch ...

User Manual
Page 6
...device could void the user's authority to correct the interference by the technology. Important: Any changes or modifications not expressly approved by turning the equipment off and on a circuit different from that this equipment. FCC Radiation Exposure Statement: This equipment complies with Part 15...the FCC Rules. If this equipment. The device could void the user's authority to which can be operated. USA - Operation is : Toshiba America Consumer Products, L.L.C. 82 Totowa Rd. The party responsible for help. Ph: 1-800-631-3811 Interference: This equipment has been ...
...device could void the user's authority to correct the interference by the technology. Important: Any changes or modifications not expressly approved by turning the equipment off and on a circuit different from that this equipment. FCC Radiation Exposure Statement: This equipment complies with Part 15...the FCC Rules. If this equipment. The device could void the user's authority to which can be operated. USA - Operation is : Toshiba America Consumer Products, L.L.C. 82 Totowa Rd. The party responsible for help. Ph: 1-800-631-3811 Interference: This equipment has been ...
User Manual
Page 10
... 57). •Dolby® Volume eliminates inconsistent TV volume when changing channels or viewing commercials (page 63). •Media Player allows you turn on ambient light conditions and input signal content (- page 75). • ENERGY STAR® qualified Overview of steps for installing, setting up...remote-controlled devices through the TV (- page 58). •AutoView™ allows you to the TV, learn the functions of your new Toshiba widescreen, integrated HD, LCD TV: •Integrated digital tuning (8VSB ATSC and QAM) eliminates the need for an overview of navigating the ...
... 57). •Dolby® Volume eliminates inconsistent TV volume when changing channels or viewing commercials (page 63). •Media Player allows you turn on ambient light conditions and input signal content (- page 75). • ENERGY STAR® qualified Overview of steps for installing, setting up...remote-controlled devices through the TV (- page 58). •AutoView™ allows you to the TV, learn the functions of your new Toshiba widescreen, integrated HD, LCD TV: •Integrated digital tuning (8VSB ATSC and QAM) eliminates the need for an overview of navigating the ...
User Manual
Page 11
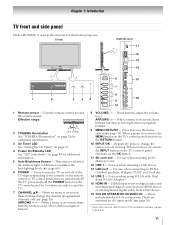
... digital video from a DVI device. 16 COLOR STREAM HD IN/VIDEO IN - If the TV stops responding to change the source you cannot turn the TV on -screen, these buttons change the channel (programmed channels only; - page 35). ARROWS U u - Chapter 1: Introduction TV ...LED See "LED indications" on the TV's control panel functions as the OK button. 11 SD card slot - Effective range: 2 TOSHIBA Illumination 16.4 ft (5m) See "TOSHIBA Illumination" on page 52 for additional information. 5 Auto Brightness Sensor - These include standard A/V connections. page 36). * About the device...
... digital video from a DVI device. 16 COLOR STREAM HD IN/VIDEO IN - If the TV stops responding to change the source you cannot turn the TV on -screen, these buttons change the channel (programmed channels only; - page 35). ARROWS U u - Chapter 1: Introduction TV ...LED See "LED indications" on the TV's control panel functions as the OK button. 11 SD card slot - Effective range: 2 TOSHIBA Illumination 16.4 ft (5m) See "TOSHIBA Illumination" on page 52 for additional information. 5 Auto Brightness Sensor - These include standard A/V connections. page 36). * About the device...
User Manual
Page 14
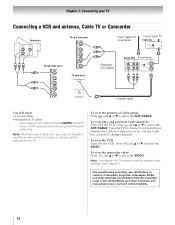
To view basic and premium Cable channels: Turn OFF the VCR. Press + and B or b to select the VIDEO. To view the camcorder video: Press + and B or b to select the ANT/CABLE. Note: To ..., and may not be able to use a Cable box, you may subject you have a mono VCR, connect L/MONO on the TV. To view the VCR: Turn ON the VCR. The unauthorized recording, use, distribution, or revision of the United States and other materials is set to civil and criminal liability. 14...
To view basic and premium Cable channels: Turn OFF the VCR. Press + and B or b to select the VIDEO. To view the camcorder video: Press + and B or b to select the ANT/CABLE. Note: To ..., and may not be able to use a Cable box, you may subject you have a mono VCR, connect L/MONO on the TV. To view the VCR: Turn ON the VCR. The unauthorized recording, use, distribution, or revision of the United States and other materials is set to civil and criminal liability. 14...

User Manual
Page 15
... TV Coaxial cable You will need: •Coaxial cables •Standard A/V cables - If your VCR's audio out terminal using the component video connections: Turn on page 36). Note: When you use , distribution, or revision of television programs, videotapes, DVDs, and other countries, and may subject you to...Video, switch AV input mode appropriately (-"Setting AV Input mode" on the satellite receiver. To view the VCR or view and record antenna channels: Turn ON the VCR. If you want to select the ColorStream HD. Tune the VCR to the channel you have component video, connect a standard ...
... TV Coaxial cable You will need: •Coaxial cables •Standard A/V cables - If your VCR's audio out terminal using the component video connections: Turn on page 36). Note: When you use , distribution, or revision of television programs, videotapes, DVDs, and other countries, and may subject you to...Video, switch AV input mode appropriately (-"Setting AV Input mode" on the satellite receiver. To view the VCR or view and record antenna channels: Turn ON the VCR. If you want to select the ColorStream HD. Tune the VCR to the channel you have component video, connect a standard ...
User Manual
Page 16
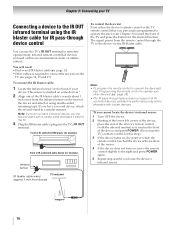
This sensor is the location of the sensor. 4 If the device does not turn on the front of your device. If you have a second device, coil the ...for IR pass-through device control You can use the TV's remote control for this step.) 3 If the device turns on, the point at which the remote control touched the device is marked on some devices.* 2 Align one of ... the TV to the right and press POWER again. 5 Repeat step 4 until you cannot locate the device's infrared sensor: 1 Turn OFF the device. 2 Starting at the lower left corner of the device, place the end of the device's remote control (with...
This sensor is the location of the sensor. 4 If the device does not turn on the front of your device. If you have a second device, coil the ...for IR pass-through device control You can use the TV's remote control for this step.) 3 If the device turns on, the point at which the remote control touched the device is marked on some devices.* 2 Align one of ... the TV to the right and press POWER again. 5 Repeat step 4 until you cannot locate the device's infrared sensor: 1 Turn OFF the device. 2 Starting at the lower left corner of the device, place the end of the device's remote control (with...

User Manual
Page 17
... HDMI Logo, and High-Definition Multimedia Interface are required. - This input is recommended that you follow these procedures: • When turning on your electronic components, turn on your HDMI TV, due to the adoption of new standards. For proper operation, it is recommended that some devices may not ...device to the HDMI input The HDMI input on the TV first and then the HDMI or DVI device. • When turning off your electronic components, turn off the HDMI or DVI device first and then the TV. [1] EIA/CEA-861-D compliance covers the transmission of uncompressed digital...
... HDMI Logo, and High-Definition Multimedia Interface are required. - This input is recommended that you follow these procedures: • When turning on your electronic components, turn on your HDMI TV, due to the adoption of new standards. For proper operation, it is recommended that some devices may not ...device to the HDMI input The HDMI input on the TV first and then the HDMI or DVI device. • When turning off your electronic components, turn off the HDMI or DVI device first and then the TV. [1] EIA/CEA-861-D compliance covers the transmission of uncompressed digital...
User Manual
Page 24
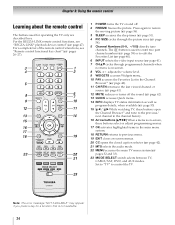
... 40). 11 CH RTN returns to control the TV. page 47). page 40). 6 INPUT selects the video input source (- page 41). 12 MUTE reduces or turns off . 2 FREEZE freezes the picture. Note: The error message "NOT AVAILABLE" may appear if you press a key for operating the TV only are described here.... pages 26-27). 1 POWER turns the TV on and off the sound (- pages 32 and 33). 23 MODE SELECT switch selects between TV, CABLE/SAT, DVD, and AUX modes. page...
... 40). 11 CH RTN returns to control the TV. page 47). page 40). 6 INPUT selects the video input source (- page 41). 12 MUTE reduces or turns off . 2 FREEZE freezes the picture. Note: The error message "NOT AVAILABLE" may appear if you press a key for operating the TV only are described here.... pages 26-27). 1 POWER turns the TV on and off the sound (- pages 32 and 33). 23 MODE SELECT switch selects between TV, CABLE/SAT, DVD, and AUX modes. page...
User Manual
Page 25
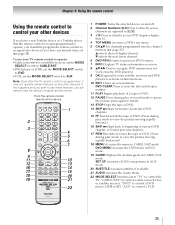
... the TV remote control is not preprogrammed to operate, you must first program the remote control to recognize the device (if you have a non-Toshiba device or a Toshiba device that the remote control is programmed, it may not work on some DVD players). 9 OK Required by some satellite receivers and DVD players.... 12 PAUSE Press during play or record mode to pause the picture; Point the remote control directly at the device. 16 17 18 19 1 POWER Turns the selected device on -screen menus. page 35): B selects the next higher channel. SET UP Accesses a DVD's setup menu in CABLE/SAT mode...
... the TV remote control is not preprogrammed to operate, you must first program the remote control to recognize the device (if you have a non-Toshiba device or a Toshiba device that the remote control is programmed, it may not work on some DVD players). 9 OK Required by some satellite receivers and DVD players.... 12 PAUSE Press during play or record mode to pause the picture; Point the remote control directly at the device. 16 17 18 19 1 POWER Turns the selected device on -screen menus. page 35): B selects the next higher channel. SET UP Accesses a DVD's setup menu in CABLE/SAT mode...

User Manual
Page 28
..., point the remote control at it is not preprogrammed to operate), follow the steps below . • If the correct code was entered, the device will turn off. • If the device does not respond, repeat steps 1 - 4 using another code, you will need to use the device's original remote control...; Some newer VCRs respond to either of two codes. Chapter 3: Using the remote control Programming the remote control to operate your other devices Your Toshiba TV remote control is listed, try each one separately until you find the code for your device. Note: • In addition to POWER, ...
..., point the remote control at it is not preprogrammed to operate), follow the steps below . • If the correct code was entered, the device will turn off. • If the device does not respond, repeat steps 1 - 4 using another code, you will need to use the device's original remote control...; Some newer VCRs respond to either of two codes. Chapter 3: Using the remote control Programming the remote control to operate your other devices Your Toshiba TV remote control is listed, try each one separately until you find the code for your device. Note: • In addition to POWER, ...
User Manual
Page 34
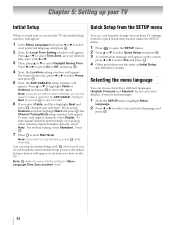
...when entering channel number directly, select Auto. You can stop scanning, press EXIT while scanning. Chapter 5: Setting up your TV Initial Setup When you first turn on or reset the TV, the Initial Setup window will appear. 1 In the Menu Language field, press C or c to select your preferred language ...for the on the screen, press C or c to select Daylight Saving Time. OK 3 A confirmation message will appear. If you want to scan channels, you turn on the TV. OK 7 Press OK to select the input. EXIT 34 OK 2 Next, the Local Time Setting window will appear on -screen display of...
...when entering channel number directly, select Auto. You can stop scanning, press EXIT while scanning. Chapter 5: Setting up your TV Initial Setup When you first turn on or reset the TV, the Initial Setup window will appear. 1 In the Menu Language field, press C or c to select your preferred language ...for the on the screen, press C or c to select Daylight Saving Time. OK 3 A confirmation message will appear. If you want to scan channels, you turn on the TV. OK 7 Press OK to select the input. EXIT 34 OK 2 Next, the Local Time Setting window will appear on -screen display of...
User Manual
Page 36
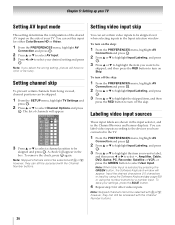
... with the Channel Number buttons. OK 3 Press B or b to highlight the item you select the wrong setting, picture will have connected to turn on the skip: 1 From the PREFERENCES menu, highlight AV Connection and press . Note: When User Input is selected by using the number buttons... skip To prevent certain channels from being viewed, channel positions can label video inputs according to the devices you want to select your TV. To turn off the skip: 1 From the PREFERENCES menu, highlight AV Connection and press . OK 2 Press B or b to highlight Input Labeling, and press ...
... with the Channel Number buttons. OK 3 Press B or b to highlight the item you select the wrong setting, picture will have connected to turn on the skip: 1 From the PREFERENCES menu, highlight AV Connection and press . Note: When User Input is selected by using the number buttons... skip To prevent certain channels from being viewed, channel positions can label video inputs according to the devices you want to select your TV. To turn off the skip: 1 From the PREFERENCES menu, highlight AV Connection and press . OK 2 Press B or b to highlight Input Labeling, and press ...
User Manual
Page 40
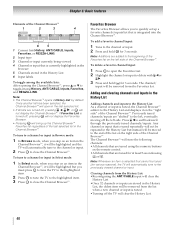
...the Channel Browser™. Previously tuned channels/inputs are added to the beginning of the Favorites list on the left side. If Favorites List is turned off the left side of the Channel Browser™. Once another list has been selected, the Channel Browser™ will open the Favorites List....last selected list in the History List, the oldest item will be removed from the list when a new channel or input is tuned. •Turning off the TV will automatically tune to the previously viewed channel or input. To add a favorite channel/input: 1 Tune to surf backward through ...
...the Channel Browser™. Previously tuned channels/inputs are added to the beginning of the Favorites list on the left side. If Favorites List is turned off the left side of the Channel Browser™. Once another list has been selected, the Channel Browser™ will open the Favorites List....last selected list in the History List, the oldest item will be removed from the list when a new channel or input is tuned. •Turning off the TV will automatically tune to the previously viewed channel or input. To add a favorite channel/input: 1 Tune to surf backward through ...
User Manual
Page 42
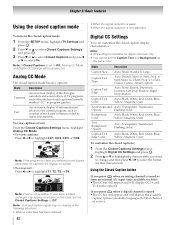
... and will display CC1-4 and T1-4 as weather or stock data (when provided by individual stations). Chapter 6: Basic features Using the closed caption mode To turn on the closed captioned (usually marked "CC" in your area, a black rectangle may not display in the following situations: • When a videotape has been dubbed...
... and will display CC1-4 and T1-4 as weather or stock data (when provided by individual stations). Chapter 6: Basic features Using the closed caption mode To turn on the closed captioned (usually marked "CC" in your area, a black rectangle may not display in the following situations: • When a videotape has been dubbed...
User Manual
Page 47
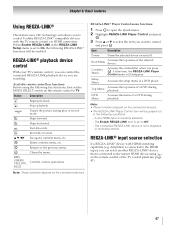
...-HDMI input is not a playback or recording device. Chapter 6: Basic features Using REGZA-LINK® This feature uses CEC technology and allows you to control Toshiba REGZA-LINK® compatible devices with HDMI switching capability (e.g. A G Pauses the picture during playback. J Fast-forwards. H B b C c Rewinds/reverses. EXIT... want to select the item you are watching. DVD Menu Accesses the menu of a DVD player. OK Item Description Power Turns the selected device on the connected devices. Top Menu Accesses the top menu of the selected device. The Enable REGZA-LINK ...
...-HDMI input is not a playback or recording device. Chapter 6: Basic features Using REGZA-LINK® This feature uses CEC technology and allows you to control Toshiba REGZA-LINK® compatible devices with HDMI switching capability (e.g. A G Pauses the picture during playback. J Fast-forwards. H B b C c Rewinds/reverses. EXIT... want to select the item you are watching. DVD Menu Accesses the menu of a DVD player. OK Item Description Power Turns the selected device on the connected devices. Top Menu Accesses the top menu of the selected device. The Enable REGZA-LINK ...
User Manual
Page 48
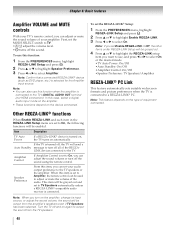
... DVD player, etc.) is set to Amplifier, the remote control can be used to the TV. Note: • You can adjust the sound volume or turn off the sound using the remote control. Other REGZA-LINK® functions When Enable REGZA-LINK and each item in the REGZA-LINK Setup menu... devices connected to adjust or mute the volume of equipment connected. Item Description TV Auto Power If a REGZA-LINK® device is turned off the sound. Note: When you turn off and on the amplifier, change its input source, or adjust the sound volume, the sound will be grayed out. 4 Press B or...
... DVD player, etc.) is set to Amplifier, the remote control can be used to the TV. Note: • You can adjust the sound volume or turn off the sound using the remote control. Other REGZA-LINK® functions When Enable REGZA-LINK and each item in the REGZA-LINK Setup menu... devices connected to adjust or mute the volume of equipment connected. Item Description TV Auto Power If a REGZA-LINK® device is turned off the sound. Note: When you turn off and on the amplifier, change its input source, or adjust the sound volume, the sound will be grayed out. 4 Press B or...
User Manual
Page 51
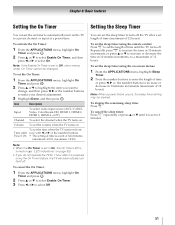
... number buttons to Off, other menus under On Timer cannot be cleared. To set the volume when the TV turns on the TV to make your desired adjustment. 3 Highlight Done, and then press . OK 2 Press B ... not operate the TV for 1 hour after a set length of time (maximum of time until the TV turns off the TV after it is set the sleep timer using the remote control: Press [ to a maximum ... unit of ten minutes. (minimum: 00:10, maximum: 12:00) Note: • When the On Timer is turned on from now with C or c or the number buttons. • The setting at a preset time. Repeatedly press ...
... number buttons to Off, other menus under On Timer cannot be cleared. To set the volume when the TV turns on the TV to make your desired adjustment. 3 Highlight Done, and then press . OK 2 Press B ... not operate the TV for 1 hour after a set length of time (maximum of time until the TV turns off the TV after it is set the sleep timer using the remote control: Press [ to a maximum ... unit of ten minutes. (minimum: 00:10, maximum: 12:00) Note: • When the On Timer is turned on from now with C or c or the number buttons. • The setting at a preset time. Repeatedly press ...
User Manual
Page 52
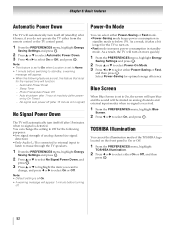
... for the following features are set, the feature that is set to Home. • 1 minute before turning off. Sleep Timer - No signal auto power off (after 1 hour of the TOSHIBA logo located on analog channels and external input modes when no signal is detected. EOXKIT 3 Press B or... or b to select Power-On Mode. 3 Press C or c to select On or Off, and press . EXIT TOSHIBA Illumination You can change , and press C or c to standby, a warning message will turn itself off (standby) after power- Auto shutdown after 15 minute of analog channel (no signal is received. 1 From the...
... for the following features are set, the feature that is set to Home. • 1 minute before turning off. Sleep Timer - No signal auto power off (after 1 hour of the TOSHIBA logo located on analog channels and external input modes when no signal is detected. EOXKIT 3 Press B or... or b to select Power-On Mode. 3 Press C or c to select On or Off, and press . EXIT TOSHIBA Illumination You can change , and press C or c to standby, a warning message will turn itself off (standby) after power- Auto shutdown after 15 minute of analog channel (no signal is received. 1 From the...


