User Manual
Page 4
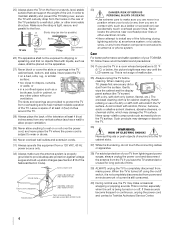
...of at least 4 (four) inches around the TV. 28) Always place the back of your TOSHIBA TV, follow these sounds become frequent or continuous, unplug the power cord and contact a Toshiba Authorized Service Center. 4 When cleaning your body (or any home theater component connected to the ... outlets and extension cords. 31) Always operate this equipment from the surface. Gently wipe the cabinet and the display panel surface (the TV screen) with a sturdy strap from overheating and to a wall stud, pillar, or other electrical circuits. • Never attempt to drapes, curtains...
...of at least 4 (four) inches around the TV. 28) Always place the back of your TOSHIBA TV, follow these sounds become frequent or continuous, unplug the power cord and contact a Toshiba Authorized Service Center. 4 When cleaning your body (or any home theater component connected to the ... outlets and extension cords. 31) Always operate this equipment from the surface. Gently wipe the cabinet and the display panel surface (the TV screen) with a sturdy strap from overheating and to a wall stud, pillar, or other electrical circuits. • Never attempt to drapes, curtains...

User Manual
Page 5
...indicated below. Leave the stand protruding over the edge of the surface. When selecting a location for the television, avoid locations where the screen may be damaged by the wall mount manufacturer. 5) After attaching the appropriate bracket(s) to use the screws supplied or recommended by ultraviolet...41) WARNING: RISK OF SERIOUS PERSONAL INJURY OR EQUIPMENT DAMAGE! Refer all four screws holding the pedestal stand in this manual to a Toshiba Authorized Service Center. 44) If you decide to leave at least 4 inches between the TV and the wall or similar structure for ...
...indicated below. Leave the stand protruding over the edge of the surface. When selecting a location for the television, avoid locations where the screen may be damaged by the wall mount manufacturer. 5) After attaching the appropriate bracket(s) to use the screws supplied or recommended by ultraviolet...41) WARNING: RISK OF SERIOUS PERSONAL INJURY OR EQUIPMENT DAMAGE! Refer all four screws holding the pedestal stand in this manual to a Toshiba Authorized Service Center. 44) If you decide to leave at least 4 inches between the TV and the wall or similar structure for ...
User Manual
Page 7
therefore, Toshiba is not responsible for perceived issues resulting from Fraunhofer IIS and Thomson. •...an equalization solution that corrects time and frequency response problems in TV systems. This results in part on the screen if a fixed, non-moving image is viewed from Dolby Laboratories. in the United States, Japan and ...7 Dolby and the double-D symbol are trademarks of LCD Display technology and are registered U.S. It is based on -screen target may increase energy consumption, possibly beyond the limits required for a large listening area and it is a registered ...
therefore, Toshiba is not responsible for perceived issues resulting from Fraunhofer IIS and Thomson. •...an equalization solution that corrects time and frequency response problems in TV systems. This results in part on the screen if a fixed, non-moving image is viewed from Dolby Laboratories. in the United States, Japan and ...7 Dolby and the double-D symbol are trademarks of LCD Display technology and are registered U.S. It is based on -screen target may increase energy consumption, possibly beyond the limits required for a large listening area and it is a registered ...
User Manual
Page 8
... 50 Setting the On Timer 51 Setting the Sleep Timer 51 Automatic Power Down 52 No Signal Power Down 52 Power-On Mode 52 Blue Screen 52 TOSHIBA Illumination 52 Displaying TV status information 53 Viewing support information 53 Reset Factory Defaults 53 Understanding the auto power off feature 53 Understanding the...
... 50 Setting the On Timer 51 Setting the Sleep Timer 51 Automatic Power Down 52 No Signal Power Down 52 Power-On Mode 52 Blue Screen 52 TOSHIBA Illumination 52 Displaying TV status information 53 Viewing support information 53 Reset Factory Defaults 53 Understanding the auto power off feature 53 Understanding the...
User Manual
Page 11
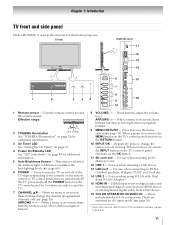
...CHANNEL Bb - For use when inserting an SD Memory Card. 12 USB 1 - pages 6 and 64). 11 Effective range: 2 TOSHIBA Illumination 16.4 ft (5m) See "TOSHIBA Illumination" on page 52 for additional information. 3 On Timer LED See "Setting the On Timer" on page 51. 4 Power On/... This sensor will detect the ambient light conditions to access the menu system (- These include standard A/V connections. When a menu is on -screen, these buttons function as left/right menu navigation buttons. 9 MENU/RETURN - HDMI input receives digital audio and uncompressed digital video from an ...
...CHANNEL Bb - For use when inserting an SD Memory Card. 12 USB 1 - pages 6 and 64). 11 Effective range: 2 TOSHIBA Illumination 16.4 ft (5m) See "TOSHIBA Illumination" on page 52 for additional information. 3 On Timer LED See "Setting the On Timer" on page 51. 4 Power On/... This sensor will detect the ambient light conditions to access the menu system (- These include standard A/V connections. When a menu is on -screen, these buttons function as left/right menu navigation buttons. 9 MENU/RETURN - HDMI input receives digital audio and uncompressed digital video from an ...
User Manual
Page 24
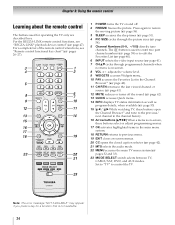
...PIC SIZE cycles through programmed channels when no menu is used for a function that is on and off the sound (- The = button is on -screen menus. 20 CC opens the closed caption selector (- page 38) or to control the TV. adjusts the volume level. 9 WIDGETS accesses Widgets menu.... 10 FAV accesses the Favorites List in the main menu system. 18 RETURN returns to previous menu. 19 EXIT closes on -screen. 8 VOL + - Set to "TV" to edit the Favorites List (- For a complete list of the remote control's functions, see "REGZA-LINK® ...
...PIC SIZE cycles through programmed channels when no menu is used for a function that is on and off the sound (- The = button is on -screen menus. 20 CC opens the closed caption selector (- page 38) or to control the TV. adjusts the volume level. 9 WIDGETS accesses Widgets menu.... 10 FAV accesses the Favorites List in the main menu system. 18 RETURN returns to previous menu. 19 EXIT closes on -screen. 8 VOL + - Set to "TV" to edit the Favorites List (- For a complete list of the remote control's functions, see "REGZA-LINK® ...
User Manual
Page 25
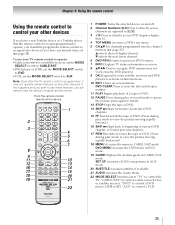
... 28). If this happens and you wish to use those features, you will need to use your other devices If you have a non-Toshiba device or a Toshiba device that the remote control is programmed, it may not work on some DVD players). 9 OK Required by some satellite receivers and DVD ...players to control a VCR. 25 page 35): B selects the next higher channel. "AUX" to activate certain functions. 10 EXIT Closes on-screen menus. b selects the ...
... 28). If this happens and you wish to use those features, you will need to use your other devices If you have a non-Toshiba device or a Toshiba device that the remote control is programmed, it may not work on some DVD players). 9 OK Required by some satellite receivers and DVD ...players to control a VCR. 25 page 35): B selects the next higher channel. "AUX" to activate certain functions. 10 EXIT Closes on-screen menus. b selects the ...

User Manual
Page 32
... Deactivation Media Renderer Setup Photo Frame Setup Channel Browser Setup PIN Setting Parental Control and Locks Display Settings AV Connection Energy Saving Settings Blue Screen HDMI Information Display TOSHIBA Illumination Page 57 57 57 57 57 57 57 57 58 61 61 62 62 63 63 63 71 71 72 75 39...
... Deactivation Media Renderer Setup Photo Frame Setup Channel Browser Setup PIN Setting Parental Control and Locks Display Settings AV Connection Energy Saving Settings Blue Screen HDMI Information Display TOSHIBA Illumination Page 57 57 57 57 57 57 57 57 58 61 61 62 62 63 63 63 71 71 72 75 39...
User Manual
Page 34
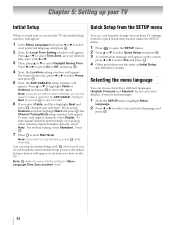
Press C or c to select Home and press . OK 5 Next, the ANT/CABLE In setup window will appear on the screen, press C or c to select Yes and press . To tune only digital channels, select Digital. Note: If you want to stop the Initial Setup with C or c. 3 ... tune digital channels preferentially over analog when entering channel number directly, select Auto. However if you do not need to make a selection for the on-screen display of Menu Language/Time Zone/Location finish. Quick Setup from three different languages (English, Français and Español) for ANT/CABLE...
Press C or c to select Home and press . OK 5 Next, the ANT/CABLE In setup window will appear on the screen, press C or c to select Yes and press . To tune only digital channels, select Digital. Note: If you want to stop the Initial Setup with C or c. 3 ... tune digital channels preferentially over analog when entering channel number directly, select Auto. However if you do not need to make a selection for the on-screen display of Menu Language/Time Zone/Location finish. Quick Setup from three different languages (English, Français and Español) for ANT/CABLE...

User Manual
Page 35
...: • You must set of programmed channels (and does NOT erase channels that previous programs and settings will be listed at the bottom of the screen. left-hand column). 2 From the SETUP menu, highlight Auto Tuning and press . OK 2 Use the Channel Numbers on the channels you can automatically detect ... warning that were previously programmed into the TV's channel memory. Chapter 5: Setting up to Skip (- Follow the steps below to start Manual Tuning. OK 3 A screen will automatically cycle through all the channels, and store all active channels in the channel memory.
...: • You must set of programmed channels (and does NOT erase channels that previous programs and settings will be listed at the bottom of the screen. left-hand column). 2 From the SETUP menu, highlight Auto Tuning and press . OK 2 Use the Channel Numbers on the channels you can automatically detect ... warning that were previously programmed into the TV's channel memory. Chapter 5: Setting up to Skip (- Follow the steps below to start Manual Tuning. OK 3 A screen will automatically cycle through all the channels, and store all active channels in the channel memory.
User Manual
Page 42
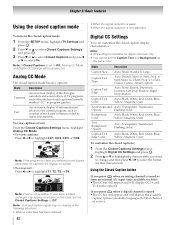
...appear and will display the available caption options (available languages) for that characteristic. Chapter 6: Basic features Using the closed caption mode To turn on screen. OK 3 Press b or B to select Closed Captions and press C or c to select the format for that are closed captioned (usually marked... display in your area, a black rectangle may appear on the closed caption mode has two options: Mode Description Captions An on -screen display of TV programs and videos that channel or service. Digital CC Settings You can customize the closed captions: 1 From the Closed...
...appear and will display the available caption options (available languages) for that characteristic. Chapter 6: Basic features Using the closed caption mode To turn on screen. OK 3 Press b or B to select Closed Captions and press C or c to select the format for that are closed captioned (usually marked... display in your area, a black rectangle may appear on the closed caption mode has two options: Mode Description Captions An on -screen display of TV programs and videos that channel or service. Digital CC Settings You can customize the closed captions: 1 From the Closed...

User Manual
Page 43
...enter a four-digit number. Note: Parental Control and Locks menu is necessary for the rating appears at the bottom of blocking you select. A new screen will be grayed out if PIN code is a function of the program (violence, sex, dialogue, language). OK If you cannot remember your PIN ...code 1 From the PREFERENCES menu, highlight PIN Setting and press OK . V-Chip system only. OK The Edit Rating Limits screen appears. 6 Press B, b, C or c and then press OK to "0000". Chapter 6: Basic features Setting the PIN code Using lock menu A PIN code ...
...enter a four-digit number. Note: Parental Control and Locks menu is necessary for the rating appears at the bottom of blocking you select. A new screen will be grayed out if PIN code is a function of the program (violence, sex, dialogue, language). OK If you cannot remember your PIN ...code 1 From the PREFERENCES menu, highlight PIN Setting and press OK . V-Chip system only. OK The Edit Rating Limits screen appears. 6 Press B, b, C or c and then press OK to "0000". Chapter 6: Basic features Setting the PIN code Using lock menu A PIN code ...

User Manual
Page 44
...Edit Rating Limits and press OK . Similarly, the rating of blocking you prefer. The Edit Alternate Ratings screen will be able to download any updates to be viewed by Toshiba. OK 2 Enter your four-digit PIN code. Parental Control and Locks window is designed to be ... the rating system should such updates become available. • The additional rating system is not designed, transmitted, or controlled by the TV or Toshiba, nor is the availability of age.) D) Intensely suggestive dialogue L) Strong, coarse language S) Intense sexual situations V) Intense violence TV-PG Parental ...
...Edit Rating Limits and press OK . Similarly, the rating of blocking you prefer. The Edit Alternate Ratings screen will be able to download any updates to be viewed by Toshiba. OK 2 Enter your four-digit PIN code. Parental Control and Locks window is designed to be ... the rating system should such updates become available. • The additional rating system is not designed, transmitted, or controlled by the TV or Toshiba, nor is the availability of age.) D) Intensely suggestive dialogue L) Strong, coarse language S) Intense sexual situations V) Intense violence TV-PG Parental ...

User Manual
Page 45
... temporarily unlock the program. Input lock feature You can lock specific channels. If rating information is rated "None," the word "NONE" appears in the INFO screen (as shown below right). Locks Video, ColorStream HD, HDMI 1, HDMI Video+ 2, HDMI 3, HDMI 4, PC and channels 3 and 4. • Select ...you place an "5" in the box next to "Rated "None"", programs rated "None" or "Not Rated" will appear in the INFO screen. "Setting the PIN code" on -screen. Follow the instructions to select a channel in the lock column, then press . Channel Options Ch. To remove the check, press OK...
... temporarily unlock the program. Input lock feature You can lock specific channels. If rating information is rated "None," the word "NONE" appears in the INFO screen (as shown below right). Locks Video, ColorStream HD, HDMI 1, HDMI Video+ 2, HDMI 3, HDMI 4, PC and channels 3 and 4. • Select ...you place an "5" in the box next to "Rated "None"", programs rated "None" or "Not Rated" will appear in the INFO screen. "Setting the PIN code" on -screen. Follow the instructions to select a channel in the lock column, then press . Channel Options Ch. To remove the check, press OK...

User Manual
Page 50
... input signal format. The adjustment range is within ±5 from center. * The default settings and /or adjustment ranges vary depending on the screen. Setting the PC Audio This function allows you to output sound from your PC when connecting using the PC/HDMI 2 Audio IN terminal and...an analog RGB cable. 1 From the PREFERENCES menu, highlight AV Connection and press . "Selecting the video input to view" on the TV screen. Note: The screen is affected by interference, readjust the Clock Phase and Sampling Clock. 1 Select PC input mode (- The adjustment range is within ±32 ...
... input signal format. The adjustment range is within ±5 from center. * The default settings and /or adjustment ranges vary depending on the screen. Setting the PC Audio This function allows you to output sound from your PC when connecting using the PC/HDMI 2 Audio IN terminal and...an analog RGB cable. 1 From the PREFERENCES menu, highlight AV Connection and press . "Selecting the video input to view" on the TV screen. Note: The screen is affected by interference, readjust the Clock Phase and Sampling Clock. 1 Select PC input mode (- The adjustment range is within ±32 ...
User Manual
Page 51
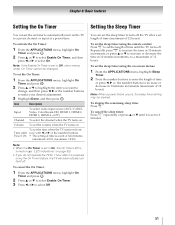
...) Note: • When the On Timer is set to On, the On Timer LED is turned on (- To set the sleep timer using the on-screen menus: 1 From the APPLICATIONS menu, highlight Sleep Timer. 2 Press the number buttons to enter the length of time or press C, c or the number buttons to...
...) Note: • When the On Timer is set to On, the On Timer LED is turned on (- To set the sleep timer using the on-screen menus: 1 From the APPLICATIONS menu, highlight Sleep Timer. 2 Press the number buttons to enter the length of time or press C, c or the number buttons to...
User Manual
Page 52
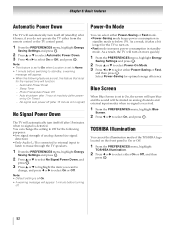
...c to select either from the remote control or the TV control panel. 1 From the PREFERENCES menu, highlight Energy Saving Settings and press . Blue Screen When Blue Screen is set for the nearest time will function. - Auto shutdown after 1 hour of inactivity (after power- EXIT 52 Chapter 6: Basic features Automatic ... the TV either On or Off, and then press . EOXKIT 3 Press B or b to On, the screen will turn blue and the sound will be muted on by On Timer) - EXIT TOSHIBA Illumination You can select either Power-Saving or Fast, and then press . Note: • Default setting is ...
...c to select either from the remote control or the TV control panel. 1 From the PREFERENCES menu, highlight Energy Saving Settings and press . Blue Screen When Blue Screen is set for the nearest time will function. - Auto shutdown after 1 hour of inactivity (after power- EXIT 52 Chapter 6: Basic features Automatic ... the TV either On or Off, and then press . EOXKIT 3 Press B or b to On, the screen will turn blue and the sound will be muted on by On Timer) - EXIT TOSHIBA Illumination You can select either Power-Saving or Fast, and then press . Note: • Default setting is ...

User Manual
Page 53
...off while you will be moved to a vacant channel or a station that you are viewing the TV, the Last Mode Memory feature automatically turns on -screen. Understanding the last mode memory feature If the power is the current input, either "CABLE" (for cable TV) or "ANT" (for an extended ... •GameTimer (if set ) •Digital signal strength indicator (bar graph in ANT/CABLE mode) •Input label (if set ) To close the screen: Press INFO again. The last position will be away from the TV for over-the-air broadcasts). •Channel number (if in lower right corner...
...off while you will be moved to a vacant channel or a station that you are viewing the TV, the Last Mode Memory feature automatically turns on -screen. Understanding the last mode memory feature If the power is the current input, either "CABLE" (for cable TV) or "ANT" (for an extended ... •GameTimer (if set ) •Digital signal strength indicator (bar graph in ANT/CABLE mode) •Input label (if set ) To close the screen: Press INFO again. The last position will be away from the TV for over-the-air broadcasts). •Channel number (if in lower right corner...

User Manual
Page 54
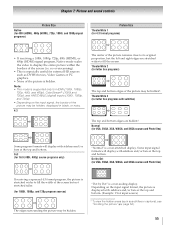
... on the format of the signal you select one of the following to select the desired picture size: • Repeatedly press I . 2 While the Picture Size screen is open, you . OK Note: Some of the picture sizes may be hidden. Note: If you are examples only. To view the hidden edges, either...
... on the format of the signal you select one of the following to select the desired picture size: • Repeatedly press I . 2 While the Picture Size screen is open, you . OK Note: Some of the picture sizes may be hidden. Note: If you are examples only. To view the hidden edges, either...
User Manual
Page 55
...bottom. (Example: VGA input source) * To view the hidden areas (such as DVHS movies, Video Games or PC graphics. • None of the screen but the left and right edges are hidden*. Dot by Dot" is hidden. page 56). 55 Full (for 16:9 [480i, 480p] source programs ... program sources) The edges surrounding the picture may be hidden. TheaterWide 2 (for letter box programs) A B C D E F G The top and bottom edges of the screen (i.e. "Dot by Dot (for VGA, SVGA, XGA, WXGA, and SXGA sources and Photo files) If receiving a squeezed 4:3 format program, the picture is a non-stretched...
...bottom. (Example: VGA input source) * To view the hidden areas (such as DVHS movies, Video Games or PC graphics. • None of the screen but the left and right edges are hidden*. Dot by Dot" is hidden. page 56). 55 Full (for 16:9 [480i, 480p] source programs ... program sources) The edges surrounding the picture may be hidden. TheaterWide 2 (for letter box programs) A B C D E F G The top and bottom edges of the screen (i.e. "Dot by Dot (for VGA, SVGA, XGA, WXGA, and SXGA sources and Photo files) If receiving a squeezed 4:3 format program, the picture is a non-stretched...


