
User Manual
Page 10
... devices 21 Connecting an HDMI audio system 21 Connecting a PC 22 Connecting to a home network 23 Chapter 3: Using the remote control 24 Controlling other devices 24 Installing batteries 24 Learning about the Remote Control 25 Chapter 4: Initial Setup and Menu 26 Initial Setup 26 Navigating the menu system 27 Main menu layout 28 Quick menu...
... devices 21 Connecting an HDMI audio system 21 Connecting a PC 22 Connecting to a home network 23 Chapter 3: Using the remote control 24 Controlling other devices 24 Installing batteries 24 Learning about the Remote Control 25 Chapter 4: Initial Setup and Menu 26 Initial Setup 26 Navigating the menu system 27 Main menu layout 28 Quick menu...
User Manual
Page 11
...IN, HDMI, and 3D . 84 PC IN signal formats 84 HDMI signal formats 85 3D signal formats 86 Remote control functional key chart 87 Operating other devices 89 Programming the remote to operate other devices . . . 89 Device code setup 89 Searching for a device code 90 Locking the... volume keys 90 Clearing the remote's programming 90 Resetting to the factory default 90 Operating the TV with combination buttons 91 Remote control codes 92 Limited United States Warranty for Toshiba ...
...IN, HDMI, and 3D . 84 PC IN signal formats 84 HDMI signal formats 85 3D signal formats 86 Remote control functional key chart 87 Operating other devices 89 Programming the remote to operate other devices . . . 89 Device code setup 89 Searching for a device code 90 Locking the... volume keys 90 Clearing the remote's programming 90 Resetting to the factory default 90 Operating the TV with combination buttons 91 Remote control codes 92 Limited United States Warranty for Toshiba ...
User Manual
Page 12
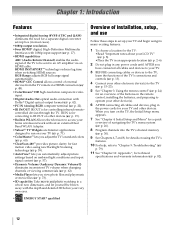
... eyes. • ENERGY STAR® qualified Overview of installation, setup, and use Follow these steps to IR OUT on the remote control, installing the batteries, and preparing to operate your TV (- p. 57). •Dynamic Volume (Audyssey Dynamic Volume®) eliminates ... 71). •ColorMaster™ lets you view photo files and play music or movie files (- p. 15-23). 5 See "Chapter 3: Using the remote control" (- Chapter 1: Introduction Features •Integrated digital tuning (8VSB ATSC and QAM) eliminates the need for a quick overview of navigating the TV's menu ...
... eyes. • ENERGY STAR® qualified Overview of installation, setup, and use Follow these steps to IR OUT on the remote control, installing the batteries, and preparing to operate your TV (- p. 57). •Dynamic Volume (Audyssey Dynamic Volume®) eliminates ... 71). •ColorMaster™ lets you view photo files and play music or movie files (- p. 15-23). 5 See "Chapter 3: Using the remote control" (- Chapter 1: Introduction Features •Integrated digital tuning (8VSB ATSC and QAM) eliminates the need for a quick overview of navigating the TV's menu ...
User Manual
Page 15
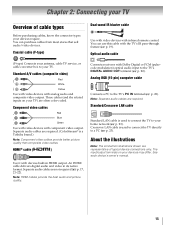
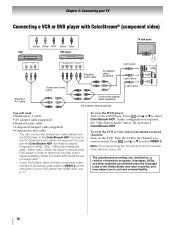
... the best audio and picture quality. About the illustrations Note: The connection illustrations shown are required. (ColorStream® is a Toshiba brand.) Note: Component video cables provide better picture quality than composite video cables. Crossover LAN cable is used to connect the ...modulation) optical audio input to a PC (- Connects receivers with component video output. p. 23). You can use this cable with infrared remote control. You can purchase cables from most stores that sell audio/video devices. Optical audio cable (F-type) Connects your antenna, cable TV ...
... the best audio and picture quality. About the illustrations Note: The connection illustrations shown are required. (ColorStream® is a Toshiba brand.) Note: Component video cables provide better picture quality than composite video cables. Crossover LAN cable is used to connect the ...modulation) optical audio input to a PC (- Connects receivers with component video output. p. 23). You can use this cable with infrared remote control. You can purchase cables from most stores that sell audio/video devices. Optical audio cable (F-type) Connects your antenna, cable TV ...
User Manual
Page 17
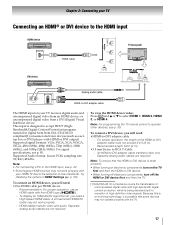
... HDMI cable per HDMI device - For proper operation, the length of the HDMI-to select HDMI 1, HDMI 2, HDMI 3, or HDMI 4. Note: For programming the TV remote control to operate other devices, see p. 85. Separate analog audio cables are required. This input is being standardized for reception of high-definition video signals. To...
... HDMI cable per HDMI device - For proper operation, the length of the HDMI-to select HDMI 1, HDMI 2, HDMI 3, or HDMI 4. Note: For programming the TV remote control to operate other devices, see p. 85. Separate analog audio cables are required. This input is being standardized for reception of high-definition video signals. To...
User Manual
Page 18
... HDMI video, see p. 89. You can use , distribution, or revision of television programs, videotapes, DVDs, and other materials is required. Note: For programming the TV remote control to operate other countries, and may subject you want to select VIDEO 2.
... HDMI video, see p. 89. You can use , distribution, or revision of television programs, videotapes, DVDs, and other materials is required. Note: For programming the TV remote control to operate other countries, and may subject you want to select VIDEO 2.

User Manual
Page 19
...Repeat the previous steps if necessary. 19 The signal passes from device) TV back panel Dualwand IR blaster cable To control the device(s): Point either the device's remote control or the TV remote control (that you have a second device, coil the second wand with the infrared emitter) so it behind the TV...it touches the front of the TV and press the button for example) Infrared sensor IR blaster cable wand (approx.1 inch from the remote control through feature does not support all IRcontrolled devices. p. 15) •Other cables as required to connect the device(s) to the device...
...Repeat the previous steps if necessary. 19 The signal passes from device) TV back panel Dualwand IR blaster cable To control the device(s): Point either the device's remote control or the TV remote control (that you have a second device, coil the second wand with the infrared emitter) so it behind the TV...it touches the front of the TV and press the button for example) Infrared sensor IR blaster cable wand (approx.1 inch from the remote control through feature does not support all IRcontrolled devices. p. 15) •Other cables as required to connect the device(s) to the device...
User Manual
Page 20
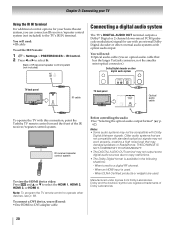
... IR cable TV back panel Optical audio cable To operate the TV with this connection, point the Toshiba TV remote control toward the front of the IR receiver/repeater control system. Older audio systems that are not compatible with standard optical out signals may damage speakers or ...may not output some digital audio sources due to operate other external audio systems with Dolby Digital bitstream signals. Note: To program the TV remote control to copy restrictions. • The Dolby Digital format is used . Dolby and the double-D symbol are used . - THIS DAMAGE ...
... IR cable TV back panel Optical audio cable To operate the TV with this connection, point the Toshiba TV remote control toward the front of the IR receiver/repeater control system. Older audio systems that are not compatible with standard optical out signals may damage speakers or ...may not output some digital audio sources due to operate other external audio systems with Dolby Digital bitstream signals. Note: To program the TV remote control to copy restrictions. • The Dolby Digital format is used . Dolby and the double-D symbol are used . - THIS DAMAGE ...
User Manual
Page 21
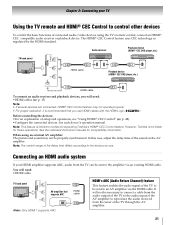
...AV amplifier. When using the TV's remote control, connect an HDMI® CEC compatible audio receiver or playback device. Connecting an HDMI audio system If your TV Using the TV remote and HDMI® CEC Control to control other devices To control the basic functions of connected audio/...;HDMI cables (- p. 15) Note: • If several devices are connected, HDMI® CEC Control feature may not be sent to models incorporating Toshiba's HDMI® CEC Control feature. Note: The control range of the delay time differs according to the device you use . In this case, adjust the...
...AV amplifier. When using the TV's remote control, connect an HDMI® CEC compatible audio receiver or playback device. Connecting an HDMI audio system If your TV Using the TV remote and HDMI® CEC Control to control other devices To control the basic functions of connected audio/...;HDMI cables (- p. 15) Note: • If several devices are connected, HDMI® CEC Control feature may not be sent to models incorporating Toshiba's HDMI® CEC Control feature. Note: The control range of the delay time differs according to the device you use . In this case, adjust the...

User Manual
Page 24
... used batteries together. • Always remove batteries from leaking into the battery compartment. 24 Chapter 3: Using the remote control Controlling other devices The TV's remote control can operate other devices such as sunshine, fire, or the like. Toshiba devices: The remote is reduced, replace the batteries. • Always replace both batteries with new ones. Note: Use carbon...
... used batteries together. • Always remove batteries from leaking into the battery compartment. 24 Chapter 3: Using the remote control Controlling other devices The TV's remote control can operate other devices such as sunshine, fire, or the like. Toshiba devices: The remote is reduced, replace the batteries. • Always replace both batteries with new ones. Note: Use carbon...

User Manual
Page 25
... AVAILABLE" may appear if you can use these buttons select or adjust programming menus. For the HDMI® CEC Control functions, see "Remote control functional key chart" (- Sets the remote control mode to the previous menu. p. 41) / Edits the Favorites List (- Turns the TV on the TV (-.... Opens the closed caption selector (- Freezes the picture (- p. 37). Chapter 3: Using the remote control Learning about the Remote Control Only the buttons used for BD/DVD, CABLE/SAT, and VCR mode. To control the TV, press TV. p. 61). Displays the NET TV™ menu (- Accesses Netflix ...
... AVAILABLE" may appear if you can use these buttons select or adjust programming menus. For the HDMI® CEC Control functions, see "Remote control functional key chart" (- Sets the remote control mode to the previous menu. p. 41) / Edits the Favorites List (- Turns the TV on the TV (-.... Opens the closed caption selector (- Freezes the picture (- p. 37). Chapter 3: Using the remote control Learning about the Remote Control Only the buttons used for BD/DVD, CABLE/SAT, and VCR mode. To control the TV, press TV. p. 61). Displays the NET TV™ menu (- Accesses Netflix ...
User Manual
Page 27
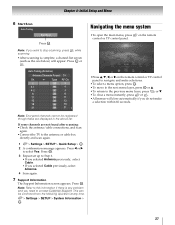
... Sound Applications Settings Preferences Setup •Press B, b, C, or c on the remote control or TV control panel to the previous menu layer, press or b. •To close a menu instantly, press or . •All menus will appear. Press . OK 27 Press OK ... 4 6 ATV 6 11 ATV 11 13 ATV 13 18 ATV 18 31 ATV 31 Navigating the menu system •To open the main menu, press control or TV control panel. Press C or c to contact Customer Support. OK Note: Refer to Step 6. •If you selected Antenna previously, select Cable. •If you do...
... Sound Applications Settings Preferences Setup •Press B, b, C, or c on the remote control or TV control panel to the previous menu layer, press or b. •To close a menu instantly, press or . •All menus will appear. Press . OK 27 Press OK ... 4 6 ATV 6 11 ATV 11 13 ATV 13 18 ATV 18 31 ATV 31 Navigating the menu system •To open the main menu, press control or TV control panel. Press C or c to contact Customer Support. OK Note: Refer to Step 6. •If you selected Antenna previously, select Cable. •If you do...

User Manual
Page 28
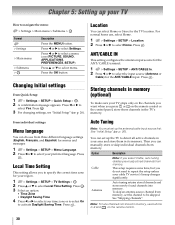
Chapter 4: Initial Setup and Menu Main menu layout To open the main menus (illustrated below), press on the remote control or TV control panel. 1st Layer 2nd Layer 3rd Layer Page Network Media Player Wallpaper Timer Settings NET TV Network Setup Wireless Information Photo ... 61 MTS 61 Balance 62 Bass 62 Treble 62 Advanced Sound Settings 63 Dynamic Volume (Audyssey 62 Dynamic Volume®) Dynamic Range Control 62 1st Layer Settings 2nd Layer APPLICATIONS PREFERENCES 3rd Layer Widgets NET TV Media Player Channel Browser Favorites Browser On Timer Sleep Timer ...
Chapter 4: Initial Setup and Menu Main menu layout To open the main menus (illustrated below), press on the remote control or TV control panel. 1st Layer 2nd Layer 3rd Layer Page Network Media Player Wallpaper Timer Settings NET TV Network Setup Wireless Information Photo ... 61 MTS 61 Balance 62 Bass 62 Treble 62 Advanced Sound Settings 63 Dynamic Volume (Audyssey 62 Dynamic Volume®) Dynamic Range Control 62 1st Layer Settings 2nd Layer APPLICATIONS PREFERENCES 3rd Layer Widgets NET TV Media Player Channel Browser Favorites Browser On Timer Sleep Timer ...
User Manual
Page 30
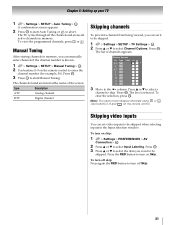
...). Press . Local Time Setting This setting allows you to select Home. Option Description Cable Note: If you press CH or CH on the remote control. 30 on the remote control or the control panel, store those channels in its memory. For normal home use buttons 0-9 and - OK 2 Press B or b to select Yes. Press . Auto Tuning...
...). Press . Local Time Setting This setting allows you to select Home. Option Description Cable Note: If you press CH or CH on the remote control. 30 on the remote control or the control panel, store those channels in its memory. For normal home use buttons 0-9 and - OK 2 Press B or b to select Yes. Press . Auto Tuning...
User Manual
Page 31
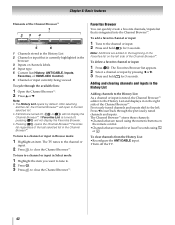
... item you want to turn off Skip. 31 CH Manual Tuning After storing channels in memory, you can set video inputs to turn on the remote control to skip. OK Note: You cannot tune skipped channels using CH or . To turn off skip: Press again the RED button to be skipped. OK...). Press OK . To clear the selection, press . Skipping video inputs You can manually enter channels if the channel number is selected. To turn on the remote control. Press the RED button to be skipped. 1 > Settings > SETUP > TV Settings > .
... item you want to turn off Skip. 31 CH Manual Tuning After storing channels in memory, you can set video inputs to turn on the remote control to skip. OK Note: You cannot tune skipped channels using CH or . To turn off skip: Press again the RED button to be skipped. OK...). Press OK . To clear the selection, press . Skipping video inputs You can manually enter channels if the channel number is selected. To turn on the remote control. Press the RED button to be skipped. 1 > Settings > SETUP > TV Settings > .

User Manual
Page 33
... and release it. Chapter 5: Setting up your TV Setting the Auto Input feature You can change TV inputs using the MODE SELECT buttons on the remote control: TV, CABLE/SAT, BD/ DVD, AUX. To reset Auto Input: Select Reset.
... and release it. Chapter 5: Setting up your TV Setting the Auto Input feature You can change TV inputs using the MODE SELECT buttons on the remote control: TV, CABLE/SAT, BD/ DVD, AUX. To reset Auto Input: Select Reset.

User Manual
Page 41
... you select one to tune to). •Quickly change the mode. Tuning in to the next programmed channel Press CH or CH on the remote control to enter the major channel number. p. 30). OK Using the Channel Browser™ The Channel Browser™ is cleared. p. 48). ...5 Select On or Off. 6 To return to highlight Channel Tuning Mode. OK •Press or . 41 OK Use the 0-9 buttons on the remote control or TV control panel. OK To open the Channel Browser™: • > Settings > APPLICATIONS > Channel Browser > . The History List is a helpful navigational interface...
... you select one to tune to). •Quickly change the mode. Tuning in to the next programmed channel Press CH or CH on the remote control to enter the major channel number. p. 30). OK Using the Channel Browser™ The Channel Browser™ is cleared. p. 48). ...5 Select On or Off. 6 To return to highlight Channel Tuning Mode. OK •Press or . 41 OK Use the 0-9 buttons on the remote control or TV control panel. OK To open the Channel Browser™: • > Settings > APPLICATIONS > Channel Browser > . The History List is a helpful navigational interface...
User Manual
Page 42
...List: As a channel or input is tuned, the Channel Browser™ adds it to the beginning of the Favorites list on the remote control. •Channels that is integrated into the Channel Browser™. The Channel Browser™ stores these channels: •Channels that are tuned... highlighted in the browser 3 Inputs or channels labels 4 Input type 5 Current list (History, ANT/CABLE, Inputs, Favorites, or HDMI-CEC Control) 6 Channel or input currently being viewed To cycle through the previously tuned channels and inputs. After selecting another list, the Channel Browser™...
...List: As a channel or input is tuned, the Channel Browser™ adds it to the beginning of the Favorites list on the remote control. •Channels that is integrated into the Channel Browser™. The Channel Browser™ stores these channels: •Channels that are tuned... highlighted in the browser 3 Inputs or channels labels 4 Input type 5 Current list (History, ANT/CABLE, Inputs, Favorites, or HDMI-CEC Control) 6 Channel or input currently being viewed To cycle through the previously tuned channels and inputs. After selecting another list, the Channel Browser™...

User Manual
Page 43
..." appears. The channel has been programmed to the button. 3 You can then change channels repeatedly, and when you can select a video input source with the remote control by repeatedly pressing or B or b. • You can select inputs that input appears. 3 If the input has multiple HDMI® CEC devices, use B or ... Return. Chapter 6: Basic features Using Channel Return You can switch between the last two channels that were tuned. "Labeling video inputs" on the remote control or TV control panel. 2 Change the input: • Press 0-8. • Repeatedly press B or b. p. 33).
..." appears. The channel has been programmed to the button. 3 You can then change channels repeatedly, and when you can select a video input source with the remote control by repeatedly pressing or B or b. • You can select inputs that input appears. 3 If the input has multiple HDMI® CEC devices, use B or ... Return. Chapter 6: Basic features Using Channel Return You can switch between the last two channels that were tuned. "Labeling video inputs" on the remote control or TV control panel. 2 Change the input: • Press 0-8. • Repeatedly press B or b. p. 33).

User Manual
Page 47
"Setting the PIN code" on the remote control. Note: If no PIN code has been set , the TV will enter program lock mode and a warning message will appear onscreen. To clear the selection, ... inputs and channels 3 and 4. 47 No rating information is provided. Note: • If you unlock the inputs by entering the PIN code. 1 > Settings > PREFERENCES > Parental Control and Locks > .
"Setting the PIN code" on the remote control. Note: If no PIN code has been set , the TV will enter program lock mode and a warning message will appear onscreen. To clear the selection, ... inputs and channels 3 and 4. 47 No rating information is provided. Note: • If you unlock the inputs by entering the PIN code. 1 > Settings > PREFERENCES > Parental Control and Locks > .


