
User Manual
Page 1
... and serial number are on the back of steps for setting up yournewTV, see page11. Record these numbers whenever you communicate with your Toshiba dealer about this TV. Owner's Manual Integrated High Definition LCD Television HIGH-DEFINITION TELEVISION 40SL412U 46SL412U 55SL412U 55S41U Foran overview of your TV. Refer to these numbers...
... and serial number are on the back of steps for setting up yournewTV, see page11. Record these numbers whenever you communicate with your Toshiba dealer about this TV. Owner's Manual Integrated High Definition LCD Television HIGH-DEFINITION TELEVISION 40SL412U 46SL412U 55SL412U 55S41U Foran overview of your TV. Refer to these numbers...
User Manual
Page 2
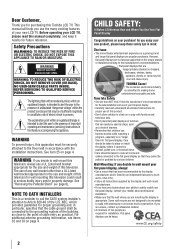
...mount manufacturers. • If you have any wall bracket other than life" flat panel display. The lightning flash with furniture and television sets. • Don't place flat panel displays on or play with arrowhead symbol, within an equilateral triangle, is appropriate. WARNING To prevent...as practical. Before operating your flat panel display. • Carefully read this television could result in the literature accompanying the appliance. TOSHIBA Cares! • The consumer electronics industry is intended to alert the user to persons. WARNING RISK OF ELECTRIC SHOCK DO NOT ...
...mount manufacturers. • If you have any wall bracket other than life" flat panel display. The lightning flash with furniture and television sets. • Don't place flat panel displays on or play with arrowhead symbol, within an equilateral triangle, is appropriate. WARNING To prevent...as practical. Before operating your flat panel display. • Carefully read this television could result in the literature accompanying the appliance. TOSHIBA Cares! • The consumer electronics industry is intended to alert the user to persons. WARNING RISK OF ELECTRIC SHOCK DO NOT ...

User Manual
Page 7
... interference received, including interference that does not operate properly (does not light, remains constantly lit, etc.). Changing Picture Settings may cause harmful interference to provide reasonable protection against harmful interference in a residential installation. Such pixels are registered U.S. ... guarantee that involve shooting a "gun" type of malfunction; FCC Declaration of Conformity Compliance Statement (Part 15): Toshiba 40SL412U, 46SL412U, 55SL412U, and 55S41U Television models comply with Part 15 of the FCC rules. ENERGY STAR® User Information: ENERGY...
... interference received, including interference that does not operate properly (does not light, remains constantly lit, etc.). Changing Picture Settings may cause harmful interference to provide reasonable protection against harmful interference in a residential installation. Such pixels are registered U.S. ... guarantee that involve shooting a "gun" type of malfunction; FCC Declaration of Conformity Compliance Statement (Part 15): Toshiba 40SL412U, 46SL412U, 55SL412U, and 55S41U Television models comply with Part 15 of the FCC rules. ENERGY STAR® User Information: ENERGY...
User Manual
Page 9
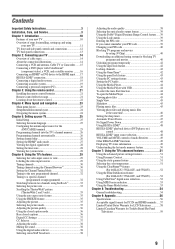
... 42 Locking channels 42 Using the GameTimer 42 Using the panel lock feature 43 Using the PC settings feature 43 Setting the PC Audio 44 Using the Media Player 44 Using the Media Player with USB 44 To ...51 Selecting the color temperature 51 Using the ClearFrame™ feature (For 46SL412U, 55SL412U, and 55S41U 52 Using the Film Stabilization feature (For 46SL412U, 55SL412U, and 55S41U 52 Using CableClear® digital noise reduction 52 Using MPEG noise reduction... United States Warranty for LCD Televisions 58 Limited Canadian Warranty for Toshiba Brand Flat Panel Televisions 59 9
... 42 Locking channels 42 Using the GameTimer 42 Using the panel lock feature 43 Using the PC settings feature 43 Setting the PC Audio 44 Using the Media Player 44 Using the Media Player with USB 44 To ...51 Selecting the color temperature 51 Using the ClearFrame™ feature (For 46SL412U, 55SL412U, and 55S41U 52 Using the Film Stabilization feature (For 46SL412U, 55SL412U, and 55S41U 52 Using CableClear® digital noise reduction 52 Using MPEG noise reduction... United States Warranty for LCD Televisions 58 Limited Canadian Warranty for Toshiba Brand Flat Panel Televisions 59 9
User Manual
Page 10
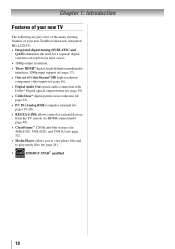
...new TV The following are just a few of the many exciting features of your new Toshiba widescreen, integrated HD, LCD TV: • Integrated digital tuning (8VSB ATSC and QAM) eliminates the need for a separate digital converter set-top box (in most cases). • 1080p output resolution. • Three HDMI...control of external devices from the TV remote via HDMI connection( page 48). • ClearFrame™ 120 Hz anti-blur feature (for 46SL412U, 55SL412U, and 55S41U) ( page 52). • Media Player allows you to view photo files and to play music files ( page 44). ...
...new TV The following are just a few of the many exciting features of your new Toshiba widescreen, integrated HD, LCD TV: • Integrated digital tuning (8VSB ATSC and QAM) eliminates the need for a separate digital converter set-top box (in most cases). • 1080p output resolution. • Three HDMI...control of external devices from the TV remote via HDMI connection( page 48). • ClearFrame™ 120 Hz anti-blur feature (for 46SL412U, 55SL412U, and 55S41U) ( page 52). • Media Player allows you to view photo files and to play music files ( page 44). ...
User Manual
Page 11
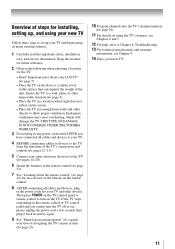
THIS TYPE OF DAMAGE IS NOT COVERED UNDER THE TOSHIBA WARRANTY. 3 Do not plug in any power cords until AFTER you cannot turn on the TV. If the TV stops responding to set up your new TV! 11 Keep this manual for future reference. 2 Observe the following when choosing a location for the TV..., which will damage the TV. Then press POWER on the TV control panel or remote control to allow proper ventilation. Overview of steps for installing, setting up, and using its many exciting features. 1 Carefully read the important safety, installation, care, and service information.
THIS TYPE OF DAMAGE IS NOT COVERED UNDER THE TOSHIBA WARRANTY. 3 Do not plug in any power cords until AFTER you cannot turn on the TV. If the TV stops responding to set up your new TV! 11 Keep this manual for future reference. 2 Observe the following when choosing a location for the TV..., which will damage the TV. Then press POWER on the TV control panel or remote control to allow proper ventilation. Overview of steps for installing, setting up, and using its many exciting features. 1 Carefully read the important safety, installation, care, and service information.
User Manual
Page 14
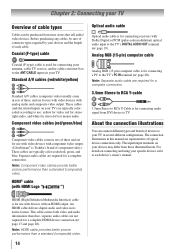
...according to use: yellow for video, red for stereo right audio, and white for stereo left (or mono) audio. The connection illustrations in sets of three and are for connecting audio signal from those illustrated herein. Analog RGB (15-pin) computer cable Analog RGB (15-pin) computer...High-Definition Multimedia Interface) cable is for use with video devices with an HDMI output. Coaxial (F-type) cable Coaxial (F-type) cable is Toshiba's brand of typical device connections only. For details on connecting and using your specific devices, refer to the ANT/CABLE input on your TV.
...according to use: yellow for video, red for stereo right audio, and white for stereo left (or mono) audio. The connection illustrations in sets of three and are for connecting audio signal from those illustrated herein. Analog RGB (15-pin) computer cable Analog RGB (15-pin) computer...High-Definition Multimedia Interface) cable is for use with video devices with an HDMI output. Coaxial (F-type) cable Coaxial (F-type) cable is Toshiba's brand of typical device connections only. For details on connecting and using your specific devices, refer to the ANT/CABLE input on your TV.
User Manual
Page 15
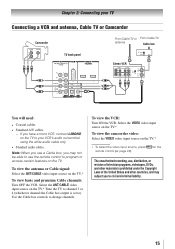
.... Note: When you use a Cable box, you may not be able to use , distribution, or revision of television programs, videotapes, DVDs, and other materials is set to). To view the antenna or Cable signal: Select the ANT/CABLE video input source on the TV.* ** To select the video input source, press...
.... Note: When you use a Cable box, you may not be able to use , distribution, or revision of television programs, videotapes, DVDs, and other materials is set to). To view the antenna or Cable signal: Select the ANT/CABLE video input source on the TV.* ** To select the video input source, press...

User Manual
Page 17
...and uncompressed digital video from an HDMI source device, or uncompressed digital video from EIA/CEA-861-Dcompliant[1] consumer electronic devices (such as a set-top box or DVD player with HDMI or DVI output).The HDMI input can accept and display VGA, SVGA, XGA, WXGA, SXGA, ... video input source on the To connect a DVI device, you will need a Category 2 cable. For detailed signal specifications, see illustration). −− See "Setting the HDMI ® audio mode" ( page 27). on the TV.* ** To select the video input source, press remote control ( page 22). ...
...and uncompressed digital video from an HDMI source device, or uncompressed digital video from EIA/CEA-861-Dcompliant[1] consumer electronic devices (such as a set-top box or DVD player with HDMI or DVI output).The HDMI input can accept and display VGA, SVGA, XGA, WXGA, SXGA, ... video input source on the To connect a DVI device, you will need a Category 2 cable. For detailed signal specifications, see illustration). −− See "Setting the HDMI ® audio mode" ( page 27). on the TV.* ** To select the video input source, press remote control ( page 22). ...
User Manual
Page 18
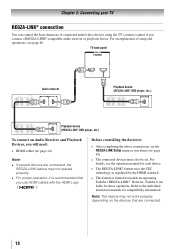
... TV's remote control if you use HDMI cables with the HDMI Logo ( ). Before controlling the device(s): • After completing the above connections, set . However, Toshiba is not liable for each device. • The REGZA-LINK® feature uses the CEC technology as you will need: • HDMI cables..., etc.) To connect an Audio Receiver and Playback Devices, you desire ( page 49). • The connected devices must also be set the REGZA-LINK Setup menu as regulated by the HDMI standard. • This feature is recommended that are connected, the REGZA-LINK feature may...
... TV's remote control if you use HDMI cables with the HDMI Logo ( ). Before controlling the device(s): • After completing the above connections, set . However, Toshiba is not liable for each device. • The REGZA-LINK® feature uses the CEC technology as you will need: • HDMI cables..., etc.) To connect an Audio Receiver and Playback Devices, you desire ( page 49). • The connected devices must also be set the REGZA-LINK Setup menu as regulated by the HDMI standard. • This feature is recommended that are connected, the REGZA-LINK feature may...
User Manual
Page 20
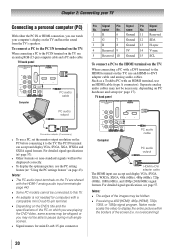
Such as a Toshiba PC with a DVI terminal to the HDMI terminal on PC hardware and setup ( page 17). Note: •• The PC audio input terminals on ..., use an HDMI cable (type A connector). TV back panel Conversion adapter (if necessary) • To use a PC, set the monitor output resolution on the TV, use the PC setting feature ( "Using the PC settings feature" on the TV and hear the sound from the TV's speakers. For detailed signal specifications, see page...
Such as a Toshiba PC with a DVI terminal to the HDMI terminal on PC hardware and setup ( page 17). Note: •• The PC audio input terminals on ..., use an HDMI cable (type A connector). TV back panel Conversion adapter (if necessary) • To use a PC, set the monitor output resolution on the TV, use the PC setting feature ( "Using the PC settings feature" on the TV and hear the sound from the TV's speakers. For detailed signal specifications, see page...
User Manual
Page 23
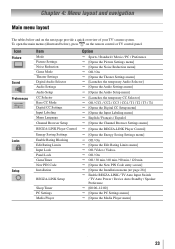
... panel. Icon Picture Sound Preferences Locks Setup Item Mode Picture Settings Noise Reduction Game Mode Theater Settings Digital Audio Selector Audio Settings Audio Setup CC Selector Base CC Mode Digital CC Settings Input Labeling Menu Language Channel Browser Setup REGZA-LINK Player Control...the Input Labeling menu] English / Français / Español [Opens the Channel Browser Settings menu] [Opens the REGZA-LINK Player Control] [Opens the Energy Saving Settings menu] Off / On [Opens the Edit Rating Limits menu] Off / Video /...
... panel. Icon Picture Sound Preferences Locks Setup Item Mode Picture Settings Noise Reduction Game Mode Theater Settings Digital Audio Selector Audio Settings Audio Setup CC Selector Base CC Mode Digital CC Settings Input Labeling Menu Language Channel Browser Setup REGZA-LINK Player Control...the Input Labeling menu] English / Français / Español [Opens the Channel Browser Settings menu] [Opens the REGZA-LINK Player Control] [Opens the Energy Saving Settings menu] Off / On [Opens the Edit Rating Limits menu] Off / Video /...
User Manual
Page 24
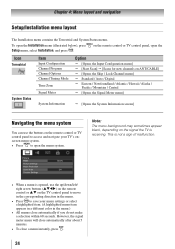
... black, depending on the remote control or TV control panel to access and navigate your TV's onscreen menu system. • Press to save your menu settings or select a highlighted item. (A highlighted menu item appears in a different color in the menu. • Press to open the menu system.
... black, depending on the remote control or TV control panel to access and navigate your TV's onscreen menu system. • Press to save your menu settings or select a highlighted item. (A highlighted menu item appears in a different color in the menu. • Press to open the menu system.

User Manual
Page 25
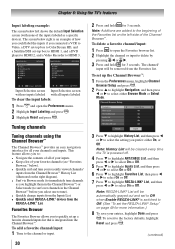
... number directly, select Auto. Configuring the antenna input source for the ANT/CABLE input on the TV. 5無 To save your original settings, highlight Cancel and press . 3無 Press to close the Preferences menu. (continued) 25 Press to continue to Auto Tuning. 6無...; Press to select your desired time zone with t or u and press . 3無 Next, the Location setting window will appear, as shown below. Open the Terrestrial menu, highlight Input Configuration, and press . 4無 Highlight ANT/CABLE In and press t or...
... number directly, select Auto. Configuring the antenna input source for the ANT/CABLE input on the TV. 5無 To save your original settings, highlight Cancel and press . 3無 Press to close the Preferences menu. (continued) 25 Press to continue to Auto Tuning. 6無...; Press to select your desired time zone with t or u and press . 3無 Next, the Location setting window will appear, as shown below. Open the Terrestrial menu, highlight Input Configuration, and press . 4無 Highlight ANT/CABLE In and press t or...

User Manual
Page 26
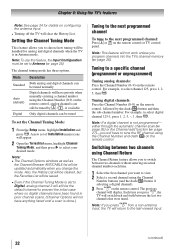
...memory. While the TV is configured for Cable will erase channels that were previously programmed into the TV's channel memory. Setting channel skip To prevent certain channels from being viewed, channel positions can automatically detect all active channels in the onscreen display and ...press ). Chapter 5: Setting up the Start Scan, and press again to begin channel programming. Programming channels automatically Your TV can be skipped. 1無 ...
...memory. While the TV is configured for Cable will erase channels that were previously programmed into the TV's channel memory. Setting channel skip To prevent certain channels from being viewed, channel positions can automatically detect all active channels in the onscreen display and ...press ). Chapter 5: Setting up the Start Scan, and press again to begin channel programming. Programming channels automatically Your TV can be skipped. 1無 ...
User Manual
Page 27
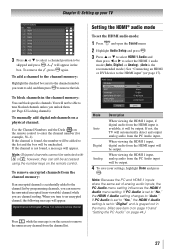
... you want to add, and then press to remove the tick. Digital Channel Is Encrypted - Note: Because the PC and HDMI-1 inputs share the same set to "Digital" and is the recommended mode.) See "Connecting an HDMI or DVI device to the HDMI input" ( page 17). Analog When viewing ...the HDMI 1 input, analog audio from the HDMI input will be output. If PC Audio is set the HDMI audio mode: 1無 Press and open the Sound menu. 2無 Highlight Audio Setup and press . 3無 Press p or q to select HDMI 1 Audio ...
... you want to add, and then press to remove the tick. Digital Channel Is Encrypted - Note: Because the PC and HDMI-1 inputs share the same set to "Digital" and is the recommended mode.) See "Connecting an HDMI or DVI device to the HDMI input" ( page 17). Analog When viewing ...the HDMI 1 input, analog audio from the HDMI input will be output. If PC Audio is set the HDMI audio mode: 1無 Press and open the Sound menu. 2無 Highlight Audio Setup and press . 3無 Press p or q to select HDMI 1 Audio ...

User Manual
Page 28
... few seconds. To view the digital signal meter: 1無 Press and open the Setup menu. 2無 Highlight Installation and press . 3無 A new set of Installation menu icons will turn off , unplug the TV power cord and then plug it in the Signal Meter screen may not correspond to.... Contact your local broadcasters to select Done and press .) A warning message will appear, select Yes and press , the TV will appear. To set the time zone: 1無 From the Setup menu, highlight Installation and press . To close the screen and return to show the correct time zone...
... few seconds. To view the digital signal meter: 1無 Press and open the Setup menu. 2無 Highlight Installation and press . 3無 A new set of Installation menu icons will turn off , unplug the TV power cord and then plug it in the Signal Meter screen may not correspond to.... Contact your local broadcasters to select Done and press .) A warning message will appear, select Yes and press , the TV will appear. To set the time zone: 1無 From the Setup menu, highlight Installation and press . To close the screen and return to show the correct time zone...
User Manual
Page 30
...prefer: either Browse Mode or Select Mode. 3無 Press to highlight History List, and then press or to select the setting you to: • Navigate the contents of all of your inputs. • Keep a list of your favorite channels (see "Favorites Browser," below). ...menu. 2無 Highlight Input Labeling and press . 3無 Highlight Reset and press . To delete a favorite channel/input: 1無 Press to quickly set the REGZA-LINK® Setup" on page 49 for more information.) 8無 To save your entries, highlight Done and press . Note: Additions are ...
...prefer: either Browse Mode or Select Mode. 3無 Press to highlight History List, and then press or to select the setting you to: • Navigate the contents of all of your inputs. • Keep a list of your favorite channels (see "Favorites Browser," below). ...menu. 2無 Highlight Input Labeling and press . 3無 Highlight Reset and press . To delete a favorite channel/input: 1無 Press to quickly set the REGZA-LINK® Setup" on page 49 for more information.) 8無 To save your entries, highlight Done and press . Note: Additions are ...
User Manual
Page 32
...not programmed- The previous channel will clear the History List. Note: To use this feature, the Input Configuration must be tuned To set to select your desired mode. Mode Standard Auto (default) Digital Description Both analog and digital channels can be tuned normally Digital channels ...TV will have to the last-viewed input. (continued) 32 Note: If you program channels into the TV's channel memory ( page 26). Setting the Channel Tuning Mode This feature allows you change the mode. Tuning to select channel 125, press 1, 2, 5, then . Tuning digital channels:...
...not programmed- The previous channel will clear the History List. Note: To use this feature, the Input Configuration must be tuned To set to select your desired mode. Mode Standard Auto (default) Digital Description Both analog and digital channels can be tuned normally Digital channels ...TV will have to the last-viewed input. (continued) 32 Note: If you program channels into the TV's channel memory ( page 26). Setting the Channel Tuning Mode This feature allows you change the mode. Tuning to select channel 125, press 1, 2, 5, then . Tuning digital channels:...

User Manual
Page 33
...). The format of picture sizes - Select the picture size that displays the current program the way that looks best to select the desired picture size setting. 3無 Highlight Done and press . To select the picture size using the menus: 1無 Select Picture Size in the Theater... Settings menu. 2無 Press or to you to that channel quickly from any other countries, and may not be available depending on the receiving ...
...). The format of picture sizes - Select the picture size that displays the current program the way that looks best to select the desired picture size setting. 3無 Highlight Done and press . To select the picture size using the menus: 1無 Select Picture Size in the Theater... Settings menu. 2無 Press or to you to that channel quickly from any other countries, and may not be available depending on the receiving ...


