
User Manual
Page 2
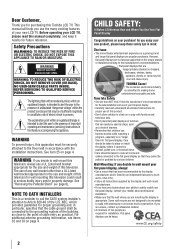
Before operating your LCD TV, please read and understand all instructions supplied by the display and wall mount manufacturers. • If you have any wall bracket other than life" flat panel display. NO USER-SERVICEABLE PARTS INSIDE. See "Removing the Pedestal Stand" ( page 6). Tune Into Safety • One size does NOT fit all cords and cables connected to the flat panel display so that has been recommended by the display manufacturer and/or listed by curious...
Before operating your LCD TV, please read and understand all instructions supplied by the display and wall mount manufacturers. • If you have any wall bracket other than life" flat panel display. NO USER-SERVICEABLE PARTS INSIDE. See "Removing the Pedestal Stand" ( page 6). Tune Into Safety • One size does NOT fit all cords and cables connected to the flat panel display so that has been recommended by the display manufacturer and/or listed by curious...
User Manual
Page 4
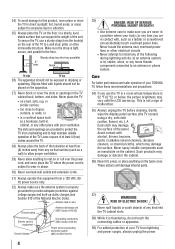
... below, the picture brightness may damage the surface. Gently wipe the display panel surface (the TV screen) using a dry, soft cloth (cotton, flannel, etc.). Such products may damage the surface of the National Electric Code). To secure the TV, use the TV in a position where your TV from any home theater component connected to drapes, curtains, or walls; Antenna lead-in...
... below, the picture brightness may damage the surface. Gently wipe the display panel surface (the TV screen) using a dry, soft cloth (cotton, flannel, etc.). Such products may damage the surface of the National Electric Code). To secure the TV, use the TV in a position where your TV from any home theater component connected to drapes, curtains, or walls; Antenna lead-in...
User Manual
Page 5
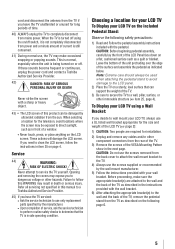
... assembly instructions included with a sharp or heavy object. 43) • The LCD screen of this manual to a Toshiba Authorized Service Provider. 45) If you have the TV serviced: • Ask the service technician to use only replacement parts specified by the wall mount manufacturer. 5) Follow the instructions provided with the wall bracket. 6) After attaching the appropriate bracket(s) to the wall and the back of the TV, remove the pedestal stand from power...
... assembly instructions included with a sharp or heavy object. 43) • The LCD screen of this manual to a Toshiba Authorized Service Provider. 45) If you have the TV serviced: • Ask the service technician to use only replacement parts specified by the wall mount manufacturer. 5) Follow the instructions provided with the wall bracket. 6) After attaching the appropriate bracket(s) to the wall and the back of the TV, remove the pedestal stand from power...
User Manual
Page 9
... panel connections 13 Chapter 2: Connecting your TV 14 Overview of cable types 14 About the connection illustrations 14 Connecting a VCR and antenna, Cable TV or Camcorder........15 Connecting a DVD player with ColorStream® (component video), a VCR, and a satellite receiver...........16 Connecting an HDMI® or DVI device to the HDMI input........17 REGZA-LINK® connection 18 Connecting a digital audio system 19 Connecting an audio system 19 Connecting a personal computer (PC 20 Chapter 3: Using the remote control 21 Installing the remote control...
... panel connections 13 Chapter 2: Connecting your TV 14 Overview of cable types 14 About the connection illustrations 14 Connecting a VCR and antenna, Cable TV or Camcorder........15 Connecting a DVD player with ColorStream® (component video), a VCR, and a satellite receiver...........16 Connecting an HDMI® or DVI device to the HDMI input........17 REGZA-LINK® connection 18 Connecting a digital audio system 19 Connecting an audio system 19 Connecting a personal computer (PC 20 Chapter 3: Using the remote control 21 Installing the remote control...
User Manual
Page 13
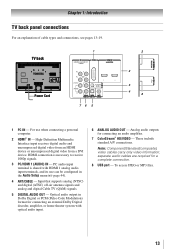
...) video cables carry only video information; HDMI connection is shared with optical audio input. 6無 ANALOG AUDIO OUT - PC audio input terminal is necessary to receive 1080p signals. 3無 PC/HDMI 1 (AUDIO) IN - Chapter 1: Introduction TV back panel connections For an explanation of cable types and connections, see pages 13-19. 1 TV back Power Cord 76 5 2 2 3 4 8 1無 PC IN - Optical audio output in the Audio Setup menu ( page 44). 4無 ANT/CABLE - Input that supports analog (NTSC) and digital (ATSC) off-air antenna signals and analog...
...) video cables carry only video information; HDMI connection is shared with optical audio input. 6無 ANALOG AUDIO OUT - PC audio input terminal is necessary to receive 1080p signals. 3無 PC/HDMI 1 (AUDIO) IN - Chapter 1: Introduction TV back panel connections For an explanation of cable types and connections, see pages 13-19. 1 TV back Power Cord 76 5 2 2 3 4 8 1無 PC IN - Optical audio output in the Audio Setup menu ( page 44). 4無 ANT/CABLE - Input that supports analog (NTSC) and digital (ATSC) off-air antenna signals and analog...
User Manual
Page 14
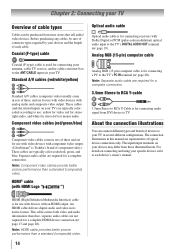
... video devices with analog audio and composite video output. This cable carries both video and audio information; An HDMI cable delivers digital audio and video in several different configurations. Coaxial (F-type) cable Coaxial (F-type) cable is Toshiba's brand of typical device connections only. Component video cables (red/green/blue) Component video cables come in this manual are required for a complete connection. 3.5mm Stereo to RCA Y-cable 3.5mm Stereo to RCA Y-Cable is for use with devices with Dolby Digital or PCM (pulse-code modulation) optical audio input...
... video devices with analog audio and composite video output. This cable carries both video and audio information; An HDMI cable delivers digital audio and video in several different configurations. Coaxial (F-type) cable Coaxial (F-type) cable is Toshiba's brand of typical device connections only. Component video cables (red/green/blue) Component video cables come in this manual are required for a complete connection. 3.5mm Stereo to RCA Y-cable 3.5mm Stereo to RCA Y-Cable is for use with devices with Dolby Digital or PCM (pulse-code modulation) optical audio input...

User Manual
Page 17
.... •• When turning off your electronic components, turn on the To connect a DVI device, you will need: • One HDMI-to-DVI adapter cable −− For proper operation, the length of uncompressed digital video with the HDMI Logo ( ). −− To display an 1080p/60Hz signal format, you will need a Category 2 cable. Separate analog audio cables are not required (see illustration). −− See "Setting the HDMI ® audio mode" ( page...
.... •• When turning off your electronic components, turn on the To connect a DVI device, you will need: • One HDMI-to-DVI adapter cable −− For proper operation, the length of uncompressed digital video with the HDMI Logo ( ). −− To display an 1080p/60Hz signal format, you will need a Category 2 cable. Separate analog audio cables are not required (see illustration). −− See "Setting the HDMI ® audio mode" ( page...
User Manual
Page 20
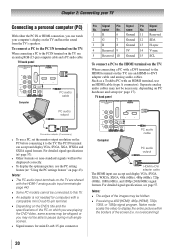
name Pin Signal No. For detailed signal specifications, see page 57. Note: •• The edges of the screen (i.e. TV back panel Computer PC audio cable PC audio output Pin Signal No. Separate analog audio cables may be necessary, depending on PC hardware and setup ( page 17). TV back panel Conversion adapter (if necessary) • To use a PC, set the monitor output resolution on the PC before connecting it to the PC...
name Pin Signal No. For detailed signal specifications, see page 57. Note: •• The edges of the screen (i.e. TV back panel Computer PC audio cable PC audio output Pin Signal No. Separate analog audio cables may be necessary, depending on PC hardware and setup ( page 17). TV back panel Conversion adapter (if necessary) • To use a PC, set the monitor output resolution on the PC before connecting it to the PC...

User Manual
Page 22
... locate later DVD chapters. 24無 FF Fast-forwards the tape or DVD (Press during play mode to view the picture moving rapidly forward). 25無 EJECT Eject the tape or DVD. 26無 PAUSE Press during play or record mode to the last viewed channel or source ( page 32). 18無 Arrow buttons (pqtu) When a menu is on-screen ( page 26). 11無 C.CAPTION accesses...
... locate later DVD chapters. 24無 FF Fast-forwards the tape or DVD (Press during play mode to view the picture moving rapidly forward). 25無 EJECT Eject the tape or DVD. 26無 PAUSE Press during play or record mode to the last viewed channel or source ( page 32). 18無 Arrow buttons (pqtu) When a menu is on-screen ( page 26). 11無 C.CAPTION accesses...
User Manual
Page 23
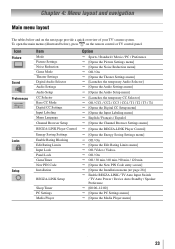
... Main menu layout The tables below ), press on the next page provide a quick overview of your TV's menu system. Icon Picture Sound Preferences Locks Setup Item Mode Picture Settings Noise Reduction Game Mode Theater Settings Digital Audio Selector Audio Settings Audio Setup CC Selector Base CC Mode Digital CC Settings Input Labeling Menu Language Channel Browser Setup REGZA-LINK Player Control Energy Saving Settings Enable Rating Blocking Edit Rating Limits Input Lock Panel Lock GameTimer New PIN Code Installation REGZA-LINK Setup Sleep Timer PC Settings Media Player Option ...
... Main menu layout The tables below ), press on the next page provide a quick overview of your TV's menu system. Icon Picture Sound Preferences Locks Setup Item Mode Picture Settings Noise Reduction Game Mode Theater Settings Digital Audio Selector Audio Settings Audio Setup CC Selector Base CC Mode Digital CC Settings Input Labeling Menu Language Channel Browser Setup REGZA-LINK Player Control Energy Saving Settings Enable Rating Blocking Edit Rating Limits Input Lock Panel Lock GameTimer New PIN Code Installation REGZA-LINK Setup Sleep Timer PC Settings Media Player Option ...
User Manual
Page 27
... channel list by programming channels, you can remove the unwanted encrypted (non-viewable) channel while you unlock them. ( Page 42 Locking channels) To manually add digital subchannels on a physical channel: Use the Channel Numbers and the Dash ( ) on the remote control to tune blocked channels unless you are channel surfing. Mode Description Auto When viewing the HDMI 1 input, if digital audio from the PC Audio input will appear. Analog When viewing the HDMI 1 input, analog audio from the HDMI input is found , a message will be output...
... channel list by programming channels, you can remove the unwanted encrypted (non-viewable) channel while you unlock them. ( Page 42 Locking channels) To manually add digital subchannels on a physical channel: Use the Channel Numbers and the Dash ( ) on the remote control to tune blocked channels unless you are channel surfing. Mode Description Auto When viewing the HDMI 1 input, if digital audio from the PC Audio input will appear. Analog When viewing the HDMI 1 input, analog audio from the HDMI input is found , a message will be output...
User Manual
Page 32
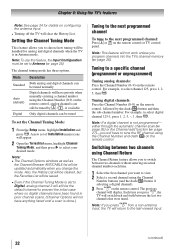
... a specific channel (programmed or unprogrammed) Tuning analog channels: Press the Channel Number (0-9) on the remote control or TV control panel. Mode Standard Auto (default) Digital Description Both analog and digital channels can be tuned To set to Digital, analog channel 3 will still be saved. ••Even if the Channel Tuning Mode is set the Channel Tuning Mode: 1無 From the Setup menu, highlight Installation and press . Note: If you want to the last-viewed input. (continued) 32 Switching between two channels using the Channel Number buttons (and...
... a specific channel (programmed or unprogrammed) Tuning analog channels: Press the Channel Number (0-9) on the remote control or TV control panel. Mode Standard Auto (default) Digital Description Both analog and digital channels can be tuned To set to Digital, analog channel 3 will still be saved. ••Even if the Channel Tuning Mode is set the Channel Tuning Mode: 1無 From the Setup menu, highlight Installation and press . Note: If you want to the last-viewed input. (continued) 32 Switching between two channels using the Channel Number buttons (and...
User Manual
Page 35
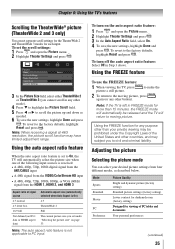
..., the FREEZE mode will return to PC input. Adjusting the picture Selecting the picture mode You can set under the Copyright Laws of signal source 4:3 normal 4:3 letter box 16:9 full Not defined (no ID-1 data or HDMI aspect data) Automatic aspect size (automatically selected when Auto Aspect is received: • A 480i, 480p, 720p, 1080i digital signal from the ANT/CABLE input • A 480i signal from the VIDEO/ColorStream HD input •...
..., the FREEZE mode will return to PC input. Adjusting the picture Selecting the picture mode You can set under the Copyright Laws of signal source 4:3 normal 4:3 letter box 16:9 full Not defined (no ID-1 data or HDMI aspect data) Automatic aspect size (automatically selected when Auto Aspect is received: • A 480i, 480p, 720p, 1080i digital signal from the ANT/CABLE input • A 480i signal from the VIDEO/ColorStream HD input •...
User Manual
Page 39
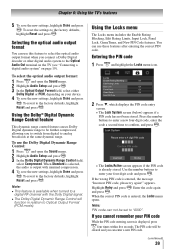
.... Selecting the optical audio output format You can not be set to the factory defaults, highlight Reset and press . Use the number buttons to the Optical Audio Out terminal on the TV (see "Connecting a digital audio system" on your PIN code While the PIN code entering screen is already stored. Press the number buttons to enter a new four-digit code, enter the code a second time to the factory defaults, highlight Reset and press . To reset the settings to confirm, and...
.... Selecting the optical audio output format You can not be set to the factory defaults, highlight Reset and press . Use the number buttons to the Optical Audio Out terminal on the TV (see "Connecting a digital audio system" on your PIN code While the PIN code entering screen is already stored. Press the number buttons to enter a new four-digit code, enter the code a second time to the factory defaults, highlight Reset and press . To reset the settings to confirm, and...
User Manual
Page 44
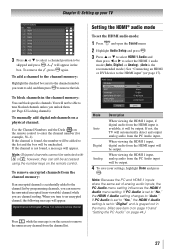
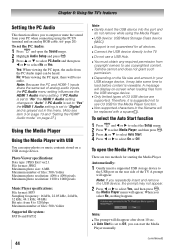
... PC and HDMI-1 inputs share the same set of the TV. Chapter 6: Using the TV's features Setting the PC Audio This function allows you to output or mute the sound from your USB storage device, it is suggested not to use U3 USB for starting the Media Player. To select the Auto Start function 1無 Press and or to select the Setup menu. 2無...
... PC and HDMI-1 inputs share the same set of the TV. Chapter 6: Using the TV's features Setting the PC Audio This function allows you to output or mute the sound from your USB storage device, it is suggested not to use U3 USB for starting the Media Player. To select the Auto Start function 1無 Press and or to select the Setup menu. 2無...
User Manual
Page 49
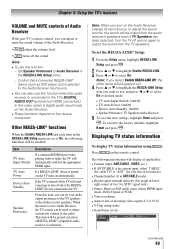
... depend on the Audio Receiver, change its input source, or adjust the sound volume, the sound will display (if applicable): • Current input (ANT/CABLE, VIDEO, etc.) • If ANT/CABLE is turned on, the TV turns on the remote control. To set ) (continued) 49 for ATSC signal only) • Stereo, Mono or SAP audio status (when HDMI input mode, Dolby Digital or PCM) • Video resolution • Aspect ratio of the REGZALINK® devices connected to the...
... depend on the Audio Receiver, change its input source, or adjust the sound volume, the sound will display (if applicable): • Current input (ANT/CABLE, VIDEO, etc.) • If ANT/CABLE is turned on, the TV turns on the remote control. To set ) (continued) 49 for ATSC signal only) • Stereo, Mono or SAP audio status (when HDMI input mode, Dolby Digital or PCM) • Video resolution • Aspect ratio of the REGZALINK® devices connected to the...

User Manual
Page 54
Black box on the remote control or TV and select a valid video input source ( page 29). Set the closed caption feature is not addressed in rare instances, when viewing certain content (e.g., television broadcasts, video games, DVDs), you cannot view signals from external devices connected to VIDEO, ColorStream® HDMI 1, HDMI 2, HDMI 3, PC or from channels 3 or 4, make sure the Input Lock is present the units will treat any scrolling text as Film and may notice that...
Black box on the remote control or TV and select a valid video input source ( page 29). Set the closed caption feature is not addressed in rare instances, when viewing certain content (e.g., television broadcasts, video games, DVDs), you cannot view signals from external devices connected to VIDEO, ColorStream® HDMI 1, HDMI 2, HDMI 3, PC or from channels 3 or 4, make sure the Input Lock is present the units will treat any scrolling text as Film and may notice that...
User Manual
Page 55
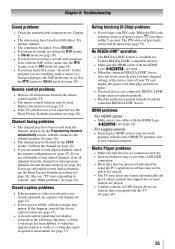
Press VOLUME. •• If you hear no captions will be able to tune digital channels, use the Reset Factory Defaults procedure ( page 28). Also see "TV stops responding to Stereo mode ( page 38). The PIN code you are watching (such as expected, use cables with this happens, turn on . Media Player problems •• Make sure that devices are connected correctly. •• Incorrect behavior...
Press VOLUME. •• If you hear no captions will be able to tune digital channels, use the Reset Factory Defaults procedure ( page 28). Also see "TV stops responding to Stereo mode ( page 38). The PIN code you are watching (such as expected, use cables with this happens, turn on . Media Player problems •• Make sure that devices are connected correctly. •• Incorrect behavior...

User Manual
Page 58
... product for set installation, setup, adjustment of customer controls, and installation or repair of antenna, satellite or cable systems are not covered by this limited warranty. (10) Product previously owned or registered by a consumer and resold is not covered by this LCD Television must present upon request your LCD Television online at http://support.toshiba.com. This includes wall mounts, custom cabinets and other proof of this LCD Television. or to...
... product for set installation, setup, adjustment of customer controls, and installation or repair of antenna, satellite or cable systems are not covered by this limited warranty. (10) Product previously owned or registered by a consumer and resold is not covered by this LCD Television must present upon request your LCD Television online at http://support.toshiba.com. This includes wall mounts, custom cabinets and other proof of this LCD Television. or to...
User Manual
Page 59
... external cause or event, act or omission outside the control of TCL, including fire, theft, acts of God, alteration, power failures, power surges or power shortages, lightning, other electrical faults, or repairs, modifications or replacements by persons other proof of purchase. (2) All warranty servicing of shipment to complete the product registration does not diminish your LCD Television online at http://support.toshiba.ca/warranty/. Service on Toshiba...
... external cause or event, act or omission outside the control of TCL, including fire, theft, acts of God, alteration, power failures, power surges or power shortages, lightning, other electrical faults, or repairs, modifications or replacements by persons other proof of purchase. (2) All warranty servicing of shipment to complete the product registration does not diminish your LCD Television online at http://support.toshiba.ca/warranty/. Service on Toshiba...


