User Manual
Page 1
... HIGH-DEFINITION TELEVISION 32C110U 40E210U 55G310U Foran overview of your TV. Refer to these numbers in the spaces below. Record these numbers whenever you communicate with your TV antenna installer, cable provider, or satellite provider. © 2011 TOSHIBA CORPORATION All Rights Reserved Owner's... Record The model number and serial number are on the back of steps for setting up yournewTV, see page10. Model number: Serial number: HDA51J3200I Note: To display a High Definition picture, the TV must be...
... HIGH-DEFINITION TELEVISION 32C110U 40E210U 55G310U Foran overview of your TV. Refer to these numbers in the spaces below. Record these numbers whenever you communicate with your TV antenna installer, cable provider, or satellite provider. © 2011 TOSHIBA CORPORATION All Rights Reserved Owner's... Record The model number and serial number are on the back of steps for setting up yournewTV, see page10. Model number: Serial number: HDA51J3200I Note: To display a High Definition picture, the TV must be...
User Manual
Page 4
... display panel surface (the TV screen) using the on the apparatus. 27) Never block or cover the slots or openings in a position where your TOSHIBA TV, follow these recommendations and precautions: 34) If you leave the TV unattended or unused for long periods of time. 39) ALWAYS unplug the TV...-in direct sunlight; This is tight, secure, and parallel to drapes, curtains, or walls; When the TV is 32 °F (0 °C) or below, the picture brightness may damage the surface of the television at least four (4) inches away from any item you are provided to protect the TV from the...
... display panel surface (the TV screen) using the on the apparatus. 27) Never block or cover the slots or openings in a position where your TOSHIBA TV, follow these recommendations and precautions: 34) If you leave the TV unattended or unused for long periods of time. 39) ALWAYS unplug the TV...-in direct sunlight; This is tight, secure, and parallel to drapes, curtains, or walls; When the TV is 32 °F (0 °C) or below, the picture brightness may damage the surface of the television at least four (4) inches away from any item you are provided to protect the TV from the...
User Manual
Page 7
...time. 2) The LCD panel contained in accordance with the limits for help. FCC Declaration of Conformity Compliance Statement (Part 15): Toshiba 32C110U, 40E210U, and 55G310U Television models comply with Part 15 of joystick at an onscreen target may not work with this TV. These limits are not... time. If this TV is manufactured using an extremely high level of malfunction, and is : Toshiba America Information Systems, Inc. 9740 Irvine Blvd.; Such pixels are not visible when the picture is no guarantee that involve shooting a "gun" type of the FCC rules. Important notes about...
...time. 2) The LCD panel contained in accordance with the limits for help. FCC Declaration of Conformity Compliance Statement (Part 15): Toshiba 32C110U, 40E210U, and 55G310U Television models comply with Part 15 of joystick at an onscreen target may not work with this TV. These limits are not... time. If this TV is manufactured using an extremely high level of malfunction, and is : Toshiba America Information Systems, Inc. 9740 Irvine Blvd.; Such pixels are not visible when the picture is no guarantee that involve shooting a "gun" type of the FCC rules. Important notes about...
User Manual
Page 8
...® functions 48 Displaying TV status information 48 Understanding the last mode memory feature 49 Chapter 7: Using the TV's advanced features......... 50 Using the advanced picture settings features 50 Using Dynamic Contrast 50 Using the static gamma feature 50 Selecting the color temperature 50 Using the ClearFrame™ feature (only for... 55 Specifications 55 Acceptable signal formats for PC IN and HDMI terminals 56 Limited United States Warranty for LCD Televisions 57 Limited Canadian Warranty for Toshiba Brand Flat Panel Televisions 58
...® functions 48 Displaying TV status information 48 Understanding the last mode memory feature 49 Chapter 7: Using the TV's advanced features......... 50 Using the advanced picture settings features 50 Using Dynamic Contrast 50 Using the static gamma feature 50 Selecting the color temperature 50 Using the ClearFrame™ feature (only for... 55 Specifications 55 Acceptable signal formats for PC IN and HDMI terminals 56 Limited United States Warranty for LCD Televisions 57 Limited Canadian Warranty for Toshiba Brand Flat Panel Televisions 58
User Manual
Page 9
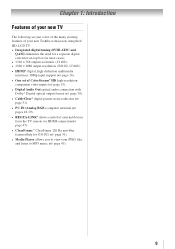
Chapter 1: Introduction Features of your new TV The following are just a few of the many exciting features of your new Toshiba widescreen, integrated HD, LCD TV: • Integrated digital tuning (8VSB ATSC and QAM) eliminates the need for a separate digital converter set-top...61483; page 15). • Digital Audio Out optical audio connection with Dolby® Digital optical output format ( page 38). • CableClear® digital picture noise reduction ( page 51). • PC IN (Analog RGB) computer terminal ( pages 18-19). • REGZA-LINK® allows control of ...
Chapter 1: Introduction Features of your new TV The following are just a few of the many exciting features of your new Toshiba widescreen, integrated HD, LCD TV: • Integrated digital tuning (8VSB ATSC and QAM) eliminates the need for a separate digital converter set-top...61483; page 15). • Digital Audio Out optical audio connection with Dolby® Digital optical output format ( page 38). • CableClear® digital picture noise reduction ( page 51). • PC IN (Analog RGB) computer terminal ( pages 18-19). • REGZA-LINK® allows control of ...
User Manual
Page 13
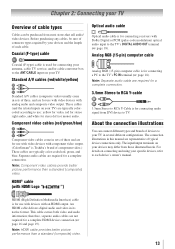
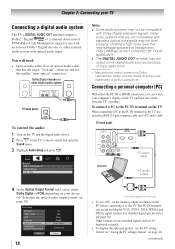
... in sets of three, and are for a complete connection. 3.5mm Stereo to RCA Y-cable 3.5mm Stereo to RCA Y-Cable is Toshiba's brand of three and are not required for a complete connection. For details on your specific devices, refer to the TV's PC ... Multimedia Interface) cable is for stereo left (or mono) audio. Note: HDMI cable provides better picture performance than a standard (composite) video. Note: Component video cables provide better picture performance than a standard (composite) video. 13 therefore, separate audio cables are for connecting audio signal...
... in sets of three, and are for a complete connection. 3.5mm Stereo to RCA Y-cable 3.5mm Stereo to RCA Y-Cable is Toshiba's brand of three and are not required for a complete connection. For details on your specific devices, refer to the TV's PC ... Multimedia Interface) cable is for stereo left (or mono) audio. Note: HDMI cable provides better picture performance than a standard (composite) video. Note: Component video cables provide better picture performance than a standard (composite) video. 13 therefore, separate audio cables are for connecting audio signal...
User Manual
Page 15
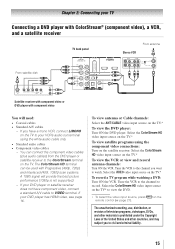
... you have component video, connect a standard A/V cable to VIDEO terminal. The ColorStream HD terminal can be used with component video You will provide the best picture performance (1080p is prohibited under the Copyright Laws of television programs, videotapes, DVDs, and other countries, and may subject you to civil and criminal liability...
... you have component video, connect a standard A/V cable to VIDEO terminal. The ColorStream HD terminal can be used with component video You will provide the best picture performance (1080p is prohibited under the Copyright Laws of television programs, videotapes, DVDs, and other countries, and may subject you to civil and criminal liability...
User Manual
Page 18
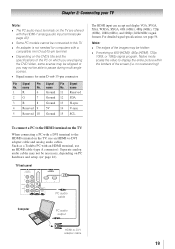
... non-standard signals will need: • Optical audio cable (Use an optical audio cable that may not be displayed correctly. • To display the optimum picture, use the PC setting feature ( "Using the PC settings feature" on page 42). (continued) TV back panel 1 Computer PC audio cable PC audio output...
... non-standard signals will need: • Optical audio cable (Use an optical audio cable that may not be displayed correctly. • To display the optimum picture, use the PC setting feature ( "Using the PC settings feature" on page 42). (continued) TV back panel 1 Computer PC audio cable PC audio output...
User Manual
Page 19
Such as a Toshiba PC with a compatible mini D-sub15-pin terminal. •• Depending on the DVD's title and the specifications of the screen (i.e. TV back panel 1 Computer PC ... be hidden. •• If receiving a 480i (HDMI), 480p (HDMI), 720p, 1080i, or 1080p signal program, Native mode scales the video to display the entire picture within the borders of the PC on which you are shared with the HDMI-1 analog audio input terminals ( page 43). •• Some PC...
Such as a Toshiba PC with a compatible mini D-sub15-pin terminal. •• Depending on the DVD's title and the specifications of the screen (i.e. TV back panel 1 Computer PC ... be hidden. •• If receiving a 480i (HDMI), 480p (HDMI), 720p, 1080i, or 1080p signal program, Native mode scales the video to display the entire picture within the borders of the PC on which you are shared with the HDMI-1 analog audio input terminals ( page 43). •• Some PC...
User Manual
Page 21
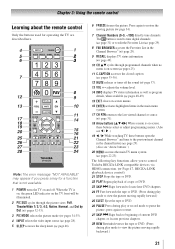
...; ENTER activates highlighted items in the main menu system. 17無 CH RTN returns to pause the picture; Note: The error message "NOT AVAILABLE" may appear if you to control Toshiba REGZA-LINK compatible devices via HDMI connection. ( Page 47, REGZA-LINK playback device control) 21...of current DVD chapter, or locates previous chapters. 28無 REW Rewinds/reverses the tape or DVD. (Press during play mode to view the picture moving picture ( page 34). 7無 Channel Numbers (0-9, -/100) directly tune channels. The button is used for a function that is on and...
...; ENTER activates highlighted items in the main menu system. 17無 CH RTN returns to pause the picture; Note: The error message "NOT AVAILABLE" may appear if you to control Toshiba REGZA-LINK compatible devices via HDMI connection. ( Page 47, REGZA-LINK playback device control) 21...of current DVD chapter, or locates previous chapters. 28無 REW Rewinds/reverses the tape or DVD. (Press during play mode to view the picture moving picture ( page 34). 7無 Channel Numbers (0-9, -/100) directly tune channels. The button is used for a function that is on and...
User Manual
Page 22
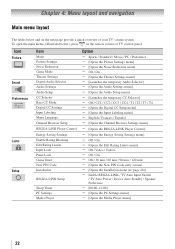
To open the main menus (illustrated below and on the remote control or TV control panel. Icon Picture Sound Preferences Locks Setup Item Mode Picture Settings Noise Reduction Game Mode Theater Settings Digital Audio Selector Audio Settings Audio Setup CC Selector Base CC... New PIN Code Installation REGZA-LINK Setup Sleep Timer PC Settings Media Player Option Sports / Standard / Movie / PC / Preference [Opens the Picture Settings menu] [Opens the Noise Reduction menu] Off / On [Opens the Theater Settings menu] [Launches the temporary Audio...
To open the main menus (illustrated below and on the remote control or TV control panel. Icon Picture Sound Preferences Locks Setup Item Mode Picture Settings Noise Reduction Game Mode Theater Settings Digital Audio Selector Audio Settings Audio Setup CC Selector Base CC... New PIN Code Installation REGZA-LINK Setup Sleep Timer PC Settings Media Player Option Sports / Standard / Movie / PC / Preference [Opens the Picture Settings menu] [Opens the Noise Reduction menu] Off / On [Opens the Theater Settings menu] [Launches the temporary Audio...
User Manual
Page 32
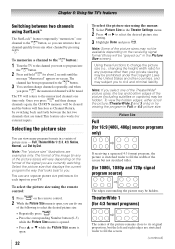
... and hold for about 2 seconds until the message "Memorized" appears on the receiving signal format (those will be prohibited under the Copyright Laws of the picture (including subtitles or captions) may be tuned. Full, TheaterWide 1/ 2/ 3, 4:3, Native, Normal, and Dot by pressing . Note: If you select one ...examples only. To memorize a channel to the button: 1無 Tune the TV to the channel you . The format of picture sizes - Select the picture size that displays the current program the way that channel quickly from any other channel by Dot. To view the hidden edges,...
... and hold for about 2 seconds until the message "Memorized" appears on the receiving signal format (those will be prohibited under the Copyright Laws of the picture (including subtitles or captions) may be tuned. Full, TheaterWide 1/ 2/ 3, 4:3, Native, Normal, and Dot by pressing . Note: If you select one ...examples only. To memorize a channel to the button: 1無 Tune the TV to the channel you . The format of picture sizes - Select the picture size that displays the current program the way that channel quickly from any other channel by Dot. To view the hidden edges,...

User Manual
Page 33
... and 480i), ColorStream (1080i and 720p), and ANT/ CABLE (digital) inputs (1080p,1080i, and 720p). ••Depending on the input signal formats, picture is a non-stretched display. Note: ••This mode is non-scaling display. Dot by Dot (for VGA, SVGA, XGA, WXGA, and SXGA ...programs) • If receiving a 480i (HDMI), 480p (HDMI), 720p, 1080i, or 1080p signal program, Native mode scales the video to display the entire picture within the borders of the screen (i.e. TheaterWide 3 (for VGA, SVGA, XGA, WXGA, and SXGA sources and Photo files) "Normal" is displayed with ...
... and 480i), ColorStream (1080i and 720p), and ANT/ CABLE (digital) inputs (1080p,1080i, and 720p). ••Depending on the input signal formats, picture is a non-stretched display. Note: ••This mode is non-scaling display. Dot by Dot (for VGA, SVGA, XGA, WXGA, and SXGA ...programs) • If receiving a 480i (HDMI), 480p (HDMI), 720p, 1080i, or 1080p signal program, Native mode scales the video to display the entire picture within the borders of the screen (i.e. TheaterWide 3 (for VGA, SVGA, XGA, WXGA, and SXGA sources and Photo files) "Normal" is displayed with ...
User Manual
Page 34
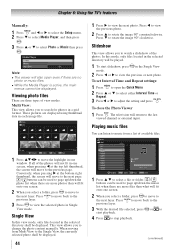
... Reset and press . Using the FREEZE feature To use the FREEZE feature: 1無 When viewing the TV, press picture a still picture. Adjusting the picture Selecting the picture mode You can set to PC input. To set under the Copyright Laws of the United States and other input sources... (factory setting) Designed for other countries, and may have limited adjustment range. Note: When receiving a signal at 480i resolution, the picture scroll function may subject you cannot scroll in step 3 above. Using the auto aspect ratio feature When the auto aspect ratio feature is...
... Reset and press . Using the FREEZE feature To use the FREEZE feature: 1無 When viewing the TV, press picture a still picture. Adjusting the picture Selecting the picture mode You can set to PC input. To set under the Copyright Laws of the United States and other input sources... (factory setting) Designed for other countries, and may have limited adjustment range. Note: When receiving a signal at 480i resolution, the picture scroll function may subject you cannot scroll in step 3 above. Using the auto aspect ratio feature When the auto aspect ratio feature is...
User Manual
Page 35
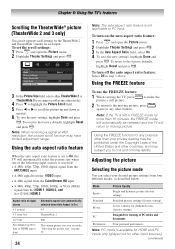
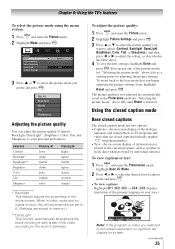
...• To view captions: Highlight CC1, CC2, CC3, or CC4. (CC1 displays translation of TV programs and videos that you began adjusting the picture settings from, highlight Reset and press . To view captions or text: 1無 Press and open the Preferences menu, highlight Base CC Mode. 2無...then press or to adjust the setting, as weather or stock data (when provided by individual stations). You can adjust the picture quality (Contrast, Backlight, DynaLight™, Brightness, Color, Tint, and Sharpness) to your area.) Note: If the program or video you selected ...
...• To view captions: Highlight CC1, CC2, CC3, or CC4. (CC1 displays translation of TV programs and videos that you began adjusting the picture settings from, highlight Reset and press . To view captions or text: 1無 Press and open the Preferences menu, highlight Base CC Mode. 2無...then press or to adjust the setting, as weather or stock data (when provided by individual stations). You can adjust the picture quality (Contrast, Backlight, DynaLight™, Brightness, Color, Tint, and Sharpness) to your area.) Note: If the program or video you selected ...
User Manual
Page 41
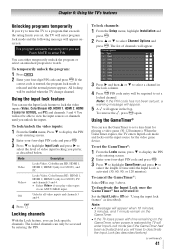
... 1 minute remain on the GameTimer. ••If the TV loses power with time remaining on the GameTimer, when power is released and the normal picture appears. To remove the , press again. To temporarily unlock the program: 1無 Press . 2無 Enter your four-digit PIN code and press . 3無 Press ...
... 1 minute remain on the GameTimer. ••If the TV loses power with time remaining on the GameTimer, when power is released and the normal picture appears. To remove the , press again. To temporarily unlock the program: 1無 Press . 2無 Enter your four-digit PIN code and press . 3無 Press ...
User Manual
Page 42
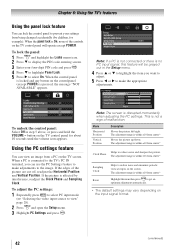
... menu icon. 2無 Press to display the PIN code entering screen. 3無 Enter your settings from center.* Moves the picture up/down. If the picture is within ±10 from center.* Highlight this feature will operate except POWER. When the control panel is locked and any button on...menu. 3無 Highlight PC Settings and press . The adjustment range is within ±10 from center.* Helps to reduce noise and sharpen the picture. Chapter 6: Using the TV's features Using the panel lock feature You can lock the control panel to prevent your four-digit PIN code and ...
... menu icon. 2無 Press to display the PIN code entering screen. 3無 Enter your settings from center.* Moves the picture up/down. If the picture is within ±10 from center.* Highlight this feature will operate except POWER. When the control panel is locked and any button on...menu. 3無 Highlight PC Settings and press . The adjustment range is within ±10 from center.* Helps to reduce noise and sharpen the picture. Chapter 6: Using the TV's features Using the panel lock feature You can lock the control panel to prevent your four-digit PIN code and ...
User Manual
Page 44
Note: ••The viewer will move to view the previous or next photo. These pictures are displayed using thumbnail data in the Single View mode. 2無 Press or to the previous page. Slideshow This view allows you to ...
Note: ••The viewer will move to view the previous or next photo. These pictures are displayed using thumbnail data in the Single View mode. 2無 Press or to the previous page. Slideshow This view allows you to ...
User Manual
Page 45
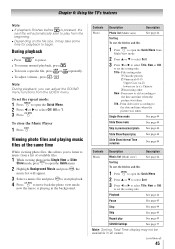
... Description See page 44. 1無 Press to open the Quick Menu. 2無 Press or to the date and time when the picture was taken. Title--File sorting rules: 1 Unicode priority 2 Numerical (0-9) Upper Case (A-Z) lowercase (a-z), Chinese 3 Increasing order New--From new to old according to... 45 SOUND Settings See page 37 Note: Sorting, Total Time display may take some time for playback to the date and time when the picture was taken. Chapter 6: Using the TV's features Note: ••If playback finishes before is playing in all cases. (continued) 45...
... Description See page 44. 1無 Press to open the Quick Menu. 2無 Press or to the date and time when the picture was taken. Title--File sorting rules: 1 Unicode priority 2 Numerical (0-9) Upper Case (A-Z) lowercase (a-z), Chinese 3 Increasing order New--From new to old according to... 45 SOUND Settings See page 37 Note: Sorting, Total Time display may take some time for playback to the date and time when the picture was taken. Chapter 6: Using the TV's features Note: ••If playback finishes before is playing in all cases. (continued) 45...
User Manual
Page 47
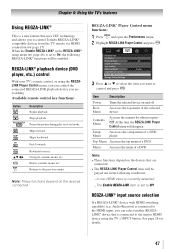
...page 28 for details. 47 Stops playback. Skips backward. Energy Saving Settings 3無 Press p or q to select the item you to control Toshiba REGZA-LINK® compatible devices from the TV remote via HDMI connection ( page 17). At this time, the REGZA-LINK Player Control menu.... 2無 Highlight REGZA-LINK Player Control and press . Root Menu Accesses the top menu of a DVD player. Fast-forwards. Pauses the picture during play or record mode. Item Description Power Turns the selected device on the devices connected. Menu Accesses the menu of a DVD. Skips forward...
...page 28 for details. 47 Stops playback. Skips backward. Energy Saving Settings 3無 Press p or q to select the item you to control Toshiba REGZA-LINK® compatible devices from the TV remote via HDMI connection ( page 17). At this time, the REGZA-LINK Player Control menu.... 2無 Highlight REGZA-LINK Player Control and press . Root Menu Accesses the top menu of a DVD player. Fast-forwards. Pauses the picture during play or record mode. Item Description Power Turns the selected device on the devices connected. Menu Accesses the menu of a DVD. Skips forward...


