User Guide
Page 7
... Such pixels are not an indication of joystick at optimal energy efficiency, select [Home] mode during initial activation. Changing Picture Settings may cause harmful interference to Part 15 of this television meet ENERGY STAR® requirements. To return to the equipment, ... not light, remains constantly lit, etc.). marks. 7 FCC Declaration of Conformity Compliance Statement (Part 15): Toshiba 19L4200U, 24L4200U, 32L4200U, 40L5200U, 46L5200U, 50L5200U Television models comply with Part 15 of light) that interference will disappear in a short period of precision technology...
... Such pixels are not an indication of joystick at optimal energy efficiency, select [Home] mode during initial activation. Changing Picture Settings may cause harmful interference to Part 15 of this television meet ENERGY STAR® requirements. To return to the equipment, ... not light, remains constantly lit, etc.). marks. 7 FCC Declaration of Conformity Compliance Statement (Part 15): Toshiba 19L4200U, 24L4200U, 32L4200U, 40L5200U, 46L5200U, 50L5200U Television models comply with Part 15 of light) that interference will disappear in a short period of precision technology...
User Guide
Page 11
... channel (programmed or unprogrammed 70 Switching between two channels using Channel Return 70 Switching between two channels using SurfLock 70 Selecting the picture size 71 Full 72 TheaterWide 1 73 TheaterWide 2 73 TheaterWide 3 74 Native 74 4:3 75 Normal 75 Dot by Dot 75 Scrolling the ...77 Selecting the cinema mode 78 Using the FREEZE feature 78 Adjusting the picture 79 Selecting the picture mode 79 Adjusting the picture quality 80 Using closed captions 81 Base closed captions 81 Digital CC settings 82 CC Selector 83 Adjusting the audio 84 Muting the sound 84 Using...
... channel (programmed or unprogrammed 70 Switching between two channels using Channel Return 70 Switching between two channels using SurfLock 70 Selecting the picture size 71 Full 72 TheaterWide 1 73 TheaterWide 2 73 TheaterWide 3 74 Native 74 4:3 75 Normal 75 Dot by Dot 75 Scrolling the ...77 Selecting the cinema mode 78 Using the FREEZE feature 78 Adjusting the picture 79 Selecting the picture mode 79 Adjusting the picture quality 80 Using closed captions 81 Base closed captions 81 Digital CC settings 82 CC Selector 83 Adjusting the audio 84 Muting the sound 84 Using...
User Guide
Page 13
... information 114 Understanding the last mode memory feature ......115 Chapter 7: Using the TV's Advanced Features 116 Using the advanced picture settings 116 Dynamic Contrast 116 Static Gamma 117 Color temperature 117 ClearFrame™ (L5200U Series 118 Film Stabilization (L5200U Series 119...CableClear® digital Noise Reduction 120 MPEG Noise Reduction 120 Game Mode 121 Chapter 8: Troubleshooting 122 General troubleshooting 122 Picture problems 123 Sound problems 125 Remote control problems 125 Channel tuning problems 126 Closed caption problems 126 Rating blocking (V-Chip...
... information 114 Understanding the last mode memory feature ......115 Chapter 7: Using the TV's Advanced Features 116 Using the advanced picture settings 116 Dynamic Contrast 116 Static Gamma 117 Color temperature 117 ClearFrame™ (L5200U Series 118 Film Stabilization (L5200U Series 119...CableClear® digital Noise Reduction 120 MPEG Noise Reduction 120 Game Mode 121 Chapter 8: Troubleshooting 122 General troubleshooting 122 Picture problems 123 Sound problems 125 Remote control problems 125 Channel tuning problems 126 Closed caption problems 126 Rating blocking (V-Chip...
User Guide
Page 16
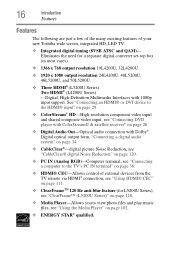
...IN terminal" on page 36. ❖ HDMI® CEC-Allows control of your new Toshiba wide screen, integrated HD, LED TV: ❖ Integrated digital tuning (8VSB ATSC and ...QAM)- "Connecting a digital audio system" on page 34 ❖ CableClear®-digital picture Noise Reduction, see "CableClear® digital Noise Reduction" on page 120. ❖ PC IN...(for a separate digital converter set-top box (in most cases). ❖ 1366 x 768 output resolution 19L4200U, 32L4200U. ❖ 1920 x 1080 output resolution 24L4200U, 40L5200U, 46L5200U, and 50L5200U. ❖ Three HDMI®...
...IN terminal" on page 36. ❖ HDMI® CEC-Allows control of your new Toshiba wide screen, integrated HD, LED TV: ❖ Integrated digital tuning (8VSB ATSC and ...QAM)- "Connecting a digital audio system" on page 34 ❖ CableClear®-digital picture Noise Reduction, see "CableClear® digital Noise Reduction" on page 120. ❖ PC IN...(for a separate digital converter set-top box (in most cases). ❖ 1366 x 768 output resolution 19L4200U, 32L4200U. ❖ 1920 x 1080 output resolution 24L4200U, 40L5200U, 46L5200U, and 50L5200U. ❖ Three HDMI®...

User Guide
Page 23
... Multimedia Interface) cable connects to video devices with component video output. (ColorStream® is Toshiba's brand of component video.) These cables are typically color-coded red, green, and blue....cables (and the related inputs on page 29. NOTE Component video cables provide better picture quality than composite video cables. Separate audio cables are not required, see "Connecting an... (Sample Illustration) Standard AV cables Standard A/V cables (composite video) usually come in sets of three and connects with video devices with analog audio and composite video output. An ...
... Multimedia Interface) cable connects to video devices with component video output. (ColorStream® is Toshiba's brand of component video.) These cables are typically color-coded red, green, and blue....cables (and the related inputs on page 29. NOTE Component video cables provide better picture quality than composite video cables. Separate audio cables are not required, see "Connecting an... (Sample Illustration) Standard AV cables Standard A/V cables (composite video) usually come in sets of three and connects with video devices with analog audio and composite video output. An ...
User Guide
Page 38
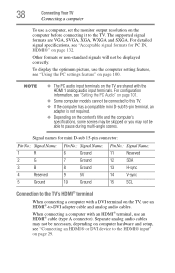
...-standard signals will not be necessary, depending on computer hardware and setup, see "Using the PC settings feature" on the TV are VGA, SVGA, XGA, WXGA and SXGA. To display the optimum picture, use the computer setting feature, see "Connecting an HDMI® or DVI device to pause during multi-angle scenes. Separate...
...-standard signals will not be necessary, depending on computer hardware and setup, see "Using the PC settings feature" on the TV are VGA, SVGA, XGA, WXGA and SXGA. To display the optimum picture, use the computer setting feature, see "Connecting an HDMI® or DVI device to pause during multi-angle scenes. Separate...

User Guide
Page 44
... sleep timer, see "Switching between two channels using the Channel Browser" on page 109. 6 The FREEZE button freezes the picture. Press again to the last viewed channel or source, see "Setting the sleep timer" on page 65. 11 The C. The (Dash 100) button allows you to enter two part channel ..." on page 66. 8 The FAV button accesses the Favorites List in the main menu system. 17 The CH RTN button returns to restore the moving picture, see "Tuning channels using Channel Return" on page 78. 7 The Channel Number buttons (0-9, and Dash 100) directly tune channels. 44 Using the Remote ...
... sleep timer, see "Switching between two channels using the Channel Browser" on page 109. 6 The FREEZE button freezes the picture. Press again to the last viewed channel or source, see "Setting the sleep timer" on page 65. 11 The C. The (Dash 100) button allows you to enter two part channel ..." on page 66. 8 The FAV button accesses the Favorites List in the main menu system. 17 The CH RTN button returns to restore the moving picture, see "Tuning channels using Channel Return" on page 78. 7 The Channel Number buttons (0-9, and Dash 100) directly tune channels. 44 Using the Remote ...

User Guide
Page 46
Icon Picture Sound Item Mode Picture Settings Noise Reduction Game Mode Theater Settings Digital Audio Selector Audio Settings Audio Setup Option Dynamic/Standard/Movie/PC/Preference Opens the Picture Settings menu Opens the Noise Reduction menu Off/On Opens the Theater Settings menu Launches the temporary Audio Selector Opens the Audio Settings menu Opens the Audio Setup menu 46 Chapter...
Icon Picture Sound Item Mode Picture Settings Noise Reduction Game Mode Theater Settings Digital Audio Selector Audio Settings Audio Setup Option Dynamic/Standard/Movie/PC/Preference Opens the Picture Settings menu Opens the Noise Reduction menu Off/On Opens the Theater Settings menu Launches the temporary Audio Selector Opens the Audio Settings menu Opens the Audio Setup menu 46 Chapter...

User Guide
Page 78
...obtained by setting the Cinema Mode to Film. To set the Cinema Mode to Video, select Video in FREEZE mode for 480i and 1080i signals) 1 Press the MENU button and open the Picture menu. 2 Highlight Picture Settings, and then press the ENTER button. 3 Highlight Advanced Picture Settings, and... then press the ENTER button. 4 In the Cinema Mode field, select Film. 5 To save the new settings, highlight Done and press the ENTER button....
...obtained by setting the Cinema Mode to Film. To set the Cinema Mode to Video, select Video in FREEZE mode for 480i and 1080i signals) 1 Press the MENU button and open the Picture menu. 2 Highlight Picture Settings, and then press the ENTER button. 3 Highlight Advanced Picture Settings, and... then press the ENTER button. 4 In the Cinema Mode field, select Film. 5 To save the new settings, highlight Done and press the ENTER button....

User Guide
Page 79
... menu system: 1 Press the MENU button and open the Picture menu. 2 Highlight Mode, and then press the ENTER button. (Sample Image) Picture menu - Mode: Dynamic Standard Movie PC Preference Description: Bright and dynamic picture (factory setting) Standard picture settings (factory setting) Lower contrast for darkened room (factory setting) Designed for viewing of PC tables and documents Your personal...
... menu system: 1 Press the MENU button and open the Picture menu. 2 Highlight Mode, and then press the ENTER button. (Sample Image) Picture menu - Mode: Dynamic Standard Movie PC Preference Description: Bright and dynamic picture (factory setting) Standard picture settings (factory setting) Lower contrast for darkened room (factory setting) Designed for viewing of PC tables and documents Your personal...
User Guide
Page 80
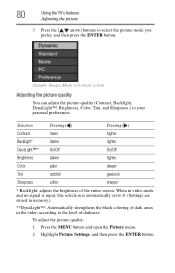
... sharper * Backlight: adjusts the brightness of darkness. To adjust the picture quality: 1 Press the MENU button and open the Picture menu. 2 Highlight Picture Settings, and then press the ENTER button. 80 Using the TV's features Adjusting the picture 3 Press the ( / arrow) buttons to select the picture mode you prefer, and then press the ENTER button. (Sample...
... sharper * Backlight: adjusts the brightness of darkness. To adjust the picture quality: 1 Press the MENU button and open the Picture menu. 2 Highlight Picture Settings, and then press the ENTER button. 80 Using the TV's features Adjusting the picture 3 Press the ( / arrow) buttons to select the picture mode you prefer, and then press the ENTER button. (Sample...

User Guide
Page 81
... Base CC Mode. 2 Press the ( / arrow) buttons to the current program, such as a starting point for adjusting the picture settings. Using closed captions Base closed captions Closed caption mode has two options: ❖ Captions-An onscreen display of the dialogue, narration and... sound effects of TV programs and videos that you began adjusting the picture settings from, highlight Reset, and then press the ENTER button. The picture qualities you wish to adjust (Contrast, Backlight, DynaLight, Brightness, Color, Tint, or Sharpness), and ...
... Base CC Mode. 2 Press the ( / arrow) buttons to the current program, such as a starting point for adjusting the picture settings. Using closed captions Base closed captions Closed caption mode has two options: ❖ Captions-An onscreen display of the dialogue, narration and... sound effects of TV programs and videos that you began adjusting the picture settings from, highlight Reset, and then press the ENTER button. The picture qualities you wish to adjust (Contrast, Backlight, DynaLight, Brightness, Color, Tint, or Sharpness), and ...
User Guide
Page 116
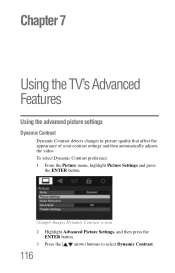
To select Dynamic Contrast preference: 1 From the Picture menu, highlight Picture Settings and press the ENTER button. (Sample Image) Dynamic Contrast screen 2 Highlight Advanced Picture Settings, and then press the ENTER button. 3 Press the ( / arrow) buttons to select Dynamic Contrast. 116 Chapter 7 Using the TV's Advanced Features Using the advanced picture settings Dynamic Contrast Dynamic Contrast detects changes in picture quality that affect the appearance of your contrast settings and then automatically adjusts the video.
To select Dynamic Contrast preference: 1 From the Picture menu, highlight Picture Settings and press the ENTER button. (Sample Image) Dynamic Contrast screen 2 Highlight Advanced Picture Settings, and then press the ENTER button. 3 Press the ( / arrow) buttons to select Dynamic Contrast. 116 Chapter 7 Using the TV's Advanced Features Using the advanced picture settings Dynamic Contrast Dynamic Contrast detects changes in picture quality that affect the appearance of your contrast settings and then automatically adjusts the video.

User Guide
Page 117
Color temperature You can change the Static Gamma setting, the picture mode automatically changes to Preference. To adjust the static gamma settings: 1 Press the MENU button and open the Picture menu. 2 Highlight Picture Settings, and then press the ENTER button. 3 Highlight Advanced Picture Settings, and then press the ENTER button. ❖ ... Temperatures (Cool, Medium, and Warm), as described below. Using the TV's Advanced Features Using the advanced picture settings 117 4 Press the ( / arrow) buttons to adjust the Static Gamma.)The adjustment range is increased. 4 To save the new...
Color temperature You can change the Static Gamma setting, the picture mode automatically changes to Preference. To adjust the static gamma settings: 1 Press the MENU button and open the Picture menu. 2 Highlight Picture Settings, and then press the ENTER button. 3 Highlight Advanced Picture Settings, and then press the ENTER button. ❖ ... Temperatures (Cool, Medium, and Warm), as described below. Using the TV's Advanced Features Using the advanced picture settings 117 4 Press the ( / arrow) buttons to adjust the Static Gamma.)The adjustment range is increased. 4 To save the new...
User Guide
Page 118
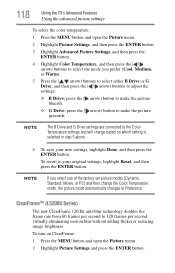
... color temperature: 1 Press the MENU button and open the Picture menu. 2 Highlight Picture Settings and press the ENTER button. NOTE The B Drive and G Drive settings are connected to the Color Temperature settings and will change based on ClearFrame: 1 Press the MENU button and open the Picture menu. 2 Highlight Picture Settings, and then press the ENTER button. 3 Highlight Advanced...
... color temperature: 1 Press the MENU button and open the Picture menu. 2 Highlight Picture Settings and press the ENTER button. NOTE The B Drive and G Drive settings are connected to the Color Temperature settings and will change based on ClearFrame: 1 Press the MENU button and open the Picture menu. 2 Highlight Picture Settings, and then press the ENTER button. 3 Highlight Advanced...
User Guide
Page 119
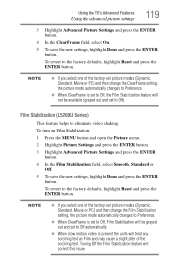
... turn on Film Stabilization: 1 Press the MENU button and open the Picture menu. 2 Highlight Picture Settings and press the ENTER button. 3 Highlight Advanced Picture Settings and press the ENTER button. 4 In the Film Stabilization field, select Smooth, Standard or Off. 5 To save the new settings, highlight Done and press the ENTER button. To revert to Off).
... turn on Film Stabilization: 1 Press the MENU button and open the Picture menu. 2 Highlight Picture Settings and press the ENTER button. 3 Highlight Advanced Picture Settings and press the ENTER button. 4 In the Film Stabilization field, select Smooth, Standard or Off. 5 To save the new settings, highlight Done and press the ENTER button. To revert to Off).
User Guide
Page 120
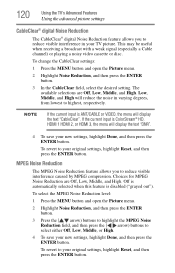
... visible interference in varying degrees, from lowest to highest, respectively. 120 Using the TV's Advanced Features Using the advanced picture settings CableClear® digital Noise Reduction The CableClear® digital Noise Reduction feature allows you to reduce visible interference caused by MPEG... with a weak signal (especially a Cable channel) or playing a noisy video cassette or disc. To change the CableClear settings: 1 Press the MENU button and open the Picture menu. 2 Highlight Noise Reduction, and then press the ENTER button. 3 Press the ( / arrow) buttons to highlight...
... visible interference in varying degrees, from lowest to highest, respectively. 120 Using the TV's Advanced Features Using the advanced picture settings CableClear® digital Noise Reduction The CableClear® digital Noise Reduction feature allows you to reduce visible interference caused by MPEG... with a weak signal (especially a Cable channel) or playing a noisy video cassette or disc. To change the CableClear settings: 1 Press the MENU button and open the Picture menu. 2 Highlight Noise Reduction, and then press the ENTER button. 3 Press the ( / arrow) buttons to highlight...
User Guide
Page 121
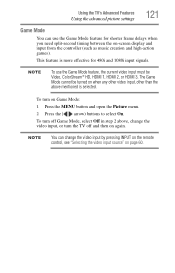
... is more effective for shorter frame delays when you need split-second timing between the on Game Mode: 1 Press the MENU button and open the Picture menu. 2 Press the ( / arrow) buttons to select On. The Game Mode cannot be Video, ColorStream® HD, HDMI 1, HDMI 2, or HDMI 3. NOTE You can use... video input by pressing INPUT on the remote control, see "Selecting the video input source" on again. Using the TV's Advanced Features Using the advanced picture settings 121 Game Mode You can change the video input, or turn off and then on page 60.
... is more effective for shorter frame delays when you need split-second timing between the on Game Mode: 1 Press the MENU button and open the Picture menu. 2 Press the ( / arrow) buttons to select On. The Game Mode cannot be Video, ColorStream® HD, HDMI 1, HDMI 2, or HDMI 3. NOTE You can use... video input by pressing INPUT on the remote control, see "Selecting the video input source" on again. Using the TV's Advanced Features Using the advanced picture settings 121 Game Mode You can change the video input, or turn off and then on page 60.
User Guide
Page 123
... or channel 3 or 4. Noisy picture. Ensure the power cord is plugged in the TV picture, see "CableClear® digital Noise Reduction" on the TV, no picture appears when you cannot view signals from external devices connected to Off, see "Using the advanced picture settings" on . The station may be... having broadcast difficulties. If no device is set the CableClear® feature to an input on page 120. If you select that the Input Lock ...
... or channel 3 or 4. Noisy picture. Ensure the power cord is plugged in the TV picture, see "CableClear® digital Noise Reduction" on the TV, no picture appears when you cannot view signals from external devices connected to Off, see "Using the advanced picture settings" on . The station may be... having broadcast difficulties. If no device is set the CableClear® feature to an input on page 120. If you select that the Input Lock ...
User Guide
Page 138
Index A advanced picture settings CableClear® digital Noise Reduction 120 Color temperature 117 Dynamic Contrast 116 MPEG Noise Reduction 120 Static Gamma 117 using 116 audio adjusting quality 86 ... output format 88 stereo/SAP broadcasts 85 Audyssey Dynamic Volume® using 87 Auto Aspect using 77 auto power down set 110 Auto Start function 138 Media Player 103 AV input mode setting 56 B blocking programs Canada rating 95 C cables 3.5mm to RCA Y-cable 24 analog RGB (15-pin) 24 coaxial (F-type...
Index A advanced picture settings CableClear® digital Noise Reduction 120 Color temperature 117 Dynamic Contrast 116 MPEG Noise Reduction 120 Static Gamma 117 using 116 audio adjusting quality 86 ... output format 88 stereo/SAP broadcasts 85 Audyssey Dynamic Volume® using 87 Auto Aspect using 77 auto power down set 110 Auto Start function 138 Media Player 103 AV input mode setting 56 B blocking programs Canada rating 95 C cables 3.5mm to RCA Y-cable 24 analog RGB (15-pin) 24 coaxial (F-type...


