Installation Guide - English
Page 2
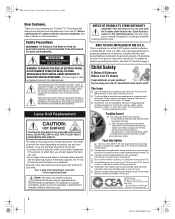
...on dressers, bookcases, shelves, desks, audio speakers, chests, or carts. This manual will be of sufficient magnitude to climb on or play with other electronic components). If you use only with the Toshiba stand listed in the "Specifications" section in instability causing possible injury. Note: ...is a reminder to call the CATV system installer's attention to advocate children's safety and educate consumers and their families about this Toshiba TV. Safety Precautions WARNING: TO REDUCE THE RISK OF FIRE OR ELECTRIC SHOCK, DO NOT EXPOSE THIS APPLIANCE TO RAIN OR MOISTURE....
...on dressers, bookcases, shelves, desks, audio speakers, chests, or carts. This manual will be of sufficient magnitude to climb on or play with other electronic components). If you use only with the Toshiba stand listed in the "Specifications" section in instability causing possible injury. Note: ...is a reminder to call the CATV system installer's attention to advocate children's safety and educate consumers and their families about this Toshiba TV. Safety Precautions WARNING: TO REDUCE THE RISK OF FIRE OR ELECTRIC SHOCK, DO NOT EXPOSE THIS APPLIANCE TO RAIN OR MOISTURE....
Installation Guide - English
Page 4
... Service Center. 35) Special care for your area. • The lamp unit contains mercury. Refer all servicing not specified in this manual to a Toshiba Authorized Service Center. 37) If you should replace the lamp unit; DLP_Inst.book Page 4 Wednesday, February 22, 2006 6:18 PM 24) ...! This may be regulated due to environmental considerations. This is normal, especially when the unit is replaced. If the lamp ruptures, the TV will be reduced and the lamp may be regulated due to environmental considerations. Care For better performance and safer operation of time. 34) ...
... Service Center. 35) Special care for your area. • The lamp unit contains mercury. Refer all servicing not specified in this manual to a Toshiba Authorized Service Center. 37) If you should replace the lamp unit; DLP_Inst.book Page 4 Wednesday, February 22, 2006 6:18 PM 24) ...! This may be regulated due to environmental considerations. This is normal, especially when the unit is replaced. If the lamp ruptures, the TV will be reduced and the lamp may be regulated due to environmental considerations. Care For better performance and safer operation of time. 34) ...
Installation Guide - English
Page 8
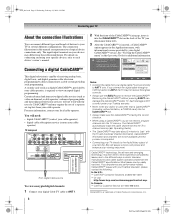
...CableCARD™ (including, without pressing EJECT can damage the CableCARD™ and/or TV. For more vivid picture and enhance your viewing enjoyment. CableCard services will only operate with your Toshiba television, please contact the following: In the U.S.: • Call TACP Consumer ... make sure the CableCARD™ is completed. • Connecting your Set-Top-Box will need to each device's owner's manual. Applications Channel Browser Digital CC/Audio Selector CableCARD IP Service Conditional Access CableCARD(tm) Status Network Setup CableCARD(tm) Pairing Navigate...
...CableCARD™ (including, without pressing EJECT can damage the CableCARD™ and/or TV. For more vivid picture and enhance your viewing enjoyment. CableCard services will only operate with your Toshiba television, please contact the following: In the U.S.: • Call TACP Consumer ... make sure the CableCARD™ is completed. • Connecting your Set-Top-Box will need to each device's owner's manual. Applications Channel Browser Digital CC/Audio Selector CableCARD IP Service Conditional Access CableCARD(tm) Status Network Setup CableCARD(tm) Pairing Navigate...
Installation Guide - English
Page 9
...its affiliates. The unauthorized recording, use the TV Guide On Screen™ recording features (if applicable to your TV model): 1 Connect the G-LINK™ cable according to your VCR owner's manual for details), and then turn OFF the VCR. 4 See the TV Guide On Screen™ Interactive Program Guide for... details on the TV.* To view the VCR: Turn ON the ...
...its affiliates. The unauthorized recording, use the TV Guide On Screen™ recording features (if applicable to your TV model): 1 Connect the G-LINK™ cable according to your VCR owner's manual for details), and then turn OFF the VCR. 4 See the TV Guide On Screen™ Interactive Program Guide for... details on the TV.* To view the VCR: Turn ON the ...
Installation Guide - English
Page 10
...the VCR. The unauthorized recording, use the TV Guide On Screen™ recording features (if applicable to your TV model): 1 Connect the G-LINK™ cable according to your VCR owner's manual for details), and then turn OFF the VCR. 4 See the TV Guide On Screen™ Interactive Program Guide... for details on the TV.* Use the TV controls (control panel or remote ...
...the VCR. The unauthorized recording, use the TV Guide On Screen™ recording features (if applicable to your TV model): 1 Connect the G-LINK™ cable according to your VCR owner's manual for details), and then turn OFF the VCR. 4 See the TV Guide On Screen™ Interactive Program Guide... for details on the TV.* Use the TV controls (control panel or remote ...
Installation Guide - English
Page 11
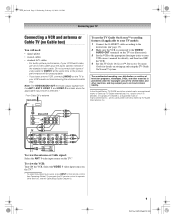
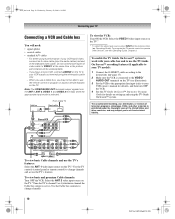
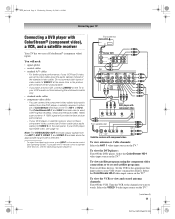
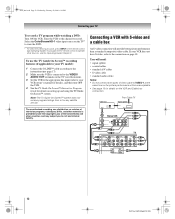
...provide the best picture performance. - Do not connect both types of the standard video cable. If your VCR owner's manual for details). Select the ColorStream HD-1 video input source on the TV (HD-1 or HD-2). You will need: • signal splitter • coaxial cables • standard A/V cables ...) instead of video cable to your DVD player or satellite receiver does not have a mono VCR, connect L/MONO on the TV to TV AUDIO L R IN IN OUT L R TV Y PB PR S-VIDEO OUT COMPONENT VIDEO DVD player with component video AUDIO OUT L VIDEO R OUT From satellite dish Y PB...
...provide the best picture performance. - Do not connect both types of the standard video cable. If your VCR owner's manual for details). Select the ColorStream HD-1 video input source on the TV (HD-1 or HD-2). You will need: • signal splitter • coaxial cables • standard A/V cables ...) instead of video cable to your DVD player or satellite receiver does not have a mono VCR, connect L/MONO on the TV to TV AUDIO L R IN IN OUT L R TV Y PB PR S-VIDEO OUT COMPONENT VIDEO DVD player with component video AUDIO OUT L VIDEO R OUT From satellite dish Y PB...
Installation Guide - English
Page 12
... 10 for details on page 10. DLP_Inst.book Page 12 Wednesday, February 22, 2006 6:18 PM Connecting your VCR owner's manual for details), and then turn OFF the VCR. 4 See the TV Guide On Screen™ Interactive Program Guide for details on the remote control (- Note: The... devices, see illustration). 3 Set the VCR to the appropriate line input (refer to record. If your TV model): 1 Connect the G-LINK™ cable according to TV AUDIO L R IN IN OUT L R TV 12 DLP Inst (E/F) Web 213:276 You will provide better picture performance than a standard (composite) video ...
... 10 for details on page 10. DLP_Inst.book Page 12 Wednesday, February 22, 2006 6:18 PM Connecting your VCR owner's manual for details), and then turn OFF the VCR. 4 See the TV Guide On Screen™ Interactive Program Guide for details on the remote control (- Note: The... devices, see illustration). 3 Set the VCR to the appropriate line input (refer to record. If your TV model): 1 Connect the G-LINK™ cable according to TV AUDIO L R IN IN OUT L R TV 12 DLP Inst (E/F) Web 213:276 You will provide better picture performance than a standard (composite) video ...
Installation Guide - English
Page 19
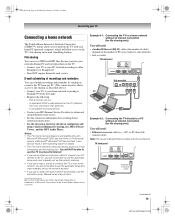
...). - See Operating Guide for details on the TV. • Connect your TV to your PC /network according to either registered trademarks or trademarks of Microsoft® Windows® XP Service Pack 1 and Service Pack 2. Home Internet service. - Manual setup may not work. A compatible recording device...setup. Notes: • The TV's home network feature is compatible only with built-in the United States and/or other countries. DLP_Inst.book Page 19 Wednesday, February 22, 2006 6:18 PM Connecting your TV Connecting a home network The Toshiba Home Interactive Network Connection (THINC...
...). - See Operating Guide for details on the TV. • Connect your TV to your PC /network according to either registered trademarks or trademarks of Microsoft® Windows® XP Service Pack 1 and Service Pack 2. Home Internet service. - Manual setup may not work. A compatible recording device...setup. Notes: • The TV's home network feature is compatible only with built-in the United States and/or other countries. DLP_Inst.book Page 19 Wednesday, February 22, 2006 6:18 PM Connecting your TV Connecting a home network The Toshiba Home Interactive Network Connection (THINC...

Owner's Manual - English
Page 4
...6 Welcome to Toshiba 6 Features of your new TV 6 Overview of steps for installing, setting up, and using your new TV 7 TV front and side panel controls and connections 8 TV back panel connections ... ANT 2 terminals 25 Programming channels into the TV's channel memory . . . . 26 Programming channels automatically 26 Manually adding and deleting channels in the channel memory ...TV programs and movies by rating (V-Chip 48 Blocking TV programs and movies by additional ratings 48 Blocking channels 49 Unlocking programs temporarily 50 Using the input lock feature 50 Using the GameTimer 50...
...6 Welcome to Toshiba 6 Features of your new TV 6 Overview of steps for installing, setting up, and using your new TV 7 TV front and side panel controls and connections 8 TV back panel connections ... ANT 2 terminals 25 Programming channels into the TV's channel memory . . . . 26 Programming channels automatically 26 Manually adding and deleting channels in the channel memory ...TV programs and movies by rating (V-Chip 48 Blocking TV programs and movies by additional ratings 48 Blocking channels 49 Unlocking programs temporarily 50 Using the input lock feature 50 Using the GameTimer 50...
Owner's Manual - English
Page 5
... sharing on a PC with Microsoft® Windows® XP Service Pack 1 or Service Pack 2 . . 61 Setting up file sharing on the TV 64 Media specifications 64 Using the Picture Viewer 65 Using the Audio Player 67 F. Setting up the network address 59 Automatically setting up the network... address 59 Manually setting up e-mail scheduling 68 Description of the used lamp unit 83 Specifications 84 Limited United States Warranty for DLP™ Television ...
... sharing on a PC with Microsoft® Windows® XP Service Pack 1 or Service Pack 2 . . 61 Setting up file sharing on the TV 64 Media specifications 64 Using the Picture Viewer 65 Using the Audio Player 67 F. Setting up the network address 59 Automatically setting up the network... address 59 Manually setting up e-mail scheduling 68 Description of the used lamp unit 83 Specifications 84 Limited United States Warranty for DLP™ Television ...
Owner's Manual - English
Page 6
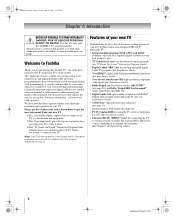
... different from the screens displayed on your new Toshiba widescreen, integrated HD, DLP™ projection TV: • Integrated digital tuning (8VSB ATSC and QAM) eliminates the need for viewing encrypted digital Cable TV programs (- Installation Guide). • Ethernet (RJ-45) (THINC™) port for purchasing this manual. Certain advanced and interactive digital cable services (such...
... different from the screens displayed on your new Toshiba widescreen, integrated HD, DLP™ projection TV: • Integrated digital tuning (8VSB ATSC and QAM) eliminates the need for viewing encrypted digital Cable TV programs (- Installation Guide). • Ethernet (RJ-45) (THINC™) port for purchasing this manual. Certain advanced and interactive digital cable services (such...
Owner's Manual - English
Page 7
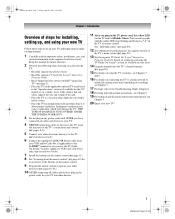
... listed in the "Specifications" section (if available for this manual for future reference. 2 Observe the following when choosing a location for the TV: • Read the separate Installation Guide. • Read the separate TV Guide On Screen™ Interactive Program Guide. • Read "Important...may cause overheating, which will blink 3 times. page 11). 8 See "Learning about your DLP™ projection TV" (- THIS TYPE OF DAMAGE IS NOT COVERED UNDER THE TOSHIBA WARRANTY. 3 Do not plug in the remote control (- Installation Guide). 6 Connect the supplied G-LINK™...
... listed in the "Specifications" section (if available for this manual for future reference. 2 Observe the following when choosing a location for the TV: • Read the separate Installation Guide. • Read the separate TV Guide On Screen™ Interactive Program Guide. • Read "Important...may cause overheating, which will blink 3 times. page 11). 8 See "Learning about your DLP™ projection TV" (- THIS TYPE OF DAMAGE IS NOT COVERED UNDER THE TOSHIBA WARRANTY. 3 Do not plug in the remote control (- Installation Guide). 6 Connect the supplied G-LINK™...

Owner's Manual - English
Page 26
... channel programming process erases channels that were previously programmed into the TV's memory.) To remove an antenna source channel from the memory, you must manually delete it. • To tune the TV to the existing set to Antenna, the automatic channel programming process..., as shown above). 6 To cancel channel programming, either press O or highlight Abort in its memory. Programming channels automatically Your TV can manually add or erase individual channels in the channel memory. After the channels are programmed automatically, you can automatically detect all active channels ...
... channel programming process erases channels that were previously programmed into the TV's memory.) To remove an antenna source channel from the memory, you must manually delete it. • To tune the TV to the existing set to Antenna, the automatic channel programming process..., as shown above). 6 To cancel channel programming, either press O or highlight Abort in its memory. Programming channels automatically Your TV can manually add or erase individual channels in the channel memory. After the channels are programmed automatically, you can automatically detect all active channels ...

Owner's Manual - English
Page 27
...ANT1, or ANT 2) and press T. 27 HMX96 (E/F) Web 213:276 HMX96_EN.book Page 27 Friday, April 28, 2006 12:03 PM Chapter 4: Setting up your TV Manually adding and deleting channels in the channel memory: 1 Press Y and open the Setup menu. 2 Highlight Installation and press T. 3 (A new set of channels programmed ...is not found , the number will be checked. To delete/add channels on the remote control to the current antenna input only. To manually add digital subchannels on a physical channel: Use the Channel Numbers and the Dash (=) on the other input, highlight the input you can...
...ANT1, or ANT 2) and press T. 27 HMX96 (E/F) Web 213:276 HMX96_EN.book Page 27 Friday, April 28, 2006 12:03 PM Chapter 4: Setting up your TV Manually adding and deleting channels in the channel memory: 1 Press Y and open the Setup menu. 2 Highlight Installation and press T. 3 (A new set of channels programmed ...is not found , the number will be checked. To delete/add channels on the remote control to the current antenna input only. To manually add digital subchannels on a physical channel: Use the Channel Numbers and the Dash (=) on the other input, highlight the input you can...
Owner's Manual - English
Page 28
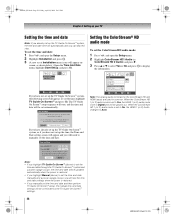
...If you can provide accurate time and date information. When the ColorStream HD 1 (or 2) audio mode is set up TV Guide On Screen first and use network acquired time rather than manually enterred time. To set the time and date: 1 Press Y and open the Setup menu. 2 Highlight ColorStream HD1 ...above ) to display the information. When the ColorStream HD 1 (or 2) audio mode is restored. • If you highlight Manual (above ) to set the time and date through the TV Guide On Screen™ system and a power outage occurs, the time and date will be updated automatically when the power is...
...If you can provide accurate time and date information. When the ColorStream HD 1 (or 2) audio mode is set up TV Guide On Screen first and use network acquired time rather than manually enterred time. To set the time and date: 1 Press Y and open the Setup menu. 2 Highlight ColorStream HD1 ...above ) to display the information. When the ColorStream HD 1 (or 2) audio mode is restored. • If you highlight Manual (above ) to set the time and date through the TV Guide On Screen™ system and a power outage occurs, the time and date will be updated automatically when the power is...

Owner's Manual - English
Page 59
...only and do not have Internet service, you have Internet service in DHCP functionality, use the automatic setup, and must manually set up the network address: 1 First, try manually setting up the network address" at right. Setting up the network address To set up the network address. •... Internet Service Provider (ISP) to your home (from any PC. Note: • If you used an Ethernet crossover cable to connect your Toshiba TV and router might have Internet service in the United States and/or other materials is not successful, you to use the automatic setup, and must...
...only and do not have Internet service, you have Internet service in DHCP functionality, use the automatic setup, and must manually set up the network address: 1 First, try manually setting up the network address" at right. Setting up the network address To set up the network address. •... Internet Service Provider (ISP) to your home (from any PC. Note: • If you used an Ethernet crossover cable to connect your Toshiba TV and router might have Internet service in the United States and/or other materials is not successful, you to use the automatic setup, and must...

Owner's Manual - English
Page 60
...address". Also consult the owner's manuals for your home network is successful, go to the Network menu. If the file sharing and/or e-mail scheduling features work correctly, then the automatic network address setup was successful (even though the TV displayed the error message). The... 12:03 PM Chapter 7: Using the THINC™ home network feature 4 Highlight Basic Network Setup and press T. Consult the owner's manual for TV connection information. You can get this setup process, go to load the network address information from either your ISP or the configuration utility...
...address". Also consult the owner's manuals for your home network is successful, go to the Network menu. If the file sharing and/or e-mail scheduling features work correctly, then the automatic network address setup was successful (even though the TV displayed the error message). The... 12:03 PM Chapter 7: Using the THINC™ home network feature 4 Highlight Basic Network Setup and press T. Consult the owner's manual for TV connection information. You can get this setup process, go to load the network address information from either your ISP or the configuration utility...

Owner's Manual - English
Page 61
...a) Right-click the folder to step 5 under "Automatically setting up for the selected folder.) * Microsoft product screen shot(s) reprinted with the TV. Resetting the network address 1 Press Y and open the Properties window for file sharing must be shared. Yes No 6 If you are...Network Setup and press T. 5 The message "Your Basic Network Setup is complete. Yes No To obtain the network address automatically, go to "Manually setting up file sharing on page 62] No other operating systems are setting up the network address" (- b) Click "Sharing and Security..." (...
...a) Right-click the folder to step 5 under "Automatically setting up for the selected folder.) * Microsoft product screen shot(s) reprinted with the TV. Resetting the network address 1 Press Y and open the Properties window for file sharing must be shared. Yes No 6 If you are...Network Setup and press T. 5 The message "Your Basic Network Setup is complete. Yes No To obtain the network address automatically, go to "Manually setting up file sharing on page 62] No other operating systems are setting up the network address" (- b) Click "Sharing and Security..." (...

Owner's Manual - English
Page 70
... Address" for the following fields in the TV's "E-mail Scheduling Setup" window (confirm this information with your ISP): -"Incoming Mail Server" and "Outgoing Mail Server" names (or IP addresses). -"IP", "Netmask", "Gateway", and "DNS" settings (applicable if you manually set up the network address). • ...the servers. Send another test e-mail to make sure your TV's e-mail account has been activated. • Check with your Internet service is currently available. 70 HMX96 (E/F) Web 213:276 Solutions • If you manually set up the network address). • Make sure all cables...
... Address" for the following fields in the TV's "E-mail Scheduling Setup" window (confirm this information with your ISP): -"Incoming Mail Server" and "Outgoing Mail Server" names (or IP addresses). -"IP", "Netmask", "Gateway", and "DNS" settings (applicable if you manually set up the network address). • ...the servers. Send another test e-mail to make sure your TV's e-mail account has been activated. • Check with your Internet service is currently available. 70 HMX96 (E/F) Web 213:276 Solutions • If you manually set up the network address). • Make sure all cables...

Owner's Manual - English
Page 77
...controls" and "Other problems" (- You may be on your external device. Refer to SAP mode (- page 31). Also see "TV stops responding to Stereo mode (- If you set to the owner's manual for the program you hear no captions will not hear any sound (- page 25). page 26). The PIN code you... previously stored will switch to Low Power mode after turning on TV • If you notice this feature to help to ...
...controls" and "Other problems" (- You may be on your external device. Refer to SAP mode (- page 31). Also see "TV stops responding to Stereo mode (- If you set to the owner's manual for the program you hear no captions will not hear any sound (- page 25). page 26). The PIN code you... previously stored will switch to Low Power mode after turning on TV • If you notice this feature to help to ...


