Installation Guide - English
Page 8
...those illustrated herein. See "Viewing the CableCARD™ menu" in several different configurations. CableCARD™ information and channels will not be easily resolved. CableCard Connected -- In Canada: • Call TCL Customer Service at (800) 631-3811 • Or visit http... • Call TACP Consumer Solutions at 1-800-268-3404. CableCard services will assure a more information, contact your digital cable TV service directly to Antenna 1. Such damage is NOT covered under your Toshiba warranty. • Never insert any performance-related CableCARD™ issues with...
...those illustrated herein. See "Viewing the CableCARD™ menu" in several different configurations. CableCARD™ information and channels will not be easily resolved. CableCard Connected -- In Canada: • Call TCL Customer Service at (800) 631-3811 • Or visit http... • Call TACP Consumer Solutions at 1-800-268-3404. CableCard services will assure a more information, contact your digital cable TV service directly to Antenna 1. Such damage is NOT covered under your Toshiba warranty. • Never insert any performance-related CableCARD™ issues with...
Owner's Manual - English
Page 2
... Model 50HM66 ST5066 56HM66 ST5666 Welcome to Toshiba Thank you turn the TV off . We have provided two separate guides to facilitate the installation and operation of malfunction. (- You may notice a change in screen brightness when this TV is a projection lamp unit with the Toshiba stand ...Guide) provides step-by your TV's current status. page 20). 8) The yellow and blue LED lights at right). 4) The TV's display is prohibited. • WOW, SRS and l symbol are trademarks of TV malfunction. Please use only with a limited service life. Use of precision technology...
... Model 50HM66 ST5066 56HM66 ST5666 Welcome to Toshiba Thank you turn the TV off . We have provided two separate guides to facilitate the installation and operation of malfunction. (- You may notice a change in screen brightness when this TV is a projection lamp unit with the Toshiba stand ...Guide) provides step-by your TV's current status. page 20). 8) The yellow and blue LED lights at right). 4) The TV's display is prohibited. • WOW, SRS and l symbol are trademarks of TV malfunction. Please use only with a limited service life. Use of precision technology...
Owner's Manual - English
Page 4
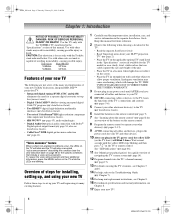
... exciting features of your new Toshiba widescreen, integrated HD, DLP™ projection TV: • Integrated digital tuning (8VSB ATSC and QAM) eliminates the need for the TV: • Read the separate...TV will blink and the TV will damage the TV. Installation Guide). • Two sets of navigating the TV's menu system (- "Voice announce" feature When certain non-standard conditions occur, the LEDs on using the TV...installation, care, and service information in any power cords until the yellow LED stops blinking and then press p on the applicable optional TV stand listed in the...
... exciting features of your new Toshiba widescreen, integrated HD, DLP™ projection TV: • Integrated digital tuning (8VSB ATSC and QAM) eliminates the need for the TV: • Read the separate...TV will blink and the TV will damage the TV. Installation Guide). • Two sets of navigating the TV's menu system (- "Voice announce" feature When certain non-standard conditions occur, the LEDs on using the TV...installation, care, and service information in any power cords until the yellow LED stops blinking and then press p on the applicable optional TV stand listed in the...
Owner's Manual - English
Page 6
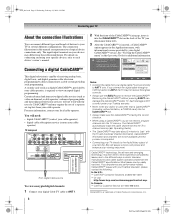
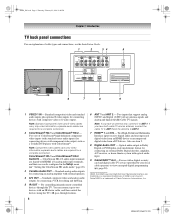
...composite) video and standard audio inputs plus optional S-video inputs for connecting devices with component video output, such as a Toshiba DVD player with external speakers. 4 A/V OUT - Two sets of ColorStream® high-definition component video inputs (with... standard stereo audio inputs) for connecting devices with a digital security card and digital cable TV service (provided by your local cable operator) to ANT 2. 7 HDMI™ 1 and 2 IN - page 20). HM66 (E/F)... or S-video output. Optical audio output in the Setup menu (-
...composite) video and standard audio inputs plus optional S-video inputs for connecting devices with component video output, such as a Toshiba DVD player with external speakers. 4 A/V OUT - Two sets of ColorStream® high-definition component video inputs (with... standard stereo audio inputs) for connecting devices with a digital security card and digital cable TV service (provided by your local cable operator) to ANT 2. 7 HDMI™ 1 and 2 IN - page 20). HM66 (E/F)... or S-video output. Optical audio output in the Setup menu (-

Owner's Manual - English
Page 17
... press < or , on the remote control or TV control panel, your Cable TV service lineup changes significantly. • If you have a CableCARD™ inserted, channel programming for ANT 1 is completed, you should not have configured the antenna input sources (- page 16). 2 Press Y and open the Setup menu. 2 Highlight Installation and press T. (A new set of...
... press < or , on the remote control or TV control panel, your Cable TV service lineup changes significantly. • If you have a CableCARD™ inserted, channel programming for ANT 1 is completed, you should not have configured the antenna input sources (- page 16). 2 Press Y and open the Setup menu. 2 Highlight Installation and press T. (A new set of...

Owner's Manual - English
Page 20
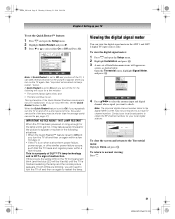
...21). Setting the Quick Restart™ feature With the Quick Restart™ feature set to On, the TV will assure a more vivid picture and enhance your digital CableCARD™ service (see Note on from Standby mode, the full picture appears immediately. 20 HM66 (E/F) Web 213:276.... Applications Channel Browser Digital CC/Audio Selector CableCARD IP Service Conditional Access CableCARD(tm) Status Network Setup CableCARD(tm) Pairing Navigate ENTER Select CH RTN Back EXIT Exit Note: The CableCARD™ menu is for several minutes after the TV is set to display the information.
...21). Setting the Quick Restart™ feature With the Quick Restart™ feature set to On, the TV will assure a more vivid picture and enhance your digital CableCARD™ service (see Note on from Standby mode, the full picture appears immediately. 20 HM66 (E/F) Web 213:276.... Applications Channel Browser Digital CC/Audio Selector CableCARD IP Service Conditional Access CableCARD(tm) Status Network Setup CableCARD(tm) Pairing Navigate ENTER Select CH RTN Back EXIT Exit Note: The CableCARD™ menu is for several minutes after the TV is set to display the information.
Owner's Manual - English
Page 21
... signal you do not prefer this occurs, the yellow LED on the TV front panel will blink (and the blue LED will occur for the picture to appear on-screen in a short period of time, the useful service life of Installation menu icons will need to turn on again to Off. To return... to select either On or Off and Press T. HM66_EN.book Page 21 Thursday, February 23, 2006 2:49 PM Chapter 4: Setting up your TV To set the Quick Restart™ feature...
... signal you do not prefer this occurs, the yellow LED on the TV front panel will blink (and the blue LED will occur for the picture to appear on-screen in a short period of time, the useful service life of Installation menu icons will need to turn on again to Off. To return... to select either On or Off and Press T. HM66_EN.book Page 21 Thursday, February 23, 2006 2:49 PM Chapter 4: Setting up your TV To set the Quick Restart™ feature...

Owner's Manual - English
Page 32
HM66_EN.book Page 32 Thursday, February 23, 2006 2:49 PM Chapter 5: Using the TV's basic features Digital closed captions You can use the Digital CC/Audio Selector to conveniently switch between audio tracks on a digital channel (for those ...Back EXIT Exit 3 Press B or b to select Closed Caption, and then press C or c to select the desired service. 4 Press O. To use the digital audio selector: 1 Press Y and open the Applications menu. 2 Highlight Digital CC/Audio Selector and press T. When such services are not available, the Digital CC/Audio Selector presents a default list of...
HM66_EN.book Page 32 Thursday, February 23, 2006 2:49 PM Chapter 5: Using the TV's basic features Digital closed captions You can use the Digital CC/Audio Selector to conveniently switch between audio tracks on a digital channel (for those ...Back EXIT Exit 3 Press B or b to select Closed Caption, and then press C or c to select the desired service. 4 Press O. To use the digital audio selector: 1 Press Y and open the Applications menu. 2 Highlight Digital CC/Audio Selector and press T. When such services are not available, the Digital CC/Audio Selector presents a default list of...
Owner's Manual - English
Page 46
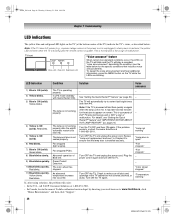
... unit replacement and care" in the TV cabinet are blinking. "Lamp not working properly after trying solutions, the problem still exists: • In the U.S., call TACP Consumer Solutions at 1-800-631-3811. • In Canada, locate the nearest Toshiba authorized service depot by directing your web browser to... the LEDs are not covered, blocked, or dusty. To repeat the voice announcement and hear additional information, press the MENU button on the TV (at 1-800-631-3811. Green blinks. 8) Blue blinks slowly. 9) Blue blinks quickly. 10)Blue blinks quickly. The lamp is ...
... unit replacement and care" in the TV cabinet are blinking. "Lamp not working properly after trying solutions, the problem still exists: • In the U.S., call TACP Consumer Solutions at 1-800-631-3811. • In Canada, locate the nearest Toshiba authorized service depot by directing your web browser to... the LEDs are not covered, blocked, or dusty. To repeat the voice announcement and hear additional information, press the MENU button on the TV (at 1-800-631-3811. Green blinks. 8) Blue blinks slowly. 9) Blue blinks quickly. 10)Blue blinks quickly. The lamp is ...

Service Manual
Page 4
... and press MUTE button twice on the remote control. ↓ 2. Set VOLUME to turn off the TV once. 3 Press MUTE button again and hold button down. ↓ Service Mode display 3. Entering Service Mode 1. Selecting the Adjusting Item Every pressing of CH Adjusting the Data or button in the... service mode changes the adjustment items. Pressing of VOLUME or button will change the value of data in the range from 00H to FFH. While holding the MUTE button, press MENU ...
... and press MUTE button twice on the remote control. ↓ 2. Set VOLUME to turn off the TV once. 3 Press MUTE button again and hold button down. ↓ Service Mode display 3. Entering Service Mode 1. Selecting the Adjusting Item Every pressing of CH Adjusting the Data or button in the... service mode changes the adjustment items. Pressing of VOLUME or button will change the value of data in the range from 00H to FFH. While holding the MUTE button, press MENU ...


