

Owners Manual
Page 2
... this Toshiba LCD TV. See "Removing the Pedestal Stand" ( page 5). Wall Mounting: If you decide to wall mount your flat panel display, always: • Use a mount that has been recommended by the display manufacturer and/or listed by an independent laboratory (such as UL, CSA, ETL). • Follow all cords and cables connected to the flat panel display so that they cannot be connected to the grounding system of the building, as close...
... this Toshiba LCD TV. See "Removing the Pedestal Stand" ( page 5). Wall Mounting: If you decide to wall mount your flat panel display, always: • Use a mount that has been recommended by the display manufacturer and/or listed by an independent laboratory (such as UL, CSA, ETL). • Follow all cords and cables connected to the flat panel display so that they cannot be connected to the grounding system of the building, as close...
Owners Manual
Page 3
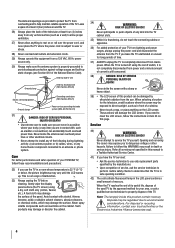
... injury from the damaged television. The LCD panel inside a wall or similar enclosed area. 20) Never modify this equipment. hot, humid areas; To secure the TV, use this apparatus near any heat sources such as power-supply cord or plug is damaged, liquid has been spilled or objects have fallen into your doctor. • ALWAYS contact a service technician to inspect the...
... injury from the damaged television. The LCD panel inside a wall or similar enclosed area. 20) Never modify this equipment. hot, humid areas; To secure the TV, use this apparatus near any heat sources such as power-supply cord or plug is damaged, liquid has been spilled or objects have fallen into your doctor. • ALWAYS contact a service technician to inspect the...
Owners Manual
Page 4
... power cord is subject to wear or abuse. 28) Never overload wall outlets and extension cords. 29) Always operate this equipment from a 120 VAC, 60 Hz power source only. 30) Always make sure you are never in a position where your body (or any item you have the TV serviced: • Ask the service technician to clean the LCD screen, follow the instructions...
... power cord is subject to wear or abuse. 28) Never overload wall outlets and extension cords. 29) Always operate this equipment from a 120 VAC, 60 Hz power source only. 30) Always make sure you are never in a position where your body (or any item you have the TV serviced: • Ask the service technician to clean the LCD screen, follow the instructions...
Owners Manual
Page 5
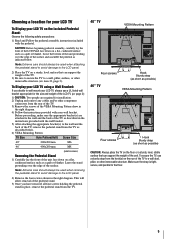
... support the weight of the unit. Choosing a location for installation. 2) Unplug and remove any cables and/or other immovable structure. ( item 23, page 3). Note: Extreme care should always be used when removing the pedestal stand to avoid damage to a wall, pillar, surface, or other component connectors from the TV. 40" TV VESA Mounting Pattern Four screws 46" TV Hook Sturdy strap (as short as possible) VESA Mounting Pattern Four screws Hook...
... support the weight of the unit. Choosing a location for installation. 2) Unplug and remove any cables and/or other immovable structure. ( item 23, page 3). Note: Extreme care should always be used when removing the pedestal stand to avoid damage to a wall, pillar, surface, or other component connectors from the TV. 40" TV VESA Mounting Pattern Four screws 46" TV Hook Sturdy strap (as short as possible) VESA Mounting Pattern Four screws Hook...

Owners Manual
Page 7
... the menu language 28 TOSHIBA Logo LED 28 Configuring the antenna input source for the ANT/CABLE terminal 28 Programming channels into the TV's channel memory ........29 Programming channels automatically 29 Manually adding and deleting channels in the channel memory 29 Labeling channels 30 Setting the HDMI™ audio mode 31 Viewing the digital signal meter 32 Setting the time zone 32 Viewing the system status 32 Chapter 6: Using the TV's features 33 Selecting the video input source to view 33...
... the menu language 28 TOSHIBA Logo LED 28 Configuring the antenna input source for the ANT/CABLE terminal 28 Programming channels into the TV's channel memory ........29 Programming channels automatically 29 Manually adding and deleting channels in the channel memory 29 Labeling channels 30 Setting the HDMI™ audio mode 31 Viewing the digital signal meter 32 Setting the time zone 32 Viewing the system status 32 Chapter 6: Using the TV's features 33 Selecting the video input source to view 33...
Owners Manual
Page 10
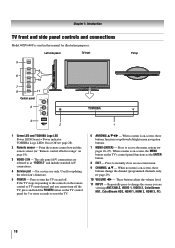
...'s control panel functions as "VIDEO 2" and include standard A/V connections. 4 Service port - For service use only. page 29). 10 VOLUME WX - Point the remote control toward this manual for updating the television's firmware. 5 POWER - Press to change the channel (programmed channels only; Used for illustration purposes. If the TV stops responding to access the menu system ( pages 26-27). When a menu is on -screen menu. 9 CHANNEL ST - Left side panel TV front TV top Control panel 1 Green LED and TOSHIBA Logo LED Power LED(Green) = Power indicator TOSHIBA Logo...
...'s control panel functions as "VIDEO 2" and include standard A/V connections. 4 Service port - For service use only. page 29). 10 VOLUME WX - Point the remote control toward this manual for updating the television's firmware. 5 POWER - Press to change the channel (programmed channels only; Used for illustration purposes. If the TV stops responding to access the menu system ( pages 26-27). When a menu is on -screen menu. 9 CHANNEL ST - Left side panel TV front TV top Control panel 1 Green LED and TOSHIBA Logo LED Power LED(Green) = Power indicator TOSHIBA Logo...
Owners Manual
Page 11
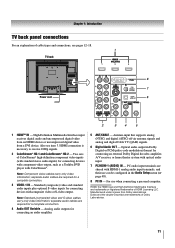
...Standard (composite) video and standard audio inputs plus optional S-video inputs for connecting an audio amplifier. 5 ANT/CABLE - Antenna input that supports analog (NTSC) and digital (ATSC) off-air antenna signals and analog and digital Cable TV (QAM) signals. 6 Digital Audio OUT - High-Definition Multimedia Interface input receives digital audio and uncompressed digital video from an HDMI device or uncompressed digital video from Dolby Laboratories. Two sets of Dolby Laboratories. 11 TV back Power cord 1 HDMI™ IN - Optical audio output in the Audio Setup menu ( page...
...Standard (composite) video and standard audio inputs plus optional S-video inputs for connecting an audio amplifier. 5 ANT/CABLE - Antenna input that supports analog (NTSC) and digital (ATSC) off-air antenna signals and analog and digital Cable TV (QAM) signals. 6 Digital Audio OUT - High-Definition Multimedia Interface input receives digital audio and uncompressed digital video from an HDMI device or uncompressed digital video from Dolby Laboratories. Two sets of Dolby Laboratories. 11 TV back Power cord 1 HDMI™ IN - Optical audio output in the Audio Setup menu ( page...

Owners Manual
Page 12
... connecting receivers with an HDMI output. therefore, separate audio cables are required for a complete HDMI device connection ( page 15 and page 18). About the connection illustrations You can be unacceptable. Standard A/V cables (red/white/yellow) Standard A/V cables (composite video) usually come in its native format. S-video cable S-video cable is for use with devices with Dolby Digital or PCM (pulse-code modulation) optical audio input to each cable. The connection illustrations in sets of three, and are typically color-coded...
... connecting receivers with an HDMI output. therefore, separate audio cables are required for a complete HDMI device connection ( page 15 and page 18). About the connection illustrations You can be unacceptable. Standard A/V cables (red/white/yellow) Standard A/V cables (composite video) usually come in its native format. S-video cable S-video cable is for use with devices with Dolby Digital or PCM (pulse-code modulation) optical audio input to each cable. The connection illustrations in sets of three, and are typically color-coded...
Owners Manual
Page 13
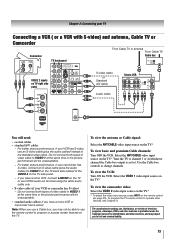
... S-video) and antenna, Cable TV or Camcorder Camcorder AUDIO OUT L VIDEO R TV back panel VIDEO 2 inputs on the TV.* To view basic and premium Cable channels: Turn OFF the VCR. Use the Cable box controls to operate other devices, see Chapter 3. Select the VIDEO 1 video input source on the TV.* To view the camcorder video: Select the VIDEO 2 video input source on the TV.* * To select the video input source, press INPUT on the TV. To program the TV remote control to change channels. Do not connect...
... S-video) and antenna, Cable TV or Camcorder Camcorder AUDIO OUT L VIDEO R TV back panel VIDEO 2 inputs on the TV.* To view basic and premium Cable channels: Turn OFF the VCR. Use the Cable box controls to operate other devices, see Chapter 3. Select the VIDEO 1 video input source on the TV.* To view the camcorder video: Select the VIDEO 2 video input source on the TV.* * To select the video input source, press INPUT on the TV. To program the TV remote control to change channels. Do not connect...
Owners Manual
Page 15
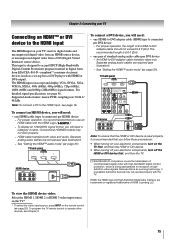
... video input source, press INPUT on your electronic components, turn off your TV receives digital audio and uncompressed digital video from an HDMI source device, or uncompressed digital video from EIA/CEA-861-D-compliant[1] consumer electronic devices (such as a set-top box or DVD player with the TV. Chapter 2: Connecting your TV Connecting an HDMI™ or DVI device to -DVI adapter cable should not exceed 9.8 ft (3m). For detailed signal specifications, see illustration). − See "Setting...
... video input source, press INPUT on your electronic components, turn off your TV receives digital audio and uncompressed digital video from an HDMI source device, or uncompressed digital video from EIA/CEA-861-D-compliant[1] consumer electronic devices (such as a set-top box or DVD player with the TV. Chapter 2: Connecting your TV Connecting an HDMI™ or DVI device to -DVI adapter cable should not exceed 9.8 ft (3m). For detailed signal specifications, see illustration). − See "Setting...
Owners Manual
Page 17
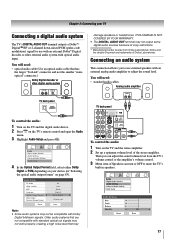
... TV's volume control or the amplifier's volume control. 3 Menu item of Dolby Laboratories. Audio Digital Audio Selector Audio Settings Advanced Audio Settings Audio Setup 4 In the Optical Output Format field, select either Dolby Digital or PCM, depending on your TV Connecting a digital audio system The TV's DIGITAL AUDIO OUT terminal outputs a Dolby®* Digital or 2-channel down-mixed PCM (pulse-code modulation) signal for use external speakers with an external analog audio amplifier to adjust the sound level. Connecting an audio system This connection allows you can turn to...
... TV's volume control or the amplifier's volume control. 3 Menu item of Dolby Laboratories. Audio Digital Audio Selector Audio Settings Advanced Audio Settings Audio Setup 4 In the Optical Output Format field, select either Dolby Digital or PCM, depending on your TV Connecting a digital audio system The TV's DIGITAL AUDIO OUT terminal outputs a Dolby®* Digital or 2-channel down-mixed PCM (pulse-code modulation) signal for use external speakers with an external analog audio amplifier to adjust the sound level. Connecting an audio system This connection allows you can turn to...
Owners Manual
Page 18
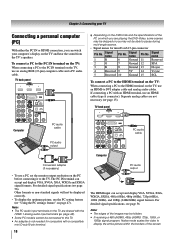
.... For detailed signal specifications, see page 56. TV back panel •• Depending on the DVD's title and the specifications of the screen To connect a PC to the PC IN terminal on the TV: When connecting a PC to the PC IN terminal on the TV, use a PC, set the monitor output resolution on the TV and hear the sound from the TV's speakers. Signal name 1 R 6 Ground...
.... For detailed signal specifications, see page 56. TV back panel •• Depending on the DVD's title and the specifications of the screen To connect a PC to the PC IN terminal on the TV: When connecting a PC to the PC IN terminal on the TV, use a PC, set the monitor output resolution on the TV and hear the sound from the TV's speakers. Signal name 1 R 6 Ground...
Owners Manual
Page 26
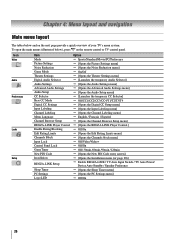
Icon Video Audio Preferences Locks Setup Item Mode Picture Settings Noise Reduction Game Mode Theater Settings Digital Audio Selector Audio Settings Advanced Audio Settings Audio Setup CC Selector Base CC Mode Digital CC Settings Input Labeling Channel Labeling Menu Language Channel Browser Setup REGZA-LINK Player Control Enable Rating Blocking Edit Rating Limits Channels Block Input Lock Control Panel Lock GameTimer New PIN Code Installation REGZA-LINK Setup Sleep Timer PC Settings Logo LED Option p Sports/Standard/Movie/PC/Preference p [Opens the Picture Settings menu] p [Opens the ...
Icon Video Audio Preferences Locks Setup Item Mode Picture Settings Noise Reduction Game Mode Theater Settings Digital Audio Selector Audio Settings Advanced Audio Settings Audio Setup CC Selector Base CC Mode Digital CC Settings Input Labeling Channel Labeling Menu Language Channel Browser Setup REGZA-LINK Player Control Enable Rating Blocking Edit Rating Limits Channels Block Input Lock Control Panel Lock GameTimer New PIN Code Installation REGZA-LINK Setup Sleep Timer PC Settings Logo LED Option p Sports/Standard/Movie/PC/Preference p [Opens the Picture Settings menu] p [Opens the ...
Owners Manual
Page 27
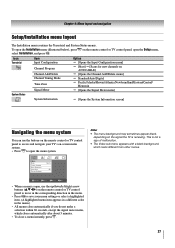
... of malfunction. • The Video sub-menu appears with a black background, which closes automatically after about 5 minutes. • To close a menu instantly, press . 27 Icon Terrestrial System Status Item Input Configuration Channel Program Channel Add/Delete Channel Tuning Mode Time Zone Signal Meter System Information Option p [Opens the Input Configuration menu] p [Start] p [Scans for new channels on ANT/CABLE] p [Opens the Channel Add/Delete menu] p Standard/Auto/Digital p Pacific/Alaska/Hawaii/Atlantic/Newfoundland...
... of malfunction. • The Video sub-menu appears with a black background, which closes automatically after about 5 minutes. • To close a menu instantly, press . 27 Icon Terrestrial System Status Item Input Configuration Channel Program Channel Add/Delete Channel Tuning Mode Time Zone Signal Meter System Information Option p [Opens the Input Configuration menu] p [Start] p [Scans for new channels on ANT/CABLE] p [Opens the Channel Add/Delete menu] p Standard/Auto/Digital p Pacific/Alaska/Hawaii/Atlantic/Newfoundland...
Owners Manual
Page 31
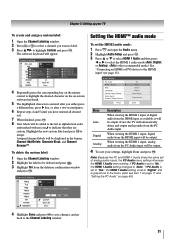
... press to be output. Chapter 5: Setting up your settings, highlight Done and press . Audio Setup PC Audio HDMI 1 Audio MTS Language Optical Output Format Dolby Digital Dynamic Range Control Reset No Auto Stereo English Dolby Digital Compressed Done Mode Auto Digital Analog Description When viewing the HDMI 1 input, if digital audio from the HDMI input will be output. 4 To save changes, and go back to "Digital" and is grayed out in the banner, Channel Add/Delete, Channels Block, and Channel Browser™. Note...
... press to be output. Chapter 5: Setting up your settings, highlight Done and press . Audio Setup PC Audio HDMI 1 Audio MTS Language Optical Output Format Dolby Digital Dynamic Range Control Reset No Auto Stereo English Dolby Digital Compressed Done Mode Auto Digital Analog Description When viewing the HDMI 1 input, if digital audio from the HDMI input will be output. 4 To save changes, and go back to "Digital" and is grayed out in the banner, Channel Add/Delete, Channels Block, and Channel Browser™. Note...
Owners Manual
Page 48
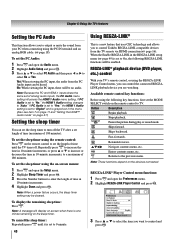
... sound from the TV remote via HDMI connection ( page 16). To set the sleep timer using the on page 31.) Setting the sleep timer You can be cleared. Stops playback. Returns to "Auto." No: When viewing the PC input, there will display on-screen when there is set of time in the menu. (Also see item 7 on page 11 and "Setting the HDMI™ Audio mode" on -screen menus: 1 Press and open the Audio menu. 2 Highlight Audio Setup...
... sound from the TV remote via HDMI connection ( page 16). To set the sleep timer using the on page 31.) Setting the sleep timer You can be cleared. Stops playback. Returns to "Auto." No: When viewing the PC input, there will display on-screen when there is set of time in the menu. (Also see item 7 on page 11 and "Setting the HDMI™ Audio mode" on -screen menus: 1 Press and open the Audio menu. 2 Highlight Audio Setup...

Owners Manual
Page 49
... DVD player, etc) is set to output the sound from the audio receiver's speakers even if TV Speakers has been selected. Note: • To use this function: − Set Speaker Preference to select On or desired mode. • TV Auto Input Switch: On/Off • TV Auto Power: On/Off • Device Auto Standby: On/Off 5 To save the new settings, highlight Done and press . Item Description TV Auto Input Switch If a connected HDMI device starts playing video...
... DVD player, etc) is set to output the sound from the audio receiver's speakers even if TV Speakers has been selected. Note: • To use this function: − Set Speaker Preference to select On or desired mode. • TV Auto Input Switch: On/Off • TV Auto Power: On/Off • Device Auto Standby: On/Off 5 To save the new settings, highlight Done and press . Item Description TV Auto Input Switch If a connected HDMI device starts playing video...

Owners Manual
Page 54
.../or Color ( page 40). Remote control problems • Make sure the remote control is set the CableClear® feature to Stereo mode ( page 42). Poor color or no picture will change to the next video input source and display the Input Selection window. 54 Cannot view external signals or channel 3 or 4 • If you cannot view signals from external devices connected to VIDEO 1, VIDEO 2, ColorStream® HDMI 1, HDMI 2, HDMI 3, PC, or from a known SAP source, make sure the Input Lock is plugged in...
.../or Color ( page 40). Remote control problems • Make sure the remote control is set the CableClear® feature to Stereo mode ( page 42). Poor color or no picture will change to the next video input source and display the Input Selection window. 54 Cannot view external signals or channel 3 or 4 • If you cannot view signals from external devices connected to VIDEO 1, VIDEO 2, ColorStream® HDMI 1, HDMI 2, HDMI 3, PC, or from a known SAP source, make sure the Input Lock is plugged in...

Owners Manual
Page 58
... warranty for LCD Television rental units begins on the type of repair required, the service will either be performed in materials or workmanship as follows: all of this manual and reviewing the section entitled "Troubleshooting," you in the unlikely event a safety notification is purchased and operated in this LCD Television and connected equipment; or Puerto Rico. (4) Labor service charges for set installation, setup, adjustment of customer controls...
... warranty for LCD Television rental units begins on the type of repair required, the service will either be performed in materials or workmanship as follows: all of this manual and reviewing the section entitled "Troubleshooting," you in the unlikely event a safety notification is purchased and operated in this LCD Television and connected equipment; or Puerto Rico. (4) Labor service charges for set installation, setup, adjustment of customer controls...

Owners Manual
Page 60
... of the warranty. How to Obtain Warranty Services If, after following all of the operating instructions in this manual and checking the "Troubleshooting" section, you find that the Dispute arises. Chapter 9: Appendix Disclaimer and Limitation of this limited warranty shall prevail. THIS WARRANTY DOES NOT APPLY AND SHALL BE VOID AND UNENFORCEABLE IF THE TELEVISION IS OPENED, SERVICED, OR REPAIRED BY...
... of the warranty. How to Obtain Warranty Services If, after following all of the operating instructions in this manual and checking the "Troubleshooting" section, you find that the Dispute arises. Chapter 9: Appendix Disclaimer and Limitation of this limited warranty shall prevail. THIS WARRANTY DOES NOT APPLY AND SHALL BE VOID AND UNENFORCEABLE IF THE TELEVISION IS OPENED, SERVICED, OR REPAIRED BY...


