Printable Spec Sheet
Page 2
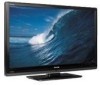
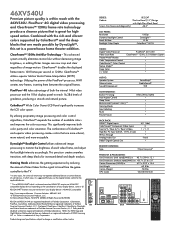
...by DynaLight™, this set is a powerhouse home ... the 46XV540U. http://www.tacp.toshiba.com Customer Solutions: 800.631.3811 © Toshiba America ...LCD color space. All Rights Reserved (5/08.06) REGZA and REGZA LINK are registered trademarks of Toshiba America Consumer Products, L.L.C. Dolby and the double-D symbol are registered trademarks of REGZA LINK® which case, it takes for the signal to travel from the game controller to the TV... & PACKAGING: Unit Dimensions (with High-Gloss Black Bezel 46.0" LCD PANEL: Resolution Dynamic Backlight Control Panel Bit Rate Backlight Color...
...by DynaLight™, this set is a powerhouse home ... the 46XV540U. http://www.tacp.toshiba.com Customer Solutions: 800.631.3811 © Toshiba America ...LCD color space. All Rights Reserved (5/08.06) REGZA and REGZA LINK are registered trademarks of Toshiba America Consumer Products, L.L.C. Dolby and the double-D symbol are registered trademarks of REGZA LINK® which case, it takes for the signal to travel from the game controller to the TV... & PACKAGING: Unit Dimensions (with High-Gloss Black Bezel 46.0" LCD PANEL: Resolution Dynamic Backlight Control Panel Bit Rate Backlight Color...
Owner's Manual - English
Page 1
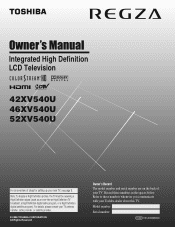
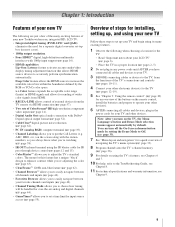
... provider, or satellite provider. © 2008 TOSHIBA CORPORATION All Rights Reserved Owner's Record The model number and serial number are on the back of steps for setting up your new TV, see page 9. Integrated High Definition LCD Television HIGH-DEFINITION TELEVISION 42XV540U 46XV540U 52XV540U For an overview of your TV. Note: To display a High Definition picture...
... provider, or satellite provider. © 2008 TOSHIBA CORPORATION All Rights Reserved Owner's Record The model number and serial number are on the back of steps for setting up your new TV, see page 9. Integrated High Definition LCD Television HIGH-DEFINITION TELEVISION 42XV540U 46XV540U 52XV540U For an overview of your TV. Note: To display a High Definition picture...
Owner's Manual - English
Page 2
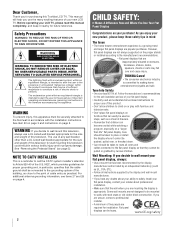
... to constitute a risk of electric shock to the point of your LCD TV, please read and understand all . WARNING To prevent injury, this product. • Don't allow children to walls with furniture and television sets. • Don't place flat panel displays on a "larger than...enclosed instructions for proper use of cable entry as close to persons. Follow the manufacturer's recommendations for wall mounting this Toshiba LCD TV. Some wall mounts are required for purchasing this television could result in accordance with arrowhead symbol, within the product's enclosure that...
... to constitute a risk of electric shock to the point of your LCD TV, please read and understand all . WARNING To prevent injury, this product. • Don't allow children to walls with furniture and television sets. • Don't place flat panel displays on a "larger than...enclosed instructions for proper use of cable entry as close to persons. Follow the manufacturer's recommendations for wall mounting this Toshiba LCD TV. Some wall mounts are required for purchasing this television could result in accordance with arrowhead symbol, within the product's enclosure that...
Owner's Manual - English
Page 7
... and Service 3 Chapter 1: Introduction 9 Features of your new TV 9 Overview of steps for installing, setting up, and using your new TV 9 TV front and side panel controls and connections 10 TV back panel connections 11 Chapter 2: Connecting your TV 12 Overview of cable types 12 About the connection illustrations 12...Main menu layout 33 Setup/Installation menu layout 33 THINC™ menu 33 Navigating the menu system 34 Chapter 5: Setting up your TV 35 Setting the Demo Mode 35 Selecting the menu language 35 Configuring the input source for the ANT/CABLE terminal 36 Programming ...
... and Service 3 Chapter 1: Introduction 9 Features of your new TV 9 Overview of steps for installing, setting up, and using your new TV 9 TV front and side panel controls and connections 10 TV back panel connections 11 Chapter 2: Connecting your TV 12 Overview of cable types 12 About the connection illustrations 12...Main menu layout 33 Setup/Installation menu layout 33 THINC™ menu 33 Navigating the menu system 34 Chapter 5: Setting up your TV 35 Setting the Demo Mode 35 Selecting the menu language 35 Configuring the input source for the ANT/CABLE terminal 36 Programming ...

Owner's Manual - English
Page 8
Chapter 7: Using the TV's advanced features 61 Using the advanced picture settings features 61 Using dynamic contrast 61 Using the static gamma feature 61 ...8482; feature 63 Using x.v.Color Selection feature 64 Using the Game Mode feature 64 Using the advanced audio settings features 64 Using the surround sound features 64 Chapter 8: Troubleshooting 65 General troubleshooting 65 LED indications 67 ...PC IN and HDMI terminals 69 Limited United States Warranty for LCD Televisions 26" and Larger 70 Limited Canadian Warranty for Toshiba Brand Flat Panel Televisions 71 Index 73 8
Chapter 7: Using the TV's advanced features 61 Using the advanced picture settings features 61 Using dynamic contrast 61 Using the static gamma feature 61 ...8482; feature 63 Using x.v.Color Selection feature 64 Using the Game Mode feature 64 Using the advanced audio settings features 64 Using the surround sound features 64 Chapter 8: Troubleshooting 65 General troubleshooting 65 LED indications 67 ...PC IN and HDMI terminals 69 Limited United States Warranty for LCD Televisions 26" and Larger 70 Limited Canadian Warranty for Toshiba Brand Flat Panel Televisions 71 Index 73 8
Owner's Manual - English
Page 9
... (- pages 12-19). 5 See "Chapter 3: Using the remote control" (- page 57). • Two sets of navigating the TV's menu system (- page 38). • IR OUT infrared terminal using its many exciting features of your new Toshiba widescreen, integrated HD, LCD TV: • Integrated digital tuning (8VSB ATSC and QAM) eliminates the need for a separate digital...
... (- pages 12-19). 5 See "Chapter 3: Using the remote control" (- page 57). • Two sets of navigating the TV's menu system (- page 38). • IR OUT infrared terminal using its many exciting features of your new Toshiba widescreen, integrated HD, LCD TV: • Integrated digital tuning (8VSB ATSC and QAM) eliminates the need for a separate digital...

Owner's Manual - English
Page 11
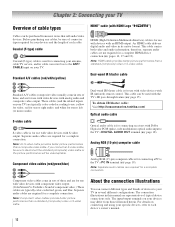
...audio amplifier. 8 IR OUT - HDMI, the HDMI logo and High-Definition Multimedia Interface are trademarks of HDMI Licensing LLC. Two sets of cable types and connections, see pages 12-19. 1 TV back 2 3 4 Power cord Cable Strap 5 67 8 1 DIGITAL AUDIO OUT - separate audio cables are required for a ...; high-definition component video inputs (with standard stereo audio inputs) for connecting devices with component video output, such as a Toshiba DVD player with ColorStream®. Optical audio output in the Audio Setup menu (- For use can connect up to receive 1080p signals...
...audio amplifier. 8 IR OUT - HDMI, the HDMI logo and High-Definition Multimedia Interface are trademarks of HDMI Licensing LLC. Two sets of cable types and connections, see pages 12-19. 1 TV back 2 3 4 Power cord Cable Strap 5 67 8 1 DIGITAL AUDIO OUT - separate audio cables are required for a ...; high-definition component video inputs (with standard stereo audio inputs) for connecting devices with component video output, such as a Toshiba DVD player with ColorStream®. Optical audio output in the Audio Setup menu (- For use can connect up to receive 1080p signals...
Owner's Manual - English
Page 12
An HDMI cable delivers digital audio and video in sets of three and are for use with video devices with Dolby Digital or PCM (pulse-code modulation) optical audio input to use with video devices ... of cable types Cables can be purchased from those illustrated herein. To obtain IR blaster cable: Visit http://ceaccessories.toshiba.com/ Optical audio cable Optical audio cable is for connecting your antenna, cable TV service, and/or cable converter box to the ANT/ CABLE input on connecting and using your specific devices...
An HDMI cable delivers digital audio and video in sets of three and are for use with video devices with Dolby Digital or PCM (pulse-code modulation) optical audio input to use with video devices ... of cable types Cables can be purchased from those illustrated herein. To obtain IR blaster cable: Visit http://ceaccessories.toshiba.com/ Optical audio cable Optical audio cable is for connecting your antenna, cable TV service, and/or cable converter box to the ANT/ CABLE input on connecting and using your specific devices...

Owner's Manual - English
Page 13
... Use the Cable box controls to ). To program the TV remote control to TV You will be able to use , distribution, or revision of television programs, videotapes, DVDs, and other materials is set to change channels. Chapter 2: Connecting your TV Connecting a VCR (or a VCR with S-video) and... antenna, Cable TV or Camcorder Camcorder AUDIO OUT L R VIDEO TV upper back panel VIDEO 2 inputs on TV right side panel TV lower back panel S-video cable or...
... Use the Cable box controls to ). To program the TV remote control to TV You will be able to use , distribution, or revision of television programs, videotapes, DVDs, and other materials is set to change channels. Chapter 2: Connecting your TV Connecting a VCR (or a VCR with S-video) and... antenna, Cable TV or Camcorder Camcorder AUDIO OUT L R VIDEO TV upper back panel VIDEO 2 inputs on TV right side panel TV lower back panel S-video cable or...

Owner's Manual - English
Page 14
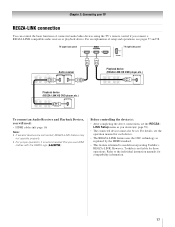
...the DVD player or satellite receiver to either set of television programs, videotapes, DVDs, and other materials is not supported). - For better picture performance, if your VCR has S-video, use , distribution, or revision of ColorStream terminals on the TV.* To view the DVD player: Turn ON ... VIDEO S-VIDEO VIDEO R IN OUT OUT Satellite receiver with ColorStream® (component video), a VCR, and a satellite receiver Your TV has two sets of the standard video cable. The ColorStream HD1 and HD2 terminals can connect the component video cables (plus the audio cables) instead ...
...the DVD player or satellite receiver to either set of television programs, videotapes, DVDs, and other materials is not supported). - For better picture performance, if your VCR has S-video, use , distribution, or revision of ColorStream terminals on the TV.* To view the DVD player: Turn ON ... VIDEO S-VIDEO VIDEO R IN OUT OUT Satellite receiver with ColorStream® (component video), a VCR, and a satellite receiver Your TV has two sets of the standard video cable. The ColorStream HD1 and HD2 terminals can connect the component video cables (plus the audio cables) instead ...

Owner's Manual - English
Page 16
...(see Chapter 3. For proper operation, the length of legacy HDMI sources may not operate properly with your latest HDMI TV, due to new standard adoption. Please try setting the following three options (Lip-Sync Latency, Deep Color, x.v.Color) to -DVI adapter cable transfers video only. See... Digital-Content Protection) program material in digital form from EIA/CEA-861-D-compliant[1] consumer electronic devices (such as a set-top box or DVD player with your TV receives digital audio and uncompressed digital video from an HDMI source device, or uncompressed digital video from a DVI (Digital...
...(see Chapter 3. For proper operation, the length of legacy HDMI sources may not operate properly with your latest HDMI TV, due to new standard adoption. Please try setting the following three options (Lip-Sync Latency, Deep Color, x.v.Color) to -DVI adapter cable transfers video only. See... Digital-Content Protection) program material in digital form from EIA/CEA-861-D-compliant[1] consumer electronic devices (such as a set-top box or DVD player with your TV receives digital audio and uncompressed digital video from an HDMI source device, or uncompressed digital video from a DVI (Digital...
Owner's Manual - English
Page 17
...explanation of connected audio/video devices using the TV's remote control if you will need: • HDMI cables (- Before controlling the device(s): • After completing the above connections, set . For details, see pages 57 and 58. However, Toshiba is not liable for compatibility information. 17... individual instruction manuals for those operations. page 59). • The connected devices must also be set the REGZALINK Setup menu as regulated by the HDMI standard. • This feature is recommended that you desire (- Refer to models incorporating Toshiba's REGZA-LINK.
...explanation of connected audio/video devices using the TV's remote control if you will need: • HDMI cables (- Before controlling the device(s): • After completing the above connections, set . For details, see pages 57 and 58. However, Toshiba is not liable for compatibility information. 17... individual instruction manuals for those operations. page 59). • The connected devices must also be set the REGZALINK Setup menu as regulated by the HDMI standard. • This feature is recommended that you desire (- Refer to models incorporating Toshiba's REGZA-LINK.

Owner's Manual - English
Page 18
...high noise level that may not output some digital audio sources because of Dolby Laboratories. LINE IN LR TV upper back panel Audio Digital Audio Selector Audio Settings Advanced Audio Settings Audio Setup 4 In the Optical Output Format field, select either Dolby Digital or PCM, depending on the... TV's remote control and open the Audio menu. 3 Highlight Audio Setup and press T. Audio Setup PC Audio HDMI ...
...high noise level that may not output some digital audio sources because of Dolby Laboratories. LINE IN LR TV upper back panel Audio Digital Audio Selector Audio Settings Advanced Audio Settings Audio Setup 4 In the Optical Output Format field, select either Dolby Digital or PCM, depending on the... TV's remote control and open the Audio menu. 3 Highlight Audio Setup and press T. Audio Setup PC Audio HDMI ...
Owner's Manual - English
Page 19
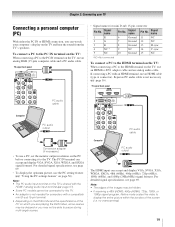
... multi-angle scenes. Note: • The PC audio input terminal on the TV, use the PC setting feature (- no overscanning). 19 Signal name 6 Ground 7 Ground 8 Ground 9 NC 10 Ground Pin No. TV upper back panel PC audio cable Computer PC audio output PC audio cable Conversion ...A connector). Chapter 2: Connecting your computer's display on the TV: When connecting a PC to -DV1 adapter cable and an analog audio cable. TV upper back panel • Signal names for computers with an HDMI terminal, use a PC, set the monitor output resolution on page 56). The PC IN...
... multi-angle scenes. Note: • The PC audio input terminal on the TV, use the PC setting feature (- no overscanning). 19 Signal name 6 Ground 7 Ground 8 Ground 9 NC 10 Ground Pin No. TV upper back panel PC audio cable Computer PC audio output PC audio cable Conversion ...A connector). Chapter 2: Connecting your computer's display on the TV: When connecting a PC to -DV1 adapter cable and an analog audio cable. TV upper back panel • Signal names for computers with an HDMI terminal, use a PC, set the monitor output resolution on page 56). The PC IN...

Owner's Manual - English
Page 21
...to the previous/next channel in channel lists. 11 3 C / # c While watching TV, these buttons open the Channel Browser™ and tune to control the TV. page 24). page 43). (Also see 3 C / # c.) 13 VOL + - When the TV is set, these buttons select or adjust programming menus. (Also see "Arrow buttons.") 12 Arrow ...programmed channels when no menu is on -screen, these keys can also be used to change inputs on the TV front will be illuminated. 3 MODE SELECT sets the five remote control device modes: TV, CABLE/SAT, HD DVD, DVD, and VCR/PVR. page 36). 15 EXIT closes on and off the...
...to the previous/next channel in channel lists. 11 3 C / # c While watching TV, these buttons open the Channel Browser™ and tune to control the TV. page 24). page 43). (Also see 3 C / # c.) 13 VOL + - When the TV is set, these buttons select or adjust programming menus. (Also see "Arrow buttons.") 12 Arrow ...programmed channels when no menu is on -screen, these keys can also be used to change inputs on the TV front will be illuminated. 3 MODE SELECT sets the five remote control device modes: TV, CABLE/SAT, HD DVD, DVD, and VCR/PVR. page 36). 15 EXIT closes on and off the...
Owner's Manual - English
Page 24
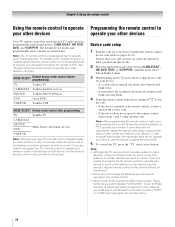
...program the TV's remote control to operate your device or some of the features on the device. These VCRs have entered the correct code. • If the device does not respond to operate most Toshiba devices. See "Programming the remote control to operate your VCR brand, set the switch... to the other position ("VCR1" or "VCR2") and reprogram the remote control. 24 Chapter 3: Using the remote control Using the remote control to operate your other devices Your TV remote control ...
...program the TV's remote control to operate your device or some of the features on the device. These VCRs have entered the correct code. • If the device does not respond to operate most Toshiba devices. See "Programming the remote control to operate your VCR brand, set the switch... to the other position ("VCR1" or "VCR2") and reprogram the remote control. 24 Chapter 3: Using the remote control Using the remote control to operate your other devices Your TV remote control ...
Owner's Manual - English
Page 25
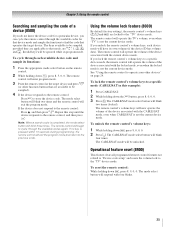
Chapter 3: Using the remote control Searching and sampling the code of a device (8500) If you do not know the device code for a particular device, you can cycle the remote control through the available codes for that device mode and sample the functions to find the code that mode, are applicable to be sampled, provided they are p, 1, z, The keys available to that operates the target device.
Chapter 3: Using the remote control Searching and sampling the code of a device (8500) If you do not know the device code for a particular device, you can cycle the remote control through the available codes for that device mode and sample the functions to find the code that mode, are applicable to be sampled, provided they are p, 1, z, The keys available to that operates the target device.
Owner's Manual - English
Page 33
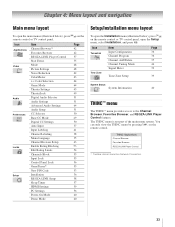
...Panel Lock GameTimer® New PIN Code Installation REGZA-LINK Setup Sleep Timer HDMI Settings PC Settings Power-On Mode Demo Mode Page 42 42 57 35 48 48 62 63 ...menu layout To open the Installation menu (illustrated below), press Y on the remote control or TV control panel, open the main menus (illustrated below), press Y on the remote control. The ...and REGZA-LINK Player Control features. THINC Applications Channel Browser Favorites Browser REGZA-LINK Player Control * Toshiba Home Interactive Network Connection. 33 Chapter 4: Menu layout and navigation Main menu layout To open the ...
...Panel Lock GameTimer® New PIN Code Installation REGZA-LINK Setup Sleep Timer HDMI Settings PC Settings Power-On Mode Demo Mode Page 42 42 57 35 48 48 62 63 ...menu layout To open the Installation menu (illustrated below), press Y on the remote control or TV control panel, open the main menus (illustrated below), press Y on the remote control. The ...and REGZA-LINK Player Control features. THINC Applications Channel Browser Favorites Browser REGZA-LINK Player Control * Toshiba Home Interactive Network Connection. 33 Chapter 4: Menu layout and navigation Main menu layout To open the ...

Owner's Manual - English
Page 35
... Setup Menu Language Please select a language. English Españ ol Franç ais 2 Press T. For normal TV usage, please select [Normal (Off)]. Next the Demo Mode setting window will display for about 2 seconds, or use the demo, please select [Store (On)]. Normal (Off) ...your preferred menu language and press T. The ClearFrame™ demonstration window will appear. Chapter 5: Setting up your TV Setting the Demo Mode When you first turn on the TV, menu language selection and Demo Mode selection windows will automatically disappear. Preferences CC Selector Base CC...
... Setup Menu Language Please select a language. English Españ ol Franç ais 2 Press T. For normal TV usage, please select [Normal (Off)]. Next the Demo Mode setting window will display for about 2 seconds, or use the demo, please select [Store (On)]. Normal (Off) ...your preferred menu language and press T. The ClearFrame™ demonstration window will appear. Chapter 5: Setting up your TV Setting the Demo Mode When you first turn on the TV, menu language selection and Demo Mode selection windows will automatically disappear. Preferences CC Selector Base CC...

Owner's Manual - English
Page 36
.... Input Configuration ANT/CABLE In Cancel Cable Done 5 To save your original settings, highlight Cancel and press T. Programming channels into the TV's channel memory. Note: • If the ANT/CABLE input signal type is set to Cable, the automatic channel programming process erases channels that were previously programmed....) To remove an Antenna source channel from the memory, you must use the Channel Number buttons on the TV. Chapter 5: Setting up your TV Configuring the input source for the ANT/CABLE input on the remote control. • Programming channels when the ANT/CABLE ...
.... Input Configuration ANT/CABLE In Cancel Cable Done 5 To save your original settings, highlight Cancel and press T. Programming channels into the TV's channel memory. Note: • If the ANT/CABLE input signal type is set to Cable, the automatic channel programming process erases channels that were previously programmed....) To remove an Antenna source channel from the memory, you must use the Channel Number buttons on the TV. Chapter 5: Setting up your TV Configuring the input source for the ANT/CABLE input on the remote control. • Programming channels when the ANT/CABLE ...


