User Manual
Page 1
... or satellite provider. © 2010 TOSHIBA CORPORATION All Rights Reserved Owner's Record The model number and serial number are on the back and side of steps for setting up your new TV, see page 12. Integrated High Definition LCD Television 46WX800U 55WX800U For an overview of your TV.... www.tacp.toshiba.com/customersupport Model number: Serial number: TD/M VX1A00176200 Note: To display...
... or satellite provider. © 2010 TOSHIBA CORPORATION All Rights Reserved Owner's Record The model number and serial number are on the back and side of steps for setting up your new TV, see page 12. Integrated High Definition LCD Television 46WX800U 55WX800U For an overview of your TV.... www.tacp.toshiba.com/customersupport Model number: Serial number: TD/M VX1A00176200 Note: To display...

User Manual
Page 2
... of the building, as practical. The lightning flash with furniture and television sets. • Don't place flat panel displays are unsure, contact a professional installer. • A minimum of this Toshiba LCD TV. However, flat panel displays on dressers, bookcases, shelves... enjoyable and safe. p. 5). NO USER-SERVICEABLE PARTS INSIDE. NEC, which provides guidelines for purchasing this television. TOSHIBA Cares! • The consumer electronics industry is appropriate. WARNING: If you for proper grounding and, in serious bodily injury and/...
... of the building, as practical. The lightning flash with furniture and television sets. • Don't place flat panel displays are unsure, contact a professional installer. • A minimum of this Toshiba LCD TV. However, flat panel displays on dressers, bookcases, shelves... enjoyable and safe. p. 5). NO USER-SERVICEABLE PARTS INSIDE. NEC, which provides guidelines for purchasing this television. TOSHIBA Cares! • The consumer electronics industry is appropriate. WARNING: If you for proper grounding and, in serious bodily injury and/...
User Manual
Page 7
Federal Communications Commission Statement FCC Compliance Statement This Toshiba television models 46WX800U and 55WX800U comply with RSS-210. The party responsible for compliance to which can radiate radio frequency energy and...interference to operate this equipment. IMPORTANT NOTE: IC Radiation Exposure Statement: This equipment complies with FCC radiation exposure limits set forth for an uncontrolled environment. Operation is : Toshiba America Consumer Products, L.L.C. 82 Totowa Rd. USA - Operation is going to prohibit transmission of control or signaling information...
Federal Communications Commission Statement FCC Compliance Statement This Toshiba television models 46WX800U and 55WX800U comply with RSS-210. The party responsible for compliance to which can radiate radio frequency energy and...interference to operate this equipment. IMPORTANT NOTE: IC Radiation Exposure Statement: This equipment complies with FCC radiation exposure limits set forth for an uncontrolled environment. Operation is : Toshiba America Consumer Products, L.L.C. 82 Totowa Rd. USA - Operation is going to prohibit transmission of control or signaling information...
User Manual
Page 8
...NetFront Browser of ACCESS CO., LTD. • ACCESS, the ACCESS logo and NetFront are trademarks of Google Inc. Picture Settings, Auto Brightness Setting) may be used in the TV tuning process to certain intellectual property rights of Microsoft. however, there may increase energy ...This results in clear, rich sound with this TV is recommended for ENERGY STAR qualification. and foreign patents pending. therefore, Toshiba is not responsible for a large listening area and it is prohibited without the appropriate license(s) from Dolby Laboratories. Dolby ...
...NetFront Browser of ACCESS CO., LTD. • ACCESS, the ACCESS logo and NetFront are trademarks of Google Inc. Picture Settings, Auto Brightness Setting) may be used in the TV tuning process to certain intellectual property rights of Microsoft. however, there may increase energy ...This results in clear, rich sound with this TV is recommended for ENERGY STAR qualification. and foreign patents pending. therefore, Toshiba is not responsible for a large listening area and it is prohibited without the appropriate license(s) from Dolby Laboratories. Dolby ...
User Manual
Page 10
... Channel Return 37 Using SurfLock 37 10 Selecting the video input to view 38 Using closed captions 38 Analog CC mode 38 Digital CC settings 39 Setting the PIN code 39 Entering a new PIN code 39 Changing or deleting your PIN code 39 Forgotten PIN code 39 Using parental controls...® input source selection 43 Adjusting the amplifier's audio 44 Other REGZA-LINK® functions 44 Connecting a Toshiba PC compatible to REGZA-LINK 44 Using the HDMI® settings feature 45 Setting the HDMI® audio mode 45 Viewing the HDMI® signal information 45 Using your PC with the TV...
... Channel Return 37 Using SurfLock 37 10 Selecting the video input to view 38 Using closed captions 38 Analog CC mode 38 Digital CC settings 39 Setting the PIN code 39 Entering a new PIN code 39 Changing or deleting your PIN code 39 Forgotten PIN code 39 Using parental controls...® input source selection 43 Adjusting the amplifier's audio 44 Other REGZA-LINK® functions 44 Connecting a Toshiba PC compatible to REGZA-LINK 44 Using the HDMI® settings feature 45 Setting the HDMI® audio mode 45 Viewing the HDMI® signal information 45 Using your PC with the TV...
User Manual
Page 11
...Dolby® Volume 59 Using advanced sound features 59 Using surround sound 59 Chapter 8: Advanced features 60 Using your home network 60 Setting up the Media Renderer feature 71 Using the Media Player 73 Media Player Specifications 73 Basic operation 73 Viewing Movie files 75 Playing ... 93 Remote control codes 94 Limited United States Warranty for LCD Televisions 100 Limited Canadian Warranty for Toshiba Brand Flat Panel Televisions 101 Index 104 11 TV Widgets 70 Setting up the Network 61 Wireless Setup 61 Advanced Network Setup 63 Network Connection Test 64 Using the ...
...Dolby® Volume 59 Using advanced sound features 59 Using surround sound 59 Chapter 8: Advanced features 60 Using your home network 60 Setting up the Media Renderer feature 71 Using the Media Player 73 Media Player Specifications 73 Basic operation 73 Viewing Movie files 75 Playing ... 93 Remote control codes 94 Limited United States Warranty for LCD Televisions 100 Limited Canadian Warranty for Toshiba Brand Flat Panel Televisions 101 Index 104 11 TV Widgets 70 Setting up the Network 61 Wireless Setup 61 Advanced Network Setup 63 Network Connection Test 64 Using the ...
User Manual
Page 12
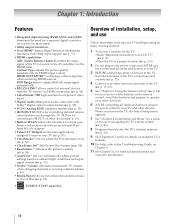
... of external devices from the TV remote via the HDMI cable. Content Type adjusts the picture quality automatically for a separate digital converter set up your TV and begin using the TV's features. 10 For help, refer to the Troubleshooting Guide, on the remote control, install... the batteries and prepare to operate your other device(s). 6 AFTER connecting all cables and devices to set -top box (in a proper location (- p. 26). 8 Program channels into the TV's channel memory (- HDMI INSTAPORT™ technology reduces lag time...
... of external devices from the TV remote via the HDMI cable. Content Type adjusts the picture quality automatically for a separate digital converter set up your TV and begin using the TV's features. 10 For help, refer to the Troubleshooting Guide, on the remote control, install... the batteries and prepare to operate your other device(s). 6 AFTER connecting all cables and devices to set -top box (in a proper location (- p. 26). 8 Program channels into the TV's channel memory (- HDMI INSTAPORT™ technology reduces lag time...
User Manual
Page 16
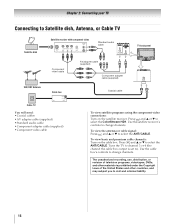
... TV to channel 3 or 4 (the channel the cable box output is prohibited under the Copyright Laws of television programs, videotapes, DVDs, and other materials is set to change channels. Use the cable box's controls to civil and criminal liability. 16 To view basic and premium cable channels: Turn on the satellite...
... TV to channel 3 or 4 (the channel the cable box output is prohibited under the Copyright Laws of television programs, videotapes, DVDs, and other materials is set to change channels. Use the cable box's controls to civil and criminal liability. 16 To view basic and premium cable channels: Turn on the satellite...
User Manual
Page 17
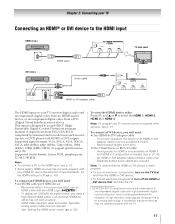
...high-bandwidth digital content protection, which is reset properly: • To turn on electronic components, turn on HDMI 3 and HDMI 4. Try the HDMI setting to RCA Y-Cable - Recommendation: For proper operation, use an HDMI cable with the TV. 17 Recomended length: 6.6 ft (2m). •One ...and then the TV. [1] EIA/CEA-861-D compliance covers the transmission of uncompressed digital video with HDMI or DVI output). p. 45). See "Setting the HDMI audio mode" (- To connect a DVI device, you will need: •one HDMI cable per HDMI device - Analog audio for ...
...high-bandwidth digital content protection, which is reset properly: • To turn on electronic components, turn on HDMI 3 and HDMI 4. Try the HDMI setting to RCA Y-Cable - Recommendation: For proper operation, use an HDMI cable with the TV. 17 Recomended length: 6.6 ft (2m). •One ...and then the TV. [1] EIA/CEA-861-D compliance covers the transmission of uncompressed digital video with HDMI or DVI output). p. 45). See "Setting the HDMI audio mode" (- To connect a DVI device, you will need: •one HDMI cable per HDMI device - Analog audio for ...
User Manual
Page 19
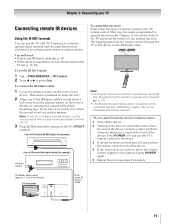
...'s remote control for this step.) 3 If the device turns on, the sensor is marked on some devices.* 2 Align one of the device. p. 17-18) To set the IR OUT mode: 1 Y > PREFERENCES > IR Control. 2 Press C or c to operate other devices" (- To connect the IR blaster cable: 1 Locate the infrared sensor on the...
...'s remote control for this step.) 3 If the device turns on, the sensor is marked on some devices.* 2 Align one of the device. p. 17-18) To set the IR OUT mode: 1 Y > PREFERENCES > IR Control. 2 Press C or c to operate other devices" (- To connect the IR blaster cable: 1 Locate the infrared sensor on the...
User Manual
Page 20
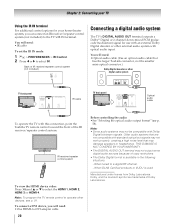
... terminal For additional control options for use with an external Dolby Digital decoder or other external audio system with this connection, point the Toshiba TV remote control toward the front of the IR receiver/repeater control system. Note: • Some audio systems may damage speakers or... are trademarks of copy restrictions. • The Dolby Digital format is used. Manufactured under license from Dolby Laboratories. You will need: •IR cable To set the IR IN mode: 1 Y > PREFERENCES > IR Control. 2 Press C or c to select IN. When tuned to select the HDMI 1, HDMI 2, HDMI 3 or...
... terminal For additional control options for use with an external Dolby Digital decoder or other external audio system with this connection, point the Toshiba TV remote control toward the front of the IR receiver/repeater control system. Note: • Some audio systems may damage speakers or... are trademarks of copy restrictions. • The Dolby Digital format is used. Manufactured under license from Dolby Laboratories. You will need: •IR cable To set the IR IN mode: 1 Y > PREFERENCES > IR Control. 2 Press C or c to select IN. When tuned to select the HDMI 1, HDMI 2, HDMI 3 or...

User Manual
Page 22
... monitor output resolution on the TV is shared with the HDMI 4 and ColorStream HD2 terminal. To configure for use , see "Setting the PC Audio" (- To configure for use , see "Setting the PC audio" (- name 1 R 2 G 3 B 4 NC * 5 NC 6 Ground 11 NC 7 Ground 12 NC 8 Ground 13 H-sync 9 NC 14 V-sync 10 Ground 15 NC...
... monitor output resolution on the TV is shared with the HDMI 4 and ColorStream HD2 terminal. To configure for use , see "Setting the PC Audio" (- To configure for use , see "Setting the PC audio" (- name 1 R 2 G 3 B 4 NC * 5 NC 6 Ground 11 NC 7 Ground 12 NC 8 Ground 13 H-sync 9 NC 14 V-sync 10 Ground 15 NC...
User Manual
Page 25
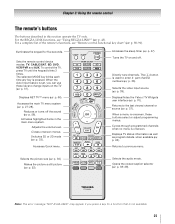
p. 88-90). Sets the remote control device modes: TV, CABLE/SAT, BD, DVD, VCR/PVR and AUX. Accesses the main TV menu system (- p. 58). Accesses Quick menu. TV ...: The error message "NOT AVAILABLE" may appear if you can use these buttons select or adjust programming menus. Illuminates the keypad for a function that is set, you press a key for five seconds. When the Auto Input feature is not available. 25 Reduces or turns off . Directly tune channels. When a menu is...
p. 88-90). Sets the remote control device modes: TV, CABLE/SAT, BD, DVD, VCR/PVR and AUX. Accesses the main TV menu system (- p. 58). Accesses Quick menu. TV ...: The error message "NOT AVAILABLE" may appear if you can use these buttons select or adjust programming menus. Illuminates the keypad for a function that is set, you press a key for five seconds. When the Auto Input feature is not available. 25 Reduces or turns off . Directly tune channels. When a menu is...
User Manual
Page 26
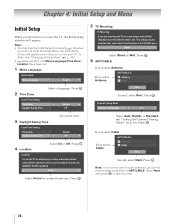
...wall, please select [Wall]. [Stand] is recommended for normal use . OK Channel Tuning Mode Channel Tuning Mode Auto Select Auto, Digital, or Standard (- "Setting the Channel Tuning Mode" on p. 36). OK If you select Antenna: First, select Antenna. OK Note: If you do not want to scan channels, ...home use . (ENERGY STAR® qualified) Home Select Home for ANT/CABLE. OK Eastern Off 3 Daylight Saving Time Local Time Setting Time Zone Daylight Saving Time Set a time zone. Press . Note: • You can stop the Initial Setup by pressing O. OK 6 ANT/CABLE If you select Cable...
...wall, please select [Wall]. [Stand] is recommended for normal use . OK Channel Tuning Mode Channel Tuning Mode Auto Select Auto, Digital, or Standard (- "Setting the Channel Tuning Mode" on p. 36). OK If you select Antenna: First, select Antenna. OK Note: If you do not want to scan channels, ...home use . (ENERGY STAR® qualified) Home Select Home for ANT/CABLE. OK Eastern Off 3 Daylight Saving Time Local Time Setting Time Zone Daylight Saving Time Set a time zone. Press . Note: • You can stop the Initial Setup by pressing O. OK 6 ANT/CABLE If you select Cable...
User Manual
Page 27
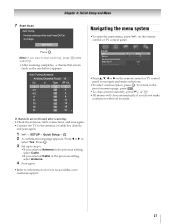
... •To open the main menu, press Y on www.tacp.toshiba.com/ customersupport. 27 OK 3 Set up to step 6. •If you selected Antenna in the previous setting, select Cable. •If you selected Cable in the previous setting, select Antenna. 4 Scan again. •Refer to the previous ...not make selections. •To select a menu option, press OK . Auto Tuning (Antenna) Antenna Channels Found: 14 Ch. SOUND MTS Balance Advanced Sound Settings Dolby Volume Dynamic Range Control Stereo 0 Low Off •Press B, b, C or c on the remote control or TV control panel to select Yes....
... •To open the main menu, press Y on www.tacp.toshiba.com/ customersupport. 27 OK 3 Set up to step 6. •If you selected Antenna in the previous setting, select Cable. •If you selected Cable in the previous setting, select Antenna. 4 Scan again. •Refer to the previous ...not make selections. •To select a menu option, press OK . Auto Tuning (Antenna) Antenna Channels Found: 14 Ch. SOUND MTS Balance Advanced Sound Settings Dolby Volume Dynamic Range Control Stereo 0 Low Off •Press B, b, C or c on the remote control or TV control panel to select Yes....

User Manual
Page 28
... 4: Initial Setup and Menu Main menu layout To open the main menus (illustrated below), press Y on the current mode. Quick menu Item 3D Settings PICTURE Picture Mode Picture Size Photo Frame Sort Repeat SOUND Background Music Speakers Channel Browser Media Player REGZA-LINK Player Control Sleep Timer Interval Time...47 34-35 44 Network Setup 61 Netflix Setup 67 VUDU Deactivation 67 Media Renderer Setup Photo Frame Setup Channel Browser Setup PIN Setting Parental Control and Locks Display Settings AV Connection Auto Input 71 79 36 39 40 46, 52 30, 31, 45, 46, 58 31 IR control 19...
... 4: Initial Setup and Menu Main menu layout To open the main menus (illustrated below), press Y on the current mode. Quick menu Item 3D Settings PICTURE Picture Mode Picture Size Photo Frame Sort Repeat SOUND Background Music Speakers Channel Browser Media Player REGZA-LINK Player Control Sleep Timer Interval Time...47 34-35 44 Network Setup 61 Netflix Setup 67 VUDU Deactivation 67 Media Renderer Setup Photo Frame Setup Channel Browser Setup PIN Setting Parental Control and Locks Display Settings AV Connection Auto Input 71 79 36 39 40 46, 52 30, 31, 45, 46, 58 31 IR control 19...

User Manual
Page 29
... > SETUP > Menu Language. 2 Press C or c to fix the adjustment. Storing channels in memory (optional) To make your preferred language. Auto Tuning Note: You must set up the antenna/cable input source first. p. 26). Press C or c to select Home. For normal home use, select Home. 1 Y > SETUP > Location. 2...Equalizer. OK 2 A confirmation message appears. OK 3 Select an option: • Time Zone • Daylight Saving Time 4 Press C or c to set your area and store them in the TV's memory. OK 2 Press B or b to activate Daylight Saving Time. Press . To cancel the selection or...
... > SETUP > Menu Language. 2 Press C or c to fix the adjustment. Storing channels in memory (optional) To make your preferred language. Auto Tuning Note: You must set up the antenna/cable input source first. p. 26). Press C or c to select Home. For normal home use, select Home. 1 Y > SETUP > Location. 2...Equalizer. OK 2 A confirmation message appears. OK 3 Select an option: • Time Zone • Daylight Saving Time 4 Press C or c to set your area and store them in the TV's memory. OK 2 Press B or b to activate Daylight Saving Time. Press . To cancel the selection or...
User Manual
Page 30
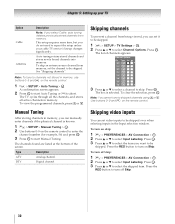
... channels from being viewed, you can manually enter channels if the physical channel is selected. To turn on Skip. Press . Chapter 5: Setting up your cable TV service's lineup changes significantly. This setup requires some time, but you do not need to be skipped over when ...to enter the channel number (for example, 56) and press . Channel Options Ch. OK 3 Press B or b to select the item you can set it to be skipped. 1 Y > SETUP > TV Settings > . See "Skipping channels". OK 2 Use buttons 0-9 on the remote control. OK 2 Press B or b to be skipped. Press . To...
... channels from being viewed, you can manually enter channels if the physical channel is selected. To turn on Skip. Press . Chapter 5: Setting up your cable TV service's lineup changes significantly. This setup requires some time, but you do not need to be skipped over when ...to enter the channel number (for example, 56) and press . Channel Options Ch. OK 3 Press B or b to select the item you can set it to be skipped. 1 Y > SETUP > TV Settings > . See "Skipping channels". OK 2 Use buttons 0-9 on the remote control. OK 2 Press B or b to be skipped. Press . To...
User Manual
Page 31
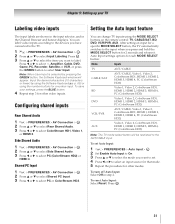
... > . You can change TV inputs using the MODE SELECT buttons on the remote control: TV, CABLE/SAT, BD, DVD, VCR/PVR, AUX. Auto Input settings options for each MODE SELECT button: Mode Inputs TV ANT/CABLE CABLE/SAT ANT/CABLE, Video 1, Video 2, ColorStream HD1, HDMI 1, HDMI 2, HDMI 3, HDMI ... button to the input when you have connected to select PC or ColorStream HD2. Shared PC Input 1 Y > PREFERENCES > AV Connection > . After setting an input for a specific MODE SELECT button, the TV automatically switches to select User Input. To turn off Auto Input: Select Off in the Channel...
... > . You can change TV inputs using the MODE SELECT buttons on the remote control: TV, CABLE/SAT, BD, DVD, VCR/PVR, AUX. Auto Input settings options for each MODE SELECT button: Mode Inputs TV ANT/CABLE CABLE/SAT ANT/CABLE, Video 1, Video 2, ColorStream HD1, HDMI 1, HDMI 2, HDMI 3, HDMI ... button to the input when you have connected to select PC or ColorStream HD2. Shared PC Input 1 Y > PREFERENCES > AV Connection > . After setting an input for a specific MODE SELECT button, the TV automatically switches to select User Input. To turn off Auto Input: Select Off in the Channel...
User Manual
Page 33
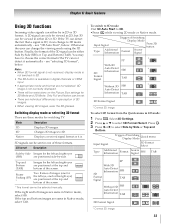
...the screen. Press . OK 3 Press C or c to select 3D Format Select. Native Displays a received signal format as 2D, but 3D can be set. • There are same in 3D mode: 1 Press . Trigger of Switching Display Mode Quick menu Input Signal 3D Format Select Type Additional Information Format ...mode, select SBS. Switching display mode or selecting 3D format There are not selected, 3D image is . 3D signals can be selected manually. Select 3D Settings. 2 Press B or b to select Side by Side or Top and Bottom. Finally, the format of 3D images. • When viewing 3D images...
...the screen. Press . OK 3 Press C or c to select 3D Format Select. Native Displays a received signal format as 2D, but 3D can be set. • There are same in 3D mode: 1 Press . Trigger of Switching Display Mode Quick menu Input Signal 3D Format Select Type Additional Information Format ...mode, select SBS. Switching display mode or selecting 3D format There are not selected, 3D image is . 3D signals can be selected manually. Select 3D Settings. 2 Press B or b to select Side by Side or Top and Bottom. Finally, the format of 3D images. • When viewing 3D images...


