Owner's Manual - English
Page 7
...Configuring the antenna input source for the ANT/CABLE terminal 29 Programming channels into the TV's channel memory . . . . 30 Programming channels automatically 30 Manually adding and deleting channels in the channel memory 30 Labeling channels 31 Setting the HDMI™ audio mode 32 Viewing the digital signal... 46 Using the Locks menu 46 Entering the PIN code 46 If you cannot remember your PIN code 46 Changing your PIN code 47 Blocking TV programs and movies by rating (V-Chip 47 Downloading an additional rating system for blocking TV programs and movies 47 Blocking channels 48...
...Configuring the antenna input source for the ANT/CABLE terminal 29 Programming channels into the TV's channel memory . . . . 30 Programming channels automatically 30 Manually adding and deleting channels in the channel memory 30 Labeling channels 31 Setting the HDMI™ audio mode 32 Viewing the digital signal... 46 Using the Locks menu 46 Entering the PIN code 46 If you cannot remember your PIN code 46 Changing your PIN code 47 Blocking TV programs and movies by rating (V-Chip 47 Downloading an additional rating system for blocking TV programs and movies 47 Blocking channels 48...

Owner's Manual - English
Page 10
... 27). Used for additional information. 3 VIDEO 2 IN - When a menu is on-screen, these buttons change the source you cannot turn the TV on and off the TV, press and hold the POWER button on -screen, these buttons function as "VIDEO 2" and include standard A/V... connections. 4 POWER - Point the remote control toward this manual for 5 or more seconds to change the channel (programmed channels only; - Press to access the menu system (- TV front Right side panel 4 8 5 9 6 7 10 3 11 1 2 1 Remote sensor - Press to instantly ...
... 27). Used for additional information. 3 VIDEO 2 IN - When a menu is on-screen, these buttons change the source you cannot turn the TV on and off the TV, press and hold the POWER button on -screen, these buttons function as "VIDEO 2" and include standard A/V... connections. 4 POWER - Point the remote control toward this manual for 5 or more seconds to change the channel (programmed channels only; - Press to access the menu system (- TV front Right side panel 4 8 5 9 6 7 10 3 11 1 2 1 Remote sensor - Press to instantly ...
Owner's Manual - English
Page 13
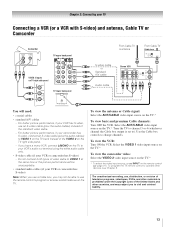
... performance will need: • coaxial cables • standard A/V cables - Select the ANT/CABLE video input source on the TV.* Tune the TV to channel 3 or 4 (whichever channel the Cable box output is prohibited under the Copyright Laws of the standard video cable. - To view the VCR: Turn ON... ANT/CABLE video input source on the remote control (- Use the Cable box controls to change channels. The unauthorized recording, use an S-video cable (plus the audio cables) to VIDEO 1 on the TV back instead of television programs, videotapes, DVDs, and other materials is set to). For ...
... performance will need: • coaxial cables • standard A/V cables - Select the ANT/CABLE video input source on the TV.* Tune the TV to channel 3 or 4 (whichever channel the Cable box output is prohibited under the Copyright Laws of the standard video cable. - To view the VCR: Turn ON... ANT/CABLE video input source on the remote control (- Use the Cable box controls to change channels. The unauthorized recording, use an S-video cable (plus the audio cables) to VIDEO 1 on the TV back instead of television programs, videotapes, DVDs, and other materials is set to). For ...
Owner's Manual - English
Page 24
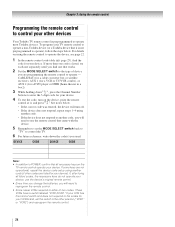
... your VCR brand, set the MODE SELECT switch back to "TV" to control the TV. 6 For future reference, write down E, press the Channel Number buttons to enter the 3-digit code for your device. ... do not operate your device, use the device's original remote control. • Every time you change the batteries, you will need to use the remote control that it , and press p. See ...notes below . If, after trying all necessary keys on using another code (if other devices Your Toshiba TV remote control is not preprogrammed to operate), follow the steps below . • If the correct code...
... your VCR brand, set the MODE SELECT switch back to "TV" to control the TV. 6 For future reference, write down E, press the Channel Number buttons to enter the 3-digit code for your device. ... do not operate your device, use the device's original remote control. • Every time you change the batteries, you will need to use the remote control that it , and press p. See ...notes below . If, after trying all necessary keys on using another code (if other devices Your Toshiba TV remote control is not preprogrammed to operate), follow the steps below . • If the correct code...

Owner's Manual - English
Page 30
... the remote control (or highlight Cancel in the channel memory. To save your Cable TV service lineup changes significantly. Follow the steps below to program channels into the channel memory, you can manually add or erase individual channels in the channel memory After automatically programming channels into the TV's channel memory. After the channels are programmed automatically, you want to remove...
... the remote control (or highlight Cancel in the channel memory. To save your Cable TV service lineup changes significantly. Follow the steps below to program channels into the channel memory, you can manually add or erase individual channels in the channel memory After automatically programming channels into the TV's channel memory. After the channels are programmed automatically, you want to remove...
Owner's Manual - English
Page 32
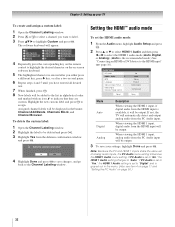
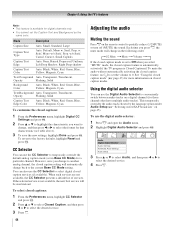
...keyboard will be output. Note: Because the PC and HDMI 1 inputs share the same set to "No," the HDMI 1 Audio setting changes to highlight Custom and press T. Audio Setup PC Audio HDMI 1 Audio MTS Language Optical Output Format Dolby Digital Dynamic Range Control Reset No ...be displayed in alphabetical order and marked with an icon to the Channel Labeling window. No Yes 4 Highlight Done and press T to save your TV To create and assign a custom label: 1 Open the Channel Labeling window. 2 Press < or , to select a channel you have entered all desired text. 7 When finished, press ...
...keyboard will be output. Note: Because the PC and HDMI 1 inputs share the same set to "No," the HDMI 1 Audio setting changes to highlight Custom and press T. Audio Setup PC Audio HDMI 1 Audio MTS Language Optical Output Format Dolby Digital Dynamic Range Control Reset No ...be displayed in alphabetical order and marked with an icon to the Channel Labeling window. No Yes 4 Highlight Done and press T to save your TV To create and assign a custom label: 1 Open the Channel Labeling window. 2 Press < or , to select a channel you have entered all desired text. 7 When finished, press ...
Owner's Manual - English
Page 33
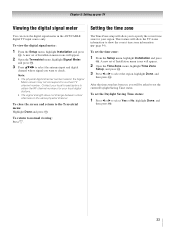
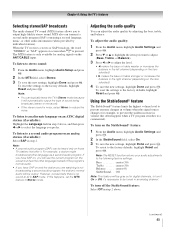
...TV status information to check. Contact your local broadcasters to select the region, highlight Done, and then press T. To set of Installation menu icons will allow you will appear. 2 Open the Time Zone menu, highlight Time Zone Setup, and press T. 3 Press C or c to obtain the RF channel... c to select the antenna input and digital channel whose signal you want to show the correct ...time zone for your TV Viewing the digital signal... digital channel number listed in the ANT/CABLE digital TV input source...Press C or c to a virtual TV channel number. To close the screen and return to...
...TV status information to check. Contact your local broadcasters to select the region, highlight Done, and then press T. To set of Installation menu icons will allow you will appear. 2 Open the Time Zone menu, highlight Time Zone Setup, and press T. 3 Press C or c to obtain the RF channel... c to select the antenna input and digital channel whose signal you want to show the correct ...time zone for your TV Viewing the digital signal... digital channel number listed in the ANT/CABLE digital TV input source...Press C or c to a virtual TV channel number. To close the screen and return to...
Owner's Manual - English
Page 35
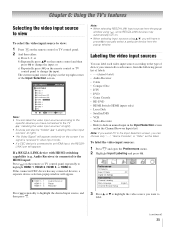
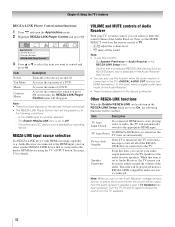
...; Satellite/DSS • VCR • Video Recorder • Hide (to hide an unused input in the Input Selection screen and in the Channel Browser Inputs list) Note: If you select PC in video input mode. • If a CEC device is connected to the HDMI input:... also be "hidden" (- "Labeling the video input sources" at right). • Sources can label the video input sources according to change the input; or c) Repeatedly press + on the remote control or TV control panel. 2 And then either: a) Press 0-9; HDMI 1 - 1 HDMI 1 - 2 HDMI 1 - 3 Audio Receiver Player Recorder Press + ...
...; Satellite/DSS • VCR • Video Recorder • Hide (to hide an unused input in the Input Selection screen and in the Channel Browser Inputs list) Note: If you select PC in video input mode. • If a CEC device is connected to the HDMI input:... also be "hidden" (- "Labeling the video input sources" at right). • Sources can label the video input sources according to change the input; or c) Repeatedly press + on the remote control or TV control panel. 2 And then either: a) Press 0-9; HDMI 1 - 1 HDMI 1 - 2 HDMI 1 - 3 Audio Receiver Player Recorder Press + ...

Owner's Manual - English
Page 36
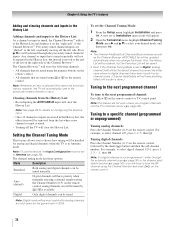
...VCR 2 Cable 3 Video Recorder 4 ColorStream HD2 (Hidden) 5 DTV 6 Satellite/DSS 7 DVD 8 HD DVD 9 PC 0 - 9 / INPUT to tune). • Quickly change inputs from the Inputs List. • Quickly select REGZA-LINK devices from the REGZALINK List. To clear the input labels: 1 From the Preferences menu, highlight...you could label the inputs if you connected a VCR to VIDEO 1, Cable TV to VIDEO 2, a video recorder to ColorStream HD1, a DTV settop box to HDMI 1, a satellite/DSS set up a favorite channels/inputs list that is pressed. Favorites Browser The Favorites Browser allows you can ...
...VCR 2 Cable 3 Video Recorder 4 ColorStream HD2 (Hidden) 5 DTV 6 Satellite/DSS 7 DVD 8 HD DVD 9 PC 0 - 9 / INPUT to tune). • Quickly change inputs from the Inputs List. • Quickly select REGZA-LINK devices from the REGZALINK List. To clear the input labels: 1 From the Preferences menu, highlight...you could label the inputs if you connected a VCR to VIDEO 1, Cable TV to VIDEO 2, a video recorder to ColorStream HD1, a DTV settop box to HDMI 1, a satellite/DSS set up a favorite channels/inputs list that is pressed. Favorites Browser The Favorites Browser allows you can ...
Owner's Manual - English
Page 38
...have anything listed until a scan is done.) Tuning to the next programmed channel To tune to the next programmed channel: Press < or , on the remote control or TV control panel. The Channel Browser™ will clear the History List. Note: See page 29 for...Channel Browser ANT/CABLE list will be handled for various reasons), the TV will clear the History List. Tuning to the left, eventually moving off the TV will store the following channels: • All channels that cannot be set the Channel Tuning Mode: 1 From the Setup menu, highlight Installation and press T. page 30)-you change...
...have anything listed until a scan is done.) Tuning to the next programmed channel To tune to the next programmed channel: Press < or , on the remote control or TV control panel. The Channel Browser™ will clear the History List. Note: See page 29 for...Channel Browser ANT/CABLE list will be handled for various reasons), the TV will clear the History List. Tuning to the left, eventually moving off the TV will store the following channels: • All channels that cannot be set the Channel Tuning Mode: 1 From the Setup menu, highlight Installation and press T. page 30)-you change...
Owner's Manual - English
Page 39
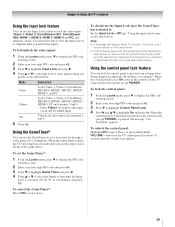
The TV will return to you. Once you press R and then change channels again, the CH RTN memory will be cleared and the button will be hidden. Note: The "picture size" illustrations are currently watching. To select the ... picture size (i.e., changing the height/ width ratio) for external inputs. Select the picture size that displays the current program the way that are tuned.This feature also works for any purpose other than your TV. The previous channel will return to the last-viewed input. The channel has been programmed to the R button. 3 You...
The TV will return to you. Once you press R and then change channels again, the CH RTN memory will be cleared and the button will be hidden. Note: The "picture size" illustrations are currently watching. To select the ... picture size (i.e., changing the height/ width ratio) for external inputs. Select the picture size that displays the current program the way that are tuned.This feature also works for any purpose other than your TV. The previous channel will return to the last-viewed input. The channel has been programmed to the R button. 3 You...
Owner's Manual - English
Page 44
... multiple audio tracks). If the selected service is not available, the next best service will automatically change to the current Base CC Mode setting. page 43) for digital channels only. • You cannot set the Caption Text and Background as the same color. To... to select the desired service. 4 Press O. "Selecting stereo/SAP broadcasts" on a digital channel (for a particular channel. Each time you select "MUTE" mode, the closed caption feature is automatically activated if the TV program is set the volume to select digital closed caption mode" (- Serif, Prop. Using...
... multiple audio tracks). If the selected service is not available, the next best service will automatically change to the current Base CC Mode setting. page 43) for digital channels only. • You cannot set the Caption Text and Background as the same color. To... to select the desired service. 4 Press O. "Selecting stereo/SAP broadcasts" on a digital channel (for a particular channel. Each time you select "MUTE" mode, the closed caption feature is automatically activated if the TV program is set the volume to select digital closed caption mode" (- Serif, Prop. Using...
Owner's Manual - English
Page 45
...following factory settings: Bass center (50) Treble center (50) Balance . . . . . To revert to Stereo mode. Chapter 6: Using the TV's features Selecting stereo/SAP broadcasts The multi-channel TV sound (MTS) feature allows you want to adjust (Bass, Treble, or Balance). 3 Press C or c to adjust the level. • ... Audio menu, highlight Audio Settings and press T. 2 Press b or B to highlight the item you to prevent extreme changes in volume when the signal source changes (for analog signals on and the station you prefer. MTS also can be tuned in volume that offer it will be...
...following factory settings: Bass center (50) Treble center (50) Balance . . . . . To revert to Stereo mode. Chapter 6: Using the TV's features Selecting stereo/SAP broadcasts The multi-channel TV sound (MTS) feature allows you want to adjust (Bass, Treble, or Balance). 3 Press C or c to adjust the level. • ... Audio menu, highlight Audio Settings and press T. 2 Press b or B to highlight the item you to prevent extreme changes in volume when the signal source changes (for analog signals on and the station you prefer. MTS also can be tuned in volume that offer it will be...
Owner's Manual - English
Page 49
... to lock the video inputs (Video 1, Video 2, ColorStream HD1, ColorStream HD2, HDMI 1, HDMI 2, HDMI 3, HDMI 4 and PC) and channels 3 and 4. button on the TV control panel will have to deactivate the Input Lock (as described above ). To unlock the control panel: Highlight Off in step 4 above ,...channels 3 and 4. When the GameTimer expires, the TV enters Input Lock mode and locks out the input source for example). To deactivate the Input Lock once the GameTimer has activated it: Set the Input Lock to display the PIN code entering screen. 2 Enter your settings from being changed ...
... to lock the video inputs (Video 1, Video 2, ColorStream HD1, ColorStream HD2, HDMI 1, HDMI 2, HDMI 3, HDMI 4 and PC) and channels 3 and 4. button on the TV control panel will have to deactivate the Input Lock (as described above ). To unlock the control panel: Highlight Off in step 4 above ,...channels 3 and 4. When the GameTimer expires, the TV enters Input Lock mode and locks out the input source for example). To deactivate the Input Lock once the GameTimer has activated it: Set the Input Lock to display the PIN code entering screen. 2 Enter your settings from being changed ...
Owner's Manual - English
Page 52
... These functions depend on the Audio Receiver, change its input source, or adjust the sound volume, the sound will be used to Audio Receiver in the following functions will be output from the TV speakers. 52 Device Auto Standby If the TV is selected for details. Accesses the top ... MUTE controls of Audio Receiver With your audio output preference to the TV. Speaker Preference From this time, the REGZA-LINK Player Control menu will be grayed out in the REGZA-LINK Setup menu. - Applications Channel Browser Favorites Browser REGZA-LINK Player Control 3 Press B or b to...
... These functions depend on the Audio Receiver, change its input source, or adjust the sound volume, the sound will be used to Audio Receiver in the following functions will be output from the TV speakers. 52 Device Auto Standby If the TV is selected for details. Accesses the top ... MUTE controls of Audio Receiver With your audio output preference to the TV. Speaker Preference From this time, the REGZA-LINK Player Control menu will be grayed out in the REGZA-LINK Setup menu. - Applications Channel Browser Favorites Browser REGZA-LINK Player Control 3 Press B or b to...
Owner's Manual - English
Page 56
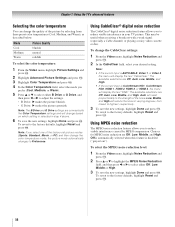
...High. • If the current input is disabled ("grayed out"). This may be useful when receiving a broadcast with a weak signal (especially a Cable channel) or playing a noisy video cassette or disc. Note: • If the current input is selected in varying degrees, from three preset color temperatures ... noise in step 4 above. 6 To save the new settings, highlight Done and press T. Chapter 7: Using the TV's advanced features Selecting the color temperature You can change the quality of the picture by MPEG compression. Choices for MPEG noise reduction are Off, Auto, Low, Middle, and...
...High. • If the current input is disabled ("grayed out"). This may be useful when receiving a broadcast with a weak signal (especially a Cable channel) or playing a noisy video cassette or disc. Note: • If the current input is selected in varying degrees, from three preset color temperatures ... noise in step 4 above. 6 To save the new settings, highlight Done and press T. Chapter 7: Using the TV's advanced features Selecting the color temperature You can change the quality of the picture by MPEG compression. Choices for MPEG noise reduction are Off, Auto, Low, Middle, and...
Owner's Manual - English
Page 59
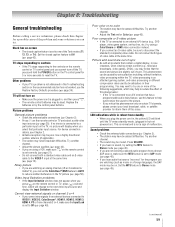
... program you can be dead. TV will change to an A/V receiver that particular input source. If the TV is set the CableClear®/DNR feature to AUTO to Off (- page 35). Try another channel. • Adjust the Tint and/or Color (- Picture and sound are watching an analog channel (off the TV, press and hold the...
... program you can be dead. TV will change to an A/V receiver that particular input source. If the TV is set the CableClear®/DNR feature to AUTO to Off (- page 35). Try another channel. • Adjust the Tint and/or Color (- Picture and sound are watching an analog channel (off the TV, press and hold the...
Owner's Manual - English
Page 60
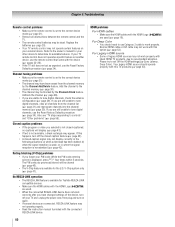
... procedure (- page 21). • The channel may be dead. page 48). • If you are unable to tune digital channels, clear all obstructions between the remote control and the TV. • The remote control batteries may have changed settings of legacy HDMI sources may not display..., press E four times within 5 seconds. page 16). page 53). page 46). • The V-Chip feature is not closed caption feature (- Rating blocking (V-Chip) problems • If you selected is available for Toshiba REGZA-LINK compatible devices. • Make sure the HDMI cables with the HDMI...
... procedure (- page 21). • The channel may be dead. page 48). • If you are unable to tune digital channels, clear all obstructions between the remote control and the TV. • The remote control batteries may have changed settings of legacy HDMI sources may not display..., press E four times within 5 seconds. page 16). page 53). page 46). • The V-Chip feature is not closed caption feature (- Rating blocking (V-Chip) problems • If you selected is available for Toshiba REGZA-LINK compatible devices. • Make sure the HDMI cables with the HDMI...
Owner's Manual - English
Page 62
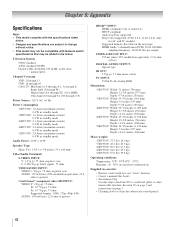
...Color supported (10 bit 4:4:4, 12 bit 4:4:4) (only for 46" and 52" models) Suggested formats: See table on page... specifications listed below. • Designs and specifications are subject to change without notice. • This model may be compatible with two ... TV to a wall stud, pillar, or other immovable structure. in-the-clear, unencrypted) Channel Coverage VHF: 2 through 13 UHF: 14 through 69 Cable TV:...current) 0.4 W in standby mode 42RV530U: 2.1 Arms (maximum current) 0.4 W in standby mode 46RV530U: 2.4 Arms (maximum current) 0.4 W in standby mode 52RV530U: 2.8 Arms (maximum current) ...
...Color supported (10 bit 4:4:4, 12 bit 4:4:4) (only for 46" and 52" models) Suggested formats: See table on page... specifications listed below. • Designs and specifications are subject to change without notice. • This model may be compatible with two ... TV to a wall stud, pillar, or other immovable structure. in-the-clear, unencrypted) Channel Coverage VHF: 2 through 13 UHF: 14 through 69 Cable TV:...current) 0.4 W in standby mode 42RV530U: 2.1 Arms (maximum current) 0.4 W in standby mode 46RV530U: 2.4 Arms (maximum current) 0.4 W in standby mode 52RV530U: 2.8 Arms (maximum current) ...


