
User Manual
Page 2
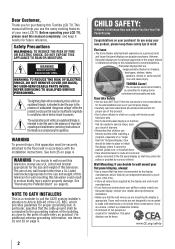
...keep it cannot be pushed, pulled over and cause injury. See item 25 on page 4. See "Removing the Pedestal Stand" ( page 6). TOSHIBA Cares! • The consumer electronics industry is intended to alert the user to the presence of uninsulated "dangerous voltage" within an equilateral triangle, is ...may fall over , or knocked down. • Care should be taken to wall mount this Toshiba LCD TV. CHILD SAFETY: It Makes A Difference How and Where You Use Your Flat Panel Display Congratulations on your LCD TV, please read and understand all enclosed instructions for the size and...
...keep it cannot be pushed, pulled over and cause injury. See item 25 on page 4. See "Removing the Pedestal Stand" ( page 6). TOSHIBA Cares! • The consumer electronics industry is intended to alert the user to the presence of uninsulated "dangerous voltage" within an equilateral triangle, is ...may fall over , or knocked down. • Care should be taken to wall mount this Toshiba LCD TV. CHILD SAFETY: It Makes A Difference How and Where You Use Your Flat Panel Display Congratulations on your LCD TV, please read and understand all enclosed instructions for the size and...
User Manual
Page 3
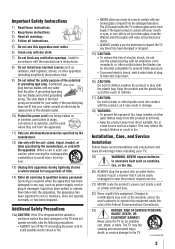
...; To prevent electric shock, match wide blade of the Federal Communications Commission. 23) DANGER: RISK OF SERIOUS PERSONAL INJURY, DEATH, OR EQUIPMENT DAMAGE! The LCD panel inside a wall or similar enclosed area. 22) Never modify this apparatus during lightning storms or when unused for your safety. A polarized Wide blade plug has...
...; To prevent electric shock, match wide blade of the Federal Communications Commission. 23) DANGER: RISK OF SERIOUS PERSONAL INJURY, DEATH, OR EQUIPMENT DAMAGE! The LCD panel inside a wall or similar enclosed area. 22) Never modify this apparatus during lightning storms or when unused for your safety. A polarized Wide blade plug has...
User Manual
Page 4
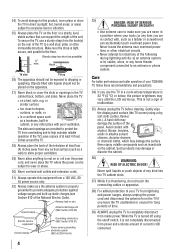
... (cotton, flannel, etc.). Never spill liquids or push objects of the following during lightning activity: a) an antenna system; Gently wipe the display panel surface (the TV screen) using the on the apparatus. 27) Never block or cover the slots or openings in wire Ground clamp Antenna discharge ...extreme care to make sure the antenna system is thundering, do not touch the connecting cables or apparatus. 38) For added protection of your TOSHIBA TV, follow these recommendations and precautions: 34) If you are provided to an antenna or phone system. Hook TV side TV top 26...
... (cotton, flannel, etc.). Never spill liquids or push objects of the following during lightning activity: a) an antenna system; Gently wipe the display panel surface (the TV screen) using the on the apparatus. 27) Never block or cover the slots or openings in wire Ground clamp Antenna discharge ...extreme care to make sure the antenna system is thundering, do not touch the connecting cables or apparatus. 38) For added protection of your TOSHIBA TV, follow these recommendations and precautions: 34) If you are provided to an antenna or phone system. Hook TV side TV top 26...
User Manual
Page 5
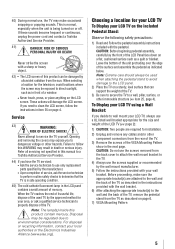
... wall bracket. This is normal, especially when the unit is in safe operating condition. 45) The cold cathode fluorescent lamp in the LCD panel contains a small amount of mercury. When selecting a location for the television, avoid locations where the screen may be damaged by the wall mount... the LCD screen. These actions will damage the LCD screen. If these sounds become frequent or continuous, unplug the power cord and contact a Toshiba Authorized Service Provider. 41) DANGER: RISK OF SERIOUS PERSONAL INJURY OR DEATH! If you have the TV serviced: • Ask the service...
... wall bracket. This is normal, especially when the unit is in safe operating condition. 45) The cold cathode fluorescent lamp in the LCD panel contains a small amount of mercury. When selecting a location for the television, avoid locations where the screen may be damaged by the wall mount... the LCD screen. These actions will damage the LCD screen. If these sounds become frequent or continuous, unplug the power cord and contact a Toshiba Authorized Service Provider. 41) DANGER: RISK OF SERIOUS PERSONAL INJURY OR DEATH! If you have the TV serviced: • Ask the service...

User Manual
Page 6
Make sure the strap is tight, secure, and parallel to the LCD panel. 2) Remove the four screws shown in the below diagram. TV Size 32" 40" 46" 55" Hole Pattern(HxV) 200x200 mm 200x200 mm 400x200 mm 400x200 ...
Make sure the strap is tight, secure, and parallel to the LCD panel. 2) Remove the four screws shown in the below diagram. TV Size 32" 40" 46" 55" Hole Pattern(HxV) 200x200 mm 200x200 mm 400x200 mm 400x200 ...

User Manual
Page 7
...An afterimage (ghost) may appear on a circuit different from that interference will disappear in a short period of time. 2) The LCD panel contained in accordance with the limits for help. Irvine CA 92618 Ph: 1-800-631-3811 Note: This equipment has been tested and ...is subject to correct the interference by one or more of the following copyright. Bitstream Vera is : Toshiba America Information Systems, Inc. 9740 Irvine Blvd.; FCC Declaration of Conformity Compliance Statement (Part 15): Toshiba 32C110U, 40E210U, 46G310U and 55G310U Television models comply with this TV.
...An afterimage (ghost) may appear on a circuit different from that interference will disappear in a short period of time. 2) The LCD panel contained in accordance with the limits for help. Irvine CA 92618 Ph: 1-800-631-3811 Note: This equipment has been tested and ...is subject to correct the interference by one or more of the following copyright. Bitstream Vera is : Toshiba America Information Systems, Inc. 9740 Irvine Blvd.; FCC Declaration of Conformity Compliance Statement (Part 15): Toshiba 32C110U, 40E210U, 46G310U and 55G310U Television models comply with this TV.
User Manual
Page 8
...Overview of steps for installing, setting up, and using your new TV 10 TV front and side panel controls and connections......... 11 TV back panel connections 12 Chapter 2: Connecting your TV 13 Overview of cable types 13 About the connection illustrations 13... programs temporarily 41 Using the input lock feature 41 Locking channels 41 Using the GameTimer 41 Using the panel lock feature 42 Using the PC settings feature 42 Setting the PC Audio 43 Using the Media Player... United States Warranty for LCD Televisions 57 Limited Canadian Warranty for Toshiba Brand Flat Panel Televisions 58
...Overview of steps for installing, setting up, and using your new TV 10 TV front and side panel controls and connections......... 11 TV back panel connections 12 Chapter 2: Connecting your TV 13 Overview of cable types 13 About the connection illustrations 13... programs temporarily 41 Using the input lock feature 41 Locking channels 41 Using the GameTimer 41 Using the panel lock feature 42 Using the PC settings feature 42 Setting the PC Audio 43 Using the Media Player... United States Warranty for LCD Televisions 57 Limited Canadian Warranty for Toshiba Brand Flat Panel Televisions 58
User Manual
Page 10
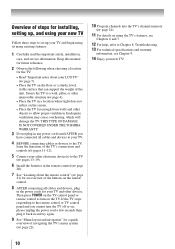
...the TV off or on the screen. • Place the TV far enough from walls and other devices. Then press POWER on the TV control panel or remote control to Chapter 8: Troubleshooting. 13 For technical specifications and warranty information, see Chapter 9. 14 Enjoy your new TV! 10 Inadequate ventilation ...pages 13-19). 6 Install the batteries in the power cords for an overview of the unit. THIS TYPE OF DAMAGE IS NOT COVERED UNDER THE TOSHIBA WARRANTY. 3 Do not plug in any power cords until AFTER you cannot turn on the remote control. 8 AFTER connecting all cables and devices to ...
...the TV off or on the screen. • Place the TV far enough from walls and other devices. Then press POWER on the TV control panel or remote control to Chapter 8: Troubleshooting. 13 For technical specifications and warranty information, see Chapter 9. 14 Enjoy your new TV! 10 Inadequate ventilation ...pages 13-19). 6 Install the batteries in the power cords for an overview of the unit. THIS TYPE OF DAMAGE IS NOT COVERED UNDER THE TOSHIBA WARRANTY. 3 Do not plug in any power cords until AFTER you cannot turn on the remote control. 8 AFTER connecting all cables and devices to ...
User Manual
Page 11
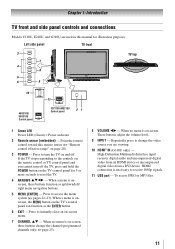
... front 3 7 4 8 5 6 9 TV top 10 46G310U/ 55G310U Control panel 11 32C110U/40E210U Control panel 21 1無 Green LED Power LED (Green) = Power indicator 2無 Remote sensor (embedded) - Repeatedly press to access the menu system ( pages 22-... page 25). 8無 VOLUME tu - These buttons adjust the volume level. 9無 INPUT - Press to instantly close an on the TV control panel for illustration purposes. Press to receive 1080p signals. 11無 USB port - When no menu is necessary to turn off . Point the remote control toward...
... front 3 7 4 8 5 6 9 TV top 10 46G310U/ 55G310U Control panel 11 32C110U/40E210U Control panel 21 1無 Green LED Power LED (Green) = Power indicator 2無 Remote sensor (embedded) - Repeatedly press to access the menu system ( pages 22-... page 25). 8無 VOLUME tu - These buttons adjust the volume level. 9無 INPUT - Press to instantly close an on the TV control panel for illustration purposes. Press to receive 1080p signals. 11無 USB port - When no menu is necessary to turn off . Point the remote control toward...
User Manual
Page 12
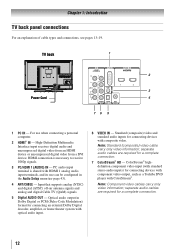
...® IN - Standard (composite) video and standard audio inputs for connecting devices with component video output, such as a Toshiba DVD player with optical audio input. 6無 VIDEO IN - Chapter 1: Introduction TV back panel connections For an explanation of cable types and connections, see pages 13-19. Input that supports analog (NTSC) and...
...® IN - Standard (composite) video and standard audio inputs for connecting devices with component video output, such as a Toshiba DVD player with optical audio input. 6無 VIDEO IN - Chapter 1: Introduction TV back panel connections For an explanation of cable types and connections, see pages 13-19. Input that supports analog (NTSC) and...
User Manual
Page 14
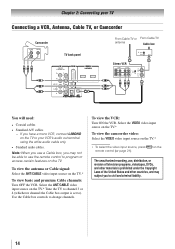
... to program or access certain features on the TV to your TV Connecting a VCR, Antenna, Cable TV, or Camcorder Camcorder AUDIO OUT L R VIDEO TV back panel 1 From Cable TV or From Cable TV antenna Cable box IN CH 3 CH 4 OUT Stereo VCR VIDEO AUDIO L R IN CH 3 CH 4 OUT L R IN from ANT...
... to program or access certain features on the TV to your TV Connecting a VCR, Antenna, Cable TV, or Camcorder Camcorder AUDIO OUT L R VIDEO TV back panel 1 From Cable TV or From Cable TV antenna Cable box IN CH 3 CH 4 OUT Stereo VCR VIDEO AUDIO L R IN CH 3 CH 4 OUT L R IN from ANT...
User Manual
Page 15
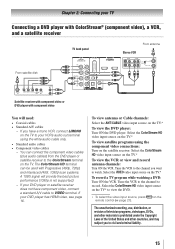
... A/V cable to VIDEO terminal. Chapter 2: Connecting your TV Connecting a DVD player with ColorStream® (component video), a VCR, and a satellite receiver From satellite dish TV back panel 1 From antenna Stereo VCR VIDEO AUDIO L R IN CH 3 CH 4 OUT L R IN from the DVD player or satellite receiver to the ColorStream terminal on the satellite...
... A/V cable to VIDEO terminal. Chapter 2: Connecting your TV Connecting a DVD player with ColorStream® (component video), a VCR, and a satellite receiver From satellite dish TV back panel 1 From antenna Stereo VCR VIDEO AUDIO L R IN CH 3 CH 4 OUT L R IN from the DVD player or satellite receiver to the ColorStream terminal on the satellite...
User Manual
Page 16
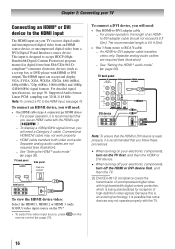
...procedures: •• When turning on your electronic components, turn on the To connect a DVI device, you will need a Category 2 cable. TV back panel 1 DVI device VIDEO AUDIO L R IN IN OUT L R DVI / HDCP OUT Note: To ensure that the HDMI or DVI device is reset properly,.... For detailed signal specifications, see illustration). −− See "Setting the HDMI ® audio mode" ( page 26). TV back panel Side panel Only for reception of an HDMIto-DVI adapter cable should not exceed 9.8 ft (3m). This input is possible that some devices may not work ...
...procedures: •• When turning on your electronic components, turn on the To connect a DVI device, you will need a Category 2 cable. TV back panel 1 DVI device VIDEO AUDIO L R IN IN OUT L R DVI / HDCP OUT Note: To ensure that the HDMI or DVI device is reset properly,.... For detailed signal specifications, see illustration). −− See "Setting the HDMI ® audio mode" ( page 26). TV back panel Side panel Only for reception of an HDMIto-DVI adapter cable should not exceed 9.8 ft (3m). This input is possible that some devices may not work ...
User Manual
Page 17
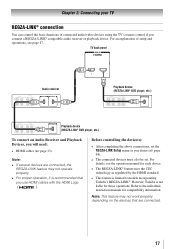
...; compatible audio receiver or playback device. Before controlling the device(s): • After completing the above connections, set . Refer to models incorporating Toshiba's REGZA-LINK®. Note: This feature may not work properly depending on the devices that are connected, the REGZA-LINK feature may not... operate properly. •• For proper operation, it is not liable for compatibility information. TV back panel Audio receiver Playback device (REGZA-LINK® DVD player, etc.) Playback device (REGZA-LINK® DVD player, etc.) To connect an...
...; compatible audio receiver or playback device. Before controlling the device(s): • After completing the above connections, set . Refer to models incorporating Toshiba's REGZA-LINK®. Note: This feature may not work properly depending on the devices that are connected, the REGZA-LINK feature may not... operate properly. •• For proper operation, it is not liable for compatibility information. TV back panel Audio receiver Playback device (REGZA-LINK® DVD player, etc.) Playback device (REGZA-LINK® DVD player, etc.) To connect an...
User Manual
Page 18
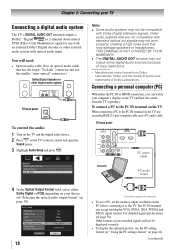
... or 2-channel down-mixed PCM (Pulse-Code Modulation) signal for use with an external Dolby® Digital decoder or other digital audio system TV back panel To control the audio: 1無 Turn on the TV and the digital audio device. 2無 Press on the TV, use an analog RGB (15... may not be displayed correctly. • To display the optimum picture, use a PC, set the monitor output resolution on page 42). (continued) TV back panel 1 Computer PC audio cable PC audio output 4無 In the Optical Output Format field, select either the PC IN or HDMI connection, you can accept...
... or 2-channel down-mixed PCM (Pulse-Code Modulation) signal for use with an external Dolby® Digital decoder or other digital audio system TV back panel To control the audio: 1無 Turn on the TV and the digital audio device. 2無 Press on the TV, use an analog RGB (15... may not be displayed correctly. • To display the optimum picture, use a PC, set the monitor output resolution on page 42). (continued) TV back panel 1 Computer PC audio cable PC audio output 4無 In the Optical Output Format field, select either the PC IN or HDMI connection, you can accept...
User Manual
Page 19
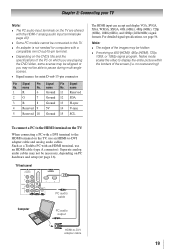
no overscanning). Such as a Toshiba PC with an HDMI terminal, use an HDMI-to-DVI adapter cable and analog audio cables. name 6 Ground 11 Reserved 2G 7 Ground 12 SDA 3B 8 ... can accept and display VGA, SVGA, XGA, WXGA, SXGA, 480i (60Hz), 480p (60Hz), 720p (60Hz), 1080i (60Hz), and 1080p (24Hz/60Hz) signal formats. TV back panel 1 Computer PC audio cable PC audio output HDMI-to the HDMI terminal on PC hardware and setup ( page 16). Chapter 2: Connecting your TV Note...
no overscanning). Such as a Toshiba PC with an HDMI terminal, use an HDMI-to-DVI adapter cable and analog audio cables. name 6 Ground 11 Reserved 2G 7 Ground 12 SDA 3B 8 ... can accept and display VGA, SVGA, XGA, WXGA, SXGA, 480i (60Hz), 480p (60Hz), 720p (60Hz), 1080i (60Hz), and 1080p (24Hz/60Hz) signal formats. TV back panel 1 Computer PC audio cable PC audio output HDMI-to the HDMI terminal on PC hardware and setup ( page 16). Chapter 2: Connecting your TV Note...
User Manual
Page 22
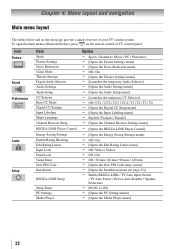
... Digital CC Settings Input Labeling Menu Language Channel Browser Setup REGZA-LINK Player Control Energy Saving Settings Enable Rating Blocking Edit Rating Limits Input Lock Panel Lock GameTimer New PIN Code Installation REGZA-LINK Setup Sleep Timer PC Settings Media Player Option Sports / Standard / Movie / PC / Preference [Opens the... PC Settings menu] [Opens the Media Player menu] 22 To open the main menus (illustrated below and on the remote control or TV control panel.
... Digital CC Settings Input Labeling Menu Language Channel Browser Setup REGZA-LINK Player Control Energy Saving Settings Enable Rating Blocking Edit Rating Limits Input Lock Panel Lock GameTimer New PIN Code Installation REGZA-LINK Setup Sleep Timer PC Settings Media Player Option Sports / Standard / Movie / PC / Preference [Opens the... PC Settings menu] [Opens the Media Player menu] 22 To open the main menus (illustrated below and on the remote control or TV control panel.
User Manual
Page 23
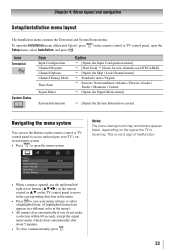
.... Note: The menu background may sometimes appear black, depending on the signal the TV is opened, use the buttons on the TV control panel to move in the corresponding direction in the menu. • Press to save your TV's onscreen menu system. • Press to access... layout The Installation menu contains the Terrestrial and System Status menus. To open the menu system. on the remote control or TV control panel, open the Icon Terrestrial System Status Item Input Configuration Channel Program Channel Options Channel Tuning Mode Time Zone Signal Meter System Information Option ...
.... Note: The menu background may sometimes appear black, depending on the signal the TV is opened, use the buttons on the TV control panel to move in the corresponding direction in the menu. • Press to save your TV's onscreen menu system. • Press to access... layout The Installation menu contains the Terrestrial and System Status menus. To open the menu system. on the remote control or TV control panel, open the Icon Terrestrial System Status Item Input Configuration Channel Program Channel Options Channel Tuning Mode Time Zone Signal Meter System Information Option ...
User Manual
Page 25
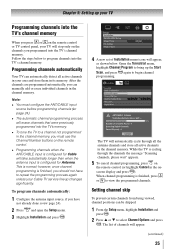
... Channel Program to bring up your TV Programming channels into the TV's channel memory When you press or on the remote control or TV control panel, your TV will automatically cycle through the channels the message "Scanning channels, please wait" appears. 5無 To cancel channel programming, press on the remote control...
... Channel Program to bring up your TV Programming channels into the TV's channel memory When you press or on the remote control or TV control panel, your TV will automatically cycle through the channels the message "Scanning channels, please wait" appears. 5無 To cancel channel programming, press on the remote control...
User Manual
Page 28
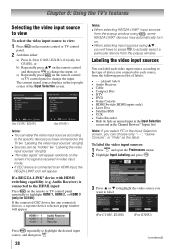
... the desired input source, and then press . 28 (continued) Audio Receiver) is connected to the HDMI input: Press on the remote or TV control panel repeatedly to highlight HDMI 1, HDMI 2, or HDMI 3 (only for G310U) Note: ••You can label the video input sources according to the... press on the screen if no signal is received in the top right corner of device you want to view: 1無 Press panel. Note: ••When selecting REGZA-LINK® input sources from the popup window. Video Audio Receiver Cable Compact Disc DTV Video Audio Receiver...
... the desired input source, and then press . 28 (continued) Audio Receiver) is connected to the HDMI input: Press on the remote or TV control panel repeatedly to highlight HDMI 1, HDMI 2, or HDMI 3 (only for G310U) Note: ••You can label the video input sources according to the... press on the screen if no signal is received in the top right corner of device you want to view: 1無 Press panel. Note: ••When selecting REGZA-LINK® input sources from the popup window. Video Audio Receiver Cable Compact Disc DTV Video Audio Receiver...

