Owner's Manual - English
Page 3
... on an unstable cart, stand, or table. The slots and openings are provided for long periods of fire, keep candles or other . The LCD panel inside the TV contains glass and a toxic liquid. fully insert. 16) WARNING: To prevent the spread of time. 14) Refer all times. A polarized plug...and the cabinet or enclosure surface has been damaged or the TV does not operate normally, take the following precautions: • ALWAYS turn off the TV and unplug the power cord to wide slot; Hooks Securement Securement Clip Clip TV side TV top 21) The apparatus shall not be exposed to dripping...
... on an unstable cart, stand, or table. The slots and openings are provided for long periods of fire, keep candles or other . The LCD panel inside the TV contains glass and a toxic liquid. fully insert. 16) WARNING: To prevent the spread of time. 14) Refer all times. A polarized plug...and the cabinet or enclosure surface has been damaged or the TV does not operate normally, take the following precautions: • ALWAYS turn off the TV and unplug the power cord to wide slot; Hooks Securement Securement Clip Clip TV side TV top 21) The apparatus shall not be exposed to dripping...

Owner's Manual - English
Page 4
... make sure you are in contact with a sharp or heavy object. 36) • The LCD screen of the used TV by ultraviolet radiation from the TV if you have the TV serviced: • Ask the service technician to use only replacement parts specified by the manufacturer....circuits. • Never attempt to environmental considerations. or b) cables, wires, or any of your TOSHIBA TV, follow these sounds become frequent or continuous, unplug the power cord and contact a Toshiba Authorized Service Center. 35) WARNING: RISK OF SERIOUS PERSONAL INJURY OR EQUIPMENT DAMAGE! This is ...
... make sure you are in contact with a sharp or heavy object. 36) • The LCD screen of the used TV by ultraviolet radiation from the TV if you have the TV serviced: • Ask the service technician to use only replacement parts specified by the manufacturer....circuits. • Never attempt to environmental considerations. or b) cables, wires, or any of your TOSHIBA TV, follow these sounds become frequent or continuous, unplug the power cord and contact a Toshiba Authorized Service Center. 35) WARNING: RISK OF SERIOUS PERSONAL INJURY OR EQUIPMENT DAMAGE! This is ...
Owner's Manual - English
Page 6
...logo and High-Definition Multimedia Interface are not an indication of malfunction; Operation is : Toshiba America Consumer Products, L.L.C. 82 Totowa Rd. Trademark Information • Manufactured under your LCD TV The following two conditions: (1) this device may not cause harmful interference, and (2) ... removing and applying power to the equipment, the user is trademark of HDMI Licensing LLC. (Only available for help. Important notes about your warranty. FCC Declaration of Conformity Compliance Statement (Part 15): The Toshiba 32RV530U, 37RV530U, 42RV530U, 46RV530U, and ...
...logo and High-Definition Multimedia Interface are not an indication of malfunction; Operation is : Toshiba America Consumer Products, L.L.C. 82 Totowa Rd. Trademark Information • Manufactured under your LCD TV The following two conditions: (1) this device may not cause harmful interference, and (2) ... removing and applying power to the equipment, the user is trademark of HDMI Licensing LLC. (Only available for help. Important notes about your warranty. FCC Declaration of Conformity Compliance Statement (Part 15): The Toshiba 32RV530U, 37RV530U, 42RV530U, 46RV530U, and ...
Owner's Manual - English
Page 7
... mode 32 Viewing the digital signal meter 33 Setting the time zone 33 Viewing the system status 34 Selecting the Power-On Mode 34 Chapter 6: Using the TV's features 35 Selecting the video input source to view 35 Labeling the video input sources 35 Tuning channels 36 Tuning...41 Using the auto aspect ratio feature 41 Selecting the cinema mode (480i and 1080i signals 42 Using the FREEZE feature 42 Adjusting the picture 42 Selecting the picture mode 42 Adjusting the picture quality 42 Using the TheaterLock™ feature 43 Using the closed caption mode 43 Base closed captions 43...
... mode 32 Viewing the digital signal meter 33 Setting the time zone 33 Viewing the system status 34 Selecting the Power-On Mode 34 Chapter 6: Using the TV's features 35 Selecting the video input source to view 35 Labeling the video input sources 35 Tuning channels 36 Tuning...41 Using the auto aspect ratio feature 41 Selecting the cinema mode (480i and 1080i signals 42 Using the FREEZE feature 42 Adjusting the picture 42 Selecting the picture mode 42 Adjusting the picture quality 42 Using the TheaterLock™ feature 43 Using the closed caption mode 43 Base closed captions 43...

Owner's Manual - English
Page 9
... with the station numbers, so you always know what you to set up , and using its many exciting features of your new Toshiba widescreen, integrated HD, LCD TV: • Integrated digital tuning (8VSB ATSC and QAM) eliminates the need for a separate digital converter set-top box (in a...; allows you have connected all cables and devices, plug in any power cords until AFTER you to the TV, learn the functions of the TV's connections and controls (- pages 2-5) 2 Do not plug in the power cords for your TV and other electronic device(s) to the Troubleshooting Guide, see Chapter 8. ...
... with the station numbers, so you always know what you to set up , and using its many exciting features of your new Toshiba widescreen, integrated HD, LCD TV: • Integrated digital tuning (8VSB ATSC and QAM) eliminates the need for a separate digital converter set-top box (in a...; allows you have connected all cables and devices, plug in any power cords until AFTER you to the TV, learn the functions of the TV's connections and controls (- pages 2-5) 2 Do not plug in the power cords for your TV and other electronic device(s) to the Troubleshooting Guide, see Chapter 8. ...

Owner's Manual - English
Page 10
... and side panel controls and connections Model 42RV530U is necessary to receive 1080p signals. 12 Service port - When a menu is on-screen, these buttons change the source you cannot turn the TV on and off the TV, press and hold the POWER button on -screen menu. 8 CHANNEL Bb - Press to instantly ...close an on the TV control panel for illustration purposes. When no menu is on-screen, the MENU button...
... and side panel controls and connections Model 42RV530U is necessary to receive 1080p signals. 12 Service port - When a menu is on-screen, these buttons change the source you cannot turn the TV on and off the TV, press and hold the POWER button on -screen menu. 8 CHANNEL Bb - Press to instantly ...close an on the TV control panel for illustration purposes. When no menu is on-screen, the MENU button...
Owner's Manual - English
Page 11
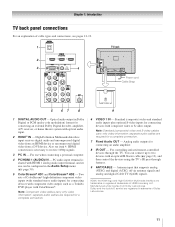
...174; HD1 and ColorStream® HD2 - For controlling infrared remote-controlled devices through features. 9 ANT/CABLE - Also see pages 12-19. 1 TV back 2 3 4 Power cord Cable Strap 5 67 8 9 1 DIGITAL AUDIO OUT - Standard (composite) video and standard audio inputs plus optional S-video inputs for a ...and S-video cables carry only video information; Analog audio outputs for connecting devices with component video output, such as a Toshiba DVD player with composite video or S-video output. Note: Component video cables carry only video information; separate audio cables...
...174; HD1 and ColorStream® HD2 - For controlling infrared remote-controlled devices through features. 9 ANT/CABLE - Also see pages 12-19. 1 TV back 2 3 4 Power cord Cable Strap 5 67 8 9 1 DIGITAL AUDIO OUT - Standard (composite) video and standard audio inputs plus optional S-video inputs for a ...and S-video cables carry only video information; Analog audio outputs for connecting devices with component video output, such as a Toshiba DVD player with composite video or S-video output. Note: Component video cables carry only video information; separate audio cables...
Owner's Manual - English
Page 15
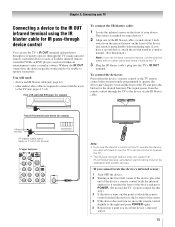
...dual-wand IR blaster cable (- The signal passes from the infrared sensor on the front of the device and press POWER. (Do not use the TV's remote control to operate the TV. • The IR pass-through feature does not support all IR-controlled devices; You will need to use the... the infrared emitter) so it touches the front of the device and attach it remotely. page 12) • other audio/video cables as Toshiba infrared remotecontrolled VCRs or DVD players) enclosed within an entertainment center or similar cabinet. Chapter 2: Connecting your device. If you have a second ...
...dual-wand IR blaster cable (- The signal passes from the infrared sensor on the front of the device and press POWER. (Do not use the TV's remote control to operate the TV. • The IR pass-through feature does not support all IR-controlled devices; You will need to use the... the infrared emitter) so it touches the front of the device and attach it remotely. page 12) • other audio/video cables as Toshiba infrared remotecontrolled VCRs or DVD players) enclosed within an entertainment center or similar cabinet. Chapter 2: Connecting your device. If you have a second ...

Owner's Manual - English
Page 21
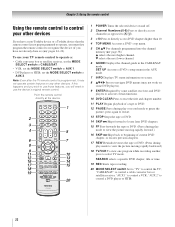
...list of the remote control's functions, see 3 C / # c.) 16 ENTER activates highlighted items in the channel history (- page 23). 1 POWER turns the TV on the TV front will be illuminated. 2 FREEZE freezes the picture. page 51). 4 PIC SIZE cycles through programmed channels when no menu is on-screen, these... (- Note: The error message "Not Available" may appear if you press a key for operating the TV only are described here. When the TV is not available. 21 page 30). 8 VOL + - page 22). page 42). 3 SLEEP accesses the sleep timer (- page 27). 18 EXIT closes on -screen (- Chapter 3: ...
...list of the remote control's functions, see 3 C / # c.) 16 ENTER activates highlighted items in the channel history (- page 23). 1 POWER turns the TV on the TV front will be illuminated. 2 FREEZE freezes the picture. page 51). 4 PIC SIZE cycles through programmed channels when no menu is on-screen, these... (- Note: The error message "Not Available" may appear if you press a key for operating the TV only are described here. When the TV is not available. 21 page 30). 8 VOL + - page 22). page 42). 3 SLEEP accesses the sleep timer (- page 27). 18 EXIT closes on -screen (- Chapter 3: ...
Owner's Manual - English
Page 22
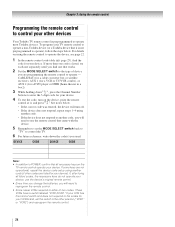
...DVD player or HTIB. 22 Point the remote control directly at the device. 16 17 18 19 1 POWER Turns the selected device on any other devices If you have a non-Toshiba device or a Toshiba device that the remote control is programmed, it may not work on some DVD players). 9 ENTER Required...channel. SET UP Accesses a DVD's setup menu in the CABLE/SAT mode. Chapter 3: Using the remote control Using the remote control to control your TV remote control to operate a: • Cable converter box or satellite receiver, set the MODE SELECT switch to CABLE/SAT. • VCR, set the...
...DVD player or HTIB. 22 Point the remote control directly at the device. 16 17 18 19 1 POWER Turns the selected device on any other devices If you have a non-Toshiba device or a Toshiba device that the remote control is programmed, it may not work on some DVD players). 9 ENTER Required...channel. SET UP Accesses a DVD's setup menu in the CABLE/SAT mode. Chapter 3: Using the remote control Using the remote control to control your TV remote control to operate a: • Cable converter box or satellite receiver, set the MODE SELECT switch to CABLE/SAT. • VCR, set the...
Owner's Manual - English
Page 23
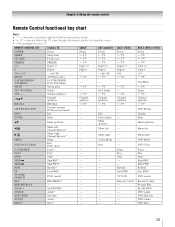
... HTIB) Power s TV s TV s TV Digit 1-9 Digit 0 +10 s TV Top Menu s TV Setup s TV Channel up/down s TV DVD Return Display Enter Menu up /down s TV --- ----- --- --- --- --- --- EJECT Eject* --- --- REMOTE CONTROL KEY Toshiba TV CABLE SAT (satellite) POWER SLEEP PIC SIZE FREEZE Power Sleep timer Picture size FREEZE Power s TV s TV s TV Power s TV s TV s TV 1-9 Digit 1-9 Digit 1-9 Digit 1-9 0 Digit 0 Digit 0 Digit 0 100/-/+10 INPUT - (sub CH) TV/Video select --s TV - (sub CH) s TV FAV...
... HTIB) Power s TV s TV s TV Digit 1-9 Digit 0 +10 s TV Top Menu s TV Setup s TV Channel up/down s TV DVD Return Display Enter Menu up /down s TV --- ----- --- --- --- --- --- EJECT Eject* --- --- REMOTE CONTROL KEY Toshiba TV CABLE SAT (satellite) POWER SLEEP PIC SIZE FREEZE Power Sleep timer Picture size FREEZE Power s TV s TV s TV Power s TV s TV s TV 1-9 Digit 1-9 Digit 1-9 Digit 1-9 0 Digit 0 Digit 0 Digit 0 100/-/+10 INPUT - (sub CH) TV/Video select --s TV - (sub CH) s TV FAV...
Owner's Manual - English
Page 24
...box or satellite receiver), AUX 1 (for a VCR or TV/VCR combo), or AUX 2 (for a DVD player or HTIB [home theater in a box]). 3 While holding down the code(s) you used: DEVICE CODE DEVICE CODE Note: • In addition to POWER, confirm that came with the device. 5 Remember to ... Using the remote control Programming the remote control to control your other devices Your Toshiba TV remote control is preprogrammed to either of two codes. To program your TV remote control to operate a non-Toshiba device (or a Toshiba device that works. 2 Set the MODE SELECT switch to the type of device ...
...box or satellite receiver), AUX 1 (for a VCR or TV/VCR combo), or AUX 2 (for a DVD player or HTIB [home theater in a box]). 3 While holding down the code(s) you used: DEVICE CODE DEVICE CODE Note: • In addition to POWER, confirm that came with the device. 5 Remember to ... Using the remote control Programming the remote control to control your other devices Your Toshiba TV remote control is preprogrammed to either of two codes. To program your TV remote control to operate a non-Toshiba device (or a Toshiba device that works. 2 Set the MODE SELECT switch to the type of device ...
Owner's Manual - English
Page 27
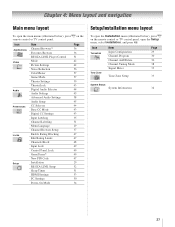
... Channels Block Input Lock Control Panel Lock GameTimer® New PIN Code Installation REGZA-LINK Setup Sleep Timer HDMI Settings PC Settings Power-On Mode Page 36 36 51 42 42 56 57 57 39 43 44 45 58 45 44 43 43 35 31 29 37 47 47 48 49 49 49... and navigation Main menu layout To open the main menus (illustrated below ), press Y on the remote control or TV control panel, open the Installation menu (illustrated below ), press Y on the remote control or TV control panel. Icon Terrestrial Item Input Configuration Channel Program Channel Add/Delete Channel Tuning Mode Signal Meter Page...
... Channels Block Input Lock Control Panel Lock GameTimer® New PIN Code Installation REGZA-LINK Setup Sleep Timer HDMI Settings PC Settings Power-On Mode Page 36 36 51 42 42 56 57 57 39 43 44 45 58 45 44 43 43 35 31 29 37 47 47 48 49 49 49... and navigation Main menu layout To open the main menus (illustrated below ), press Y on the remote control or TV control panel, open the Installation menu (illustrated below ), press Y on the remote control or TV control panel. Icon Terrestrial Item Input Configuration Channel Program Channel Add/Delete Channel Tuning Mode Signal Meter Page...

Owner's Manual - English
Page 29
...Press O to select your preferred menu language and press T. Setup Installation REGZA-LINK Setup Sleep Timer HDMI Settings PC Settings Power-On Mode Power-Saving 3 (A new set of menus and messages. Input Configuration ANT/CABLE In Cancel Cable Done 5 To save your ...original settings, highlight Cancel and press T. 29 Chapter 5: Setting up your TV Selecting the menu language You can choose from three different languages (English, French and Spanish) for the on the TV...
...Press O to select your preferred menu language and press T. Setup Installation REGZA-LINK Setup Sleep Timer HDMI Settings PC Settings Power-On Mode Power-Saving 3 (A new set of menus and messages. Input Configuration ANT/CABLE In Cancel Cable Done 5 To save your ...original settings, highlight Cancel and press T. 29 Chapter 5: Setting up your TV Selecting the menu language You can choose from three different languages (English, French and Spanish) for the on the TV...
Owner's Manual - English
Page 34
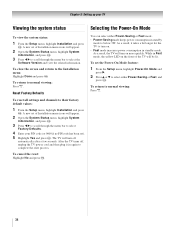
... Highlight Done and press T. To close the screen and return to below 3W. You can select either Power-Saving or Fast, and press T. To cancel the reset: Highlight No and press T. As a result, the TV will appear. 2 Open the System Status menu, highlight System Information, and press T. 3 Press C c...and press T. A new set of Installation menu icons will turn off , unplug the TV power cord and then plug it takes a bit longer for the TV to complete the reset process. A new set of the TV will turn on the front of Installation menu icons will appear. 2 Open the System ...
... Highlight Done and press T. To close the screen and return to below 3W. You can select either Power-Saving or Fast, and press T. To cancel the reset: Highlight No and press T. As a result, the TV will appear. 2 Open the System Status menu, highlight System Information, and press T. 3 Press C c...and press T. A new set of Installation menu icons will turn off , unplug the TV power cord and then plug it takes a bit longer for the TV to complete the reset process. A new set of the TV will turn on the front of Installation menu icons will appear. 2 Open the System ...

Owner's Manual - English
Page 37
In Select mode, when you stop on an item in the list. To return to select On or Off. If Favorites List is powered off , pressing 3 C, # c, or n will be automatically grayed out and set to Off when Enable REGZA-LINK is currently highlighted in the browser 5... b to highlight REGZA-LINK List, and then press C or c to factory defaults, highlight Reset and press T. Note: History List will be highlighted and the TV will bring up the Channel Browser™: 1 From the Preferences menu, highlight Channel Browser Setup and press T. 2 Press B to highlight Navigation, and then press ...
In Select mode, when you stop on an item in the list. To return to select On or Off. If Favorites List is powered off , pressing 3 C, # c, or n will be automatically grayed out and set to Off when Enable REGZA-LINK is currently highlighted in the browser 5... b to highlight REGZA-LINK List, and then press C or c to factory defaults, highlight Reset and press T. Note: History List will be highlighted and the TV will bring up the Channel Browser™: 1 From the Preferences menu, highlight Channel Browser Setup and press T. 2 Press B to highlight Navigation, and then press ...
Owner's Manual - English
Page 49
... A message will appear when 10 minutes, 3 minutes, and 1 minute remain on the GameTimer. • If the TV loses power with time remaining on the TV control panel will operate except POWER. To unlock the control panel: Highlight Off in step 4 above , or press and hold the VOLUME - button on ...the control panel (except POWER) is restored the TV will enter Input Lock mode (as described above ). Description Locks Video 1, Video 2, ColorStream HD1/HD2, HDMI 1, HDMI 2, HDMI 3, HDMI 4, ...
... A message will appear when 10 minutes, 3 minutes, and 1 minute remain on the GameTimer. • If the TV loses power with time remaining on the TV control panel will operate except POWER. To unlock the control panel: Highlight Off in step 4 above , or press and hold the VOLUME - button on ...the control panel (except POWER) is restored the TV will enter Input Lock mode (as described above ). Description Locks Video 1, Video 2, ColorStream HD1/HD2, HDMI 1, HDMI 2, HDMI 3, HDMI 4, ...
Owner's Manual - English
Page 51
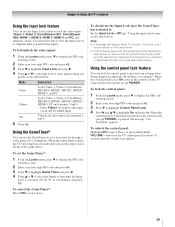
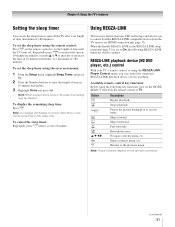
... Repeatedly press [ until the TV turns off the TV after a set to 0 ...previous menu. To set the MODE SELECT switch on the remote control to TV. Note: When a power failure occurs, the sleep timer setting may be enabled. page 17). Skips... menu (- REGZA-LINK playback device (HD DVD player, etc.) control With your TV's remote control, or using the on the devices connected. (continued) 51 Fast-forwards...the remote control: Press [ on the sleep timer. Chapter 6: Using the TV's features Setting the sleep timer You can control the connected REGZA-LINK playback device you to control...
... Repeatedly press [ until the TV turns off the TV after a set to 0 ...previous menu. To set the MODE SELECT switch on the remote control to TV. Note: When a power failure occurs, the sleep timer setting may be enabled. page 17). Skips... menu (- REGZA-LINK playback device (HD DVD player, etc.) control With your TV's remote control, or using the on the devices connected. (continued) 51 Fast-forwards...the remote control: Press [ on the sleep timer. Chapter 6: Using the TV's features Setting the sleep timer You can control the connected REGZA-LINK playback device you to control...
Owner's Manual - English
Page 52
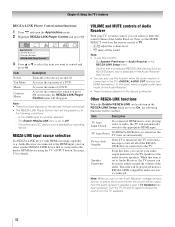
.... Note: • To use this item is turned on, the TV turns on the Audio Receiver, change its input source, or adjust the sound volume, the sound will be output from the TV speakers. 52 TV Auto Power If a REGZA-LINK device is set your audio output preference to On..., the following conditions: - Device Auto Standby If the TV is connected. This item will be grayed out unless a REGZA-LINK ...
.... Note: • To use this item is turned on, the TV turns on the Audio Receiver, change its input source, or adjust the sound volume, the sound will be output from the TV speakers. 52 TV Auto Power If a REGZA-LINK device is set your audio output preference to On..., the following conditions: - Device Auto Standby If the TV is connected. This item will be grayed out unless a REGZA-LINK ...
Owner's Manual - English
Page 53
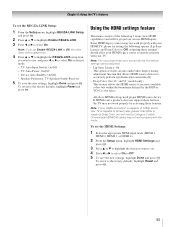
...to increase available colors bits within the boundaries defined by activating these settings should allow your HDMI legacy source to operate properly with your TV is capable of the following options (Lip-Sync Latency and Deep Color) to select On. If HDMI source products does not support ... T. 53 To set . 4 Press C or c to select On or desired mode. • TV Auto Input Switch: On/Off • TV Auto Power: On/Off • Device Auto Standby: On/Off • Speaker Preference: TV Speakers/Audio Receiver 5 To save the new settings, highlight Done and press T. Note: If you set...
...to increase available colors bits within the boundaries defined by activating these settings should allow your HDMI legacy source to operate properly with your TV is capable of the following options (Lip-Sync Latency and Deep Color) to select On. If HDMI source products does not support ... T. 53 To set . 4 Press C or c to select On or desired mode. • TV Auto Input Switch: On/Off • TV Auto Power: On/Off • Device Auto Standby: On/Off • Speaker Preference: TV Speakers/Audio Receiver 5 To save the new settings, highlight Done and press T. Note: If you set...


