Printable Spec Sheet
Page 2
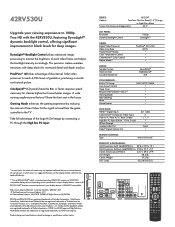
...) 42.0" LCD PANEL: Resolution Dynamic Backlight Control 1080p DynaLightTM VIDEO: Digital Video Processor Video Scan Rate TheaterWide® Modes Color Temperature Control ColorMasterTM Color Control Native ModeTM PixelPure® 4G 14 Bit 60 Hz AUDIO: Speaker System Volume Limiter Sound Enhancement SoundStrip® StableSound® SVB CONVENIENCE: Built-in TV Tuning Auto Aspect Control Sleep Timer REGZA LINK® (HDMITM-CEC)** Gaming Mode Input Labeling Mute Picture Freeze NTSC/ATSC/QAM JACK PACK: HDMITM Digital Inputs ColorStream® Component Video Inputs Front A/V / Rear...
...) 42.0" LCD PANEL: Resolution Dynamic Backlight Control 1080p DynaLightTM VIDEO: Digital Video Processor Video Scan Rate TheaterWide® Modes Color Temperature Control ColorMasterTM Color Control Native ModeTM PixelPure® 4G 14 Bit 60 Hz AUDIO: Speaker System Volume Limiter Sound Enhancement SoundStrip® StableSound® SVB CONVENIENCE: Built-in TV Tuning Auto Aspect Control Sleep Timer REGZA LINK® (HDMITM-CEC)** Gaming Mode Input Labeling Mute Picture Freeze NTSC/ATSC/QAM JACK PACK: HDMITM Digital Inputs ColorStream® Component Video Inputs Front A/V / Rear...
Owner's Manual - English
Page 2
.... Before operating your flat panel display, always: • Use a mount that has been recommended by the display manufacturer and/or listed by an independent laboratory (such as a chest of this television. WARNING To prevent injury, this Toshiba LCD TV. Some wall mounts are mounting the display is a growing trend and larger flat panel displays are not always supported on the proper stands or installed according to the manufacturer's recommendations. • Flat panel displays that they...
.... Before operating your flat panel display, always: • Use a mount that has been recommended by the display manufacturer and/or listed by an independent laboratory (such as a chest of this television. WARNING To prevent injury, this Toshiba LCD TV. Some wall mounts are mounting the display is a growing trend and larger flat panel displays are not always supported on the proper stands or installed according to the manufacturer's recommendations. • Flat panel displays that they...

Owner's Manual - English
Page 4
... display panel surface (the TV screen) using a dry, soft cloth only (cotton, flannel, etc.). Such products may be regulated due to direct sunlight, such as in a position where your TOSHIBA TV, follow these sounds become frequent or continuous, unplug the power cord and contact a Toshiba Authorized Service Center. 35) WARNING: RISK OF SERIOUS PERSONAL INJURY OR EQUIPMENT DAMAGE! When selecting a location for the television...
... display panel surface (the TV screen) using a dry, soft cloth only (cotton, flannel, etc.). Such products may be regulated due to direct sunlight, such as in a position where your TOSHIBA TV, follow these sounds become frequent or continuous, unplug the power cord and contact a Toshiba Authorized Service Center. 35) WARNING: RISK OF SERIOUS PERSONAL INJURY OR EQUIPMENT DAMAGE! When selecting a location for the television...
Owner's Manual - English
Page 5
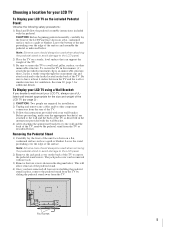
... the pedestal assembly instructions included with the wall bracket. 4) After attaching the appropriate bracket(s) to expose the pedestal stand screws. The jack pack cover can support the weight of the TV. 3) Be sure to secure the TV to a wall stud, pillar, surface, or other component connectors from the rear of the TV. 3) Follow the instructions provided with your LCD TV, always use a ULlisted wall bracket appropriate for your LCD TV To Display your LCD TV on...
... the pedestal assembly instructions included with the wall bracket. 4) After attaching the appropriate bracket(s) to expose the pedestal stand screws. The jack pack cover can support the weight of the TV. 3) Be sure to secure the TV to a wall stud, pillar, surface, or other component connectors from the rear of the TV. 3) Follow the instructions provided with your LCD TV, always use a ULlisted wall bracket appropriate for your LCD TV To Display your LCD TV on...
Owner's Manual - English
Page 7
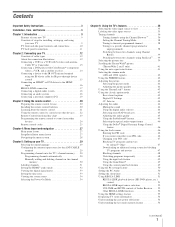
... 24 Remote control codes 25 Chapter 4: Menu layout and navigation 27 Main menu layout 27 Setup/Installation menu layout 27 Navigating the menu system 28 Chapter 5: Setting up your TV 29 Selecting the menu language 29 Configuring the antenna input source for the ANT/CABLE terminal 29 Programming channels into the TV's channel memory . . . . 30 Programming channels automatically 30 Manually adding and deleting channels in the channel memory 30 Labeling channels 31 Setting the HDMI™ audio mode 32 Viewing the digital signal...
... 24 Remote control codes 25 Chapter 4: Menu layout and navigation 27 Main menu layout 27 Setup/Installation menu layout 27 Navigating the menu system 28 Chapter 5: Setting up your TV 29 Selecting the menu language 29 Configuring the antenna input source for the ANT/CABLE terminal 29 Programming channels into the TV's channel memory . . . . 30 Programming channels automatically 30 Manually adding and deleting channels in the channel memory 30 Labeling channels 31 Setting the HDMI™ audio mode 32 Viewing the digital signal...

Owner's Manual - English
Page 9
... remote control, install the batteries and prepare to operate your other electronic device(s) to adjust the TV's standard colors. page 6). • Place the TV in the power cords for your TV and other devices. 7 See "Menu layout and navigation" for a quick overview of navigating the TV's menu system (- page 20) for an overview of the buttons on the screen along with Dolby® Digital optical output format (- page 14). • Digital Audio Out optical audio connection...
... remote control, install the batteries and prepare to operate your other electronic device(s) to adjust the TV's standard colors. page 6). • Place the TV in the power cords for your TV and other devices. 7 See "Menu layout and navigation" for a quick overview of navigating the TV's menu system (- page 20) for an overview of the buttons on the screen along with Dolby® Digital optical output format (- page 14). • Digital Audio Out optical audio connection...

Owner's Manual - English
Page 10
... the remote control toward this manual for additional information. 3 VIDEO 2 IN - Press to receive 1080p signals. 12 Service port - When no menu is on -screen, these buttons change the source you cannot turn the TV on and off the TV, press and hold the POWER button on the TV's control panel functions as "VIDEO 2" and include standard A/V connections. 4 POWER - These buttons adjust the volume level. 10 INPUT - "Selecting the Power-On Mode" on page 34) See "LED indications" on -screen menu. 8 CHANNEL Bb - When a menu...
... the remote control toward this manual for additional information. 3 VIDEO 2 IN - Press to receive 1080p signals. 12 Service port - When no menu is on -screen, these buttons change the source you cannot turn the TV on and off the TV, press and hold the POWER button on the TV's control panel functions as "VIDEO 2" and include standard A/V connections. 4 POWER - These buttons adjust the volume level. 10 INPUT - "Selecting the Power-On Mode" on page 34) See "LED indications" on -screen menu. 8 CHANNEL Bb - When a menu...
Owner's Manual - English
Page 11
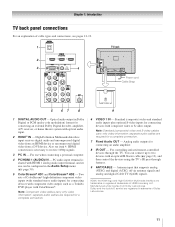
...12-19. 1 TV back 2 3 4 Power cord Cable Strap 5 67 8 9 1 DIGITAL AUDIO OUT - For use can connect up to receive 1080p signals. 3 PC IN - Two sets of Dolby Laboratories. 11 Note: Standard (composite) video and S-video cables carry only video information; You can be configured in Dolby Digital or PCM (pulse-code modulation) format for connecting devices with component video output, such as a Toshiba DVD player with composite video or S-video output. Analog audio outputs for a complete connection. 7 Fixed Audio OUT - HDMI connection is shared with HDMI 1 analog audio input...
...12-19. 1 TV back 2 3 4 Power cord Cable Strap 5 67 8 9 1 DIGITAL AUDIO OUT - For use can connect up to receive 1080p signals. 3 PC IN - Two sets of Dolby Laboratories. 11 Note: Standard (composite) video and S-video cables carry only video information; You can be configured in Dolby Digital or PCM (pulse-code modulation) format for connecting devices with component video output, such as a Toshiba DVD player with composite video or S-video output. Analog audio outputs for a complete connection. 7 Fixed Audio OUT - HDMI connection is shared with HDMI 1 analog audio input...
Owner's Manual - English
Page 12
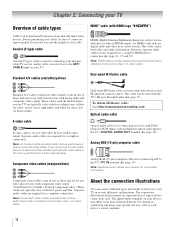
....toshiba.com/ Optical audio cable Optical audio cable is for use with devices with Dolby Digital or PCM (pulse-code modulation) optical audio input to disconnect the standard (composite) video cable or the picture performance will be used for a complete HDMI device connection (- page 18). Note: Separate audio cables are not required for connecting your antenna, cable TV service, and/or cable converter box to your TV in sets of three and are for connecting receivers with an HDMI output. For details on connecting and using...
....toshiba.com/ Optical audio cable Optical audio cable is for use with devices with Dolby Digital or PCM (pulse-code modulation) optical audio input to disconnect the standard (composite) video cable or the picture performance will be used for a complete HDMI device connection (- page 18). Note: Separate audio cables are not required for connecting your antenna, cable TV service, and/or cable converter box to your TV in sets of three and are for connecting receivers with an HDMI output. For details on connecting and using...
Owner's Manual - English
Page 13
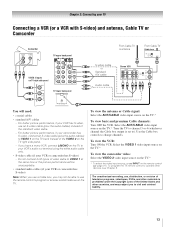
... picture performance will need: • coaxial cables • standard A/V cables - Do not connect both types of the standard video cable. - To view the antenna or Cable signal: Select the ANT/CABLE video input source on the remote control (- For better picture performance, if your VCR or camcorder has S-video) - Select the VIDEO 1 video input source on the TV.* To view the camcorder video: Select the VIDEO 2 video input source on the TV.* * To select the video input source, press INPUT on the TV.* To view basic and premium Cable channels: Turn...
... picture performance will need: • coaxial cables • standard A/V cables - Do not connect both types of the standard video cable. - To view the antenna or Cable signal: Select the ANT/CABLE video input source on the remote control (- For better picture performance, if your VCR or camcorder has S-video) - Select the VIDEO 1 video input source on the TV.* To view the camcorder video: Select the VIDEO 2 video input source on the TV.* * To select the video input source, press INPUT on the TV.* To view basic and premium Cable channels: Turn...
Owner's Manual - English
Page 19
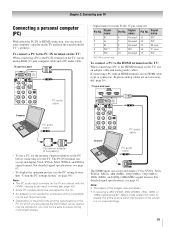
... the specifications of the screen (i.e. If connecting a PC with the HDMI 1 analog audio input terminals (- Signal name 6 Ground 7 Ground 8 Ground 9 NC 10 Ground Pin No. page 16). Note: • The PC audio input terminals on the TV are not necessary (- TV upper back panel PC audio cable Computer PC audio output PC audio cable Conversion adapter (if necessary) • To use a PC, set the monitor output resolution on the PC before connecting it to display the entire picture...
... the specifications of the screen (i.e. If connecting a PC with the HDMI 1 analog audio input terminals (- Signal name 6 Ground 7 Ground 8 Ground 9 NC 10 Ground Pin No. page 16). Note: • The PC audio input terminals on the TV are not necessary (- TV upper back panel PC audio cable Computer PC audio output PC audio cable Conversion adapter (if necessary) • To use a PC, set the monitor output resolution on the PC before connecting it to display the entire picture...
Owner's Manual - English
Page 27
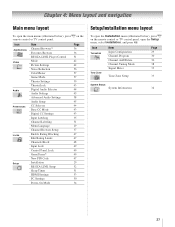
...Video Audio Preferences Locks Setup Item Channel Browser™ Favorites Browser REGZA-LINK Player Control Mode Picture Settings Noise Reduction ColorMaster Game Mode Theater Settings TheaterLock Digital Audio Selector Audio Settings Advanced Audio Settings Audio Setup CC Selector Base CC Mode Digital CC Settings Input Labeling Channel Labeling Menu Language Channel Browser Setup Enable Rating Blocking Edit Rating Limits Channels Block Input Lock Control Panel Lock GameTimer® New PIN Code Installation REGZA-LINK Setup Sleep Timer HDMI Settings PC Settings Power-On Mode Page 36 36 51 42...
...Video Audio Preferences Locks Setup Item Channel Browser™ Favorites Browser REGZA-LINK Player Control Mode Picture Settings Noise Reduction ColorMaster Game Mode Theater Settings TheaterLock Digital Audio Selector Audio Settings Advanced Audio Settings Audio Setup CC Selector Base CC Mode Digital CC Settings Input Labeling Channel Labeling Menu Language Channel Browser Setup Enable Rating Blocking Edit Rating Limits Channels Block Input Lock Control Panel Lock GameTimer® New PIN Code Installation REGZA-LINK Setup Sleep Timer HDMI Settings PC Settings Power-On Mode Page 36 36 51 42...

Owner's Manual - English
Page 30
... TV's memory.) To remove an Antenna source channel from the channel memory: Highlight the checked box next to the channel number you programmed into the TV's channel memory. If the channel is finished, you in the channel memory. To save your Cable TV service lineup changes significantly. Note: • You must use the Channel Number buttons on the remote control. • Programming channels when the ANT/CABLE input is configured for example, 56-1). page 29). 2 From the Setup menu, highlight Installation...
... TV's memory.) To remove an Antenna source channel from the channel memory: Highlight the checked box next to the channel number you programmed into the TV's channel memory. If the channel is finished, you in the channel memory. To save your Cable TV service lineup changes significantly. Note: • You must use the Channel Number buttons on the remote control. • Programming channels when the ANT/CABLE input is configured for example, 56-1). page 29). 2 From the Setup menu, highlight Installation...
Owner's Manual - English
Page 32
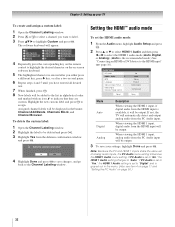
... the remote control to highlight the desired character on the on page 50.) 32 Audio Setup PC Audio HDMI 1 Audio MTS Language Optical Output Format Dolby Digital Dynamic Range Control Reset No Auto Stereo English Dolby Digital Compressed Done Mode Description Auto When viewing the HDMI 1 input, if digital audio from the PC Audio input will be added to the list in alphabetical order and marked with an icon to the Channel Labeling window. Analog When viewing the HDMI 1 input, analog audio...
... the remote control to highlight the desired character on the on page 50.) 32 Audio Setup PC Audio HDMI 1 Audio MTS Language Optical Output Format Dolby Digital Dynamic Range Control Reset No Auto Stereo English Dolby Digital Compressed Done Mode Description Auto When viewing the HDMI 1 input, if digital audio from the PC Audio input will be added to the list in alphabetical order and marked with an icon to the Channel Labeling window. Analog When viewing the HDMI 1 input, analog audio...
Owner's Manual - English
Page 44
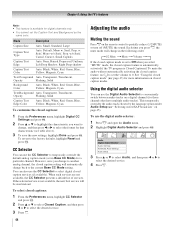
... "Using the closed caption feature is automatically activated if the TV program is Closed Captioned. Mode Description Caption Size Auto, Small, Standard, Large Caption Text Type Auto, Default, Mono w. To revert to conveniently switch between audio tracks on a digital channel (for a particular channel. You can also use Z to set in the following order: 1/2 Mute Mute Volume If the closed caption mode is not available, the next best service will change back to highlight the characteristic you select "MUTE" mode, the closed caption mode...
... "Using the closed caption feature is automatically activated if the TV program is Closed Captioned. Mode Description Caption Size Auto, Small, Standard, Large Caption Text Type Auto, Default, Mono w. To revert to conveniently switch between audio tracks on a digital channel (for a particular channel. You can also use Z to set in the following order: 1/2 Mute Mute Volume If the closed caption mode is not available, the next best service will change back to highlight the characteristic you select "MUTE" mode, the closed caption mode...
Owner's Manual - English
Page 59
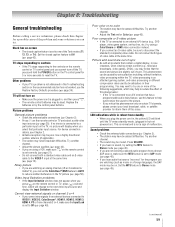
... modes (T1, T2, T3, or T4). page 42). • If you are watching an analog channel (off the TV, press and hold the POWER button on -screen • The closed caption feature to inform them of this issue. Noisy picture • If you are using a ColorStream or HDMI video connection instead. • If you connect an S-video cable, be poor. Cannot view external signals or channel 3 or 4 • If you cannot view signals from external devices connected...
... modes (T1, T2, T3, or T4). page 42). • If you are watching an analog channel (off the TV, press and hold the POWER button on -screen • The closed caption feature to inform them of this issue. Noisy picture • If you are using a ColorStream or HDMI video connection instead. • If you connect an S-video cable, be poor. Cannot view external signals or channel 3 or 4 • If you cannot view signals from external devices connected...
Owner's Manual - English
Page 64
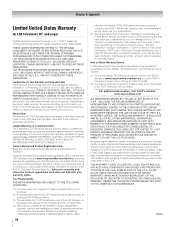
... BY THESE WARRANTIES. LCD TELEVISIONS PURCHASED ANYWHERE OUTSIDE OF THE U.S.A., INCLUDING, WITHOUT LIMITATION, CANADA AND MEXICO, AND USED IN THE U.S.A., ARE NOT COVERED BY THESE WARRANTIES. During this warranty. Owner's Manual and Product Registration Card Read this owner's manual thoroughly before operating this LCD Television and connected equipment; Reception problems caused by TACP; For additional information, visit TACP's website: www.tacp.toshiba.com ALL WARRANTIES IMPLIED BY...
... BY THESE WARRANTIES. LCD TELEVISIONS PURCHASED ANYWHERE OUTSIDE OF THE U.S.A., INCLUDING, WITHOUT LIMITATION, CANADA AND MEXICO, AND USED IN THE U.S.A., ARE NOT COVERED BY THESE WARRANTIES. During this warranty. Owner's Manual and Product Registration Card Read this owner's manual thoroughly before operating this LCD Television and connected equipment; Reception problems caused by TACP; For additional information, visit TACP's website: www.tacp.toshiba.com ALL WARRANTIES IMPLIED BY...
Owner's Manual - English
Page 65
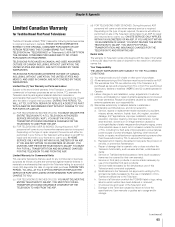
..., YOU MUST DELIVER THE ENTIRE TELEVISION TO AN ASP. Reception problems caused by the use of incompatible third party products; Service on which the TOSHIBA label or logo, rating label or serial number have been defaced or removed; THESE LIMITED WARRANTIES EXTEND TO THE ORIGINAL CONSUMER PURCHASER OR ANY PERSON RECEIVING THIS TOSHIBA BRAND FLAT PANEL TELEVISION (the "TELEVISION(S)" or "Television(s)") AS A GIFT FROM THE ORIGINAL...
..., YOU MUST DELIVER THE ENTIRE TELEVISION TO AN ASP. Reception problems caused by the use of incompatible third party products; Service on which the TOSHIBA label or logo, rating label or serial number have been defaced or removed; THESE LIMITED WARRANTIES EXTEND TO THE ORIGINAL CONSUMER PURCHASER OR ANY PERSON RECEIVING THIS TOSHIBA BRAND FLAT PANEL TELEVISION (the "TELEVISION(S)" or "Television(s)") AS A GIFT FROM THE ORIGINAL...
Owner's Manual - English
Page 66
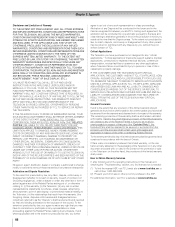
... persons or loss of the warranty. THIS WARRANTY WILL NOT COVER ANY SERVICE THAT IS REQUIRED, IN PART OR IN WHOLE, AS A RESULT OF ANY FAILURE TO FOLLOW THE SET-UP AND USAGE INSTRUCTIONS. YOU MUST READ AND FOLLOW ALL SET-UP AND USAGE INSTRUCTIONS IN THE APPLICABLE USER GUIDES AND/OR MANUALS. Arbitration of these warranties in which you and TCL...
... persons or loss of the warranty. THIS WARRANTY WILL NOT COVER ANY SERVICE THAT IS REQUIRED, IN PART OR IN WHOLE, AS A RESULT OF ANY FAILURE TO FOLLOW THE SET-UP AND USAGE INSTRUCTIONS. YOU MUST READ AND FOLLOW ALL SET-UP AND USAGE INSTRUCTIONS IN THE APPLICABLE USER GUIDES AND/OR MANUALS. Arbitration of these warranties in which you and TCL...
Owner's Manual - English
Page 68
... code 47 Panel lock 49 Unlocking programs temporarily 48 Video inputs, locking 49 Locks menu 46 M MPEG noise reduction 56 MTS feature 45 MUTE button 44 O Optical audio output format 46 P PC Audio 50 PC connection 19 PC settings 50 Picture mode 42 Picture quality 42 Picture scroll 41 Picture size selection 39 POWER button 10, 21 Power-On Mode 34 R RECALL button 54 REGZA-LINK connection 17 REGZA-LINK feature 51 Remote control Battery installation 20 Device code table 25 Functional key chart 23 Programming 24 Reset Factory Defaults 34 S SAP sound...
... code 47 Panel lock 49 Unlocking programs temporarily 48 Video inputs, locking 49 Locks menu 46 M MPEG noise reduction 56 MTS feature 45 MUTE button 44 O Optical audio output format 46 P PC Audio 50 PC connection 19 PC settings 50 Picture mode 42 Picture quality 42 Picture scroll 41 Picture size selection 39 POWER button 10, 21 Power-On Mode 34 R RECALL button 54 REGZA-LINK connection 17 REGZA-LINK feature 51 Remote control Battery installation 20 Device code table 25 Functional key chart 23 Programming 24 Reset Factory Defaults 34 S SAP sound...


