Owner's Manual - English
Page 3
... been dropped. Servicing is dropped and the cabinet or enclosure surface has been damaged or the TV does not operate normally, take the following precautions: • ALWAYS turn off the TV and unplug the power cord to avoid possible electric shock or fire. • NEVER allow your body to wide ...slot; The LCD panel inside the TV contains glass and a toxic liquid. Make sure the tie is used, use a ...
... been dropped. Servicing is dropped and the cabinet or enclosure surface has been damaged or the TV does not operate normally, take the following precautions: • ALWAYS turn off the TV and unplug the power cord to avoid possible electric shock or fire. • NEVER allow your body to wide ...slot; The LCD panel inside the TV contains glass and a toxic liquid. Make sure the tie is used, use a ...
Owner's Manual - English
Page 4
... or heavy object. 36) • The LCD screen of this WARNING may make sure the antenna system is thundering, do not touch the connecting cables or apparatus. 33) For added protection of your TOSHIBA TV, follow these sounds become frequent or continuous, unplug the power cord and contact a Toshiba Authorized Service Center. 35) WARNING: RISK...
... or heavy object. 36) • The LCD screen of this WARNING may make sure the antenna system is thundering, do not touch the connecting cables or apparatus. 33) For added protection of your TOSHIBA TV, follow these sounds become frequent or continuous, unplug the power cord and contact a Toshiba Authorized Service Center. 35) WARNING: RISK...
Owner's Manual - English
Page 6
...will not occur in this device may be determined by removing and applying power to the equipment, the user is manufactured using an extremely high level of ...the dealer or an experienced radio/TV technician for perceived issues resulting from these rules is viewed from SRS Labs, Inc. • Manufactured under your LCD TV The following measures: • ... LCD technology, is displayed for compliance to Part 15 of malfunction, and is incorporated under license from a normal viewing distance. FCC Declaration of Conformity Compliance Statement (Part 15): The Toshiba 42HL167,...
...will not occur in this device may be determined by removing and applying power to the equipment, the user is manufactured using an extremely high level of ...the dealer or an experienced radio/TV technician for perceived issues resulting from these rules is viewed from SRS Labs, Inc. • Manufactured under your LCD TV The following measures: • ... LCD technology, is displayed for compliance to Part 15 of malfunction, and is incorporated under license from a normal viewing distance. FCC Declaration of Conformity Compliance Statement (Part 15): The Toshiba 42HL167,...
Owner's Manual - English
Page 7
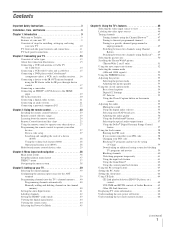
...and Service 3 Chapter 1: Introduction 9 Welcome to Toshiba 9 Features of your new TV 9 Overview of steps for installing, setting up, and using your new TV 10 TV front and side panel controls and connections 11 TV back panel connections 12 Chapter 2: Connecting your TV 13 Overview of cable types 13 About the ...40 Setting the Auto Input feature 41 Labeling channels 42 Setting the HDMI™ audio mode 43 Viewing the digital signal meter 44 Viewing the system status 44 Selecting the Power-On Mode 45 Chapter 6: Using the TV's features 46 Selecting the video input source to view...
...and Service 3 Chapter 1: Introduction 9 Welcome to Toshiba 9 Features of your new TV 9 Overview of steps for installing, setting up, and using your new TV 10 TV front and side panel controls and connections 11 TV back panel connections 12 Chapter 2: Connecting your TV 13 Overview of cable types 13 About the ...40 Setting the Auto Input feature 41 Labeling channels 42 Setting the HDMI™ audio mode 43 Viewing the digital signal meter 44 Viewing the system status 44 Selecting the Power-On Mode 45 Chapter 6: Using the TV's features 46 Selecting the video input source to view...
Owner's Manual - English
Page 10
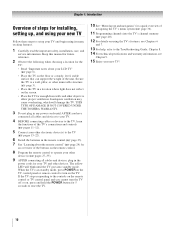
... UNDER THE TOSHIBA WARRANTY. 3 Do not plug in any power cords until the TV goes into the TV's channel memory (- page 24) for an overview of the buttons on the remote control. 8 Program the remote control to operate your other electronic device(s) to the TV (- pages 27...in a location where light does not reflect on using the TV's features, see Chapters 6 and 7. 13 For help, refer to the Troubleshooting Guide, Chapter 8. 14 For technical specifications and warranty information, see Chapter 9. 15 Enjoy your LCD TV" (- Chapter 1: Introduction Overview of steps for installing, setting...
... UNDER THE TOSHIBA WARRANTY. 3 Do not plug in any power cords until the TV goes into the TV's channel memory (- page 24) for an overview of the buttons on the remote control. 8 Program the remote control to operate your other electronic device(s) to the TV (- pages 27...in a location where light does not reflect on using the TV's features, see Chapters 6 and 7. 13 For help, refer to the Troubleshooting Guide, Chapter 8. 14 For technical specifications and warranty information, see Chapter 9. 15 Enjoy your LCD TV" (- Chapter 1: Introduction Overview of steps for installing, setting...
Owner's Manual - English
Page 11
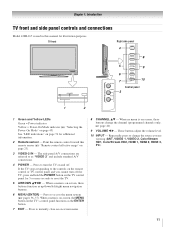
...connections Model 42HL167 is on-screen, these buttons function as up/down/left/right menu navigation buttons. 6 MENU (ENTER) - If the TV stops responding to the controls on the TV's control panel functions as "VIDEO 2" and include standard A/V connections. 4 POWER - ...as the ENTER button. 7 EXIT - pages 36-37). page 40). 9 VOLUME C c - TV front Right side panel 4 8 POWER 5 9 6 7 10 Control panel 3 1 2 1 Green and Yellow LEDs Green = Power indicator Yellow = Power-On Mode indicator (- The side panel A/V connections are viewing (ANT, VIDEO 1, VIDEO 2, ColorStream HD1...
...connections Model 42HL167 is on-screen, these buttons function as up/down/left/right menu navigation buttons. 6 MENU (ENTER) - If the TV stops responding to the controls on the TV's control panel functions as "VIDEO 2" and include standard A/V connections. 4 POWER - ...as the ENTER button. 7 EXIT - pages 36-37). page 40). 9 VOLUME C c - TV front Right side panel 4 8 POWER 5 9 6 7 10 Control panel 3 1 2 1 Green and Yellow LEDs Green = Power indicator Yellow = Power-On Mode indicator (- The side panel A/V connections are viewing (ANT, VIDEO 1, VIDEO 2, ColorStream HD1...
Owner's Manual - English
Page 12
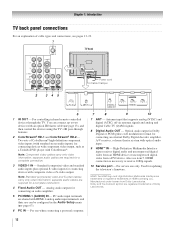
... pass-through the TV. Two sets of ColorStream® high-definition component video inputs (with standard stereo audio inputs) for connecting devices with component video output, such as a Toshiba DVD player with composite video or S-video output. Optical audio output in the Audio Setup menu (- ...can connect up to receive 1080p signals. 10 Service port - Manufactured under license from a DVI device. Also see pages 13-22. 1 TV back 2 345 Power cord Cable Clamper 6 1 IR OUT - Antenna input that supports analog (NTSC) and digital (ATSC) off-air antenna signals and analog ...
... pass-through the TV. Two sets of ColorStream® high-definition component video inputs (with standard stereo audio inputs) for connecting devices with component video output, such as a Toshiba DVD player with composite video or S-video output. Optical audio output in the Audio Setup menu (- ...can connect up to receive 1080p signals. 10 Service port - Manufactured under license from a DVI device. Also see pages 13-22. 1 TV back 2 345 Power cord Cable Clamper 6 1 IR OUT - Antenna input that supports analog (NTSC) and digital (ATSC) off-air antenna signals and analog ...
Owner's Manual - English
Page 17
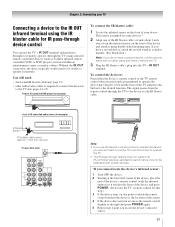
...end of the device's remote control (with the infrared emitter) so it touches the front of the device and press POWER. (Do not use the TV's remote control to operate the TV. • The IR pass-through feature does not support all IR-controlled devices; Chapter 3) toward the front of your...device, you also will need to be attainable with a rubber band and leave it remotely. page 13) • other audio/video cables as Toshiba infrared remotecontrolled VCRs or DVD players) enclosed within an entertainment center or similar cabinet. This sensor is the location of the sensor. 4 If the...
...end of the device's remote control (with the infrared emitter) so it touches the front of the device and press POWER. (Do not use the TV's remote control to operate the TV. • The IR pass-through feature does not support all IR-controlled devices; Chapter 3) toward the front of your...device, you also will need to be attainable with a rubber band and leave it remotely. page 13) • other audio/video cables as Toshiba infrared remotecontrolled VCRs or DVD players) enclosed within an entertainment center or similar cabinet. This sensor is the location of the sensor. 4 If the...
Owner's Manual - English
Page 24
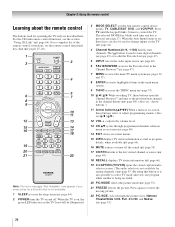
... page 53). 21 FREEZE freezes the picture. page 64). page 64). 2 POWER turns the TV on and off the sound (- page 49) or to the last viewed channel or source (page 49...BbC c) When a menu is set, these buttons open the Channel Browser™ and tune to control the TV. page 46). 6 FAV BROWSER accesses the Favorites List in the main menu system. 9 THINC accesses the THINC... menu (- page 40). 14 EXIT closes on-screen menus. 15 INFO displays TV status information as well as program details, when available (- For a complete list of the remote control's ...
... page 53). 21 FREEZE freezes the picture. page 64). page 64). 2 POWER turns the TV on and off the sound (- page 49) or to the last viewed channel or source (page 49...BbC c) When a menu is set, these buttons open the Channel Browser™ and tune to control the TV. page 46). 6 FAV BROWSER accesses the Favorites List in the main menu system. 9 THINC accesses the THINC... menu (- page 40). 14 EXIT closes on-screen menus. 15 INFO displays TV status information as well as program details, when available (- For a complete list of the remote control's ...
Owner's Manual - English
Page 25
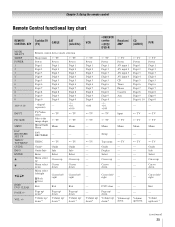
... Info Select Cursor up /down Cursor left / right --- s TV --------- --- --- s TV s TV Menu s TV Power Digit 1 Digit 2 Digit 3 Digit 4 Digit 5 Digit 6 Digit 7 Digit 8 Digit 9 Digit 0 -/--, +10, +100 s TV s TV Menu FAV BROWSER --- --- Chapter 3: Using the remote control Remote Control functional key chart REMOTE CONTROL KEY Toshiba TV (TV) CABLE SAT (satellite) MODE SELECT SLEEP POWER 1 2 3 4 5 6 7 8 9 0 100/-/+10 INPUT PIC SIZE MENU FAV...
... Info Select Cursor up /down Cursor left / right --- s TV --------- --- --- s TV s TV Menu s TV Power Digit 1 Digit 2 Digit 3 Digit 4 Digit 5 Digit 6 Digit 7 Digit 8 Digit 9 Digit 0 -/--, +10, +100 s TV s TV Menu FAV BROWSER --- --- Chapter 3: Using the remote control Remote Control functional key chart REMOTE CONTROL KEY Toshiba TV (TV) CABLE SAT (satellite) MODE SELECT SLEEP POWER 1 2 3 4 5 6 7 8 9 0 100/-/+10 INPUT PIC SIZE MENU FAV...
Owner's Manual - English
Page 36
To open the main menus (illustrated below and on the remote control or TV control panel. Icon Video Audio Preferences Locks Setup Item Mode Picture Settings Noise Reduction ColorMaster Game Mode Theater Settings Digital Audio Selector Audio Settings Advanced ...] S [Opens the CE-Link Setup menu] S [Opens the Sleep Timer menu] S [Opens the PC Settings menu] S Power-Saving/Fast Page 53 53 68 69 70 50 55 56 71 56 55 54 54 41 46 42 39 47 59 59 60 61 62 62 58 39 65 64 63 45 36 Chapter...
To open the main menus (illustrated below and on the remote control or TV control panel. Icon Video Audio Preferences Locks Setup Item Mode Picture Settings Noise Reduction ColorMaster Game Mode Theater Settings Digital Audio Selector Audio Settings Advanced ...] S [Opens the CE-Link Setup menu] S [Opens the Sleep Timer menu] S [Opens the PC Settings menu] S Power-Saving/Fast Page 53 53 68 69 70 50 55 56 71 56 55 54 54 41 46 42 39 47 59 59 60 61 62 62 58 39 65 64 63 45 36 Chapter...
Owner's Manual - English
Page 39
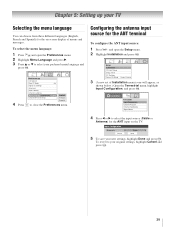
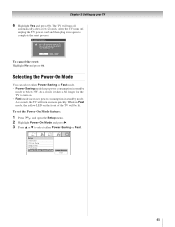
... Y and open the Setup menu. 2 Highlight Installation and press T. Setup Installation CE-Link Setup Sleep Timer PC Settings Power-On Mode Power-Saving 3 (A new set of menus and messages. Chapter 5: Setting up your TV Selecting the menu language You can choose from three different languages (English, French and Spanish) for the on the...
... Y and open the Setup menu. 2 Highlight Installation and press T. Setup Installation CE-Link Setup Sleep Timer PC Settings Power-On Mode Power-Saving 3 (A new set of menus and messages. Chapter 5: Setting up your TV Selecting the menu language You can choose from three different languages (English, French and Spanish) for the on the...
Owner's Manual - English
Page 40
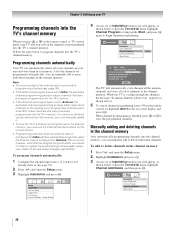
..., once channel programming is configured for Antenna. Setup Installation CE-Link Setup Sleep Timer PC Settings Power-On Mode Power-Saving 4 (A new set of Channels Found - 73 Scanning Digital Channels Found Channel - 118 Abort The TV will take substantially longer than when the antenna input is finished, you can manually add or delete...
..., once channel programming is configured for Antenna. Setup Installation CE-Link Setup Sleep Timer PC Settings Power-On Mode Power-Saving 4 (A new set of Channels Found - 73 Scanning Digital Channels Found Channel - 118 Abort The TV will take substantially longer than when the antenna input is finished, you can manually add or delete...
Owner's Manual - English
Page 41
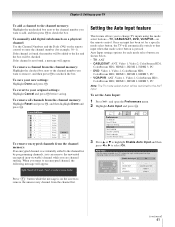
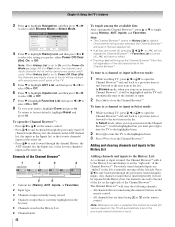
... new settings: Highlight Done and press T. To remove all channels from the channel list. Enable Auto Input On SLEEP POWER MODE SELECT CABLE/SAT DVD TV VCR/PVR TV CABLE/SAT DVD VCR/PVR -ColorStream HD1 HDMI 1 Video 1 Reset Done (continued) 41 To manually add digital subchannels... c to remove the unnecessary channel from the channel memory: Highlight Reset and press T, and then highlight Done and press T. When you are shown below. • TV: ANT • CABLE/SAT: ANT, Video 1, Video 2, ColorStream HD1, ColorStream HD2, HDMI 1, HDMI 2, HDMI 3, PC • DVD: Video 1, Video ...
... new settings: Highlight Done and press T. To remove all channels from the channel list. Enable Auto Input On SLEEP POWER MODE SELECT CABLE/SAT DVD TV VCR/PVR TV CABLE/SAT DVD VCR/PVR -ColorStream HD1 HDMI 1 Video 1 Reset Done (continued) 41 To manually add digital subchannels... c to remove the unnecessary channel from the channel memory: Highlight Reset and press T, and then highlight Done and press T. When you are shown below. • TV: ANT • CABLE/SAT: ANT, Video 1, Video 2, ColorStream HD1, ColorStream HD2, HDMI 1, HDMI 2, HDMI 3, PC • DVD: Video 1, Video ...
Owner's Manual - English
Page 42
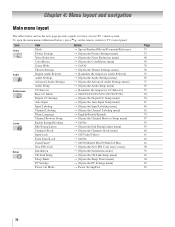
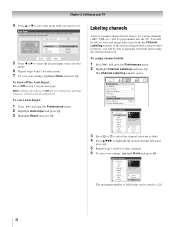
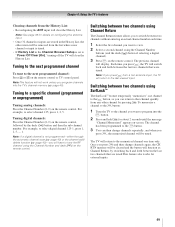
... in step 3 on your settings, highlight Done and press T. Auto Input Use this menu to change channels. If the desired channel label is 128. 42 Channel Labeling {No Label} A&E ABC ABCFAM ABCHD AMAX AMAXW AMC ANIMAL ANT 24 A&E Press CH UP/DOWN to enable your... and press T. To reset Auto Input: 1 Press Y and open the Preferences menu. 2 Highlight Channel Labeling and press T. Enable Auto Input On SLEEP POWER MODE SELECT CABLE/SAT DVD TV VCR/PVR TV CABLE/SAT DVD VCR/PVR -ColorStream HD1 HDMI 1 Video 1 Reset Done 5 Press C or c to set. Custom Clear All Done 3 Press <...
... in step 3 on your settings, highlight Done and press T. Auto Input Use this menu to change channels. If the desired channel label is 128. 42 Channel Labeling {No Label} A&E ABC ABCFAM ABCHD AMAX AMAXW AMC ANIMAL ANT 24 A&E Press CH UP/DOWN to enable your... and press T. To reset Auto Input: 1 Press Y and open the Preferences menu. 2 Highlight Channel Labeling and press T. Enable Auto Input On SLEEP POWER MODE SELECT CABLE/SAT DVD TV VCR/PVR TV CABLE/SAT DVD VCR/PVR -ColorStream HD1 HDMI 1 Video 1 Reset Done 5 Press C or c to set. Custom Clear All Done 3 Press <...
Owner's Manual - English
Page 45
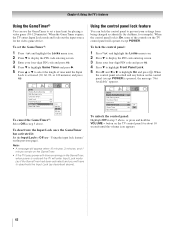
...Fast mode, the yellow LED on . • Fast mode increases power consumption in to complete the reset. Chapter 5: Setting up your TV 6 Highlight Yes and press T. The TV will turn on more quickly. After the TV turns off automatically after a few seconds. Setup Installation CE-Link Setup... Sleep Timer PC Settings Power-On Mode Power-Saving Power-Saving Fast 45 As a result, it ...
...Fast mode, the yellow LED on . • Fast mode increases power consumption in to complete the reset. Chapter 5: Setting up your TV 6 Highlight Yes and press T. The TV will turn on more quickly. After the TV turns off automatically after a few seconds. Setup Installation CE-Link Setup... Sleep Timer PC Settings Power-On Mode Power-Saving Power-Saving Fast 45 As a result, it ...
Owner's Manual - English
Page 48
... b to close the Channel Browser™. Any channel or input that is selected that cannot be tuned (for various reasons), the TV will not be cleared with every power on/off , n will have no effect. • Pressing n will be highlighted but instead is in Fast mode, the channels... Inputs list, or the favorite channels/ inputs in the Channel Browser™, it will be highlighted and the TV will be saved every power on/off , pressing 3 C, # c, or n will open in Select mode: 1 While watching TV, press 3 C or # c to open the Channel Browser™: • Press 3 C or # c on the ...
... b to close the Channel Browser™. Any channel or input that is selected that cannot be tuned (for various reasons), the TV will not be cleared with every power on/off , n will have no effect. • Pressing n will be highlighted but instead is in Fast mode, the channels... Inputs list, or the favorite channels/ inputs in the Channel Browser™, it will be highlighted and the TV will be saved every power on/off , pressing 3 C, # c, or n will open in Select mode: 1 While watching TV, press 3 C or # c to open the Channel Browser™: • Press 3 C or # c on the ...
Owner's Manual - English
Page 49
... R, the TV will switch back and forth between two channels without entering an actual channel number each time. 1 Select the first channel you can then change channels again, the CH RTN memory will be cleared and the button will be tuned. Note: If a digital channel is set to "Power Off Clear... (On)," turning off the TV will return to the memorized channel one channel to the R button, so you want to view. 2 Select a second channel using Channel ...
... R, the TV will switch back and forth between two channels without entering an actual channel number each time. 1 Select the first channel you can then change channels again, the CH RTN memory will be cleared and the button will be tuned. Note: If a digital channel is set to "Power Off Clear... (On)," turning off the TV will return to the memorized channel one channel to the R button, so you want to view. 2 Select a second channel using Channel ...
Owner's Manual - English
Page 62
... press T. Note: • A message will appear when 10 minutes, 3 minutes, and 1 minute remain on the GameTimer. • If the TV loses power with time remaining on the TV control panel will have to deactivate the Input Lock (as if the GameTimer had been activated) and you will operate except... 5 Press B or b to select the length of the controls on the GameTimer, when power is activated (30, 60, 90, or 120 minutes) and press T. "Using the input lock feature" on the TV control panel for example). Locks Enable Rating Blocking Off Edit Rating Limits Channels Block Input Lock ...
... press T. Note: • A message will appear when 10 minutes, 3 minutes, and 1 minute remain on the GameTimer. • If the TV loses power with time remaining on the TV control panel will have to deactivate the Input Lock (as if the GameTimer had been activated) and you will operate except... 5 Press B or b to select the length of the controls on the GameTimer, when power is activated (30, 60, 90, or 120 minutes) and press T. "Using the input lock feature" on the TV control panel for example). Locks Enable Rating Blocking Off Edit Rating Limits Channels Block Input Lock ...
Owner's Manual - English
Page 63
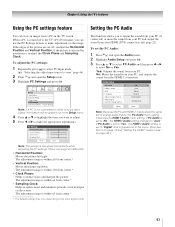
... influences the HDMI 1 Audio menu setting. Setup Installation CE-Link Setup Sleep Timer PC Settings Power-On Mode Power-Saving Note: If a PC is not connected or there is no pc input signal, this... feature will be grayed out in the menu. (Also see item 5 on page 12 and "Setting the HDMI™ Audio mode" on the TV... sound from center.* • Vertical Position: Moves the picture up/down. Chapter 6: Using the TV's features Using the PC settings feature Setting the PC Audio You can use the PC Settings feature ...
... influences the HDMI 1 Audio menu setting. Setup Installation CE-Link Setup Sleep Timer PC Settings Power-On Mode Power-Saving Note: If a PC is not connected or there is no pc input signal, this... feature will be grayed out in the menu. (Also see item 5 on page 12 and "Setting the HDMI™ Audio mode" on the TV... sound from center.* • Vertical Position: Moves the picture up/down. Chapter 6: Using the TV's features Using the PC settings feature Setting the PC Audio You can use the PC Settings feature ...


