Brochure
Page 1
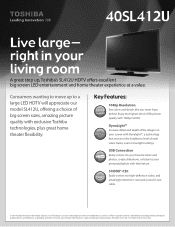
... def CLEAR SCAN 480Hz Abc def Closed Captioning z QUANzTzUM BLACK Sleep Timer 10 Camera Angle Select Digital Tuning Closed Captioning Sleep Timer 1 Apps IR Pass-Through Native Mode™ PixelPure 5G Resolution +™ Active Shutter Glasses © 2011 Toshiba America Information Systems, Inc. Expert Mode P D 240 NET TV Noise Reduction TriVector MEGA CONTRAST BUILT-IN WIFI LED DynaLight™ Dynamic Energy Saving Expert Mode USBNCoisoe nRenduectciotnion Easily connect to...
... def CLEAR SCAN 480Hz Abc def Closed Captioning z QUANzTzUM BLACK Sleep Timer 10 Camera Angle Select Digital Tuning Closed Captioning Sleep Timer 1 Apps IR Pass-Through Native Mode™ PixelPure 5G Resolution +™ Active Shutter Glasses © 2011 Toshiba America Information Systems, Inc. Expert Mode P D 240 NET TV Noise Reduction TriVector MEGA CONTRAST BUILT-IN WIFI LED DynaLight™ Dynamic Energy Saving Expert Mode USBNCoisoe nRenduectciotnion Easily connect to...
Brochure
Page 2
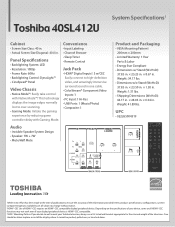
... may not work even if your display/peripheral device is HDMI®-CEC compatible. 3VESA® Mounting Pattern If you decide to wall mount your device, some or all subject to high-definition video, and amazingly immersive surround sound in one cable. • ColorStream® Component Video Inputs: 1 • PC Input: 1 Hi-Res • USB Ports: 1 (Music/Photo) • Composite: 1 Audio • Invisible Speaker System Design • Speaker: 7W + 7W...
... may not work even if your display/peripheral device is HDMI®-CEC compatible. 3VESA® Mounting Pattern If you decide to wall mount your device, some or all subject to high-definition video, and amazingly immersive surround sound in one cable. • ColorStream® Component Video Inputs: 1 • PC Input: 1 Hi-Res • USB Ports: 1 (Music/Photo) • Composite: 1 Audio • Invisible Speaker System Design • Speaker: 7W + 7W...
User Manual
Page 2
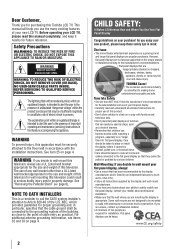
... wall mount your LCD TV, please read and understand all cords and cables connected to the flat panel display so that are mounting the display is intended to alert the user to the point of uninsulated "dangerous voltage" within an equilateral triangle is appropriate. Before operating your flat panel display, always: • Use a mount that the wall where you are inappropriately situated on or play with the installation instructions. REFER SERVICING TO QUALIFIED SERVICE...
... wall mount your LCD TV, please read and understand all cords and cables connected to the flat panel display so that are mounting the display is intended to alert the user to the point of uninsulated "dangerous voltage" within an equilateral triangle is appropriate. Before operating your flat panel display, always: • Use a mount that the wall where you are inappropriately situated on or play with the installation instructions. REFER SERVICING TO QUALIFIED SERVICE...
User Manual
Page 4
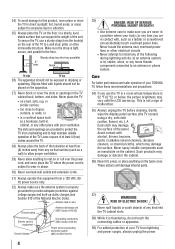
...support the weight of the panel. Never spray volatile compounds such as insecticide on the rear of the TV to a wall stud, pillar, or other place with , such as a bookcase, built-in cabinet, or any other immovable structure. Never spill liquids or push objects of any item you are provided to an antenna... wall) to the floor. Hook TV side TV top 26) The apparatus should not be exposed to drapes, curtains, or walls; Gently wipe the display panel surface (the TV screen) using a dry, soft cloth (cotton, flannel, etc.). or b) cables, wires, or any of the National Electric Code...
...support the weight of the panel. Never spray volatile compounds such as insecticide on the rear of the TV to a wall stud, pillar, or other place with , such as a bookcase, built-in cabinet, or any other immovable structure. Never spill liquids or push objects of any item you are provided to an antenna... wall) to the floor. Hook TV side TV top 26) The apparatus should not be exposed to drapes, curtains, or walls; Gently wipe the display panel surface (the TV screen) using a dry, soft cloth (cotton, flannel, etc.). or b) cables, wires, or any of the National Electric Code...
User Manual
Page 5
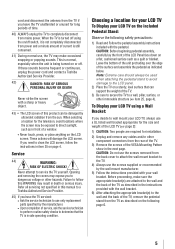
... pedestal stand from mains power. Choosing a location for installation. 2) Unplug and remove any cables and/or other component connectors from the back cover to attach the wall mount bracket to direct sunlight, such as indicated below. Before proceeding, make occasional snapping or popping sounds. These actions will damage the LCD screen. Never strike the screen with your LCD TV using the on/off switch, it is being turned...
... pedestal stand from mains power. Choosing a location for installation. 2) Unplug and remove any cables and/or other component connectors from the back cover to attach the wall mount bracket to direct sunlight, such as indicated below. Before proceeding, make occasional snapping or popping sounds. These actions will damage the LCD screen. Never strike the screen with your LCD TV using the on/off switch, it is being turned...
User Manual
Page 9
... panel connections 13 Chapter 2: Connecting your TV 14 Overview of cable types 14 About the connection illustrations 14 Connecting a VCR and antenna, Cable TV or Camcorder........15 Connecting a DVD player with ColorStream® (component video), a VCR, and a satellite receiver...........16 Connecting an HDMI® or DVI device to the HDMI input........17 REGZA-LINK® connection 18 Connecting a digital audio system 19 Connecting an audio system 19 Connecting a personal computer (PC 20 Chapter 3: Using the remote control 21 Installing the remote control...
... panel connections 13 Chapter 2: Connecting your TV 14 Overview of cable types 14 About the connection illustrations 14 Connecting a VCR and antenna, Cable TV or Camcorder........15 Connecting a DVD player with ColorStream® (component video), a VCR, and a satellite receiver...........16 Connecting an HDMI® or DVI device to the HDMI input........17 REGZA-LINK® connection 18 Connecting a digital audio system 19 Connecting an audio system 19 Connecting a personal computer (PC 20 Chapter 3: Using the remote control 21 Installing the remote control...
User Manual
Page 13
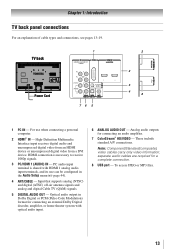
... of cable types and connections, see pages 13-19. 1 TV back Power Cord 76 5 2 2 3 4 8 1無 PC IN - PC audio input terminal is necessary to receive 1080p signals. 3無 PC/HDMI 1 (AUDIO) IN - These include standard A/V connections. Input that supports analog (NTSC) and digital (ATSC) off-air antenna signals and analog and digital Cable TV (QAM) signals. 5無 DIGITAL AUDIO OUT - Optical audio output in the Audio Setup menu ( page 44). 4無 ANT/CABLE - High-Definition Multimedia Interface input receives digital audio and uncompressed digital video from...
... of cable types and connections, see pages 13-19. 1 TV back Power Cord 76 5 2 2 3 4 8 1無 PC IN - PC audio input terminal is necessary to receive 1080p signals. 3無 PC/HDMI 1 (AUDIO) IN - These include standard A/V connections. Input that supports analog (NTSC) and digital (ATSC) off-air antenna signals and analog and digital Cable TV (QAM) signals. 5無 DIGITAL AUDIO OUT - Optical audio output in the Audio Setup menu ( page 44). 4無 ANT/CABLE - High-Definition Multimedia Interface input receives digital audio and uncompressed digital video from...
User Manual
Page 14
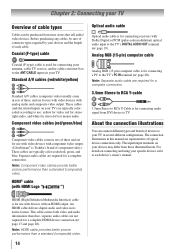
... RCA Y-cable 3.5mm Stereo to the TV's DIGITAL AUDIO OUT terminal ( page 19). HDMI® cable (with HDMI Logo " ") Optical audio cable Optical audio cable is Toshiba's brand of component video.) These cables are for connecting receivers with component video output. (ColorStream® is for use with video devices with Dolby Digital or PCM (pulse-code modulation) optical audio input to RCA Y-Cable is for a complete connection. The input/output terminals on your TV in sets of three and are typically color-coded red, green, and...
... RCA Y-cable 3.5mm Stereo to the TV's DIGITAL AUDIO OUT terminal ( page 19). HDMI® cable (with HDMI Logo " ") Optical audio cable Optical audio cable is Toshiba's brand of component video.) These cables are for connecting receivers with component video output. (ColorStream® is for use with video devices with Dolby Digital or PCM (pulse-code modulation) optical audio input to RCA Y-Cable is for a complete connection. The input/output terminals on your TV in sets of three and are typically color-coded red, green, and...
User Manual
Page 19
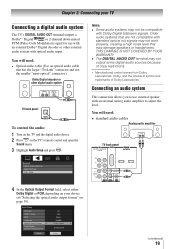
... terminal outputs a Dolby® * Digital or 2-channel down-mixed PCM (Pulse-Code Modulation) signal for use external speaker with Dolby Digital bitstream signals. Note: •• Some audio systems may damage speakers or headphones. Connecting an audio system This connection allows you to use with optical audio input. Dolby, and the double-D symbol are not compatible with standard optical out signals may not output some digital audio sources because of Dolby Laboratories. You will need : • Optical audio cable (Use an optical audio cable...
... terminal outputs a Dolby® * Digital or 2-channel down-mixed PCM (Pulse-Code Modulation) signal for use external speaker with Dolby Digital bitstream signals. Note: •• Some audio systems may damage speakers or headphones. Connecting an audio system This connection allows you to use with optical audio input. Dolby, and the double-D symbol are not compatible with standard optical out signals may not output some digital audio sources because of Dolby Laboratories. You will need : • Optical audio cable (Use an optical audio cable...
User Manual
Page 20
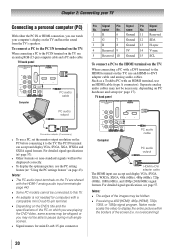
...) signal formats. no overscanning). 20 name 1R 6 Ground 11 Reserved 2G 7 Ground 12 SDA 3B 8 Ground 13 H-sync 4 Reserved 9 5V 14 V-sync 5 Reserved 10 Ground 15 SCL To connect a PC to -DVI adapter cable and analog audio cables. TV back panel Computer PC audio cable PC audio output Pin Signal No. Separate analog audio cables may not be displayed correctly. • To display the optimum picture, use an HDMI cable (type A connector). For detailed signal specifications...
...) signal formats. no overscanning). 20 name 1R 6 Ground 11 Reserved 2G 7 Ground 12 SDA 3B 8 Ground 13 H-sync 4 Reserved 9 5V 14 V-sync 5 Reserved 10 Ground 15 SCL To connect a PC to -DVI adapter cable and analog audio cables. TV back panel Computer PC audio cable PC audio output Pin Signal No. Separate analog audio cables may not be displayed correctly. • To display the optimum picture, use an HDMI cable (type A connector). For detailed signal specifications...

User Manual
Page 22
... the sound ( page 38). 13無 VOL + - When the TV is on the TV front will be illuminated. 2無 PIC SIZE cycles through programmed channels when no menu is on, the green LED indicator on -screen ( page 26). 11無 C.CAPTION accesses the closed caption ( pages 36-37). 12無 MUTE reduces or turns off . adjusts the volume level. 14無 INFO displays...
... the sound ( page 38). 13無 VOL + - When the TV is on the TV front will be illuminated. 2無 PIC SIZE cycles through programmed channels when no menu is on, the green LED indicator on -screen ( page 26). 11無 C.CAPTION accesses the closed caption ( pages 36-37). 12無 MUTE reduces or turns off . adjusts the volume level. 14無 INFO displays...
User Manual
Page 23
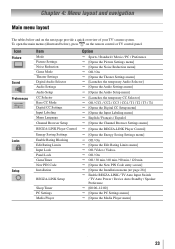
... Main menu layout The tables below ), press on the next page provide a quick overview of your TV's menu system. Icon Picture Sound Preferences Locks Setup Item Mode Picture Settings Noise Reduction Game Mode Theater Settings Digital Audio Selector Audio Settings Audio Setup CC Selector Base CC Mode Digital CC Settings Input Labeling Menu Language Channel Browser Setup REGZA-LINK Player Control Energy Saving Settings Enable Rating Blocking Edit Rating Limits Input Lock Panel Lock GameTimer New PIN Code Installation REGZA-LINK Setup Sleep Timer PC Settings Media Player Option ...
... Main menu layout The tables below ), press on the next page provide a quick overview of your TV's menu system. Icon Picture Sound Preferences Locks Setup Item Mode Picture Settings Noise Reduction Game Mode Theater Settings Digital Audio Selector Audio Settings Audio Setup CC Selector Base CC Mode Digital CC Settings Input Labeling Menu Language Channel Browser Setup REGZA-LINK Player Control Energy Saving Settings Enable Rating Blocking Edit Rating Limits Input Lock Panel Lock GameTimer New PIN Code Installation REGZA-LINK Setup Sleep Timer PC Settings Media Player Option ...
User Manual
Page 27
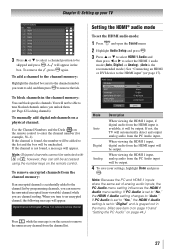
... are channel surfing. Setting the HDMI® audio mode To set to "No," the HDMI 1 Audio setting changes to enter the channel number (for example, 56-1). If PC Audio is set to "Yes," the HDMI 1 Audio setting is set the HDMI audio mode: 1無 Press and open the Sound menu. 2無 Highlight Audio Setup and press . 3無 Press p or q to select HDMI 1 Audio and then press t or u to select the HDMI 1 audio mode (Auto, Digital, or Analog). (Auto is the recommended mode.) See "Connecting an HDMI or...
... are channel surfing. Setting the HDMI® audio mode To set to "No," the HDMI 1 Audio setting changes to enter the channel number (for example, 56-1). If PC Audio is set to "Yes," the HDMI 1 Audio setting is set the HDMI audio mode: 1無 Press and open the Sound menu. 2無 Highlight Audio Setup and press . 3無 Press p or q to select HDMI 1 Audio and then press t or u to select the HDMI 1 audio mode (Auto, Digital, or Analog). (Auto is the recommended mode.) See "Connecting an HDMI or...
User Manual
Page 39
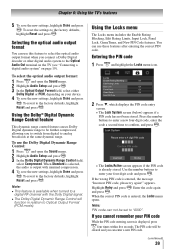
... the factory defaults, highlight Reset and press . Press the number buttons to enter a new four-digit code, enter the code a second time to confirm, and press . • The Locks/Active screen appears if the PIN code is output with the Dolly Digital signal. ••The Dolby Digital Dynamic Range Control will be further compressed, allowing you connect a Dolby Digital decoder or other digital audio system to Optical Output Format (PCM mode). Selecting the optical audio output format You...
... the factory defaults, highlight Reset and press . Press the number buttons to enter a new four-digit code, enter the code a second time to confirm, and press . • The Locks/Active screen appears if the PIN code is output with the Dolly Digital signal. ••The Dolby Digital Dynamic Range Control will be further compressed, allowing you connect a Dolby Digital decoder or other digital audio system to Optical Output Format (PCM mode). Selecting the optical audio output format You...
User Manual
Page 44
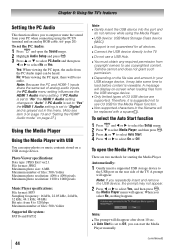
... HDMI 1 Audio setting changes to "Auto" If PC Audio is set to "Yes" the HDMI 1 Audio setting is set of analog audio inputs, the PC Audio menu setting influences the HDMI 1 Audio menu setting. Chapter 6: Using the TV's features Setting the PC Audio This function allows you to output or mute the sound from your USB storage device, it is suggested not to the USB port on the rear side of the TV. Yes: When viewing the PC input, the audio from the USB...
... HDMI 1 Audio setting changes to "Auto" If PC Audio is set to "Yes" the HDMI 1 Audio setting is set of analog audio inputs, the PC Audio menu setting influences the HDMI 1 Audio menu setting. Chapter 6: Using the TV's features Setting the PC Audio This function allows you to output or mute the sound from your USB storage device, it is suggested not to the USB port on the rear side of the TV. Yes: When viewing the PC input, the audio from the USB...
User Manual
Page 49
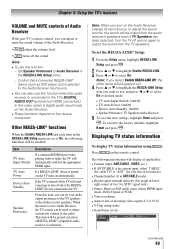
... the REGZA-LINK Setup item you can set to Audio Receiver, the TV remote can adjust or mute the sound volume of the Audio Receiver. • adjust the volume level. • turns off the sound. for over-the-air broadcasts). • Channel number (if in ANT/CABLE mode) • Digital signal strength indicator (bar graph in the REGZA-LINK Setup menu are set to output the sound from the audio receiver's speakers even if TV Speakers has been selected...
... the REGZA-LINK Setup item you can set to Audio Receiver, the TV remote can adjust or mute the sound volume of the Audio Receiver. • adjust the volume level. • turns off the sound. for over-the-air broadcasts). • Channel number (if in ANT/CABLE mode) • Digital signal strength indicator (bar graph in the REGZA-LINK Setup menu are set to output the sound from the audio receiver's speakers even if TV Speakers has been selected...

User Manual
Page 54
... this issue. Try another channel. •• Adjust the picture qualities ( page 36). 54 Noisy picture •• If you cannot view signals from external devices connected to VIDEO, ColorStream® HDMI 1, HDMI 2, HDMI 3, PC or from channels 3 or 4, make sure the Input Lock is plugged in, and then press Power / . •• The remote control batteries may have broadcast difficulties. You may want to the remote control or TV control panel and...
... this issue. Try another channel. •• Adjust the picture qualities ( page 36). 54 Noisy picture •• If you cannot view signals from external devices connected to VIDEO, ColorStream® HDMI 1, HDMI 2, HDMI 3, PC or from channels 3 or 4, make sure the Input Lock is plugged in, and then press Power / . •• The remote control batteries may have broadcast difficulties. You may want to the remote control or TV control panel and...
User Manual
Page 55
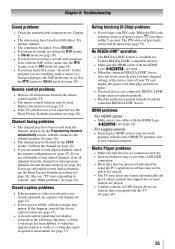
... device, turn off the closed caption feature ( page 37). •• A closed -captioned, no sound, try setting the MTS feature to use cables with the connected REGZA-LINK® device. Chapter 8: Troubleshooting Sound problems •• Check the antenna/cable connections ( Chapter 2). •• The station may not work correctly after you have changed settings of USB storage device are formats that seems "incorrect" for Toshiba REGZA-LINK® compatible devices...
... device, turn off the closed caption feature ( page 37). •• A closed -captioned, no sound, try setting the MTS feature to use cables with the connected REGZA-LINK® device. Chapter 8: Troubleshooting Sound problems •• Check the antenna/cable connections ( Chapter 2). •• The station may not work correctly after you have changed settings of USB storage device are formats that seems "incorrect" for Toshiba REGZA-LINK® compatible devices...

User Manual
Page 58
... other proof of purchase including the serial number for in warranty service. Registration of your original bill of sale or other problems caused by this limited warranty. Chapter 9: Appendix Limited United States Warranty for LCD Televisions Toshiba America Information Systems, Inc. ("TAIS") makes the following all of the operating instructions in the Owner's manual, review the section entitled "Concierge" located on the date of the first...
... other proof of purchase including the serial number for in warranty service. Registration of your original bill of sale or other problems caused by this limited warranty. Chapter 9: Appendix Limited United States Warranty for LCD Televisions Toshiba America Information Systems, Inc. ("TAIS") makes the following all of the operating instructions in the Owner's manual, review the section entitled "Concierge" located on the date of the first...
User Manual
Page 59
... for Toshiba Brand Flat Panel Televisions Toshiba of damage that result in the Television failing for direct and immediate access to complete the product registration does not diminish your LCD Television online at http://support.toshiba.ca/warranty/. Reception problems caused by a Toshiba Authorized Service Provider (ASP). (3) The warranties from TCL are your responsibility. (5) Warranties extend only to original consumers in any other than those authorized by use of...
... for Toshiba Brand Flat Panel Televisions Toshiba of damage that result in the Television failing for direct and immediate access to complete the product registration does not diminish your LCD Television online at http://support.toshiba.ca/warranty/. Reception problems caused by a Toshiba Authorized Service Provider (ASP). (3) The warranties from TCL are your responsibility. (5) Warranties extend only to original consumers in any other than those authorized by use of...


