
Owners Manual
Page 9
Chapter 1: Introduction Features of your new TV The following are just a few of the many exciting features of external devices from the TV remote via HDMI connection( page 50). 9 ABC, HBO, etc.) on the screen along with Dolby® Digital optical output format ( page 44). •...connection with the station numbers, so you always know what you're watching ( page 31). • REGZA-LINK allows control of your new Toshiba widescreen, integrated HD, LCD TV: • Integrated digital tuning (8VSB ATSC and QAM) eliminates the need for a separate digital converter set-top...
Chapter 1: Introduction Features of your new TV The following are just a few of the many exciting features of external devices from the TV remote via HDMI connection( page 50). 9 ABC, HBO, etc.) on the screen along with Dolby® Digital optical output format ( page 44). •...connection with the station numbers, so you always know what you're watching ( page 31). • REGZA-LINK allows control of your new Toshiba widescreen, integrated HD, LCD TV: • Integrated digital tuning (8VSB ATSC and QAM) eliminates the need for a separate digital converter set-top...
Owners Manual
Page 10
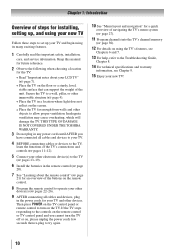
THIS TYPE OF DAMAGE IS NOT COVERED UNDER THE TOSHIBA WARRANTY. 3 Do not plug in any power cords until AFTER ...( page 20). 7 See "Learning about your LCD TV" ( page 7). • Place the TV on the screen. • Place the TV far enough from walls and other objects to operate your other device(s) ( pages 22-26... support the weight of the unit. Chapter 1: Introduction Overview of steps for installing, setting up, and using your new TV Follow these steps to the Troubleshooting Guide, Chapter 8. 14 For technical specifications and warranty information, see Chapters 6...
THIS TYPE OF DAMAGE IS NOT COVERED UNDER THE TOSHIBA WARRANTY. 3 Do not plug in any power cords until AFTER ...( page 20). 7 See "Learning about your LCD TV" ( page 7). • Place the TV on the screen. • Place the TV far enough from walls and other objects to operate your other device(s) ( pages 22-26... support the weight of the unit. Chapter 1: Introduction Overview of steps for installing, setting up, and using your new TV Follow these steps to the Troubleshooting Guide, Chapter 8. 14 For technical specifications and warranty information, see Chapters 6...
Owners Manual
Page 27
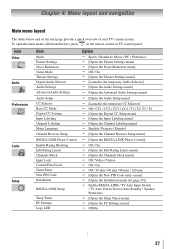
...Channel Labeling Menu Language Channel Browser Setup REGZA-LINK Player Control Enable Rating Blocking Edit Rating Limits Channels Block Input Lock Control Panel Lock GameTimer New PIN Code Installation REGZA-LINK Setup Sleep Timer PC Settings Logo LED Option Sports / Standard / Movie / PC / Preference &#... Off / Video / Video+ Off / On Off / 30 min / 60 min / 90 min / 120 min [Opens the New PIN Code entry screen] [Opens the Installation menu ( page 29)] Enable REGZA-LINK / TV Auto Input Switch / TV Auto Power/ Device Auto Standby / ...
...Channel Labeling Menu Language Channel Browser Setup REGZA-LINK Player Control Enable Rating Blocking Edit Rating Limits Channels Block Input Lock Control Panel Lock GameTimer New PIN Code Installation REGZA-LINK Setup Sleep Timer PC Settings Logo LED Option Sports / Standard / Movie / PC / Preference &#... Off / Video / Video+ Off / On Off / 30 min / 60 min / 90 min / 120 min [Opens the New PIN Code entry screen] [Opens the Installation menu ( page 29)] Enable REGZA-LINK / TV Auto Input Switch / TV Auto Power/ Device Auto Standby / ...
Owners Manual
Page 28
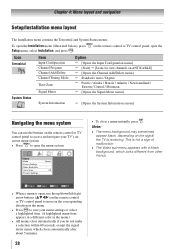
...Program Channel Add/Delete Channel Tuning Mode Time Zone Signal Meter Option [Opens the Input Configuration menu] [Start] [Scans for new channels on ANT/CABLE] [Opens the Channel Add/Delete menu] Standard / Auto / Digital Pacific / Alaska / Hawaii ... Newfoundland / Eastern / Central / Mountain [Opens the Signal Meter menu] System Status System Information [Opens the System Information screen] Navigating the menu system You can use the up/down/left/right arrow buttons (pqtu) on the remote control or TV control panel to...
...Program Channel Add/Delete Channel Tuning Mode Time Zone Signal Meter Option [Opens the Input Configuration menu] [Start] [Scans for new channels on ANT/CABLE] [Opens the Channel Add/Delete menu] Standard / Auto / Digital Pacific / Alaska / Hawaii ... Newfoundland / Eastern / Central / Mountain [Opens the Signal Meter menu] System Status System Information [Opens the System Information screen] Navigating the menu system You can use the up/down/left/right arrow buttons (pqtu) on the remote control or TV control panel to...
Owners Manual
Page 29
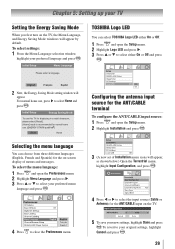
...TOSHIBA Logo LED You can choose from three different languages (English, French and Spanish) for the ANT/CABLE input on the TV. 4無 Press to close the Preferences menu. 5無 To save your new... settings, highlight Done and press . Selecting the menu language You can select TOSHIBA Logo LED either On or Off. 1無 Press...Home and press . Chapter 5: Setting up your preferred menu language and press . 3無 (A new set of Installation menu icons will appear, as shown below.) Open the Terrestrial menu, highlight Input ...
...TOSHIBA Logo LED You can choose from three different languages (English, French and Spanish) for the ANT/CABLE input on the TV. 4無 Press to close the Preferences menu. 5無 To save your new... settings, highlight Done and press . Selecting the menu language You can select TOSHIBA Logo LED either On or Off. 1無 Press...Home and press . Chapter 5: Setting up your preferred menu language and press . 3無 (A new set of Installation menu icons will appear, as shown below.) Open the Terrestrial menu, highlight Input ...
Owners Manual
Page 31
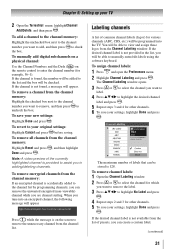
To remove all channels from the list of common channel labels (logos) for other channels. 5無 To save your new settings: Highlight Done and press . To remove encrypted channels from the channel list. Press while the message is accidentally added to remove the ...settings: Highlight Cancel and press before saving. To manually add digital subchannels on a physical channel: Use the Channel Numbers and the Dash ( ) on the screen to the channel list by programming channels, you will appear. If the channel is 128. To save your settings, highlight Done and press . If the...
To remove all channels from the list of common channel labels (logos) for other channels. 5無 To save your new settings: Highlight Done and press . To remove encrypted channels from the channel list. Press while the message is accidentally added to remove the ...settings: Highlight Cancel and press before saving. To manually add digital subchannels on a physical channel: Use the Channel Numbers and the Dash ( ) on the screen to the channel list by programming channels, you will appear. If the channel is 128. To save your settings, highlight Done and press . If the...
Owners Manual
Page 32
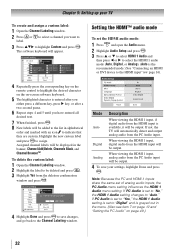
... To set to "Digital" and is grayed out in the menu. (Also see item 7 on page 12 and "Setting the PC Audio" on -screen software keyboard. 5無 The highlighted character is the recommended mode.) See "Connecting an HDMI or DVI device to the HDMI input" ( page 16... inputs, the PC Audio menu setting influences the HDMI 1 Audio menu setting. Highlight the new custom label and press to select a channel you have entered all desired text. 7無 When finished, press . 8無 New labels will be output. Chapter 5: Setting up your settings, highlight Done and press ....
... To set to "Digital" and is grayed out in the menu. (Also see item 7 on page 12 and "Setting the PC Audio" on -screen software keyboard. 5無 The highlighted character is the recommended mode.) See "Connecting an HDMI or DVI device to the HDMI input" ( page 16... inputs, the PC Audio menu setting influences the HDMI 1 Audio menu setting. Highlight the new custom label and press to select a channel you have entered all desired text. 7無 When finished, press . 8無 New labels will be output. Chapter 5: Setting up your settings, highlight Done and press ....
Owners Manual
Page 33
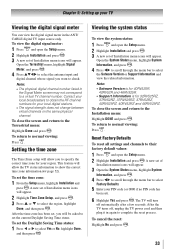
...1無 Press and open the Setup menu. 2無 Highlight Installation and press . 3無 A new set of Installation menu icons will appear. 3無 Open the System Status menu, highlight System Information,... return to specify the correct time zone for 32RV525RZ, 37RV52RZ, 37RV525RZ, 37RV52RZ, 40RV525RZ, 40RV52RZ and 46RV525RZ. Chapter 5: Setting up your TV Viewing the digital signal meter You can... view the digital signal meter in again to check. To close the screen and return to the Terrestrial menu: Highlight Done and press . Note: • Sotware...
...1無 Press and open the Setup menu. 2無 Highlight Installation and press . 3無 A new set of Installation menu icons will appear. 3無 Open the System Status menu, highlight System Information,... return to specify the correct time zone for 32RV525RZ, 37RV52RZ, 37RV525RZ, 37RV52RZ, 40RV525RZ, 40RV52RZ and 46RV525RZ. Chapter 5: Setting up your TV Viewing the digital signal meter You can... view the digital signal meter in again to check. To close the screen and return to the Terrestrial menu: Highlight Done and press . Note: • Sotware...

Owners Manual
Page 35
...and a DVD player to Select Navigate Input Selection screen with none of the inputs labeled as a specific...screen below left side of the Favorites list on the left shows the default Input Selection screen ... Done 4無 Press or to Select Navigate Input Selection screen with no inputs labeled. Input Selection ANT/CABLE 0 ANT/CABLE 1 VCR 2...for that input will be "grayed out" in the Input Selection screen and skipped over channels in the Channel Browser™) or Select ...be removed from the REGZA-LINK List. The screen below ). • Keep a history of all...
...and a DVD player to Select Navigate Input Selection screen with none of the inputs labeled as a specific...screen below left side of the Favorites list on the left shows the default Input Selection screen ... Done 4無 Press or to Select Navigate Input Selection screen with no inputs labeled. Input Selection ANT/CABLE 0 ANT/CABLE 1 VCR 2...for that input will be "grayed out" in the Input Selection screen and skipped over channels in the Channel Browser™) or Select ...be removed from the REGZA-LINK List. The screen below ). • Keep a history of all...
Owners Manual
Page 40
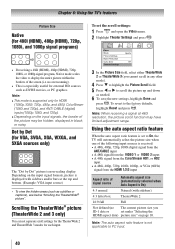
...), 720p, 1080i, or 1080p signal program, Native mode scales the video to scroll the picture up and down as needed. 6無 To save the new settings, highlight Done and press . no overscanning). • This is On) 4:3 normal Natural (with sidebars and/or bars at 480i resolution, the picture... HD1, or HD2 input • A 480i, 480p, 720p, 1080i, 1080p, or VGA (60Hz) signal from the HDMI 1/2/3 input Aspect ratio of the screen (i.e. Chapter 6: Using the TV's features Picture Size Native (for external HD sources such as DVHS movies, or PC graphics. Note: ••This mode ...
...), 720p, 1080i, or 1080p signal program, Native mode scales the video to scroll the picture up and down as needed. 6無 To save the new settings, highlight Done and press . no overscanning). • This is On) 4:3 normal Natural (with sidebars and/or bars at 480i resolution, the picture... HD1, or HD2 input • A 480i, 480p, 720p, 1080i, 1080p, or VGA (60Hz) signal from the HDMI 1/2/3 input Aspect ratio of the screen (i.e. Chapter 6: Using the TV's features Picture Size Native (for external HD sources such as DVHS movies, or PC graphics. Note: ••This mode ...

Owners Manual
Page 42
... and Sharpness) to the level of darkness. Note: If text is non-standard If this will display on -screen display of the dialogue, narration, and sound effects of TV programs and videos that you began adjusting the picture ... or to select the desired closed captioned (usually marked "CC" in program guides). • Text-An on screen. Note: A closed captioned, no signal is selected. 42 Using the closed caption mode Base closed captions The closed caption ... above left ) as described in the table above. 4無 To save the new settings, highlight Done and press .
... and Sharpness) to the level of darkness. Note: If text is non-standard If this will display on -screen display of the dialogue, narration, and sound effects of TV programs and videos that you began adjusting the picture ... or to select the desired closed captioned (usually marked "CC" in program guides). • Text-An on screen. Note: A closed captioned, no signal is selected. 42 Using the closed caption mode Base closed captions The closed caption ... above left ) as described in the table above. 4無 To save the new settings, highlight Done and press .
Owners Manual
Page 44
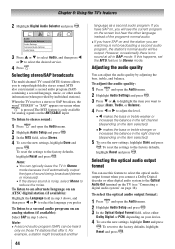
... Press and open the Audio menu. 2無 Highlight Audio Setup and press . 3無 In the MTS field, select Stereo. 4無 To save the new settings, highlight Done and press . If you have SAP on and the station you will be heard only on page 18). To reset the settings... features 2無 Highlight Digital Audio Selector and press . To listen to the Optical Audio Out terminal on the TV (see the current program on the screen but hear the other digital audio system to stereo sound: 1無 Press and open the Audio menu. 2無 Highlight Audio Settings and press . ...
... Press and open the Audio menu. 2無 Highlight Audio Setup and press . 3無 In the MTS field, select Stereo. 4無 To save the new settings, highlight Done and press . If you have SAP on and the station you will be heard only on page 18). To reset the settings... features 2無 Highlight Digital Audio Selector and press . To listen to the Optical Audio Out terminal on the TV (see the current program on the screen but hear the other digital audio system to stereo sound: 1無 Press and open the Audio menu. 2無 Highlight Audio Settings and press . ...
Owners Manual
Page 45
...28961; Press and highlight the Locks menu icon. 2無 Press to display the PIN code entering screen. 3無 Enter your four-digit PIN code and press . 4無 Press to highlight New PIN Code and press . 5無 Press the Number buttons to the ratings you select. (For rating ... and press . The PIN code will function in this TV detects the signals and blocks the programs according to enter a new four- Reenter the PIN code to enter your PIN code While the PIN code entering screen is entered, the message "Incorrect PIN code, please try again!" The...
...28961; Press and highlight the Locks menu icon. 2無 Press to display the PIN code entering screen. 3無 Enter your four-digit PIN code and press . 4無 Press to highlight New PIN Code and press . 5無 Press the Number buttons to the ratings you select. (For rating ... and press . The PIN code will function in this TV detects the signals and blocks the programs according to enter a new four- Reenter the PIN code to enter your PIN code While the PIN code entering screen is entered, the message "Incorrect PIN code, please try again!" The...
Owners Manual
Page 50
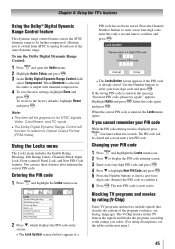
... 7 on page 12 and "Setting the HDMI™ Audio mode" on the remote control to control Toshiba REGZA-LINK compatible devices from your TV's remote control, or using the remote control: Press on the screen. When the Enable REGZA-LINK in the REGZALINK setup menu ( page 51) is set to "No...," the HDMI 1 Audio setting changes to set the length of time until it is a new feature that uses CEC technology and allows you are watching...
... 7 on page 12 and "Setting the HDMI™ Audio mode" on the remote control to control Toshiba REGZA-LINK compatible devices from your TV's remote control, or using the remote control: Press on the screen. When the Enable REGZA-LINK in the REGZALINK setup menu ( page 51) is set to "No...," the HDMI 1 Audio setting changes to set the length of time until it is a new feature that uses CEC technology and allows you are watching...
Owners Manual
Page 52
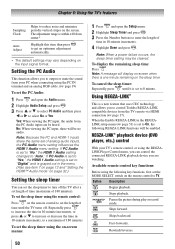
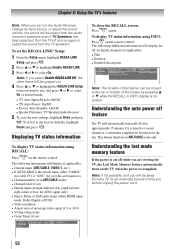
...Video resolution • Aspect ratio of incoming video signal (4:3 or 16:9) • V-Chip rating status • Game Timer (if set) To close the RECALL screen: Press again. Understanding the last mode memory feature If the power is cut off while you select Enable REGZA-LINK Off, the other items will...8226; TV Auto Power: On/Off • Device Auto Standby: On/Off • Speaker Preference: TV Speakers/Audio Receiver 5無 To save the new settings, highlight Done and press . Turn the TV off and on the TV when the power is resupplied. for over-the-air broadcasts). • Channel...
...Video resolution • Aspect ratio of incoming video signal (4:3 or 16:9) • V-Chip rating status • Game Timer (if set) To close the RECALL screen: Press again. Understanding the last mode memory feature If the power is cut off while you select Enable REGZA-LINK Off, the other items will...8226; TV Auto Power: On/Off • Device Auto Standby: On/Off • Speaker Preference: TV Speakers/Audio Receiver 5無 To save the new settings, highlight Done and press . Turn the TV off and on the TV when the power is resupplied. for over-the-air broadcasts). • Channel...
Owners Manual
Page 54
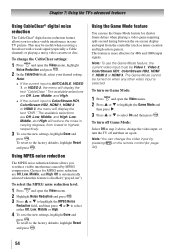
...text "DNR." Choices for shorter frame delays when playing a video game requiring split-second timing between the on-screen display and input from lowest to highest, respectively. 3無 To save the new settings, highlight Done and press . To select the MPEG noise reduction level: 1無 Press and open ... or to select On and then press . To revert to select either Off, Low, Middle or High. 4無 To save the new settings, highlight Done and press . To turn the TV off and then on again. Chapter 7: Using the TV's advanced features Using CableClear® digital ...
...text "DNR." Choices for shorter frame delays when playing a video game requiring split-second timing between the on-screen display and input from lowest to highest, respectively. 3無 To save the new settings, highlight Done and press . To select the MPEG noise reduction level: 1無 Press and open ... or to select On and then press . To revert to select either Off, Low, Middle or High. 4無 To save the new settings, highlight Done and press . To turn the TV off and then on again. Chapter 7: Using the TV's advanced features Using CableClear® digital ...
Owners Manual
Page 57
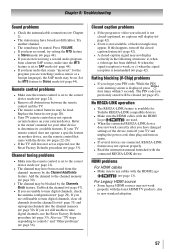
...; If text is not available, a black rectangle may not work correctly after you are unable to new standard adoption. 57 b) when the signal reception is nonstandard ( page 42). The PIN code...available features. HDMI problems For HDMI cables •• Make sure to the owner's manual for Toshiba REGZA-LINK compatible devices. •• Make sure the HDMI cables with the HDMI Logo ( ...caption signal may be muted. If you forget your PIN code: While the PIN code entering screen is set to the correct device mode ( page 21). •• Remove all ...
...; If text is not available, a black rectangle may not work correctly after you are unable to new standard adoption. 57 b) when the signal reception is nonstandard ( page 42). The PIN code...available features. HDMI problems For HDMI cables •• Make sure to the owner's manual for Toshiba REGZA-LINK compatible devices. •• Make sure the HDMI cables with the HDMI Logo ( ...caption signal may be muted. If you forget your PIN code: While the PIN code entering screen is set to the correct device mode ( page 21). •• Remove all ...


