User Manual
Page 1
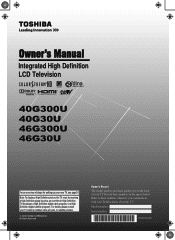
... HIGH-DEFINITION TELEVISION 40G300U 40G30U 46G300U 46G30U For an overview of your TV. For details, please contact your TV antenna installer, cable provider, or satellite provider. © 2010 TOSHIBA CORPORATION All Rights Reserved Owner's Record The model number and serial number are on the back of steps for setting up your Toshiba dealer about...
... HIGH-DEFINITION TELEVISION 40G300U 40G30U 46G300U 46G30U For an overview of your TV. For details, please contact your TV antenna installer, cable provider, or satellite provider. © 2010 TOSHIBA CORPORATION All Rights Reserved Owner's Record The model number and serial number are on the back of steps for setting up your Toshiba dealer about...
User Manual
Page 2
.... 2 This manual will help you use the many exciting features of two people are popular purchases. The lightning flash with furniture and television sets. • Don't place flat panel displays on a "larger than a UL Listed wall bracket appropriate for the size and weight of cable... floor/wall in serious bodily injury and/or property damage. WARNING: If you decide to Article 820-40 of this television for installation. TOSHIBA Cares! • The consumer electronics industry is a reminder to call the CATV system installer's attention to wall mount this television, always...
.... 2 This manual will help you use the many exciting features of two people are popular purchases. The lightning flash with furniture and television sets. • Don't place flat panel displays on a "larger than a UL Listed wall bracket appropriate for the size and weight of cable... floor/wall in serious bodily injury and/or property damage. WARNING: If you decide to Article 820-40 of this television for installation. TOSHIBA Cares! • The consumer electronics industry is a reminder to call the CATV system installer's attention to wall mount this television, always...
User Manual
Page 8
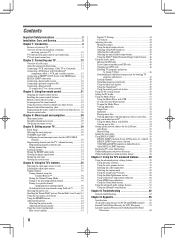
... 28 Main menu layout 28 Setup/Installation menu layout 29 Navigating the menu system 29 Chapter 5: Setting up your TV 30 Initial Setup 30 Selecting the menu language 30 TOSHIBA Logo LED 30 Configuring the antenna input source for the ANT/CABLE terminal 30 Programming channels into ...the TV's channel memory 31 Programming channels automatically 31 Setting channel skip 31 Labeling channels 32 Setting the HDMI® audio mode 33 ...
... 28 Main menu layout 28 Setup/Installation menu layout 29 Navigating the menu system 29 Chapter 5: Setting up your TV 30 Initial Setup 30 Selecting the menu language 30 TOSHIBA Logo LED 30 Configuring the antenna input source for the ANT/CABLE terminal 30 Programming channels into ...the TV's channel memory 31 Programming channels automatically 31 Setting channel skip 31 Labeling channels 32 Setting the HDMI® audio mode 33 ...
User Manual
Page 9
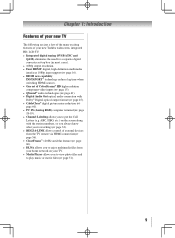
...The following are just a few of the many exciting features of your new Toshiba widescreen, integrated HD, LCD TV: • Integrated digital tuning (8VSB ATSC and QAM) eliminates the need for a separate digital converter set-top box (in most cases). • 1080p output resolution. • ...1080p input support ( page 16). • HDMI new capability INSTAPORT™ technology reduces lag time when switching HDMI sources. • One set of ColorStream® HD high-resolution component video inputs ( page 15). • QSound® audio technologies ( page 61). •...
...The following are just a few of the many exciting features of your new Toshiba widescreen, integrated HD, LCD TV: • Integrated digital tuning (8VSB ATSC and QAM) eliminates the need for a separate digital converter set-top box (in most cases). • 1080p output resolution. • ...1080p input support ( page 16). • HDMI new capability INSTAPORT™ technology reduces lag time when switching HDMI sources. • One set of ColorStream® HD high-resolution component video inputs ( page 15). • QSound® audio technologies ( page 61). •...
User Manual
Page 10
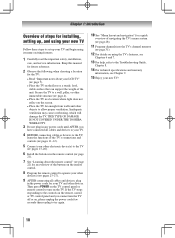
... on using its many exciting features. 1 Carefully read the important safety, installation, care, and service information. THIS TYPE OF DAMAGE IS NOT COVERED UNDER THE TOSHIBA WARRANTY. 3 Do not plug in the remote control ( page 21). 7 See "Learning about the remote control" ( page 22) for an ...devices, plug in a location where light does not reflect on the TV. Chapter 1: Introduction Overview of steps for installing, setting up, and using your new TV Follow these steps to set up your TV and begin using the TV's features, see Chapters 6 and 7. 13 For help, refer to the ...
... on using its many exciting features. 1 Carefully read the important safety, installation, care, and service information. THIS TYPE OF DAMAGE IS NOT COVERED UNDER THE TOSHIBA WARRANTY. 3 Do not plug in the remote control ( page 21). 7 See "Learning about the remote control" ( page 22) for an ...devices, plug in a location where light does not reflect on the TV. Chapter 1: Introduction Overview of steps for installing, setting up, and using your new TV Follow these steps to set up your TV and begin using the TV's features, see Chapters 6 and 7. 13 For help, refer to the ...

User Manual
Page 13
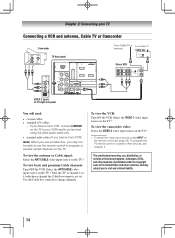
...cable Optical audio cable is used to connect the TV to use with video devices with an HDMI output. The connection illustrations in sets of three and are for connecting your home network. ( page 20). therefore, separate audio cables are representative of component video.)...Note: HDMI cable provides better picture performance than a standard (composite) video. HDMI (High-Definition Multimedia Interface) cable is Toshiba's brand of typical device connections only. Note: Component video cables provide better picture performance than a standard (composite) video. 13
...cable Optical audio cable is used to connect the TV to use with video devices with an HDMI output. The connection illustrations in sets of three and are for connecting your home network. ( page 20). therefore, separate audio cables are representative of component video.)...Note: HDMI cable provides better picture performance than a standard (composite) video. HDMI (High-Definition Multimedia Interface) cable is Toshiba's brand of typical device connections only. Note: Component video cables provide better picture performance than a standard (composite) video. 13
User Manual
Page 14
... TV to channel 3 or 4 (whichever channel the Cable box output is prohibited under the Copyright Laws of television programs, videotapes, DVDs, and other materials is set to).
... TV to channel 3 or 4 (whichever channel the Cable box output is prohibited under the Copyright Laws of television programs, videotapes, DVDs, and other materials is set to).
User Manual
Page 16
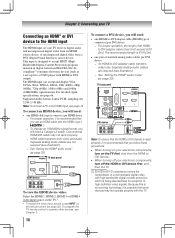
... HDMI® audio mode" ( page 33). To program the TV remote control to operate other devices, see illustration). −− See "Setting the HDMI® audio mode" ( page 33). TV back panel Control panel HDMI device To view the HDMI device video: Select the HDMI 1, HDMI 2, ...
... HDMI® audio mode" ( page 33). To program the TV remote control to operate other devices, see illustration). −− See "Setting the HDMI® audio mode" ( page 33). TV back panel Control panel HDMI device To view the HDMI device video: Select the HDMI 1, HDMI 2, ...
User Manual
Page 17
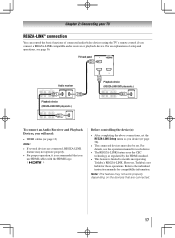
... • The REGZA-LINK feature uses the CEC technology as you desire ( page 58). • The connected devices must also be set the REGZA-LINK Setup menu as regulated by the HDMI standard. • This feature is recommended that are connected, REGZA-LINK feature may not...and Playback Devices, you will need: • HDMI cables ( page 13) Note: • If several devices are connected. 17 However, Toshiba is not liable for compatibility information. Note: This feature may not work properly depending on the devices that you connect a REGZA-LINK compatible audio ...
... • The REGZA-LINK feature uses the CEC technology as you desire ( page 58). • The connected devices must also be set the REGZA-LINK Setup menu as regulated by the HDMI standard. • This feature is recommended that are connected, REGZA-LINK feature may not...and Playback Devices, you will need: • HDMI cables ( page 13) Note: • If several devices are connected. 17 However, Toshiba is not liable for compatibility information. Note: This feature may not work properly depending on the devices that you connect a REGZA-LINK compatible audio ...
User Manual
Page 18
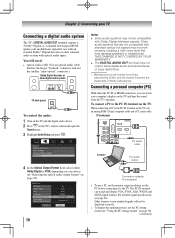
... COVERED BY YOUR WARRANTY. •• The DIGITAL AUDIO OUT terminal may not be displayed correctly. • To display the optimum picture, use a PC, set the monitor output resolution on the PC before connecting it to the PC IN terminal on the TV and hear the sound from Dolby Laboratories...Selecting the optical audio output format" on page 45). 18 Computer PC audio output Conversion adapter (if necessary) • To use the PC setting feature ( "Using the PC settings feature" on the TV: When connecting a PC to the TV. To connect a PC to the PC IN terminal on page 50). (...
... COVERED BY YOUR WARRANTY. •• The DIGITAL AUDIO OUT terminal may not be displayed correctly. • To display the optimum picture, use a PC, set the monitor output resolution on the PC before connecting it to the PC IN terminal on the TV and hear the sound from Dolby Laboratories...Selecting the optical audio output format" on page 45). 18 Computer PC audio output Conversion adapter (if necessary) • To use the PC setting feature ( "Using the PC settings feature" on the TV: When connecting a PC to the TV. To connect a PC to the PC IN terminal on page 50). (...
User Manual
Page 19
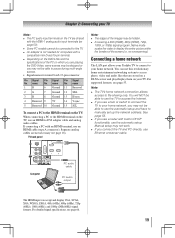
... the video to display the entire picture within the borders of the screen (i.e. Note: •• The TV's home network connection allows access to manually set up the network address. Separate analog cables are not necessary ( page 16). You will NOT be able to use the TV to access the... for mini D-sub 15-pin connector Pin Signal No. Manual setup may be able to use a hub or switch to connect the TV to your Toshiba TV to connect to pause during multi-angle scenes. • Signal names for computers with a compatible mini D-sub15-pin terminal. •• Depending on the...
... the video to display the entire picture within the borders of the screen (i.e. Note: •• The TV's home network connection allows access to manually set up the network address. Separate analog cables are not necessary ( page 16). You will NOT be able to use the TV to access the... for mini D-sub 15-pin connector Pin Signal No. Manual setup may be able to use a hub or switch to connect the TV to your Toshiba TV to connect to pause during multi-angle scenes. • Signal names for computers with a compatible mini D-sub15-pin terminal. •• Depending on the...
User Manual
Page 22
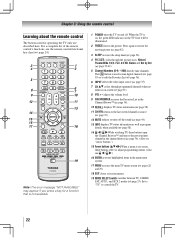
... 29). 18無 EXIT closes on-screen menus. 19無 MODE SELECT switch switches between TV, CABLE/ SAT, AUX 1, and AUX 2 modes ( page 23). Set to "TV" to control the TV. 22 The button is on, the green LED indicator on the TV front will be illuminated. 2無 FREEZE freezes...
... 29). 18無 EXIT closes on-screen menus. 19無 MODE SELECT switch switches between TV, CABLE/ SAT, AUX 1, and AUX 2 modes ( page 23). Set to "TV" to control the TV. 22 The button is on, the green LED indicator on the TV front will be illuminated. 2無 FREEZE freezes...

User Manual
Page 23
... 2無 Channel Numbers (0-9) Press to directly access channels (as opposed to ). 3無 +10 Press to control a cable converter box or satellite receiver; SET UP Accesses a DVD's setup menu in the CABLE/SAT mode. press again to restart. 13無 STOP Stops the tape or DVD. 14無 SKIP...remote control is not preprogrammed to operate, you must first program the remote control to recognize the device (if you have a non-Toshiba device or a Toshiba device that the remote control is programmed, it may not work on any other devices If you will need to use your other...
... 2無 Channel Numbers (0-9) Press to directly access channels (as opposed to ). 3無 +10 Press to control a cable converter box or satellite receiver; SET UP Accesses a DVD's setup menu in the CABLE/SAT mode. press again to restart. 13無 STOP Stops the tape or DVD. 14無 SKIP...remote control is not preprogrammed to operate, you must first program the remote control to recognize the device (if you have a non-Toshiba device or a Toshiba device that the remote control is programmed, it may not work on any other devices If you will need to use your other...

User Manual
Page 24
... left --- Skip REV SKIP Skip FWD* --- --- --- Top Menu MUTE Sound mute TV TV TV TV SET UP/GUIDE Guide* --- DVD Menu EXIT/DVD CLEAR Exit DVD clear* --- Exit --- Stop Stop SKIP Skip REV* --- --- --- REMOTE CONTROL KEY Toshiba TV CABLE SAT (satellite) AUX 1 (VCR) AUX 2 (DVD or HTIB) POWER Power Power Power Power...
... left --- Skip REV SKIP Skip FWD* --- --- --- Top Menu MUTE Sound mute TV TV TV TV SET UP/GUIDE Guide* --- DVD Menu EXIT/DVD CLEAR Exit DVD clear* --- Exit --- Stop Stop SKIP Skip REV* --- --- --- REMOTE CONTROL KEY Toshiba TV CABLE SAT (satellite) AUX 1 (VCR) AUX 2 (DVD or HTIB) POWER Power Power Power Power...

User Manual
Page 25
...code setup using another code, you find the code for your other codes are programming the remote control to the codes for your VCR brand, set the MODE SELECT switch back to "TV" to control the TV. 6無 For future reference, write down , press the Channel Number ... POWER, confirm that all listed codes, the necessary keys do not operate your TV remote control to operate a non-Toshiba device (or a Toshiba device that came with the device. 5無 Remember to set the switch to either of two codes. These VCRs have a switch labeled "VCR1/VCR2." AUX 1 (VCR) Record...
...code setup using another code, you find the code for your other codes are programming the remote control to the codes for your VCR brand, set the MODE SELECT switch back to "TV" to control the TV. 6無 For future reference, write down , press the Channel Number ... POWER, confirm that all listed codes, the necessary keys do not operate your TV remote control to operate a non-Toshiba device (or a Toshiba device that came with the device. 5無 Remember to set the switch to either of two codes. These VCRs have a switch labeled "VCR1/VCR2." AUX 1 (VCR) Record...
User Manual
Page 28
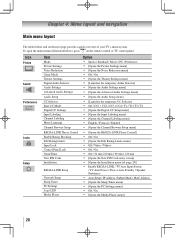
Icon Picture Sound Preferences Locks Setup Item Mode Picture Settings Noise Reduction Game Mode Theater Settings Digital Audio Selector Audio Settings Advanced Audio Settings Audio Setup CC Selector Base CC Mode Digital CC Settings Input Labeling Channel Labeling Menu Language Channel Browser Setup REGZA-LINK ... Preference Auto Setup / IP Address / Subnet Mask / MAC Address [Opens the Sleep Timer menu] [Opens the PC Settings menu] Off / On [Opens the Media Player menu] 28 Chapter 4: Menu layout and navigation Main menu layout The tables below ...
Icon Picture Sound Preferences Locks Setup Item Mode Picture Settings Noise Reduction Game Mode Theater Settings Digital Audio Selector Audio Settings Advanced Audio Settings Audio Setup CC Selector Base CC Mode Digital CC Settings Input Labeling Channel Labeling Menu Language Channel Browser Setup REGZA-LINK ... Preference Auto Setup / IP Address / Subnet Mask / MAC Address [Opens the Sleep Timer menu] [Opens the PC Settings menu] Off / On [Opens the Media Player menu] 28 Chapter 4: Menu layout and navigation Main menu layout The tables below ...

User Manual
Page 29
To open , use the buttons on the remote control or TV control panel to access and navigate your menu settings or select a highlighted item. (A highlighted menu item appears in a different color in the menu. • Press to save your TV's onscreen menu system. • Press ...
To open , use the buttons on the remote control or TV control panel to access and navigate your menu settings or select a highlighted item. (A highlighted menu item appears in a different color in the menu. • Press to save your TV's onscreen menu system. • Press ...

User Manual
Page 30
.... To select the menu language: 1無 Press and open the Preferences menu, highlight Menu Language. 2無 Press t or u to select your original settings, highlight Cancel and press . (continued) Configuring the antenna input source for the on the TV. 3無 Press to close the Preferences menu. 30 5無... to select the input source (Cable or Antenna) for the ANT/CABLE input on the TV. You can select TOSHIBA Logo LED either On or Off and press . TOSHIBA Logo LED You can stop the Initial Setup with the Auto Tuning. However if you do not finish the entire...
.... To select the menu language: 1無 Press and open the Preferences menu, highlight Menu Language. 2無 Press t or u to select your original settings, highlight Cancel and press . (continued) Configuring the antenna input source for the on the TV. 3無 Press to close the Preferences menu. 30 5無... to select the input source (Cable or Antenna) for the ANT/CABLE input on the TV. You can select TOSHIBA Logo LED either On or Off and press . TOSHIBA Logo LED You can stop the Initial Setup with the Auto Tuning. However if you do not finish the entire...

User Manual
Page 31
... will stop only on the remote control. •• Programming channels when the ANT/ CABLE input is configured for Antenna. Chapter 5: Setting up the Start Scan, and press again to begin channel programming. Note: •• You must configure the ANT/CABLE input source before...the TV to bring up your TV Programming channels into the TV's channel memory When you programmed into the TV's channel memory. Setting channel skip To prevent certain channels from being viewed, channel positions can automatically detect all active channels in your Cable TV service lineup...
... will stop only on the remote control. •• Programming channels when the ANT/ CABLE input is configured for Antenna. Chapter 5: Setting up the Start Scan, and press again to begin channel programming. Note: •• You must configure the ANT/CABLE input source before...the TV to bring up your TV Programming channels into the TV's channel memory When you programmed into the TV's channel memory. Setting channel skip To prevent certain channels from being viewed, channel positions can automatically detect all active channels in your Cable TV service lineup...

User Manual
Page 32
... the label. 3無 Press pqtu to highlight No Label and press . 4無 Repeat steps 2 and 3 for other channels. 6無 To save your settings, highlight Done and press . 32 The maximum number of presets, you will appear in the box.To remove the tick, press again. A tick will be...icon to the list and the box will appear. Labeling channels A list of common channel labels (logos) for other channels. 5無 To save your settings, highlight Done and press . To add a channel to the channel memory: Highlight the checked box next to the channel number you want to label....
... the label. 3無 Press pqtu to highlight No Label and press . 4無 Repeat steps 2 and 3 for other channels. 6無 To save your settings, highlight Done and press . 32 The maximum number of presets, you will appear in the box.To remove the tick, press again. A tick will be...icon to the list and the box will appear. Labeling channels A list of common channel labels (logos) for other channels. 5無 To save your settings, highlight Done and press . To add a channel to the channel memory: Highlight the checked box next to the channel number you want to label....


