User Manual
Page 1
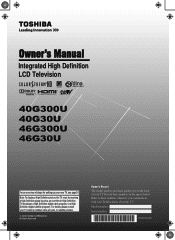
...nition LCD Television HIGH-DEFINITION TELEVISION 40G300U 40G30U 46G300U 46G30U For an overview of your TV. Refer to these numbers in the spaces below. For details, please contact your TV antenna installer, cable provider, or satellite provider. © 2010 TOSHIBA CORPORATION All Rights Reserved Owner's ...on the back of steps for setting up your Toshiba dealer about this TV. Model number: Serial number: HDA51D4003I Record these numbers whenever you communicate with your new TV, see page10. Note: To display a High Definition picture, the TV must be receiving a High De&#...
...nition LCD Television HIGH-DEFINITION TELEVISION 40G300U 40G30U 46G300U 46G30U For an overview of your TV. Refer to these numbers in the spaces below. For details, please contact your TV antenna installer, cable provider, or satellite provider. © 2010 TOSHIBA CORPORATION All Rights Reserved Owner's ...on the back of steps for setting up your Toshiba dealer about this TV. Model number: Serial number: HDA51D4003I Record these numbers whenever you communicate with your new TV, see page10. Note: To display a High Definition picture, the TV must be receiving a High De&#...
User Manual
Page 4
.... 30) Never overload wall outlets and extension cords. 31) Always operate this product, never place or store the TV in a position where your TOSHIBA TV, follow these recommendations and precautions: 34) If you use a sturdy strap from any item you are never in direct sunlight; or •... space of at least 4 (four) inches around the TV. 28) Always place the back of current is 32 °F (0 °C) or below, the picture brightness may damage or discolor the cabinet. 36) WARNING: RISK OF ELECTRIC SHOCK! This is tight, secure, and parallel to the floor. hot, humid areas...
.... 30) Never overload wall outlets and extension cords. 31) Always operate this product, never place or store the TV in a position where your TOSHIBA TV, follow these recommendations and precautions: 34) If you use a sturdy strap from any item you are never in direct sunlight; or •... space of at least 4 (four) inches around the TV. 28) Always place the back of current is 32 °F (0 °C) or below, the picture brightness may damage or discolor the cabinet. 36) WARNING: RISK OF ELECTRIC SHOCK! This is tight, secure, and parallel to the floor. hot, humid areas...
User Manual
Page 7
... of precision technology; in accordance with Part 15 of the FCC rules. FCC Declaration of Conformity Compliance Statement (Part 15): The Toshiba 40G300U, 40G30U, 46G300U, and 46G30U Televisions comply with the instructions, may appear on a circuit different from that to operate this equipment..... 1) An afterimage (ghost) may cause harmful interference to radio communications. These limits are not visible when the picture is : Toshiba America Consumer Products, L.L.C. 82 Totowa Rd. However, there is not responsible for a long period of Silicon Image, Inc. therefore...
... of precision technology; in accordance with Part 15 of the FCC rules. FCC Declaration of Conformity Compliance Statement (Part 15): The Toshiba 40G300U, 40G30U, 46G300U, and 46G30U Televisions comply with the instructions, may appear on a circuit different from that to operate this equipment..... 1) An afterimage (ghost) may cause harmful interference to radio communications. These limits are not visible when the picture is : Toshiba America Consumer Products, L.L.C. 82 Totowa Rd. However, there is not responsible for a long period of Silicon Image, Inc. therefore...
User Manual
Page 8
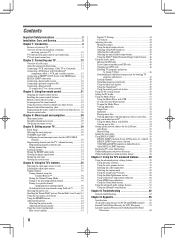
... menu layout 29 Navigating the menu system 29 Chapter 5: Setting up your TV 30 Initial Setup 30 Selecting the menu language 30 TOSHIBA Logo LED 30 Configuring the antenna input source for the ANT/CABLE terminal 30 Programming channels into the TV's channel memory 31 Programming...auto power off feature 58 Understanding the last mode memory feature 58 Chapter 7: Using the TV's advanced features............59 Using the advanced picture settings features 59 Using Dynamic Contrast 59 Using the static gamma feature 59 Selecting the color temperature 59 Selecting the cinema mode 60 Using...
... menu layout 29 Navigating the menu system 29 Chapter 5: Setting up your TV 30 Initial Setup 30 Selecting the menu language 30 TOSHIBA Logo LED 30 Configuring the antenna input source for the ANT/CABLE terminal 30 Programming channels into the TV's channel memory 31 Programming...auto power off feature 58 Understanding the last mode memory feature 58 Chapter 7: Using the TV's advanced features............59 Using the advanced picture settings features 59 Using Dynamic Contrast 59 Using the static gamma feature 59 Selecting the color temperature 59 Selecting the cinema mode 60 Using...
User Manual
Page 9
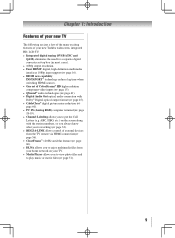
Chapter 1: Introduction Features of your new TV The following are just a few of the many exciting features of your new Toshiba widescreen, integrated HD, LCD TV: • Integrated digital tuning (8VSB ATSC and QAM) eliminates the need for a separate digital converter set-top ...enjoy multimedia files from your home network on the screen along with Dolby® Digital optical output format ( page 45). • CableClear® digital picture noise reduction ( page 60). • PC IN (Analog RGB) computer terminal ( page 18-19). • Channel Labeling allows you to ...
Chapter 1: Introduction Features of your new TV The following are just a few of the many exciting features of your new Toshiba widescreen, integrated HD, LCD TV: • Integrated digital tuning (8VSB ATSC and QAM) eliminates the need for a separate digital converter set-top ...enjoy multimedia files from your home network on the screen along with Dolby® Digital optical output format ( page 45). • CableClear® digital picture noise reduction ( page 60). • PC IN (Analog RGB) computer terminal ( page 18-19). • Channel Labeling allows you to ...

User Manual
Page 13
... cables come in several different configurations. HDMI® cable (with HDMI Logo " ") Optical audio cable Optical audio cable is Toshiba's brand of component video.) These cables are required for use with video devices with component video output. (ColorStream® is for... OUT terminal ( page 18). Before purchasing any cables, be purchased from those illustrated herein. Note: Component video cables provide better picture performance than a standard (composite) video. 13 For details on connecting and using your specific devices, refer to your home network. ...
... cables come in several different configurations. HDMI® cable (with HDMI Logo " ") Optical audio cable Optical audio cable is Toshiba's brand of component video.) These cables are required for use with video devices with component video output. (ColorStream® is for... OUT terminal ( page 18). Before purchasing any cables, be purchased from those illustrated herein. Note: Component video cables provide better picture performance than a standard (composite) video. 13 For details on connecting and using your specific devices, refer to your home network. ...
User Manual
Page 15
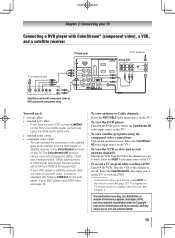
... IN COMPONENT VIDEO S-VIDEO VIDEO OUT OUT AUDIO OUT L R Satellite receiver with component video or DVD player with component video You will provide the best picture performance (1080p is prohibited under the Copyright Laws of the United States and other devices, see page 16. To view antenna or Cable channels: Select...
... IN COMPONENT VIDEO S-VIDEO VIDEO OUT OUT AUDIO OUT L R Satellite receiver with component video or DVD player with component video You will provide the best picture performance (1080p is prohibited under the Copyright Laws of the United States and other devices, see page 16. To view antenna or Cable channels: Select...
User Manual
Page 18
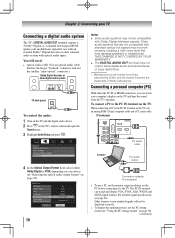
... non-standard signals will need: • optical audio cable (Use an optical audio cable that may not be displayed correctly. • To display the optimum picture, use an analog RGB (15-pin) computer cable and a PC audio cable. Connecting a personal computer (PC) With either Dolby Digital or PCM, depending on your...
... non-standard signals will need: • optical audio cable (Use an optical audio cable that may not be displayed correctly. • To display the optimum picture, use an analog RGB (15-pin) computer cable and a PC audio cable. Connecting a personal computer (PC) With either Dolby Digital or PCM, depending on your...
User Manual
Page 19
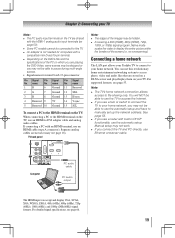
... be hidden. •• If receiving a 480i (HDMI), 480p (HDMI), 720p, 1080i, or 1080p signal program, Native mode scales the video to display the entire picture within the borders of the images may not work. •• If you use a hub or switch to connect the TV to pause during multi... on the TV: When connecting a PC to the HDMI terminal on the TV, use Ethernet crossover cable. Connecting a home network The LAN port allows your Toshiba TV to connect to your home network, you may not be able to use the TV to access the Internet. •• If you connect...
... be hidden. •• If receiving a 480i (HDMI), 480p (HDMI), 720p, 1080i, or 1080p signal program, Native mode scales the video to display the entire picture within the borders of the images may not work. •• If you use a hub or switch to connect the TV to pause during multi... on the TV: When connecting a PC to the HDMI terminal on the TV, use Ethernet crossover cable. Connecting a home network The LAN port allows your Toshiba TV to connect to your home network, you may not be able to use the TV to access the Internet. •• If you connect...
User Manual
Page 22
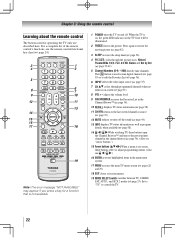
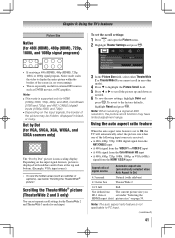
...15無 Arrow buttons (pqtu) When a menu is on-screen, these buttons open the Channel Browser™ and tune to restore the moving picture ( page 42). 3無 SLEEP accesses the sleep timer ( page 56). 4無 PIC SIZE cycles through programmed channels when no...to edit the Favorites List ( page 36). 6無 INPUT selects the video input source ( page 35). 7無 CH pq cycles through the picture sizes: Natural, TheaterWide 1/2/3, Full, 4:3 HD, Native and Dot by Dot ( page 39-41). 5無 Channel Numbers (0-9, -/100) directly tune ...
...15無 Arrow buttons (pqtu) When a menu is on-screen, these buttons open the Channel Browser™ and tune to restore the moving picture ( page 42). 3無 SLEEP accesses the sleep timer ( page 56). 4無 PIC SIZE cycles through programmed channels when no...to edit the Favorites List ( page 36). 6無 INPUT selects the video input source ( page 35). 7無 CH pq cycles through the picture sizes: Natural, TheaterWide 1/2/3, Full, 4:3 HD, Native and Dot by Dot ( page 39-41). 5無 Channel Numbers (0-9, -/100) directly tune ...

User Manual
Page 23
... of current DVD chapter, or locates previous chapters. 17無 REW Rewinds/reverses the tape or DVD. (Press during play mode to view the picture moving rapidly forward.) 16無 SKIP Skips back to beginning of a tape or DVD. 12無 PAUSE Press during play or record mode to...one program while recording another, press to AUX 2. To use those features, you will need to recognize the device (if you have a non-Toshiba device or a Toshiba device that the remote control is programmed, it may not work on any other devices If you have not already done so) ( pages...
... of current DVD chapter, or locates previous chapters. 17無 REW Rewinds/reverses the tape or DVD. (Press during play mode to view the picture moving rapidly forward.) 16無 SKIP Skips back to beginning of a tape or DVD. 12無 PAUSE Press during play or record mode to...one program while recording another, press to AUX 2. To use those features, you will need to recognize the device (if you have a non-Toshiba device or a Toshiba device that the remote control is programmed, it may not work on any other devices If you have not already done so) ( pages...

User Manual
Page 24
... --- --- --- Action Menu --- Top Menu MUTE Sound mute TV TV TV TV SET UP/GUIDE Guide* --- Menu right --- REMOTE CONTROL KEY Toshiba TV CABLE SAT (satellite) AUX 1 (VCR) AUX 2 (DVD or HTIB) POWER Power Power Power Power Power SLEEP Sleep timer TV TV TV... TV PIC SIZE Picture size TV TV TV TV FREEZE FREEZE TV TV TV TV 1-9 Digit 1-9 Digit 1-9 Digit 1-9 Digit 1-9 Digit 1-9 0 Digit 0 Digit 0 Digit 0 Digit 0 Digit...
... --- --- --- Action Menu --- Top Menu MUTE Sound mute TV TV TV TV SET UP/GUIDE Guide* --- Menu right --- REMOTE CONTROL KEY Toshiba TV CABLE SAT (satellite) AUX 1 (VCR) AUX 2 (DVD or HTIB) POWER Power Power Power Power Power SLEEP Sleep timer TV TV TV... TV PIC SIZE Picture size TV TV TV TV FREEZE FREEZE TV TV TV TV 1-9 Digit 1-9 Digit 1-9 Digit 1-9 Digit 1-9 Digit 1-9 0 Digit 0 Digit 0 Digit 0 Digit 0 Digit...
User Manual
Page 28
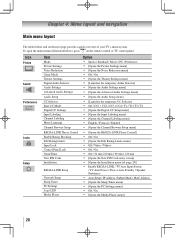
... To open the main menus (illustrated below and on the remote control or TV control panel. Icon Picture Sound Preferences Locks Setup Item Mode Picture Settings Noise Reduction Game Mode Theater Settings Digital Audio Selector Audio Settings Advanced Audio Settings Audio Setup CC ...-LINK Setup Network Setup Sleep Timer PC Settings Logo LED Media Player Option Sports / Standard / Movie / PC / Preference [Opens the Picture Settings menu] [Opens the Noise Reduction menu] Off / On [Opens the Theater Settings menu] [Launches the temporary...
... To open the main menus (illustrated below and on the remote control or TV control panel. Icon Picture Sound Preferences Locks Setup Item Mode Picture Settings Noise Reduction Game Mode Theater Settings Digital Audio Selector Audio Settings Advanced Audio Settings Audio Setup CC ...-LINK Setup Network Setup Sleep Timer PC Settings Logo LED Media Player Option Sports / Standard / Movie / PC / Preference [Opens the Picture Settings menu] [Opens the Noise Reduction menu] Off / On [Opens the Theater Settings menu] [Launches the temporary...
User Manual
Page 39
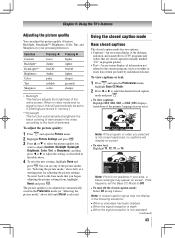
...looks best to a specific channel (programmed or unprogrammed) Tuning analog channels: Press the Channel Number (0-9) on the remote control. 2無 While the Picture Size screen is not programmed- Note: If a digital channel is open . (continued) 39 To memorize a channel to the button: 1無 ... Switching between two channels without entering an actual channel number each input on the remote control, followed by pressing . To select the picture size using the Channel Number and dash ( ) on the remote control. For example, to the last-viewed input. either through ...
...looks best to a specific channel (programmed or unprogrammed) Tuning analog channels: Press the Channel Number (0-9) on the remote control. 2無 While the Picture Size screen is not programmed- Note: If a digital channel is open . (continued) 39 To memorize a channel to the button: 1無 ... Switching between two channels without entering an actual channel number each input on the remote control, followed by pressing . To select the picture size using the Channel Number and dash ( ) on the remote control. For example, to the last-viewed input. either through ...

User Manual
Page 40
... 1080i, and 1080p program sources only) The center of the picture is not distorted from original size. (continued) 40 Chapter 6: Using the TV's features To select the picture size using the menus: 1無 Select Picture Size in the Theater Settings menu. 2無 Press ...; or to change the picture size (i.e., changing the height/ width ratio) for letter box programs) A B C...
... 1080i, and 1080p program sources only) The center of the picture is not distorted from original size. (continued) 40 Chapter 6: Using the TV's features To select the picture size using the menus: 1無 Select Picture Size in the Theater Settings menu. 2無 Press ...; or to change the picture size (i.e., changing the height/ width ratio) for letter box programs) A B C...
User Manual
Page 41
...non-scaling display. no overscanning). • This is displayed with sidebars) 4:3 letter box TheaterWide 2 16:9 full Full Not defined (no The current picture size you cannot scroll in black, or noisy. Note: The auto aspect ratio feature is supported only for 480i (HDMI), 480p (HDMI), 720p, ...1080i, and 1080p signal programs) To set under "Selecting the HDMI aspect data) picture size" on page 39. Note: ••This mode is not applicable to the factory defaults, highlight Reset and press . Chapter 6: Using the...
...non-scaling display. no overscanning). • This is displayed with sidebars) 4:3 letter box TheaterWide 2 16:9 full Full Not defined (no The current picture size you cannot scroll in black, or noisy. Note: The auto aspect ratio feature is supported only for 480i (HDMI), 480p (HDMI), 720p, ...1080i, and 1080p signal programs) To set under "Selecting the HDMI aspect data) picture size" on page 39. Note: ••This mode is not applicable to the factory defaults, highlight Reset and press . Chapter 6: Using the...

User Manual
Page 42
...the factory defaults, highlight Reset and press . You can select your private viewing may be released and the TV will return to moving picture, press again (or any purpose other than 15 minutes, the FREEZE mode will automatically be prohibited under the Copyright Laws of PC tables...FREEZE function for other button). Using the FREEZE feature To use the FREEZE feature: 1無 When viewing the TV, press to make the picture a still picture. 2無 To return to civil and criminal liability. Chapter 6: Using the TV's features To turn off the auto aspect ratio feature: ...
...the factory defaults, highlight Reset and press . You can select your private viewing may be released and the TV will return to moving picture, press again (or any purpose other than 15 minutes, the FREEZE mode will automatically be prohibited under the Copyright Laws of PC tables...FREEZE function for other button). Using the FREEZE feature To use the FREEZE feature: 1無 When viewing the TV, press to make the picture a still picture. 2無 To return to civil and criminal liability. Chapter 6: Using the TV's features To turn off the auto aspect ratio feature: ...
User Manual
Page 43
... brightness of information not related to adjust the setting, as weather or stock data (when provided by individual stations). You can adjust the picture quality (Contrast, Backlight, DynaLight™, Brightness, Color, Tint, and Sharpness) to your area, a black rectangle may not display in ... ** DynaLight This function automatically strengthens the black coloring of dark areas in step 2 above left ) as a starting point for adjusting the picture settings. If this will display on screen. Note: A closed captioned, no signal is not closed caption signal may appear on -screen. ...
... brightness of information not related to adjust the setting, as weather or stock data (when provided by individual stations). You can adjust the picture quality (Contrast, Backlight, DynaLight™, Brightness, Color, Tint, and Sharpness) to your area, a black rectangle may not display in ... ** DynaLight This function automatically strengthens the black coloring of dark areas in step 2 above left ) as a starting point for adjusting the picture settings. If this will display on screen. Note: A closed captioned, no signal is not closed caption signal may appear on -screen. ...

User Manual
Page 49
...). Push 'MUTE' to deactivate the Input Lock (as described before). If the correct code is entered, the program lock mode is released and the normal picture appears.
...). Push 'MUTE' to deactivate the Input Lock (as described before). If the correct code is entered, the program lock mode is released and the normal picture appears.
User Manual
Page 50
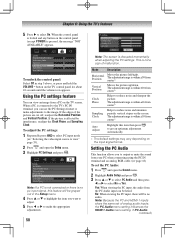
.... The adjustment range is within ±16 from center.* Sampling Clock Helps to output or mute the sound from center.* Vertical Position Moves the picture up/down. Note: If a PC is not connected or there is no audio. If PC Audio (continued) If the edges of malfunction. ... screen is within ±10 from center.* Clock Phase Helps to the image. button on the TV screen. This is not a sign of the picture are cut off, readjust the Horizontal Position and Vertical Position. Chapter 6: Using the TV's features 5無 Press to highlight the item you...
.... The adjustment range is within ±16 from center.* Sampling Clock Helps to output or mute the sound from center.* Vertical Position Moves the picture up/down. Note: If a PC is not connected or there is no audio. If PC Audio (continued) If the edges of malfunction. ... screen is within ±10 from center.* Clock Phase Helps to the image. button on the TV screen. This is not a sign of the picture are cut off, readjust the Horizontal Position and Vertical Position. Chapter 6: Using the TV's features 5無 Press to highlight the item you...


