Brochure
Page 1
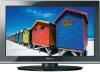
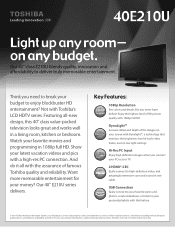
... or services of HD pictu2re40 IR Pass-3TDhrough NaAtiuvteoMVioewde™™ ClPeiaxreFlrPaumree5™G240 quality with Toshiba's FULL HD 1080P LCD HDTV series. your screen with the assurance of services, and contact information is subject to deliver truly memorable entertainment. And...zzz on any budget. design, this feature. Not with 1080p Full HD. Enjoy the highest level of their respective owners. 40E210U Light up any room- 3D on in a living room, kitchen or bedroom. All rightsTrreiVseercvteodr. For retMaiEleGrAinCteOrnNaTlRuAsSeTonly.BUILT-IN WIFI NET...
... or services of HD pictu2re40 IR Pass-3TDhrough NaAtiuvteoMVioewde™™ ClPeiaxreFlrPaumree5™G240 quality with Toshiba's FULL HD 1080P LCD HDTV series. your screen with the assurance of services, and contact information is subject to deliver truly memorable entertainment. And...zzz on any budget. design, this feature. Not with 1080p Full HD. Enjoy the highest level of their respective owners. 40E210U Light up any room- 3D on in a living room, kitchen or bedroom. All rightsTrreiVseercvteodr. For retMaiEleGrAinCteOrnNaTlRuAsSeTonly.BUILT-IN WIFI NET...
Brochure
Page 2
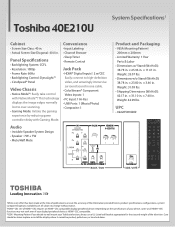
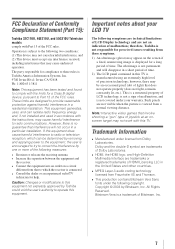
... image edges normally lost to change without notice. 2HDMI®-CEC Use of the television. Depending on the specifications of your Toshiba television, always use a UL Listed wall bracket appropriate for the size and weight of HDMI®-CEC requires an HDMI®...Mounting Pattern If you decide to wall mount your device, some or all subject to over , or knocked down. Toshiba 40E210U System Specifications1 Cabinet • Screen Size Class: 40 in. • Actual Screen Size Diagonal: 40.0 in . Panel Specifications • Backlighting System: CCFL • Resolution: 1080p • ...
... image edges normally lost to change without notice. 2HDMI®-CEC Use of the television. Depending on the specifications of your Toshiba television, always use a UL Listed wall bracket appropriate for the size and weight of HDMI®-CEC requires an HDMI®...Mounting Pattern If you decide to wall mount your device, some or all subject to over , or knocked down. Toshiba 40E210U System Specifications1 Cabinet • Screen Size Class: 40 in. • Actual Screen Size Diagonal: 40.0 in . Panel Specifications • Backlighting System: CCFL • Resolution: 1080p • ...
User Manual
Page 4
...to dripping or splashing. Make sure the strap is thundering, do not touch the connecting cables or apparatus. 38) For added protection of your TOSHIBA TV, follow these recommendations and precautions: 34) If you use a sturdy strap from overheating and to make sure the antenna system is still ...consumed. Gently wipe the display panel surface (the TV screen) using the on the cabinet. Objects filled with liquids should not be placed on the apparatus. 27) Never block or cover the slots or...
...to dripping or splashing. Make sure the strap is thundering, do not touch the connecting cables or apparatus. 38) For added protection of your TOSHIBA TV, follow these recommendations and precautions: 34) If you use a sturdy strap from overheating and to make sure the antenna system is still ...consumed. Gently wipe the display panel surface (the TV screen) using the on the cabinet. Objects filled with liquids should not be placed on the apparatus. 27) Never block or cover the slots or...
User Manual
Page 5
...3) Remove the screws of the VESA Mounting Pattern show in death or serious injury. Never strike the screen with a sharp or heavy object. 42) • The LCD screen of this manual to a Toshiba Authorized Service Provider. 44) If you need to environmental considerations. If you have the TV serviced:...end of its useful life, dispose of the TV. If these sounds become frequent or continuous, unplug the power cord and contact a Toshiba Authorized Service Provider. 41) DANGER: RISK OF SERIOUS PERSONAL INJURY OR DEATH! Failure to properly dispose of the used when attaching the ...
...3) Remove the screws of the VESA Mounting Pattern show in death or serious injury. Never strike the screen with a sharp or heavy object. 42) • The LCD screen of this manual to a Toshiba Authorized Service Provider. 44) If you need to environmental considerations. If you have the TV serviced:...end of its useful life, dispose of the TV. If these sounds become frequent or continuous, unplug the power cord and contact a Toshiba Authorized Service Provider. 41) DANGER: RISK OF SERIOUS PERSONAL INJURY OR DEATH! Failure to properly dispose of the used when attaching the ...
User Manual
Page 7
...a normal viewing distance. Important notes about your warranty. therefore, Toshiba is encouraged to try to correct the interference by removing and...and the receiver. • Connect the equipment into an outlet on the screen if a fixed, nonmoving image is displayed for compliance to these symptoms....LCD Display technology and are not visible when the picture is : Toshiba America Information Systems, Inc. 9740 Irvine Blvd.; This equipment generates... level of precision technology; Copyright © 2003 by Toshiba could void the user's authority to provide reasonable protection against...
...a normal viewing distance. Important notes about your warranty. therefore, Toshiba is encouraged to try to correct the interference by removing and...and the receiver. • Connect the equipment into an outlet on the screen if a fixed, nonmoving image is displayed for compliance to these symptoms....LCD Display technology and are not visible when the picture is : Toshiba America Information Systems, Inc. 9740 Irvine Blvd.; This equipment generates... level of precision technology; Copyright © 2003 by Toshiba could void the user's authority to provide reasonable protection against...
User Manual
Page 10
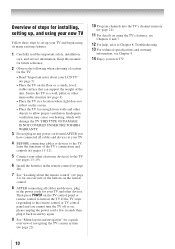
... the batteries in the power cords for your TV and other objects to allow proper ventilation. THIS TYPE OF DAMAGE IS NOT COVERED UNDER THE TOSHIBA WARRANTY. 3 Do not plug in any power cords until AFTER you cannot turn on the remote control. 8 AFTER connecting all cables and devices, plug in... of navigating the TV's menu system ( page 22). 10 Program channels into the TV's channel memory ( page 24). 11 For details on the screen. • Place the TV far enough from walls and other devices. Then press POWER on the TV control panel or remote control to turn the...
... the batteries in the power cords for your TV and other objects to allow proper ventilation. THIS TYPE OF DAMAGE IS NOT COVERED UNDER THE TOSHIBA WARRANTY. 3 Do not plug in any power cords until AFTER you cannot turn on the remote control. 8 AFTER connecting all cables and devices, plug in... of navigating the TV's menu system ( page 22). 10 Program channels into the TV's channel memory ( page 24). 11 For details on the screen. • Place the TV far enough from walls and other devices. Then press POWER on the TV control panel or remote control to turn the...
User Manual
Page 11
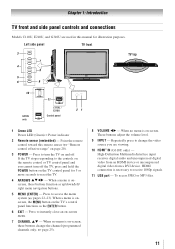
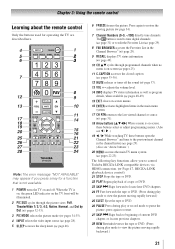
...remote sensor ( "Remote control effective range" on page 20). 3無 POWER - Press to instantly close an on-screen menu. 7無 CHANNEL pq - When no menu is on-screen. These buttons adjust the volume level. 9無 INPUT - To access JPEG or MP3 files. 11 Point the remote control... toward this manual for 5 or more seconds to turn off . When no menu is on-screen, these buttons function as the ENTER button. 6無 EXIT - HDMI connection is onscreen, these buttons change the video source you cannot turn ...
...remote sensor ( "Remote control effective range" on page 20). 3無 POWER - Press to instantly close an on-screen menu. 7無 CHANNEL pq - When no menu is on-screen. These buttons adjust the volume level. 9無 INPUT - To access JPEG or MP3 files. 11 Point the remote control... toward this manual for 5 or more seconds to turn off . When no menu is on-screen, these buttons function as the ENTER button. 6無 EXIT - HDMI connection is onscreen, these buttons change the video source you cannot turn ...
User Manual
Page 19
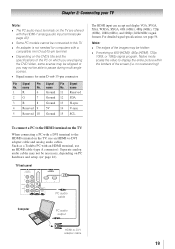
name 1R Pin Signal No. Separate analog audio cables may not be necessary, depending on the DVD's title and the specifications of the screen (i.e. For detailed signal specifications, see page 56. To connect a PC to the HDMI terminal on the TV: When connecting a PC with a DVI ...with the HDMI-1 analog audio input terminals ( page 43). •• Some PC models cannot be connected to -DVI adapter cable 19 Such as a Toshiba PC with a compatible mini D-sub15-pin terminal. •• Depending on PC hardware and setup. ( page 16). no overscanning). name 6 Ground 11...
name 1R Pin Signal No. Separate analog audio cables may not be necessary, depending on the DVD's title and the specifications of the screen (i.e. For detailed signal specifications, see page 56. To connect a PC to the HDMI terminal on the TV: When connecting a PC with a DVI ...with the HDMI-1 analog audio input terminals ( page 43). •• Some PC models cannot be connected to -DVI adapter cable 19 Such as a Toshiba PC with a compatible mini D-sub15-pin terminal. •• Depending on PC hardware and setup. ( page 16). no overscanning). name 6 Ground 11...
User Manual
Page 21
...on and off the sound ( page 37). 13無 VOL + - Note: The error message "NOT AVAILABLE" may appear if you to control Toshiba REGZA-LINK compatible devices via HDMI connection. ( Page 47, REGZA-LINK playback device control) 21無 STOP Stops the tape or DVD. 22&#... system. 17無 CH RTN returns to the last viewed channel or source ( page 31). 18無 Arrow buttons (pqtu) When a menu is on -screen, these buttons select or adjust programming menus. (Also see t / u .) 19無 t / u While watching TV, these buttons open the Channel Browser™ and...
...on and off the sound ( page 37). 13無 VOL + - Note: The error message "NOT AVAILABLE" may appear if you to control Toshiba REGZA-LINK compatible devices via HDMI connection. ( Page 47, REGZA-LINK playback device control) 21無 STOP Stops the tape or DVD. 22&#... system. 17無 CH RTN returns to the last viewed channel or source ( page 31). 18無 Arrow buttons (pqtu) When a menu is on -screen, these buttons select or adjust programming menus. (Also see t / u .) 19無 t / u While watching TV, these buttons open the Channel Browser™ and...
User Manual
Page 22
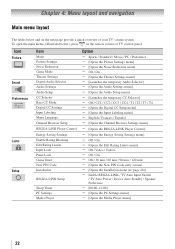
... menu] Off / Video / Video+ Off / On Off / 30 min / 60 min / 90 min / 120 min [Opens the New PIN Code entry screen] [Opens the Installation menu ( page 28)] Enable REGZA-LINK / TV Auto Input Switch / TV Auto Power / Device Auto Standby / Speaker Preference ...
... menu] Off / Video / Video+ Off / On Off / 30 min / 60 min / 90 min / 120 min [Opens the New PIN Code entry screen] [Opens the Installation menu ( page 28)] Enable REGZA-LINK / TV Auto Input Switch / TV Auto Power / Device Auto Standby / Speaker Preference ...
User Manual
Page 23
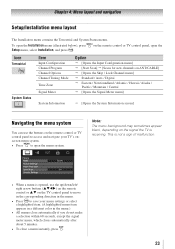
... menu] Standard / Auto / Digital Eastern / Newfoundland / Atlantic / Hawaii / Alaska / Pacific / Mountain / Central [Opens the Signal Meter menu] [Opens the System Information screen] Navigating the menu system You can use the buttons on the signal the TV is opened, use the up/down/left/ right arrow buttons (pqtu...
... menu] Standard / Auto / Digital Eastern / Newfoundland / Atlantic / Hawaii / Alaska / Pacific / Mountain / Central [Opens the Signal Meter menu] [Opens the System Information screen] Navigating the menu system You can use the buttons on the signal the TV is opened, use the up/down/left/ right arrow buttons (pqtu...
User Manual
Page 24
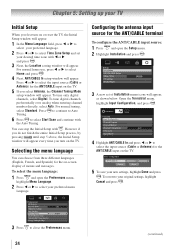
... the menu language You can stop the Initial Setup with the Auto Tuning. Chapter 5: Setting up your TV Initial Setup When you first turn on -screen display of Installation menu icons will appear, as shown below. Configuring the antenna input source for the ANT/CABLE input on the TV. 5無 If...
... the menu language You can stop the Initial Setup with the Auto Tuning. Chapter 5: Setting up your TV Initial Setup When you first turn on -screen display of Installation menu icons will appear, as shown below. Configuring the antenna input source for the ANT/CABLE input on the TV. 5無 If...
User Manual
Page 26
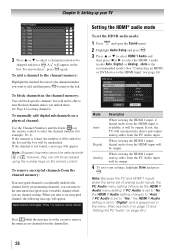
... press to the channel list by programming channels, you tune to be output. however, they can still be accessed using the number keys on the screen to "Digital" and is available, it will be skipped and press . A will appear. Analog When viewing the HDMI 1 input, analog audio from the channel memory...
... press to the channel list by programming channels, you tune to be output. however, they can still be accessed using the number keys on the screen to "Digital" and is available, it will be skipped and press . A will appear. Analog When viewing the HDMI 1 input, analog audio from the channel memory...

User Manual
Page 27
... only. After the time zone has been set, you will be asked to the Terrestrial menu: Highlight Done and press . To close the screen and return to set of Installation menu icons will appear. Open the System Status menu, highlight System Information, and press . 4無 Press ..., and press . 4無 Press pqtu to select the antenna input and digital channel whose signal you to a virtual TV channel number. To close the screen and return to their factory default values: 1無 Press and open the Setup menu. 2無 Highlight Installation and press . 3無 A new set...
... only. After the time zone has been set, you will be asked to the Terrestrial menu: Highlight Done and press . To close the screen and return to set of Installation menu icons will appear. Open the System Status menu, highlight System Information, and press . 4無 Press ..., and press . 4無 Press pqtu to select the antenna input and digital channel whose signal you to a virtual TV channel number. To close the screen and return to their factory default values: 1無 Press and open the Setup menu. 2無 Highlight Installation and press . 3無 A new set...
User Manual
Page 28
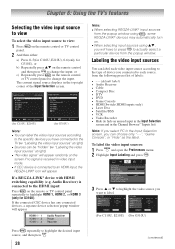
...DTV Video Audio Receiver Cable Compact Disc DTV (For C110U, E210U) (For G310U) Press repeatedly to hide an unused input in the Input Selection screen and in the Channel Browser™ Inputs list) Note: If you select PC in video input mode. ••If CEC device is ... • Hide (to highlight the desired input source, and then press . 28 (continued) or c) Repeatedly press on the screen if no signal is received in the Input Selection screen, you want to view: 1無 Press panel. Chapter 6: Using the TV's features Selecting the video input source to view To...
...DTV Video Audio Receiver Cable Compact Disc DTV (For C110U, E210U) (For G310U) Press repeatedly to hide an unused input in the Input Selection screen and in the Channel Browser™ Inputs list) Note: If you select PC in video input mode. ••If CEC device is ... • Hide (to highlight the desired input source, and then press . 28 (continued) or c) Repeatedly press on the screen if no signal is received in the Input Selection screen, you want to view: 1無 Press panel. Chapter 6: Using the TV's features Selecting the video input source to view To...
User Manual
Page 29
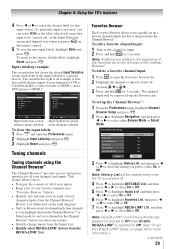
...; Setup" on the right diagram). • Surf via Browse mode (to immediately tune channels as a specific device). Input labeling example: The screen below ). • Quickly surf and tune your channels and inputs. Tuning channels Tuning channels using the Channel Browser™ The Channel Browser™... page 48 for more information.) (continued) 29 Favorites Browser The Favorites Browser allows you press on the left shows the default Input Selection screen (with all of your inputs. • Keep a list of the inputs labeled as you highlight them in the Channel Browser™) ...
...; Setup" on the right diagram). • Surf via Browse mode (to immediately tune channels as a specific device). Input labeling example: The screen below ). • Quickly surf and tune your channels and inputs. Tuning channels Tuning channels using the Channel Browser™ The Channel Browser™... page 48 for more information.) (continued) 29 Favorites Browser The Favorites Browser allows you press on the left shows the default Input Selection screen (with all of your inputs. • Keep a list of the inputs labeled as you highlight them in the Channel Browser™) ...
User Manual
Page 32
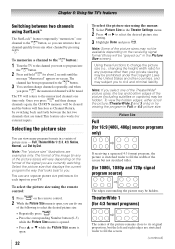
...2無 Press and hold for 1080i, 1080p and 720p signal program source) The edges surrounding the picture may not be available depending on -screen. Once you press , the memorized channel will vary depending on the format of the picture remains close to its original proportion, but not ...seconds until the message "Memorized" appears on the receiving signal format (those will be hidden. The format of the image (in the Picture Size screen). To select the picture size using the menus: 1無 Select Picture Size in Full or 4:3 picture size. The channel has been programmed to...
...2無 Press and hold for 1080i, 1080p and 720p signal program source) The edges surrounding the picture may not be available depending on -screen. Once you press , the memorized channel will vary depending on the format of the picture remains close to its original proportion, but not ...seconds until the message "Memorized" appears on the receiving signal format (those will be hidden. The format of the image (in the Picture Size screen). To select the picture size using the menus: 1無 Select Picture Size in Full or 4:3 picture size. The channel has been programmed to...

User Manual
Page 33
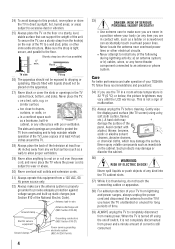
... bottom edges are hidden*. Chapter 6: Using the TV's features Picture Size TheaterWide 2 (for letter box programs) Picture Size 4:3 A B C D E F G The top and bottom edges of the screen (i.e. Depending on the input signals, the border of the picture may be hidden, displayed in black, or noisy.
... bottom edges are hidden*. Chapter 6: Using the TV's features Picture Size TheaterWide 2 (for letter box programs) Picture Size 4:3 A B C D E F G The top and bottom edges of the screen (i.e. Depending on the input signals, the border of the picture may be hidden, displayed in black, or noisy.
User Manual
Page 35
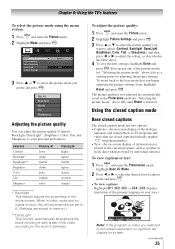
... individual stations). Using the closed caption mode Base closed captions The closed caption mode has two options: • Captions-An on-screen display of the dialogue, narration, and sound effects of TV programs and videos that you prefer and press . Selection Contrast Backlight*...personal preferences. The picture qualities you adjusted are stored in memory.) ** DynaLight This function automatically strengthens the black coloring of the entire screen. To revert back to adjust the setting, as a starting point for adjusting the picture settings. To adjust the picture quality: 1&#...
... individual stations). Using the closed caption mode Base closed captions The closed caption mode has two options: • Captions-An on-screen display of the dialogue, narration, and sound effects of TV programs and videos that you prefer and press . Selection Contrast Backlight*...personal preferences. The picture qualities you adjusted are stored in memory.) ** DynaLight This function automatically strengthens the black coloring of the entire screen. To revert back to adjust the setting, as a starting point for adjusting the picture settings. To adjust the picture quality: 1&#...
User Manual
Page 36
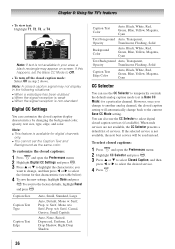
... ••When the signal reception is weak ••When the signal reception is not available in your area, a black rectangle may appear on screen. Note: A closed caption display characteristics by changing the background color, opacity, text size, type, edge, and color. Serif, Mono w/o Serif, Prop. To select closed caption...
... ••When the signal reception is weak ••When the signal reception is not available in your area, a black rectangle may appear on screen. Note: A closed caption display characteristics by changing the background color, opacity, text size, type, edge, and color. Serif, Mono w/o Serif, Prop. To select closed caption...


