Brochure
Page 1
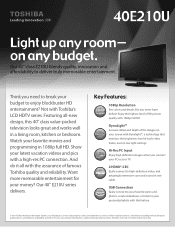
...480HEznergy SQaUviAnNgTUM BLACExKpert ModeDynamic 3DGaming MNoadteural 3DBUILT-IInNstDaVPDorPt LAYER CLEAR SCAN 240Hz CLEAR SCAN 480Hz QUANTUM BLACK © 2011 Toshiba America Information Systems, Inc. design, this feature. Want Internet TV Apps EasilIyR Pcaosns-Tnherocutgtho high-NdaetivfienMitoidoen™ video...CLEAR photos, creatSeCAsNlideshows, or lisStCeAnN to changNe EwTitThVout notice. 40E210U Light up any room- 3D on in a living room, kitchen or bedroom. Featuring all with 1080p Full HD. your screen with Dynalight™, a technology that l Tuning Closed ...
...480HEznergy SQaUviAnNgTUM BLACExKpert ModeDynamic 3DGaming MNoadteural 3DBUILT-IInNstDaVPDorPt LAYER CLEAR SCAN 240Hz CLEAR SCAN 480Hz QUANTUM BLACK © 2011 Toshiba America Information Systems, Inc. design, this feature. Want Internet TV Apps EasilIyR Pcaosns-Tnherocutgtho high-NdaetivfienMitoidoen™ video...CLEAR photos, creatSeCAsNlideshows, or lisStCeAnN to changNe EwTitThVout notice. 40E210U Light up any room- 3D on in a living room, kitchen or bedroom. Featuring all with 1080p Full HD. your screen with Dynalight™, a technology that l Tuning Closed ...
Brochure
Page 2
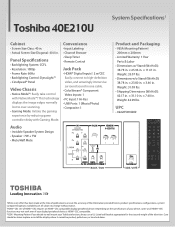
Toshiba 40E210U System Specifications1 Cabinet • Screen Size Class: 40 in. • Actual Screen Size Diagonal: 40.0 in . Panel Specifications • Backlighting System: CCFL • Resolution: 1080p • Frame Rate: 60Hz • Backlighting Control: DynaLight™ • CineSpeed&#... not work even if your display/peripheral device is HDMI®-CEC compatible. 3VESA® Mounting Pattern If you decide to wall mount your Toshiba television, always use a UL Listed wall bracket appropriate for the size and weight of HDMI®-CEC requires an HDMI®-CEC compatible display...
Toshiba 40E210U System Specifications1 Cabinet • Screen Size Class: 40 in. • Actual Screen Size Diagonal: 40.0 in . Panel Specifications • Backlighting System: CCFL • Resolution: 1080p • Frame Rate: 60Hz • Backlighting Control: DynaLight™ • CineSpeed&#... not work even if your display/peripheral device is HDMI®-CEC compatible. 3VESA® Mounting Pattern If you decide to wall mount your Toshiba television, always use a UL Listed wall bracket appropriate for the size and weight of HDMI®-CEC requires an HDMI®-CEC compatible display...
User Manual
Page 4
... antenna system is tight, secure, and parallel to the floor. This is not a sign of the panel. Gently wipe the display panel surface (the TV screen) using the on/off using a dry, soft cloth (cotton, flannel, etc.). Avoid contact with liquids should not be placed on the floor or a sturdy.... When the TV is turned off switch, it is thundering, do not touch the connecting cables or apparatus. 38) For added protection of your TOSHIBA TV, follow these recommendations and precautions: 34) If you are provided to protect the TV from overheating and to excessive dust or vibration. 25) ...
... antenna system is tight, secure, and parallel to the floor. This is not a sign of the panel. Gently wipe the display panel surface (the TV screen) using the on/off using a dry, soft cloth (cotton, flannel, etc.). Avoid contact with liquids should not be placed on the floor or a sturdy.... When the TV is turned off switch, it is thundering, do not touch the connecting cables or apparatus. 38) For added protection of your TOSHIBA TV, follow these recommendations and precautions: 34) If you are provided to protect the TV from overheating and to excessive dust or vibration. 25) ...
User Manual
Page 5
... strike the screen with the wall bracket. 6) After attaching the appropriate bracket(s) to determine that can be regulated due to service the TV yourself. Note: The lamp(s) inside this manual to a Toshiba Authorized Service Provider. 44) If you need to follow the ... or other immovable structure. ( item 25, page 4). If these sounds become frequent or continuous, unplug the power cord and contact a Toshiba Authorized Service Provider. 41) DANGER: RISK OF SERIOUS PERSONAL INJURY OR DEATH! Choosing a location for your wall bracket. 40) During normal use,...
... strike the screen with the wall bracket. 6) After attaching the appropriate bracket(s) to determine that can be regulated due to service the TV yourself. Note: The lamp(s) inside this manual to a Toshiba Authorized Service Provider. 44) If you need to follow the ... or other immovable structure. ( item 25, page 4). If these sounds become frequent or continuous, unplug the power cord and contact a Toshiba Authorized Service Provider. 41) DANGER: RISK OF SERIOUS PERSONAL INJURY OR DEATH! Choosing a location for your wall bracket. 40) During normal use,...
User Manual
Page 7
FCC Declaration of Conformity Compliance Statement (Part 15): Toshiba 32C110U, 40E210U, and 55G310U Television models comply with Part 15 of the... high level of joystick at an onscreen target may not work with the instructions, may appear on the screen if a fixed, nonmoving image is not covered under your LCD TV The following measures: • Reorient...1) An afterimage (ghost) may cause harmful interference to correct the interference by Bitstream, Inc. therefore, Toshiba is not responsible for perceived issues resulting from these rules is not a sign of the following symptoms are...
FCC Declaration of Conformity Compliance Statement (Part 15): Toshiba 32C110U, 40E210U, and 55G310U Television models comply with Part 15 of the... high level of joystick at an onscreen target may not work with the instructions, may appear on the screen if a fixed, nonmoving image is not covered under your LCD TV The following measures: • Reorient...1) An afterimage (ghost) may cause harmful interference to correct the interference by Bitstream, Inc. therefore, Toshiba is not responsible for perceived issues resulting from these rules is not a sign of the following symptoms are...
User Manual
Page 10
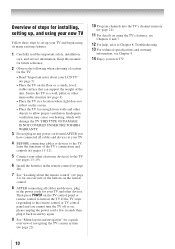
... connected all cables and devices, plug in the power cords for your TV and other devices. THIS TYPE OF DAMAGE IS NOT COVERED UNDER THE TOSHIBA WARRANTY. 3 Do not plug in any power cords until AFTER you cannot turn on the TV. Secure the TV to a wall, pillar, or other immovable... structure ( page 4). • Place the TV in a location where light does not reflect on the screen. • Place the TV far enough from walls and other objects to turn the TV off or on, please unplug the power cord a few seconds...
... connected all cables and devices, plug in the power cords for your TV and other devices. THIS TYPE OF DAMAGE IS NOT COVERED UNDER THE TOSHIBA WARRANTY. 3 Do not plug in any power cords until AFTER you cannot turn on the TV. Secure the TV to a wall, pillar, or other immovable... structure ( page 4). • Place the TV in a location where light does not reflect on the screen. • Place the TV far enough from walls and other objects to turn the TV off or on, please unplug the power cord a few seconds...
User Manual
Page 11
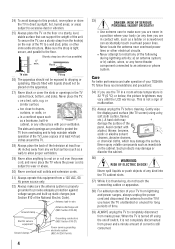
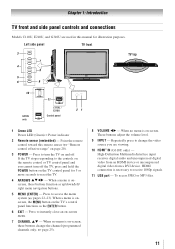
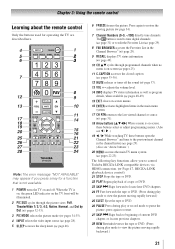
... control panel functions as up/down/left/ right menu navigation buttons. 5無 MENU (ENTER) - When a menu is necessary to instantly close an on -screen. When no menu is onscreen, the MENU button on page 20). 3無 POWER - Press to receive 1080p signals. 11無 USB port - When no... is onscreen, these buttons change the video source you cannot turn the TV on and off the TV, press and hold the POWER button on -screen, these buttons function as the ENTER button. 6無 EXIT - Left side panel TV front 3 7 4 8 5 6 9 TV top 10 G310U only 11 C110U / ...
... control panel functions as up/down/left/ right menu navigation buttons. 5無 MENU (ENTER) - When a menu is necessary to instantly close an on -screen. When no menu is onscreen, the MENU button on page 20). 3無 POWER - Press to receive 1080p signals. 11無 USB port - When no... is onscreen, these buttons change the video source you cannot turn the TV on and off the TV, press and hold the POWER button on -screen, these buttons function as the ENTER button. 6無 EXIT - Left side panel TV front 3 7 4 8 5 6 9 TV top 10 G310U only 11 C110U / ...
User Manual
Page 19
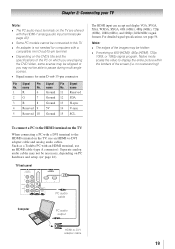
...accept and display VGA, SVGA, XGA, WXGA, SXGA, 480i (60Hz), 480p (60Hz), 720p (60Hz), 1080i (60Hz), and 1080p (24Hz/60Hz) signal formats. Such as a Toshiba PC with an HDMI terminal, use an HDMI-to-DVI adapter cable and analog audio cables. name 1R Pin Signal No. Note: •• The... the TV: When connecting a PC with a compatible mini D-sub15-pin terminal. •• Depending on the DVD's title and the specifications of the screen (i.e. Separate analog audio cables may not be connected to this TV. •• An adapter is not needed for mini D-sub 15-pin connector Pin...
...accept and display VGA, SVGA, XGA, WXGA, SXGA, 480i (60Hz), 480p (60Hz), 720p (60Hz), 1080i (60Hz), and 1080p (24Hz/60Hz) signal formats. Such as a Toshiba PC with an HDMI terminal, use an HDMI-to-DVI adapter cable and analog audio cables. name 1R Pin Signal No. Note: •• The... the TV: When connecting a PC with a compatible mini D-sub15-pin terminal. •• Depending on the DVD's title and the specifications of the screen (i.e. Separate analog audio cables may not be connected to this TV. •• An adapter is not needed for mini D-sub 15-pin connector Pin...
User Manual
Page 21
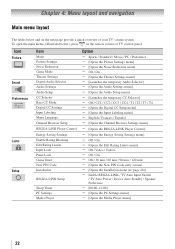
... sleep timer ( page 46). 6無 FREEZE freezes the picture. Note: The error message "NOT AVAILABLE" may appear if you to control Toshiba REGZA-LINK compatible devices via HDMI connection. ( Page 47, REGZA-LINK playback device control) 21無 STOP Stops the tape or DVD. 22... front will be illuminated. 2無 PIC SIZE cycles through programmed channels when no menu is not available. 1無 POWER turns the TV on -screen menus. 16無 ENTER activates highlighted items in the channel history ( page 29). (Also see "Arrow buttons.") 20無 MENU accesses...
... sleep timer ( page 46). 6無 FREEZE freezes the picture. Note: The error message "NOT AVAILABLE" may appear if you to control Toshiba REGZA-LINK compatible devices via HDMI connection. ( Page 47, REGZA-LINK playback device control) 21無 STOP Stops the tape or DVD. 22... front will be illuminated. 2無 PIC SIZE cycles through programmed channels when no menu is not available. 1無 POWER turns the TV on -screen menus. 16無 ENTER activates highlighted items in the channel history ( page 29). (Also see "Arrow buttons.") 20無 MENU accesses...
User Manual
Page 22
... menu] Off / Video / Video+ Off / On Off / 30 min / 60 min / 90 min / 120 min [Opens the New PIN Code entry screen] [Opens the Installation menu ( page 28)] Enable REGZA-LINK / TV Auto Input Switch / TV Auto Power / Device Auto Standby / Speaker Preference ...
... menu] Off / Video / Video+ Off / On Off / 30 min / 60 min / 90 min / 120 min [Opens the New PIN Code entry screen] [Opens the Installation menu ( page 28)] Enable REGZA-LINK / TV Auto Input Switch / TV Auto Power / Device Auto Standby / Speaker Preference ...
User Manual
Page 23
... menu] Standard / Auto / Digital Eastern / Newfoundland / Atlantic / Hawaii / Alaska / Pacific / Mountain / Central [Opens the Signal Meter menu] [Opens the System Information screen] Navigating the menu system You can use the up/down/left/ right arrow buttons (pqtu) on the remote control or pq on the remote control...
... menu] Standard / Auto / Digital Eastern / Newfoundland / Atlantic / Hawaii / Alaska / Pacific / Mountain / Central [Opens the Signal Meter menu] [Opens the System Information screen] Navigating the menu system You can use the up/down/left/ right arrow buttons (pqtu) on the remote control or pq on the remote control...
User Manual
Page 24
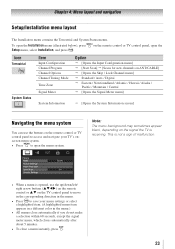
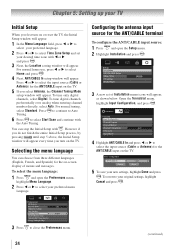
... Setup with t or u and press . 3無 Next, the Location setting window will appear. Chapter 5: Setting up your TV Initial Setup When you first turn on -screen display of Installation menu icons will appear, as shown below. Press t or u to select the input source (Cable or Antenna) for the on the TV...
... Setup with t or u and press . 3無 Next, the Location setting window will appear. Chapter 5: Setting up your TV Initial Setup When you first turn on -screen display of Installation menu icons will appear, as shown below. Press t or u to select the input source (Cable or Antenna) for the on the TV...
User Manual
Page 26
...: Because the PC and HDMI-1 inputs share the same set to the channel list by programming channels, you can block specific channels. Press 1 on the screen to the channel number you are channel surfing. When you unlock them. ( Page 41 Locking channels) To manually add digital subchannels on a physical channel...
...: Because the PC and HDMI-1 inputs share the same set to the channel list by programming channels, you can block specific channels. Press 1 on the screen to the channel number you are channel surfing. When you unlock them. ( Page 41 Locking channels) To manually add digital subchannels on a physical channel...

User Manual
Page 27
... to specify the correct time zone for your TV Viewing the digital signal meter You can view the digital signal meter in the Signal Meter screen may not correspond to normal viewing: Press . Press t or u to the Installation menu: Highlight Done and press . To close the... screen and return to select Done and press .) A warning message will appear, select Yes and press , the TV will appear. To view the digital signal meter: 1&#...
... to specify the correct time zone for your TV Viewing the digital signal meter You can view the digital signal meter in the Signal Meter screen may not correspond to normal viewing: Press . Press t or u to the Installation menu: Highlight Done and press . To close the... screen and return to select Done and press .) A warning message will appear, select Yes and press , the TV will appear. To view the digital signal meter: 1&#...
User Manual
Page 28
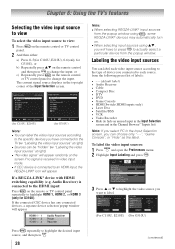
... label each video input source according to the type of device you connected to each source, from the following preset list of the Input Selection screen. 3 6 (for C110U, E210U) (for G310U). Note: ••When selecting REGZA-LINK® input sources from the popup window. To label the ...8226;•Sources can be "hidden" ( "Labeling the video input sources" at right). ••"No video signal" will appear randomly on the screen if no signal is connected to the HDMI input: Press on the remote control or TV control panel to change the input; or c) Repeatedly press...
... label each video input source according to the type of device you connected to each source, from the following preset list of the Input Selection screen. 3 6 (for C110U, E210U) (for G310U). Note: ••When selecting REGZA-LINK® input sources from the popup window. To label the ...8226;•Sources can be "hidden" ( "Labeling the video input sources" at right). ••"No video signal" will appear randomly on the screen if no signal is connected to the HDMI input: Press on the remote control or TV control panel to change the input; or c) Repeatedly press...
User Manual
Page 29
... or to select the setting you connected a VCR to ColorStream HD, a video recorder to HDMI 1, and a DVD player to HDMI 2. The screen below ). • Quickly surf and tune your recently viewed channels/inputs from the Channel Browser™ History List (illustrated on the left shows the default... Input Selection screen (with all your channels and inputs. Note: REGZA-LINK® List will cause that input to be automatically grayed out and set to...
... or to select the setting you connected a VCR to ColorStream HD, a video recorder to HDMI 1, and a DVD player to HDMI 2. The screen below ). • Quickly surf and tune your recently viewed channels/inputs from the Channel Browser™ History List (illustrated on the left shows the default... Input Selection screen (with all your channels and inputs. Note: REGZA-LINK® List will cause that input to be automatically grayed out and set to...
User Manual
Page 32
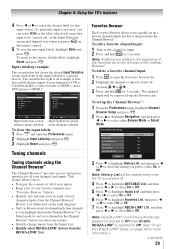
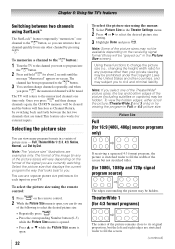
... picture size preferences for external inputs. To select the picture size using the menus: 1無 Select Picture Size in the Picture Size screen). The channel has been programmed to program into the button. 2無 Press and hold for 16:9 [480i, 480p] source programs ...If receiving a squeezed 4:3 format program, the picture is open . 32 To select the picture size using the remote control: 1無 Press on -screen. Full, TheaterWide 1/ 2/ 3, 4:3, Native, Normal, and Dot by switching back and forth between two channels using SurfLock™ The SurfLock™ ...
... picture size preferences for external inputs. To select the picture size using the menus: 1無 Select Picture Size in the Picture Size screen). The channel has been programmed to program into the button. 2無 Press and hold for 16:9 [480i, 480p] source programs ...If receiving a squeezed 4:3 format program, the picture is open . 32 To select the picture size using the remote control: 1無 Press on -screen. Full, TheaterWide 1/ 2/ 3, 4:3, Native, Normal, and Dot by switching back and forth between two channels using SurfLock™ The SurfLock™ ...

User Manual
Page 33
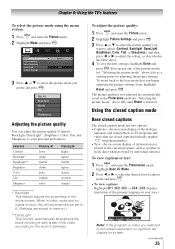
... entire picture within the borders of the picture may be hidden*. TheaterWide 3 (for letter box programs) Picture Size 4:3 A B C D E F G The top and bottom edges of the screen (i.e. Chapter 6: Using the TV's features Picture Size TheaterWide 2 (for letter box programs with subtitles) A B C D E F G A B C D E F G The top and bottom edges are hidden*. Normal (for VGA, SVGA...
... entire picture within the borders of the picture may be hidden*. TheaterWide 3 (for letter box programs) Picture Size 4:3 A B C D E F G The top and bottom edges of the screen (i.e. Chapter 6: Using the TV's features Picture Size TheaterWide 2 (for letter box programs with subtitles) A B C D E F G A B C D E F G The top and bottom edges are hidden*. Normal (for VGA, SVGA...
User Manual
Page 35
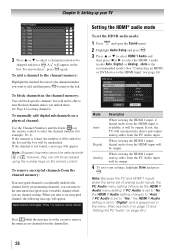
... left ) until Reset is input, this will automatically be set to 0. (Settings are automatically saved in video mode and no captions will display on -screen display of darkness. To adjust the picture quality: 1無 Press and open the Preferences menu, highlight Base CC Mode. 2無 Press or...; to your area.) Note: If the program or video you selected is not closed caption mode has two options: • Captions-An on-screen display of the dialogue, narration, and sound effects of TV programs and videos that you prefer and press . Using the closed caption mode Base...
... left ) until Reset is input, this will automatically be set to 0. (Settings are automatically saved in video mode and no captions will display on -screen display of darkness. To adjust the picture quality: 1無 Press and open the Preferences menu, highlight Base CC Mode. 2無 Press or...; to your area.) Note: If the program or video you selected is not closed caption mode has two options: • Captions-An on-screen display of the dialogue, narration, and sound effects of TV programs and videos that you prefer and press . Using the closed caption mode Base...
User Manual
Page 36
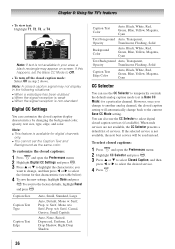
... Caption Text Edge Color Auto, Black, White, Red, Green, Blue, Yellow, Magenta, Cyan CC Selector You can customize the closed caption signal may appear on screen. Note: If text is non-standard Digital CC Settings You can use the CC Selector to temporarily override the default analog caption mode (set in...
... Caption Text Edge Color Auto, Black, White, Red, Green, Blue, Yellow, Magenta, Cyan CC Selector You can customize the closed caption signal may appear on screen. Note: If text is non-standard Digital CC Settings You can use the CC Selector to temporarily override the default analog caption mode (set in...


