
User's Guide for Model 39L22U
Page 2
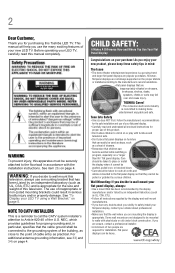
...to the flat panel display so that children can be mounted to wall mount this television. This manual will help you use of your new product, please keep these safety tips in particular, specifies...: It Makes A Difference How and Where You Use Your Flat Panel Display Congratulations on page 5. TOSHIBA Cares! • The consumer electronics industry is appropriate. Follow the manufacturer's recommendations for the safe installation... display. • Carefully read this Toshiba LED TV. Some wall mounts are required for installation. 2 Dear Customer, Thank you for purchasing this...
...to the flat panel display so that children can be mounted to wall mount this television. This manual will help you use of your new product, please keep these safety tips in particular, specifies...: It Makes A Difference How and Where You Use Your Flat Panel Display Congratulations on page 5. TOSHIBA Cares! • The consumer electronics industry is appropriate. Follow the manufacturer's recommendations for the safe installation... display. • Carefully read this Toshiba LED TV. Some wall mounts are required for installation. 2 Dear Customer, Thank you for purchasing this...
User's Guide for Model 39L22U
Page 5
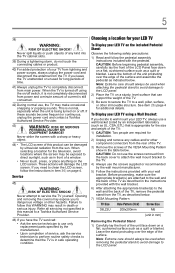
...the pedestal stand from power and a minute amount of current is in the table below . 7) VESA Mounting Pattern TV Size Hole Pattern (HxV) Screw Size 39L22U 200x200mm M6 (unit in mm) Removing the Pedestal Stand 1) Carefully lay the front of service, ask the service ...or place anything on the included Pedestal Stand: Observe the following safety precautions: 1) Read and follow this manual to a Toshiba Authorized Service Provider. 46) If you to the LCD panel. 2) Place the TV on or off switch, it is appropriate for additional details. When selecting a location for your LED...
...the pedestal stand from power and a minute amount of current is in the table below . 7) VESA Mounting Pattern TV Size Hole Pattern (HxV) Screw Size 39L22U 200x200mm M6 (unit in mm) Removing the Pedestal Stand 1) Carefully lay the front of service, ask the service ...or place anything on the included Pedestal Stand: Observe the following safety precautions: 1) Read and follow this manual to a Toshiba Authorized Service Provider. 46) If you to the LCD panel. 2) Place the TV on or off switch, it is appropriate for additional details. When selecting a location for your LED...
User's Guide for Model 39L22U
Page 17
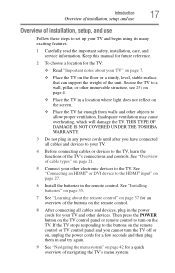
... page 27. 6 Install the batteries in a location where light does not reflect on the screen. ❖ Place the TV far enough from walls and other devices. THIS TYPE OF DAMAGE IS NOT COVERED UNDER THE TOSHIBA WARRANTY. 3 Do not plug in any power cords until after you cannot turn on the... all cables and devices, plug in and try again. 9 See "Navigating the menu system" on page 42 for a quick overview of navigating the TV's menu system. Keep this manual for future reference. 2 To choose a location for the TV: ❖ Read "Important notes about the remote control" on page 37 for your...
... page 27. 6 Install the batteries in a location where light does not reflect on the screen. ❖ Place the TV far enough from walls and other devices. THIS TYPE OF DAMAGE IS NOT COVERED UNDER THE TOSHIBA WARRANTY. 3 Do not plug in any power cords until after you cannot turn on the... all cables and devices, plug in and try again. 9 See "Navigating the menu system" on page 42 for a quick overview of navigating the TV's menu system. Keep this manual for future reference. 2 To choose a location for the TV: ❖ Read "Important notes about the remote control" on page 37 for your...
User's Guide for Model 39L22U
Page 23
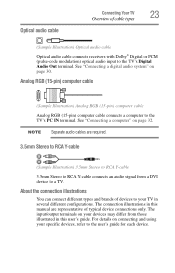
...Sample Illustration) 3.5mm Stereo to RCA Y-cable 3.5mm Stereo to a TV. For details on your devices may differ from a DVI device to RCA Y-cable connects an audio signal from those illustrated in this manual are representative of typical device connections only. See "Connecting a digital audio ...system" on page 32. See "Connecting a computer" on page 30. The input/output terminals on connecting and using your specific devices, refer to the TV's PC IN terminal....
...Sample Illustration) 3.5mm Stereo to RCA Y-cable 3.5mm Stereo to a TV. For details on your devices may differ from a DVI device to RCA Y-cable connects an audio signal from those illustrated in this manual are representative of typical device connections only. See "Connecting a digital audio ...system" on page 32. See "Connecting a computer" on page 30. The input/output terminals on connecting and using your specific devices, refer to the TV's PC IN terminal....

User's Guide for Model 39L22U
Page 29
...(type A connector) per HDMI® device (see "Overview of connected audio/video devices using the TV's remote control if you use an HDMI® cable with the desired settings, see the operation manual for each device. ❖ This feature uses the CEC technology as regulated by the HDMI® ... CEC Setup menu with the HDMI® Logo ( ). For details, see "HDMI® CEC input source selection" on page 21). Connecting Your TV 29 HDMI® CEC connection HDMI® CEC connection You can control the basic functions of cable types" on page 105. ❖ The connected devices...
...(type A connector) per HDMI® device (see "Overview of connected audio/video devices using the TV's remote control if you use an HDMI® cable with the desired settings, see the operation manual for each device. ❖ This feature uses the CEC technology as regulated by the HDMI® ... CEC Setup menu with the HDMI® Logo ( ). For details, see "HDMI® CEC input source selection" on page 21). Connecting Your TV 29 HDMI® CEC connection HDMI® CEC connection You can control the basic functions of cable types" on page 105. ❖ The connected devices...
User's Guide for Model 39L22U
Page 30
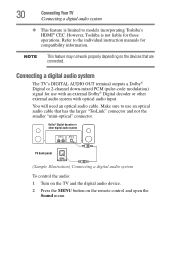
...or other external audio system with optical audio input. However, Toshiba is limited to use with an external Dolby® Digital decoder or other digital audio system TV back panel (Sample Illustration) Connecting a digital audio system To... that has the larger "TosLink" connector and not the smaller "mini-optical" connector. 30 Connecting Your TV Connecting a digital audio system ❖ This feature is not liable for use an optical audio cable that...Sound menu. Refer to the individual instruction manuals for compatibility information. You will need an optical audio cable.
...or other external audio system with optical audio input. However, Toshiba is limited to use with an external Dolby® Digital decoder or other digital audio system TV back panel (Sample Illustration) Connecting a digital audio system To... that has the larger "TosLink" connector and not the smaller "mini-optical" connector. 30 Connecting Your TV Connecting a digital audio system ❖ This feature is not liable for use an optical audio cable that...Sound menu. Refer to the individual instruction manuals for compatibility information. You will need an optical audio cable.
User's Guide for Model 39L22U
Page 46
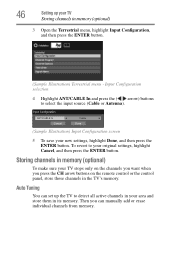
...them in its memory. Then you press the CH arrow buttons on the channels you want when you can set up your TV Storing channels in the TV's memory. Auto Tuning You can manually add or erase individual channels from memory. Storing channels in memory (optional) To make sure your... TV stops only on the remote control or the control panel, store those channels in memory (optional) 3 Open the Terrestrial menu, highlight Input...
...them in its memory. Then you press the CH arrow buttons on the channels you want when you can set up your TV Storing channels in the TV's memory. Auto Tuning You can manually add or erase individual channels from memory. Storing channels in memory (optional) To make sure your... TV stops only on the remote control or the control panel, store those channels in memory (optional) 3 Open the Terrestrial menu, highlight Input...
User's Guide for Model 39L22U
Page 49
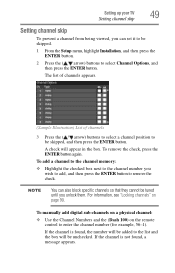
...the ENTER button again. For information, see "Locking channels" on the remote control to the channel number you unlock them. Setting up your TV 49 Setting channel skip Setting channel skip To prevent a channel from being viewed, you can also block specific channels so that they cannot be...the check. To add a channel to the channel memory: ❖ Highlight the checked box next to enter the channel number (for example, 56-1). To manually add digital sub-channels on a physical channel: ❖ Use the Channel Numbers and the (Dash 100) on page 90. A check will be skipped...
...the ENTER button again. For information, see "Locking channels" on the remote control to the channel number you unlock them. Setting up your TV 49 Setting channel skip Setting channel skip To prevent a channel from being viewed, you can also block specific channels so that they cannot be...the check. To add a channel to the channel memory: ❖ Highlight the checked box next to enter the channel number (for example, 56-1). To manually add digital sub-channels on a physical channel: ❖ Use the Channel Numbers and the (Dash 100) on page 90. A check will be skipped...
User's Guide for Model 39L22U
Page 96
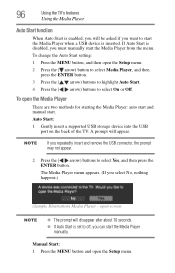
...Start: 1 Gently insert a supported USB storage device into the USB port on the back of the TV. To change the Auto Start setting: 1 Press the MENU button, and then open the Setup menu....On or Off. open the Media Player There are two methods for starting the Media Player: auto start and manual start. To open screen NOTE ❖ The prompt will appear. A prompt will disappear after about 10 seconds... is disabled, you want to off, you can start the Media Player manually. 96 Using the TV's features Using the Media Player Auto Start function When Auto Start is enabled, you ...
...Start: 1 Gently insert a supported USB storage device into the USB port on the back of the TV. To change the Auto Start setting: 1 Press the MENU button, and then open the Setup menu....On or Off. open the Media Player There are two methods for starting the Media Player: auto start and manual start. To open screen NOTE ❖ The prompt will appear. A prompt will disappear after about 10 seconds... is disabled, you want to off, you can start the Media Player manually. 96 Using the TV's features Using the Media Player Auto Start function When Auto Start is enabled, you ...

User's Guide for Model 39L22U
Page 98
... close the Photo Viewer, press the EXIT button. This view allows you to rotate the image 90° clockwise. Press to change the photo content manually. Slide show This view allows you to watch a slide show : 1 Press the ENTER button in the Single View mode. 2 Press the ( / arrow) buttons to view... button to the last viewed channel or external input. The television will return to view the selected photo in Single View mode. 98 Using the TV's features Using the Media Player in photo list when there are disabled. To set Interval Time and Repeat settings: 1 Press the MENU button to open...
... close the Photo Viewer, press the EXIT button. This view allows you to rotate the image 90° clockwise. Press to change the photo content manually. Slide show This view allows you to watch a slide show : 1 Press the ENTER button in the Single View mode. 2 Press the ( / arrow) buttons to view... button to the last viewed channel or external input. The television will return to view the selected photo in Single View mode. 98 Using the TV's features Using the Media Player in photo list when there are disabled. To set Interval Time and Repeat settings: 1 Press the MENU button to open...
User's Guide for Model 39L22U
Page 118
... text is cleared. No HDMI® CEC operation The HDMI® CEC feature is available for Toshiba HDMI® CECcompatible devices. A closed caption signal may not operate properly. When the PIN code ..., press the INFO button 4 times within approximately 5 seconds. V-Chip systems only. Read the instruction manual furnished with the ( ) logo are connected, the HDMI® CEC feature may not display correctly under...Factory Defaults" on page 83. If this happens, turn it in and turn off your TV and unplug the power cord, and then plug it on page 83. Ensure that HDMI&#...
... text is cleared. No HDMI® CEC operation The HDMI® CEC feature is available for Toshiba HDMI® CECcompatible devices. A closed caption signal may not operate properly. When the PIN code ..., press the INFO button 4 times within approximately 5 seconds. V-Chip systems only. Read the instruction manual furnished with the ( ) logo are connected, the HDMI® CEC feature may not display correctly under...Factory Defaults" on page 83. If this happens, turn it in and turn off your TV and unplug the power cord, and then plug it on page 83. Ensure that HDMI&#...


