User Manual
Page 1
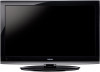
... satellite program). Record these numbers whenever you communicate with your Toshiba dealer about this TV. Owner's Manual Integrated High Definition LCD Television HIGH-DEFINITION TELEVISION 32E200U 32E20U 37E200U 37E20U 40E200U 40E20U For an overview of your new TV, see... page10. For details, please contact your TV antenna installer, cable provider, or satellite provider. © 2010 TOSHIBA CORPORATION All Rights Reserved Owner's Record The model number and serial number are on the back of steps for setting...
... satellite program). Record these numbers whenever you communicate with your Toshiba dealer about this TV. Owner's Manual Integrated High Definition LCD Television HIGH-DEFINITION TELEVISION 32E200U 32E20U 37E200U 37E20U 40E200U 40E20U For an overview of your new TV, see... page10. For details, please contact your TV antenna installer, cable provider, or satellite provider. © 2010 TOSHIBA CORPORATION All Rights Reserved Owner's Record The model number and serial number are on the back of steps for setting...
User Manual
Page 2
...Don't allow children to climb on or play with arrowhead symbol, within the product's enclosure that they cannot be mounted to route all . TOSHIBA Cares! • The consumer electronics industry is a reminder to call the CATV system installer's attention to the point of cable entry as...pulled or grabbed by an independent laboratory (such as practical. Follow the manufacturer's recommendations for installation. The lightning flash with furniture and television sets. • Don't place flat panel displays on furniture that can easily be used as steps, such as a chest of drawers. ...
...Don't allow children to climb on or play with arrowhead symbol, within the product's enclosure that they cannot be mounted to route all . TOSHIBA Cares! • The consumer electronics industry is a reminder to call the CATV system installer's attention to the point of cable entry as...pulled or grabbed by an independent laboratory (such as practical. Follow the manufacturer's recommendations for installation. The lightning flash with furniture and television sets. • Don't place flat panel displays on furniture that can easily be used as steps, such as a chest of drawers. ...
User Manual
Page 8
...22 Main menu layout 22 Setup/Installation menu layout 23 Navigating the menu system 23 Chapter 5: Setting up your TV 24 Initial Setup 24 Selecting the menu language 24 TOSHIBA Logo LED 24 Configuring the antenna input source for the ANT/CABLE terminal 24 Programming channels ...into the TV's channel memory............25 Programming channels automatically 25 Setting channel skip 25 Labeling channels 26 Setting the HDMI® audio mode 27...
...22 Main menu layout 22 Setup/Installation menu layout 23 Navigating the menu system 23 Chapter 5: Setting up your TV 24 Initial Setup 24 Selecting the menu language 24 TOSHIBA Logo LED 24 Configuring the antenna input source for the ANT/CABLE terminal 24 Programming channels ...into the TV's channel memory............25 Programming channels automatically 25 Setting channel skip 25 Labeling channels 26 Setting the HDMI® audio mode 27...
User Manual
Page 9
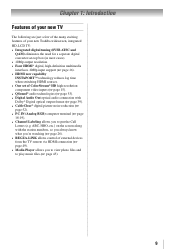
...The following are just a few of the many exciting features of your new Toshiba widescreen, integrated HD, LCD TV: • Integrated digital tuning (8VSB ATSC and QAM) eliminates the need for a separate digital converter set-top box (in most cases). • 1080p output resolution. • ...1080p input support ( page 16). • HDMI new capability INSTAPORT™ technology reduces lag time when switching HDMI sources. • One set of ColorStream® HD high-resolution component video inputs ( page 15). • QSound® audio technologies ( page 53). •...
...The following are just a few of the many exciting features of your new Toshiba widescreen, integrated HD, LCD TV: • Integrated digital tuning (8VSB ATSC and QAM) eliminates the need for a separate digital converter set-top box (in most cases). • 1080p output resolution. • ...1080p input support ( page 16). • HDMI new capability INSTAPORT™ technology reduces lag time when switching HDMI sources. • One set of ColorStream® HD high-resolution component video inputs ( page 15). • QSound® audio technologies ( page 53). •...
User Manual
Page 10
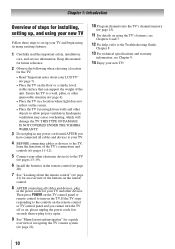
... 20). 7 See "Learning about your LCD TV" ( page 7). • Place the TV on the TV. THIS TYPE OF DAMAGE IS NOT COVERED UNDER THE TOSHIBA WARRANTY. 3 Do not plug in the power cords for your TV and other objects to allow proper ventilation. Then press POWER on the TV control... or a sturdy, level, stable surface that can support the weight of the unit. Chapter 1: Introduction Overview of steps for installing, setting up, and using your new TV Follow these steps to set up your TV and begin using the TV's features, see Chapters 6 and 7. 12 For help, refer to the Troubleshooting Guide...
... 20). 7 See "Learning about your LCD TV" ( page 7). • Place the TV on the TV. THIS TYPE OF DAMAGE IS NOT COVERED UNDER THE TOSHIBA WARRANTY. 3 Do not plug in the power cords for your TV and other objects to allow proper ventilation. Then press POWER on the TV control... or a sturdy, level, stable surface that can support the weight of the unit. Chapter 1: Introduction Overview of steps for installing, setting up, and using your new TV Follow these steps to set up your TV and begin using the TV's features, see Chapters 6 and 7. 12 For help, refer to the Troubleshooting Guide...
User Manual
Page 13
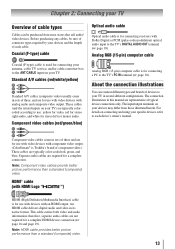
... cables are required for stereo left (or mono) audio. Standard A/V cables (red/white/yellow) Standard A/V cables (composite video) usually come in sets of three and are for use : yellow for video, red for stereo right audio, and white for a complete connection. These cables (and the...page 18). This cable carries both video and audio information; Component video cables (red/green/blue) Optical audio cable Optical audio cable is Toshiba's brand of component video.) These cables are typically colorcoded according to use with video devices with component video output. (ColorStream® is...
... cables are required for stereo left (or mono) audio. Standard A/V cables (red/white/yellow) Standard A/V cables (composite video) usually come in sets of three and are for use : yellow for video, red for stereo right audio, and white for a complete connection. These cables (and the...page 18). This cable carries both video and audio information; Component video cables (red/green/blue) Optical audio cable Optical audio cable is Toshiba's brand of component video.) These cables are typically colorcoded according to use with video devices with component video output. (ColorStream® is...
User Manual
Page 14
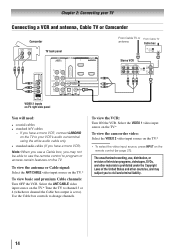
... TV to channel 3 or 4 (whichever channel the Cable box output is prohibited under the Copyright Laws of television programs, videotapes, DVDs, and other materials is set to). Select the VIDEO 1 video input source on the TV.* To view the camcorder video: Select the VIDEO 2 video input source on the TV.* ** To...
... TV to channel 3 or 4 (whichever channel the Cable box output is prohibited under the Copyright Laws of television programs, videotapes, DVDs, and other materials is set to). Select the VIDEO 1 video input source on the TV.* To view the camcorder video: Select the VIDEO 2 video input source on the TV.* ** To...
User Manual
Page 16
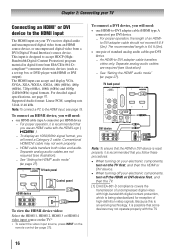
...device to the HDMI input The HDMI input on the remote control ( page 21). compliant[1] consumer electronic devices (such as a set-top box or DVD player with high-bandwidth digital content protection, which is being standardized for reception of high-definition video signals. To ... (60Hz), 480p (60Hz), 720p (60Hz), 1080i (60Hz) and 1080p (24Hz/60Hz) signal formats. For detailed signal specifications, see illustration). −− See "Setting the HDMI® audio mode" ( page 27). TV back panel DVI device VIDEO AUDIO L R IN IN OUT L R DVI / HDCP OUT Note: To...
...device to the HDMI input The HDMI input on the remote control ( page 21). compliant[1] consumer electronic devices (such as a set-top box or DVD player with high-bandwidth digital content protection, which is being standardized for reception of high-definition video signals. To ... (60Hz), 480p (60Hz), 720p (60Hz), 1080i (60Hz) and 1080p (24Hz/60Hz) signal formats. For detailed signal specifications, see illustration). −− See "Setting the HDMI® audio mode" ( page 27). TV back panel DVI device VIDEO AUDIO L R IN IN OUT L R DVI / HDCP OUT Note: To...
User Manual
Page 17
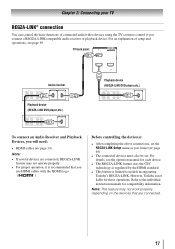
For details, see page 49. However, Toshiba is limited to the individual instruction manuals for those operations. Before controlling the device(s): • After completing the above connections, set . For an explanation of connected audio/video devices using the TV's remote control if you ...connect a REGZA-LINK compatible audio receiver or playback device. Refer to models incorporating Toshiba's REGZA-LINK. TV back panel Audio receiver...
For details, see page 49. However, Toshiba is limited to the individual instruction manuals for those operations. Before controlling the device(s): • After completing the above connections, set . For an explanation of connected audio/video devices using the TV's remote control if you ...connect a REGZA-LINK compatible audio receiver or playback device. Refer to models incorporating Toshiba's REGZA-LINK. TV back panel Audio receiver...
User Manual
Page 18
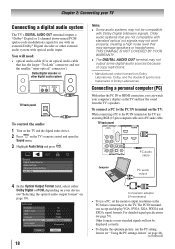
... Dolby Laboratories. Note: •• Some audio systems may not be displayed correctly. • To display the optimum picture, use the PC setting feature ( "Using the PC settings feature" on page 44). (continued) To connect a PC to the PC IN terminal on the TV: When connecting a PC to the TV... PCM, depending on your device ("Selecting the optical audio output format" on page 39). 18 Conversion adapter (if necessary) • To use a PC, set the monitor output resolution on the PC before connecting it to the PC IN terminal on the TV, use an analog RGB (15-pin) computer...
... Dolby Laboratories. Note: •• Some audio systems may not be displayed correctly. • To display the optimum picture, use the PC setting feature ( "Using the PC settings feature" on page 44). (continued) To connect a PC to the PC IN terminal on the TV: When connecting a PC to the TV... PCM, depending on your device ("Selecting the optical audio output format" on page 39). 18 Conversion adapter (if necessary) • To use a PC, set the monitor output resolution on the PC before connecting it to the PC IN terminal on the TV, use an analog RGB (15-pin) computer...
User Manual
Page 22
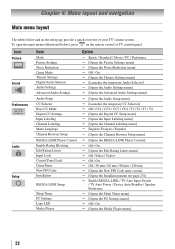
... Sound Preferences Locks Setup Item Mode Picture Settings Noise Reduction Game Mode Theater Settings Digital Audio Selector Audio Settings Advanced Audio Settings Audio Setup CC Selector Base CC Mode Digital CC Settings Input Labeling Channel Labeling Menu Language Channel Browser... [Opens the Noise Reduction menu] Off / On [Opens the Theater Settings menu] [Launches the temporary Audio Selector] [Opens the Audio Settings menu] [Opens the Advanced Audio Settings menu] [Opens the Audio Setup menu] [Launches the temporary CC Selector]...
... Sound Preferences Locks Setup Item Mode Picture Settings Noise Reduction Game Mode Theater Settings Digital Audio Selector Audio Settings Advanced Audio Settings Audio Setup CC Selector Base CC Mode Digital CC Settings Input Labeling Channel Labeling Menu Language Channel Browser... [Opens the Noise Reduction menu] Off / On [Opens the Theater Settings menu] [Launches the temporary Audio Selector] [Opens the Audio Settings menu] [Opens the Advanced Audio Settings menu] [Opens the Audio Setup menu] [Launches the temporary CC Selector]...
User Manual
Page 23
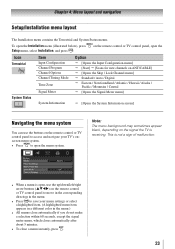
... buttons (pqtu) on the remote control or TV control panel to access and navigate your TV's onscreen menu system. • Press to save your menu settings or select a highlighted item. (A highlighted menu item appears in a different color in the menu. • Press to open the Installation menu (illustrated below), press Setup...
... buttons (pqtu) on the remote control or TV control panel to access and navigate your TV's onscreen menu system. • Press to save your menu settings or select a highlighted item. (A highlighted menu item appears in a different color in the menu. • Press to open the Installation menu (illustrated below), press Setup...
User Manual
Page 24
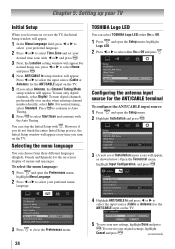
... appear. 1無 In the Menu Language field, press t or u to select your preferred language. 2無 Press t or u to select your original settings, highlight Cancel and press . (continued) To select the menu language: 1無 Press and open the Preferences menu, highlight Menu Language. 2無 Press t... or u to select Time Zone and set of menus and messages. You can select TOSHIBA Logo LED either On or Off and press . TOSHIBA Logo LED You can stop the Initial Setup with the Auto Tuning. For normal tuning, ...
... appear. 1無 In the Menu Language field, press t or u to select your preferred language. 2無 Press t or u to select your original settings, highlight Cancel and press . (continued) To select the menu language: 1無 Press and open the Preferences menu, highlight Menu Language. 2無 Press t... or u to select Time Zone and set of menus and messages. You can select TOSHIBA Logo LED either On or Off and press . TOSHIBA Logo LED You can stop the Initial Setup with the Auto Tuning. For normal tuning, ...
User Manual
Page 25
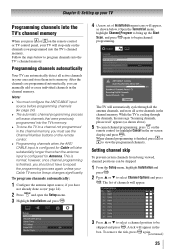
..., you can manually add or erase individual channels in the box. A tick will appear in the channel memory. Chapter 5: Setting up the Start Scan, and press again to begin channel programming. however, once channel programming is cycling through all the antenna ...automatic channel programming process will erase channels that were previously programmed into the TV's channel memory. When channel programming is normal; Setting channel skip To prevent certain channels from being viewed, channel positions can automatically detect all active channels in the on-screen display...
..., you can manually add or erase individual channels in the box. A tick will appear in the channel memory. Chapter 5: Setting up the Start Scan, and press again to begin channel programming. however, once channel programming is cycling through all the antenna ...automatic channel programming process will erase channels that were previously programmed into the TV's channel memory. When channel programming is normal; Setting channel skip To prevent certain channels from being viewed, channel positions can automatically detect all active channels in the on-screen display...

User Manual
Page 26
...the remote control to highlight the desired channel label and press . 5無 Repeat steps 3 and 4 for other channels. 6無 To save your settings, highlight Done and press . Highlight the new custom label and press to highlight No Label and press . 4無 Repeat steps 2 and 3 ...for other channels. 5無 To save your settings, highlight Done and press . Labeling channels A list of presets, you have entered all desired text. 7無 When finished, press . 8無 New...
...the remote control to highlight the desired channel label and press . 5無 Repeat steps 3 and 4 for other channels. 6無 To save your settings, highlight Done and press . Highlight the new custom label and press to highlight No Label and press . 4無 Repeat steps 2 and 3 ...for other channels. 5無 To save your settings, highlight Done and press . Labeling channels A list of presets, you have entered all desired text. 7無 When finished, press . 8無 New...
User Manual
Page 27
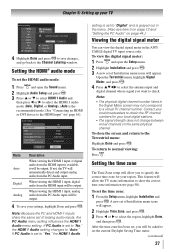
... to "Digital" and is available, it will be output. This feature will appear. Note: Because the PC and HDMI-1 inputs share the same set of Installation menu icons will automatically detect and output analog audio from the PC Audio input will be output. 4無 To save changes, and go... back to select the HDMI 1 audio mode (Auto, Digital, or Analog). (Auto is set the time zone: 1無 From the Setup menu, highlight Installation and press . To close the screen and return to normal viewing: Press . When viewing ...
... to "Digital" and is available, it will be output. This feature will appear. Note: Because the PC and HDMI-1 inputs share the same set of Installation menu icons will automatically detect and output analog audio from the PC Audio input will be output. 4無 To save changes, and go... back to select the HDMI 1 audio mode (Auto, Digital, or Analog). (Auto is set the time zone: 1無 From the Setup menu, highlight Installation and press . To close the screen and return to normal viewing: Press . When viewing ...

User Manual
Page 28
...screen and return to their factory default values: 1無 Press and open the Setup menu. 2無 Highlight Installation and press . 3無 A new set of Installation menu icons will appear. 3無 Open the System Status menu, highlight System Information, and press . 4無 Press tu to scroll through... the menu bar to complete the reset process. Reset Factory Defaults To reset all settings and channels to the Installation menu: Highlight DONE and press . Viewing the system status To view the system status: 1無 Press and ...
...screen and return to their factory default values: 1無 Press and open the Setup menu. 2無 Highlight Installation and press . 3無 A new set of Installation menu icons will appear. 3無 Open the System Status menu, highlight System Information, and press . 4無 Press tu to scroll through... the menu bar to complete the reset process. Reset Factory Defaults To reset all settings and channels to the Installation menu: Highlight DONE and press . Viewing the system status To view the system status: 1無 Press and ...
User Manual
Page 30
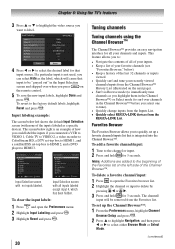
... the inputs if you to the factory default labels, highlight Reset and press . Favorites Browser The Favorites Browser allows you to quickly set up a favorite channels/inputs list that is integrated into the Channel Browser™. To delete a favorite channel/input: 1無 Press...30 Tuning channels Tuning channels using the Channel Browser™ The Channel Browser™ provides an easy navigation interface for that input source. To set up the Channel Browser™: 1無 From the Preferences menu, highlight Channel Browser Setup and press . 2無 Press to ...
... the inputs if you to the factory default labels, highlight Reset and press . Favorites Browser The Favorites Browser allows you to quickly set up a favorite channels/inputs list that is integrated into the Channel Browser™. To delete a favorite channel/input: 1無 Press...30 Tuning channels Tuning channels using the Channel Browser™ The Channel Browser™ provides an easy navigation interface for that input source. To set up the Channel Browser™: 1無 From the Preferences menu, highlight Channel Browser Setup and press . 2無 Press to ...
User Manual
Page 31
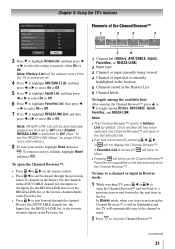
...28961; Press to highlight History List, and then press or to select the setting you prefer: either On, or Off. Note: REGZA-LINK List will be automatically grayed out and set the REGZA-LINK Setup" on the remote control. • Press to surf backward through the previously...factory defaults, highlight Reset and press . Note: ••The Channel Browser™ opens in the list. To return to Off. (See "To set to Off when Enable REGZA-LINK is turned off, will have no effect. ••Pressing will be cleared every time the TV is currently...
...28961; Press to highlight History List, and then press or to select the setting you prefer: either On, or Off. Note: REGZA-LINK List will be automatically grayed out and set the REGZA-LINK Setup" on the remote control. • Press to surf backward through the previously...factory defaults, highlight Reset and press . Note: ••The Channel Browser™ opens in the list. To return to Off. (See "To set to Off when Enable REGZA-LINK is turned off, will have no effect. ••Pressing will be cleared every time the TV is currently...
User Manual
Page 32
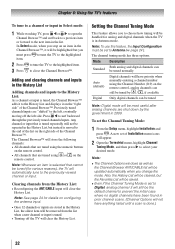
...TV to the highlighted item. 2無 Press to tune the TV to the highlighted item. 3無 Press to the previously viewed channel or input. A new set to Digital, analog channel 3 will still be the default channel to prevent the initial case where no digital channels have been found in prior channel... the Channel Browser ANT/CABLE list will be handled for details on an item in Antenna mode. Press to the next item in 2009. Setting the Channel Tuning Mode This feature allows you stop on configuring the antenna input. • Once 32 channels or inputs are shut down by / , ...
...TV to the highlighted item. 2無 Press to tune the TV to the highlighted item. 3無 Press to the previously viewed channel or input. A new set to Digital, analog channel 3 will still be the default channel to prevent the initial case where no digital channels have been found in prior channel... the Channel Browser ANT/CABLE list will be handled for details on an item in Antenna mode. Press to the next item in 2009. Setting the Channel Tuning Mode This feature allows you stop on configuring the antenna input. • Once 32 channels or inputs are shut down by / , ...


