
Owners Manual
Page 3
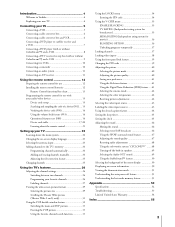
... Unlocking programs temporarily 37 Locking channels 37 Locking video inputs 38 Using the front panel lock feature 39 Changing the PIN code 39 Adjusting the picture 40 Selecting the picture mode 40 Adjusting the picture quality 40 Saving new preference 41 Using the flesh tone feature 41 Using the Digital Noise Reduction (DNR) feature .... 41 Selecting the cinema mode 42 Selecting the color temperature 42 Resetting picture adjustments 42 Selecting the video input source 43 Labeling the video input sources 43 Using the closed caption feature 44 Setting...
... Unlocking programs temporarily 37 Locking channels 37 Locking video inputs 38 Using the front panel lock feature 39 Changing the PIN code 39 Adjusting the picture 40 Selecting the picture mode 40 Adjusting the picture quality 40 Saving new preference 41 Using the flesh tone feature 41 Using the Digital Noise Reduction (DNR) feature .... 41 Selecting the cinema mode 42 Selecting the color temperature 42 Resetting picture adjustments 42 Selecting the video input source 43 Labeling the video input sources 43 Using the closed caption feature 44 Setting...

Owners Manual
Page 5
... color-coded in the same manner as the cables. • S-video cables provide better picture performance. S-video cables can only be used with S-video compatible components. • ColorStream™ cables come in the S-video jacks) instead of audio cables (one single audio cable for a mono VCR) • one video cable (one audio cable. Do not connect a regular video cable and an S-video cable to Video-1 at the rear panel of the TV, you will need: • one coaxial cable • one channel while watching another channel...
... color-coded in the same manner as the cables. • S-video cables provide better picture performance. S-video cables can only be used with S-video compatible components. • ColorStream™ cables come in the S-video jacks) instead of audio cables (one single audio cable for a mono VCR) • one video cable (one audio cable. Do not connect a regular video cable and an S-video cable to Video-1 at the rear panel of the TV, you will need: • one coaxial cable • one channel while watching another channel...

Owners Manual
Page 6
... need : • three coaxial cables • one pair of a regular video cable. Introduction Connecting your TV Using the Remote Control Setting up your TV Connecting a cable converter box This connection allows you use a converter box with your TV, the remote control will not operate some features, such as programming your favorite channels, labeling channels, and locking channels. To view premium channels, select ANT-2, tune the TV to channel 3 or 4 (whichever channel is vacant in your favorite channels, labeling channels, and locking channels...
... need : • three coaxial cables • one pair of a regular video cable. Introduction Connecting your TV Using the Remote Control Setting up your TV Connecting a cable converter box This connection allows you use a converter box with your TV, the remote control will not operate some features, such as programming your favorite channels, labeling channels, and locking channels. To view premium channels, select ANT-2, tune the TV to channel 3 or 4 (whichever channel is vacant in your favorite channels, labeling channels, and locking channels...

Owners Manual
Page 11
... your surround sound system. To control the audio, turn the TV off the built-in speakers (see "Turning off before connecting or disconnecting the Audio Center Channel audio cable. Introduction Connecting your TV Using the Remote Control Connecting an audio system This connection allows you to use an audio/video (A/V) receiver to enhance your TV's sound. This also allows you can add to the realism of the sound by using an external audio amplifier, the volume of...
... your surround sound system. To control the audio, turn the TV off the built-in speakers (see "Turning off before connecting or disconnecting the Audio Center Channel audio cable. Introduction Connecting your TV Using the Remote Control Connecting an audio system This connection allows you to use an audio/video (A/V) receiver to enhance your TV's sound. This also allows you can add to the realism of the sound by using an external audio amplifier, the volume of...
Owners Manual
Page 13
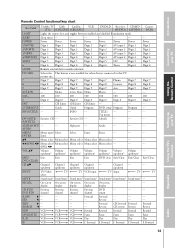
...SERVICES Digit 4 Digit 4 Digit 4 Digit 4 Digit 4 AV input 4 Digit 4 Digit 4 5/LIST Digit 5 Digit 5 Digit 5 Digit 5 Digit 5 CD Digit 5 Digit 5 6 Digit 6 Digit 6 Digit 6 Digit 6 Digit 6 Tuner Digit 6 Digit 6 MODE Remote control device mode selection PIC SIZE Selects the This button is not available for other devices connected to this TV. AUDIO MENU/ Menu open/ Select Select Enter Enter --- --- --- Introduction Connecting your TV Using the Remote Control Setting up /down * EXIT/ Exit Exit Exit Exit DVD clear Exit/Clear Exit/Clear Exit/Clear DVD CLEAR CH yz Channel...
...SERVICES Digit 4 Digit 4 Digit 4 Digit 4 Digit 4 AV input 4 Digit 4 Digit 4 5/LIST Digit 5 Digit 5 Digit 5 Digit 5 Digit 5 CD Digit 5 Digit 5 6 Digit 6 Digit 6 Digit 6 Digit 6 Digit 6 Tuner Digit 6 Digit 6 MODE Remote control device mode selection PIC SIZE Selects the This button is not available for other devices connected to this TV. AUDIO MENU/ Menu open/ Select Select Enter Enter --- --- --- Introduction Connecting your TV Using the Remote Control Setting up /down * EXIT/ Exit Exit Exit Exit DVD clear Exit/Clear Exit/Clear Exit/Clear DVD CLEAR CH yz Channel...

Owners Manual
Page 15
... sampled). 4. If the device does not respond to that are capable of two remote codes.These VCRs have entered the correct code. Introduction Connecting your TV Using the Remote Control Setting up your TV Programming the remote control for use with your VCR brand, set up . 3. Note: • Every time you replace the batteries, you have a switch labeled "VCR1/VCR2." The mode indicator will blink twice and the remote control will blink three times.
... sampled). 4. If the device does not respond to that are capable of two remote codes.These VCRs have entered the correct code. Introduction Connecting your TV Using the Remote Control Setting up your TV Programming the remote control for use with your VCR brand, set up . 3. Note: • Every time you replace the batteries, you have a switch labeled "VCR1/VCR2." The mode indicator will blink twice and the remote control will blink three times.

Owners Manual
Page 21
... access to on-screen programming menus (page 22) ENTER sets programming menu information (page 22) yz x • select or adjust programming menus (page 22) (FAV) x • cycles through favorite channels (page 26) CH yz cycles through the six device modes: TV, CABLE/SAT, VCR, DVD, AUDIO1, and AUDIO2. POWER turns the TV on and off SLEEP allows access to the automatic TV shut-off . Introduction Connecting your TV Using the Remote Control Setting...
... access to on-screen programming menus (page 22) ENTER sets programming menu information (page 22) yz x • select or adjust programming menus (page 22) (FAV) x • cycles through favorite channels (page 26) CH yz cycles through the six device modes: TV, CABLE/SAT, VCR, DVD, AUDIO1, and AUDIO2. POWER turns the TV on and off SLEEP allows access to the automatic TV shut-off . Introduction Connecting your TV Using the Remote Control Setting...
Owners Manual
Page 22
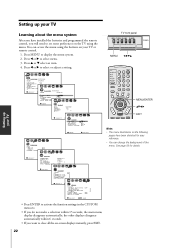
... within 15 seconds, the main menu display disappears automatically; TV front panel MENU TV/VIDEO VOLUME CHANNEL POWER MENU x •zy Connecting your TV Using the Remote Control Setting up your TV or remote control. 1. Introduction Setting up your TV Using the TV's Features P I CTURE ANTENNA MODE SPORTS CONTRAST 100 BR I GHTNESS 50 COLOR 50 T I NT 0 SHARPNESS 50 RESET SAVE NEW PREFERENCE ON / OFF P I CTURE : SELECT EXITMO: EDNED ANTENNA SPORTS FLESH TONE ON / OFF...
... within 15 seconds, the main menu display disappears automatically; TV front panel MENU TV/VIDEO VOLUME CHANNEL POWER MENU x •zy Connecting your TV Using the Remote Control Setting up your TV or remote control. 1. Introduction Setting up your TV Using the TV's Features P I CTURE ANTENNA MODE SPORTS CONTRAST 100 BR I GHTNESS 50 COLOR 50 T I NT 0 SHARPNESS 50 RESET SAVE NEW PREFERENCE ON / OFF P I CTURE : SELECT EXITMO: EDNED ANTENNA SPORTS FLESH TONE ON / OFF...
Owners Manual
Page 24
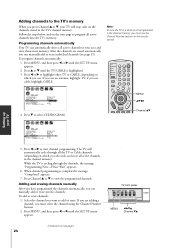
... the next page to program all active channels in its memory. To add or erase channels: 1. Select the channel you can manually add or erase specific channels. MENU yzx • Channel yz TV front panel MENU TV/VIDEO VOLUME CHANNEL POWER MENU x •zy Channel zy Using the TV's Features Appendix Index (continued on next page) 24 After the channels are adding a channel, you must use the Channel Number buttons on the remote control. Press x or •...
... the next page to program all active channels in its memory. To add or erase channels: 1. Select the channel you can manually add or erase specific channels. MENU yzx • Channel yz TV front panel MENU TV/VIDEO VOLUME CHANNEL POWER MENU x •zy Channel zy Using the TV's Features Appendix Index (continued on next page) 24 After the channels are adding a channel, you must use the Channel Number buttons on the remote control. Press x or •...

Owners Manual
Page 26
... FAVORITE CH2 modes using the Favorite Channel Programming feature. Channel Number INPUT CH RTN MENU/ENTER yzx • (FAV) x • Notes: • The (FAV) x • buttons operate as menu x • buttons when a menu display is on the screen. • The favorite channel feature is not available in a 9-picture multi-window: Press FAVORITE (see page 33). Because this feature scans through your favorite channels in ANT2 mode. Select the first channel or video mode you...
... FAVORITE CH2 modes using the Favorite Channel Programming feature. Channel Number INPUT CH RTN MENU/ENTER yzx • (FAV) x • Notes: • The (FAV) x • buttons operate as menu x • buttons when a menu display is on the screen. • The favorite channel feature is not available in a 9-picture multi-window: Press FAVORITE (see page 33). Because this feature scans through your favorite channels in ANT2 mode. Select the first channel or video mode you...

Owners Manual
Page 34
... mode. • Factory Reset status: Set your 4-digit code by pressing the Number buttons (0-9), and then press ENTER. • When the PIN code is already stored: Press the Number buttons (0-9) to set each item following the steps on the next page. Enter the code again, and then press ENTER. Number MENU/ENTER yzx • RECALL Setting up your TV Using the Remote Control Using the LOCKS menu The LOCKS menu includes the V-Chip, CH Lock, Video Lock...
... mode. • Factory Reset status: Set your 4-digit code by pressing the Number buttons (0-9), and then press ENTER. • When the PIN code is already stored: Press the Number buttons (0-9) to set each item following the steps on the next page. Enter the code again, and then press ENTER. Number MENU/ENTER yzx • RECALL Setting up your TV Using the Remote Control Using the LOCKS menu The LOCKS menu includes the V-Chip, CH Lock, Video Lock...

Owners Manual
Page 42
... 18 Picture Quality blueish neutral reddish Resetting picture adjustments The RESET function adjusts the picture qualities to the following factory settings: Contrast max (100) Sharpness center (50) Brightness center (50) Color temperature cool Color center (50) DNR auto Tint center (0) Mode sports To reset the picture adjustments: 1. Press y or z to highlight CINEMA MODE. 3. Selecting the color temperature You can change the quality of the picture by selecting from a DVD player connected to the ColorStream (component video) inputs on...
... 18 Picture Quality blueish neutral reddish Resetting picture adjustments The RESET function adjusts the picture qualities to the following factory settings: Contrast max (100) Sharpness center (50) Brightness center (50) Color temperature cool Color center (50) DNR auto Tint center (0) Mode sports To reset the picture adjustments: 1. Press y or z to highlight CINEMA MODE. 3. Selecting the color temperature You can change the quality of the picture by selecting from a DVD player connected to the ColorStream (component video) inputs on...

Owners Manual
Page 45
...5 6 6 7 SET UP 7 8 8 9 LANGUAGE ENGL I SH 9 10 CLOCK SET 09: 25 10 11 ANT 1 / 2 ANT1 11 12 TV / CABLE CABLE 12 13 CH PROGRAM 13 14 ADD /...number position starts to blink, press the Number buttons (0-9) to 0. Note : If the TV's power source is interrupted (the power cord is set the sleep timer to highlight CLOCK SET. 3. Introduction Connecting your TV Using the TV's Features Appendix Setting the clock To set the length of time until it is unplugged or a power failure occurs), the clock must be set using the on-screen menu: 1. Press y or z to turn...
...5 6 6 7 SET UP 7 8 8 9 LANGUAGE ENGL I SH 9 10 CLOCK SET 09: 25 10 11 ANT 1 / 2 ANT1 11 12 TV / CABLE CABLE 12 13 CH PROGRAM 13 14 ADD /...number position starts to blink, press the Number buttons (0-9) to 0. Note : If the TV's power source is interrupted (the power cord is set the sleep timer to highlight CLOCK SET. 3. Introduction Connecting your TV Using the TV's Features Appendix Setting the clock To set the length of time until it is unplugged or a power failure occurs), the clock must be set using the on-screen menu: 1. Press y or z to turn...

Owners Manual
Page 46
... the AUDIO menu appears. 2. MENU yzx • MUTE RECALL TV front panel MENU TV/VIDEO VOLUME CHANNEL POWER MENU x •zy Note : A second audio program (SAP) can also transmit a second audio program (SAP) containing a second language, music, or other audio information (when provided by individual stations). While the sound is noisy, select MONO to SAP (if available): 1. Every time you press the button, the mute mode will change in STEREO mode because it . Press MENU, and...
... the AUDIO menu appears. 2. MENU yzx • MUTE RECALL TV front panel MENU TV/VIDEO VOLUME CHANNEL POWER MENU x •zy Note : A second audio program (SAP) can also transmit a second audio program (SAP) containing a second language, music, or other audio information (when provided by individual stations). While the sound is noisy, select MONO to SAP (if available): 1. Every time you press the button, the mute mode will change in STEREO mode because it . Press MENU, and...

Owners Manual
Page 47
... under license from the TV's speakers. Select STEREO mode (see "Selecting stereo/SAP broadcasts" on or off the surround sound effect. • FOCUS - The feature uses stereo signals from among HIGH, LOW or OFF. Press MENU, and then press x or • until the AUDIO menu appears. 2. To adjust the WOW feature: 1. To turn on . Adjusting the sound quality You can change the quality of SRS Labs...
... under license from the TV's speakers. Select STEREO mode (see "Selecting stereo/SAP broadcasts" on or off the surround sound effect. • FOCUS - The feature uses stereo signals from among HIGH, LOW or OFF. Press MENU, and then press x or • until the AUDIO menu appears. 2. To adjust the WOW feature: 1. To turn on . Adjusting the sound quality You can change the quality of SRS Labs...

Owners Manual
Page 49
... 33 34 35 • MAIN : Outputs the sound of the main program. • POP : Outputs the sound of the main picture through the built-in speakers. Note: Make sure the volume control of your audio amplifier is useful when amplifying or recording the POP sound with external equipment while hearing the sound of the POP program. To turn off when you to select MAIN or POP. 1 2 3 4 5 6 7 8 9 10...
... 33 34 35 • MAIN : Outputs the sound of the main program. • POP : Outputs the sound of the main picture through the built-in speakers. Note: Make sure the volume control of your audio amplifier is useful when amplifying or recording the POP sound with external equipment while hearing the sound of the POP program. To turn off when you to select MAIN or POP. 1 2 3 4 5 6 7 8 9 10...

Owners Manual
Page 50
... TV Using the Remote Control Connecting your TV Introduction Using the StableSoundTM feature When the signal source is changed, the stable sound feature limits the high volume level to prevent extreme changes in volume (for example, to prevent the sudden increase in TV mode) • Channel number or VIDEO mode selected • Time (if set) • Channel label (if set) • Stereo or SAP audio status • V-CHIP rating status • Picture size STEREO SAP TV...
... TV Using the Remote Control Connecting your TV Introduction Using the StableSoundTM feature When the signal source is changed, the stable sound feature limits the high volume level to prevent extreme changes in volume (for example, to prevent the sudden increase in TV mode) • Channel number or VIDEO mode selected • Time (if set) • Channel label (if set) • Stereo or SAP audio status • V-CHIP rating status • Picture size STEREO SAP TV...

Owners Manual
Page 53
... and/or COLOR in the TV. • The remote control batteries may be poor. Turn closed caption feature may have broadcast difficulties. The remote control does not operate • Check whether the appropriate device mode is set properly. Index Cannot access signal input sources • Check the VIDEO LOCK feature. (Video1, Video2, Video3, ColorStream HD1/HD2) and/or Channels 3 and 4. 53 Try another channel. • Adjust the PICTURE menu. Multiple images •...
... and/or COLOR in the TV. • The remote control batteries may be poor. Turn closed caption feature may have broadcast difficulties. The remote control does not operate • Check whether the appropriate device mode is set properly. Index Cannot access signal input sources • Check the VIDEO LOCK feature. (Video1, Video2, Video3, ColorStream HD1/HD2) and/or Channels 3 and 4. 53 Try another channel. • Adjust the PICTURE menu. Multiple images •...
Owners Manual
Page 54
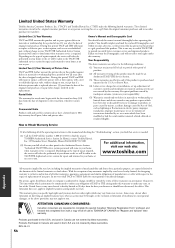
... to you. and used in the replacement. During this warranty or under state law. Rental Units The warranty for a period of two (2) years after the date of original retail purchase. This is needed: (1) Call the TACP toll-free number 1-800-631-3811 to find the nearest TOSHIBA Authorized Service Station. or Puerto Rico. (4) Labor service charges for set installation, set will be taken...
... to you. and used in the replacement. During this warranty or under state law. Rental Units The warranty for a period of two (2) years after the date of original retail purchase. This is needed: (1) Call the TACP toll-free number 1-800-631-3811 to find the nearest TOSHIBA Authorized Service Station. or Puerto Rico. (4) Labor service charges for set installation, set will be taken...

Owners Manual
Page 55
... the buttons 21 Operational feature reset 16 Programming 15 Searching and sampling the code 15 Verifying the device code 16 Volume Lock feature 16 RESET 42, 48 S SAP sound 46 Satellite receiver connection 7 Scrolling the Theater Wide picture 31 Set-top box 9 Sleep timer 45 Sound quality adjustments 47 SPEAKERS on/off 49 Specifications 52 SRS 3D surround 47 StableSound 50 TM ...Stereo sound 46 S-video cables 5 T Theater wide picture 29, 30 Tilt correction adjustment 25 Troubleshooting...
... the buttons 21 Operational feature reset 16 Programming 15 Searching and sampling the code 15 Verifying the device code 16 Volume Lock feature 16 RESET 42, 48 S SAP sound 46 Satellite receiver connection 7 Scrolling the Theater Wide picture 31 Set-top box 9 Sleep timer 45 Sound quality adjustments 47 SPEAKERS on/off 49 Specifications 52 SRS 3D surround 47 StableSound 50 TM ...Stereo sound 46 S-video cables 5 T Theater wide picture 29, 30 Tilt correction adjustment 25 Troubleshooting...


