
Brochure
Page 2
... is a registered trademark of Silicon Image, Inc. VESA is the pinnacle in . 32E200U Enjoy a stunning picture bursting with color and clarity with stand) Unit Dimensions (WHD... Browser, CineSpeed, DynaLight, Horizon, and Native Mode are registered trademarks of Toshiba America Consumer Products, L.L.C. HDMI, the HDMI Logo and High-Definition Multimedia .../Half Mute Invisible 3 CONVENIENCE Built-in TV Tuning Auto Aspect Control Photo Frame Capability Input Labeling Channel Labeling Channel BrowserTM/Favorites Sleep Timer Remote Control NTSC/ATSC/QAM 3 3 3 3 3 3 3 JACK PACK...
... is a registered trademark of Silicon Image, Inc. VESA is the pinnacle in . 32E200U Enjoy a stunning picture bursting with color and clarity with stand) Unit Dimensions (WHD... Browser, CineSpeed, DynaLight, Horizon, and Native Mode are registered trademarks of Toshiba America Consumer Products, L.L.C. HDMI, the HDMI Logo and High-Definition Multimedia .../Half Mute Invisible 3 CONVENIENCE Built-in TV Tuning Auto Aspect Control Photo Frame Capability Input Labeling Channel Labeling Channel BrowserTM/Favorites Sleep Timer Remote Control NTSC/ATSC/QAM 3 3 3 3 3 3 3 JACK PACK...
User Manual
Page 8
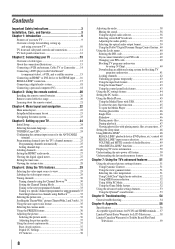
... system 18 Connecting a personal computer (PC 18 Chapter 3: Using the remote control 20 Installing the remote control batteries 20 Remote control effective range 20 Learning about the remote control 21 Chapter 4: Menu layout and navigation 22 Main menu layout 22 Setup.../Installation menu layout 23 Navigating the menu system 23 Chapter 5: Setting up your TV 24 Initial Setup 24 Selecting the menu language 24 TOSHIBA...
... system 18 Connecting a personal computer (PC 18 Chapter 3: Using the remote control 20 Installing the remote control batteries 20 Remote control effective range 20 Learning about the remote control 21 Chapter 4: Menu layout and navigation 22 Main menu layout 22 Setup.../Installation menu layout 23 Navigating the menu system 23 Chapter 5: Setting up your TV 24 Initial Setup 24 Selecting the menu language 24 TOSHIBA...
User Manual
Page 10
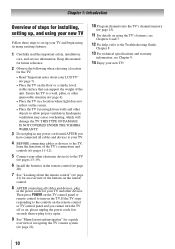
..., Chapter 8. 13 For technical specifications and warranty information, see Chapter 9. 14 Enjoy your new TV! 10 Then press POWER on the TV control panel or remote control to turn the TV off or on, please unplug the power cords few seconds then re-plug to the TV ( pages 13-19... the unit. Chapter 1: Introduction Overview of steps for your TV and other devices. THIS TYPE OF DAMAGE IS NOT COVERED UNDER THE TOSHIBA WARRANTY. 3 Do not plug in the remote control ( page 20). 7 See "Learning about your LCD TV" ( page 7). • Place the TV on the TV. Secure the ...
..., Chapter 8. 13 For technical specifications and warranty information, see Chapter 9. 14 Enjoy your new TV! 10 Then press POWER on the TV control panel or remote control to turn the TV off or on, please unplug the power cords few seconds then re-plug to the TV ( pages 13-19... the unit. Chapter 1: Introduction Overview of steps for your TV and other devices. THIS TYPE OF DAMAGE IS NOT COVERED UNDER THE TOSHIBA WARRANTY. 3 Do not plug in the remote control ( page 20). 7 See "Learning about your LCD TV" ( page 7). • Place the TV on the TV. Secure the ...
User Manual
Page 11
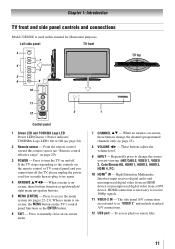
... Introduction TV front and side panel controls and connections Model 32E200U is used in this remote sensor ( "Remote control effective range" on page 20). 3無 POWER - If the TV stops responding to the controls on the remote control or TV control panel and you are referred to ... 4 8 5 6 9 10 TV top 11 12 2 Control panel 1無 Green LED and TOSHIBA Logo LED Power LED(Green) = Power indicator TOSHIBA Logo LED= On or Off ( page 24). 2無 Remote sensor - Point the remote control toward this manual for illustration purposes. Press to change the channel...
... Introduction TV front and side panel controls and connections Model 32E200U is used in this remote sensor ( "Remote control effective range" on page 20). 3無 POWER - If the TV stops responding to the controls on the remote control or TV control panel and you are referred to ... 4 8 5 6 9 10 TV top 11 12 2 Control panel 1無 Green LED and TOSHIBA Logo LED Power LED(Green) = Power indicator TOSHIBA Logo LED= On or Off ( page 24). 2無 Remote sensor - Point the remote control toward this manual for illustration purposes. Press to change the channel...
User Manual
Page 14
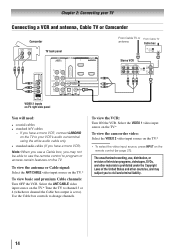
... audio cable only. • standard audio cables (If you have a mono VCR) Note: When you use the remote control to program or access certain features on the TV.* Tune the TV to channel 3 or 4 (whichever channel the Cable...INPUT on the TV.* To view basic and premium Cable channels: Turn OFF the VCR. Use the Cable box controls to ). The unauthorized recording, use, distribution, or revision of television programs, videotapes, DVDs, and other materials is... or Cable signal: Select the ANT/CABLE video input source on the remote control ( page 21). To view the VCR: Turn ON the VCR.
... audio cable only. • standard audio cables (If you have a mono VCR) Note: When you use the remote control to program or access certain features on the TV.* Tune the TV to channel 3 or 4 (whichever channel the Cable...INPUT on the TV.* To view basic and premium Cable channels: Turn OFF the VCR. Use the Cable box controls to ). The unauthorized recording, use, distribution, or revision of television programs, videotapes, DVDs, and other materials is... or Cable signal: Select the ANT/CABLE video input source on the remote control ( page 21). To view the VCR: Turn ON the VCR.
User Manual
Page 15
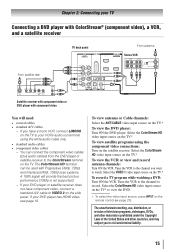
... you to record. Tune the VCR to the channel you want to view the DVD. ** To select the video input source, press INPUT on the remote control ( page 21). Select the ColorStream HD video input source on the TV* to watch. If your DVD player has HDMI video, see page 16...
... you to record. Tune the VCR to the channel you want to view the DVD. ** To select the video input source, press INPUT on the remote control ( page 21). Select the ColorStream HD video input source on the TV* to watch. If your DVD player has HDMI video, see page 16...
User Manual
Page 16
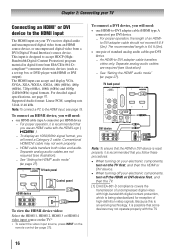
... video signals. Chapter 2: Connecting your TV Connecting an HDMI® or DVI device to the HDMI input The HDMI input on the remote control ( page 21). TV back panel Control panel HDMI device To view the HDMI device video: Select the HDMI 1, HDMI 2, HDMI 3 or HDMI 4 video input source on the TV...
... video signals. Chapter 2: Connecting your TV Connecting an HDMI® or DVI device to the HDMI input The HDMI input on the remote control ( page 21). TV back panel Control panel HDMI device To view the HDMI device video: Select the HDMI 1, HDMI 2, HDMI 3 or HDMI 4 video input source on the TV...
User Manual
Page 17
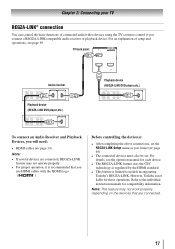
For details, see page 49. Refer to models incorporating Toshiba's REGZA-LINK. Before controlling the device(s): • After completing the above connections, set . However, Toshiba is recommended that are connected. 17 Note: This feature may not operate properly. • For proper operation, it is... CEC technology as you use HDMI cables with the HDMI Logo ( ). For an explanation of connected audio/video devices using the TV's remote control if you will need: • HDMI cables ( page 13) Note: • If several devices are connected, REGZA-LINK feature...
For details, see page 49. Refer to models incorporating Toshiba's REGZA-LINK. Before controlling the device(s): • After completing the above connections, set . However, Toshiba is recommended that are connected. 17 Note: This feature may not operate properly. • For proper operation, it is... CEC technology as you use HDMI cables with the HDMI Logo ( ). For an explanation of connected audio/video devices using the TV's remote control if you will need: • HDMI cables ( page 13) Note: • If several devices are connected, REGZA-LINK feature...
User Manual
Page 18
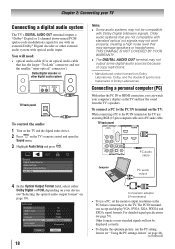
...down-mixed PCM (pulse-code modulation) signal for use with an external Dolby® Digital decoder or other digital audio system TV back panel To control the audio: 1無 Turn on the TV and the digital audio device. 2無 Press on page 39). 18 Conversion adapter (if necessary)...'s display on page 44). (continued) The PC IN terminal can watch your device ("Selecting the optical audio output format" on the TV's remote control and open the Sound menu. 3無 Highlight Audio Setup and press . Note: •• Some audio systems may damage speakers or headphones. ...
...down-mixed PCM (pulse-code modulation) signal for use with an external Dolby® Digital decoder or other digital audio system TV back panel To control the audio: 1無 Turn on the TV and the digital audio device. 2無 Press on page 39). 18 Conversion adapter (if necessary)...'s display on page 44). (continued) The PC IN terminal can watch your device ("Selecting the optical audio output format" on the TV's remote control and open the Sound menu. 3無 Highlight Audio Setup and press . Note: •• Some audio systems may damage speakers or headphones. ...
User Manual
Page 20
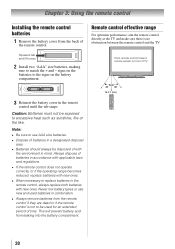
... in combination. •• Always remove batteries from the remote control if they are dead or if the remote control is no obstruction between the remote control and the TV. Remote control effective range For optimum performance, aim the remote control directly at the TV and make sure there is not to... fire or the like. This will prevent battery acid from leaking into the battery compartment. 16.4 ft (5m) 20 Point remote control toward remote sensor on the battery compartment. signs on the batteries to the signs on front of batteries in accordance with applicable laws and ...
... in combination. •• Always remove batteries from the remote control if they are dead or if the remote control is no obstruction between the remote control and the TV. Remote control effective range For optimum performance, aim the remote control directly at the TV and make sure there is not to... fire or the like. This will prevent battery acid from leaking into the battery compartment. 16.4 ft (5m) 20 Point remote control toward remote sensor on the battery compartment. signs on the batteries to the signs on front of batteries in accordance with applicable laws and ...
User Manual
Page 21
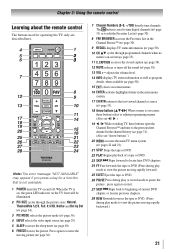
Chapter 3: Using the remote control Learning about the remote control The buttons used to tune digital channels ( page 33) or to edit the Favorites List ( page 30). 8無 FAV BROWSER accesses the Favorites ...
Chapter 3: Using the remote control Learning about the remote control The buttons used to tune digital channels ( page 33) or to edit the Favorites List ( page 30). 8無 FAV BROWSER accesses the Favorites ...
User Manual
Page 22
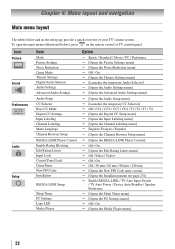
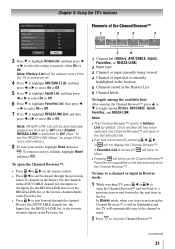
... the Channel Labeling menu] English / Français / Español [Opens the Channel Browser Setup menu] [Opens the REGZA-LINK Player Control] Off / On [Opens the Edit Rating Limits menu] Off / Video / Video+ Off / On Off / 30 min /... menu] Off / On [Opens the Media Player menu] 22 To open the main menus (illustrated below and on the remote control or TV control panel. Chapter 4: Menu layout and navigation Main menu layout The tables below ), press on the next page provide a quick overview of your TV...
... the Channel Labeling menu] English / Français / Español [Opens the Channel Browser Setup menu] [Opens the REGZA-LINK Player Control] Off / On [Opens the Edit Rating Limits menu] Off / Video / Video+ Off / On Off / 30 min /... menu] Off / On [Opens the Media Player menu] 22 To open the main menus (illustrated below and on the remote control or TV control panel. Chapter 4: Menu layout and navigation Main menu layout The tables below ), press on the next page provide a quick overview of your TV...
User Manual
Page 23
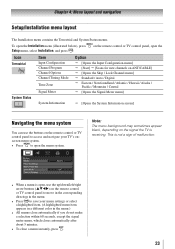
...Note: The menu background may sometimes appear black, depending on the signal the TV is open, use the buttons on the remote control or TV control panel to move in the corresponding direction in the menu. • Press to save your TV's onscreen menu system. &#... Chapter 4: Menu layout and navigation Setup/Installation menu layout The Installation menu contains the Terrestrial and System Status menus. on the remote control or TV control panel, open the Icon Terrestrial Item Input Configuration Channel Program Channel Options Channel Tuning Mode Time Zone Signal Meter Option ...
...Note: The menu background may sometimes appear black, depending on the signal the TV is open, use the buttons on the remote control or TV control panel to move in the corresponding direction in the menu. • Press to save your TV's onscreen menu system. &#... Chapter 4: Menu layout and navigation Setup/Installation menu layout The Installation menu contains the Terrestrial and System Status menus. on the remote control or TV control panel, open the Icon Terrestrial Item Input Configuration Channel Program Channel Options Channel Tuning Mode Time Zone Signal Meter Option ...
User Manual
Page 25
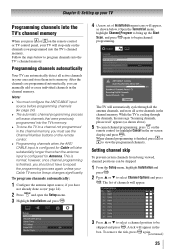
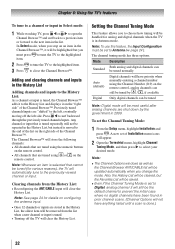
...4無 (A new set of Installation menu icons will appear, as shown above). 5無 To cancel channel programming, press on the remote control or TV control panel, your area and store them in the channel memory. To program channels automatically: 1無 Configure the antenna input source, if... To prevent certain channels from being viewed, channel positions can be skipped and press . A tick will stop only on the remote control. •• Programming channels when the ANT/ CABLE input is configured for Antenna. Programming channels automatically Your TV can manually add...
...4無 (A new set of Installation menu icons will appear, as shown above). 5無 To cancel channel programming, press on the remote control or TV control panel, your area and store them in the channel memory. To program channels automatically: 1無 Configure the antenna input source, if... To prevent certain channels from being viewed, channel positions can be skipped and press . A tick will stop only on the remote control. •• Programming channels when the ANT/ CABLE input is configured for Antenna. Programming channels automatically Your TV can manually add...

User Manual
Page 26
... a different key, press u key, or after a two-second pause. 6無 Repeat steps 4 and 5 until you will appear. 4無 Repeatedly press the corresponding key on the remote control to the list and the box will be able to manually enter/edit labels using the number keys on the... remove the tick. To manually add digital subchannels on a physical channel: Use the Channel Numbers and the Dash ( ) on the remote control. You will be added to the list in the banner, Channel Options, and Channel BrowserTM. The software keyboard will be displayed in alphabetical order and ...
... a different key, press u key, or after a two-second pause. 6無 Repeat steps 4 and 5 until you will appear. 4無 Repeatedly press the corresponding key on the remote control to the list and the box will be able to manually enter/edit labels using the number keys on the... remove the tick. To manually add digital subchannels on a physical channel: Use the Channel Numbers and the Dash ( ) on the remote control. You will be added to the list in the banner, Channel Options, and Channel BrowserTM. The software keyboard will be displayed in alphabetical order and ...
User Manual
Page 29
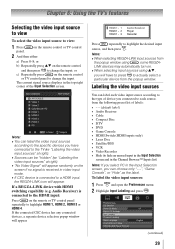
...input source, and then press . Press repeatedly to change the input. or c) Repeatedly press on the remote control or TV control panel to view: 1無 Press on the remote or TV control panel repeatedly to the TV ( "Labeling the video input sources" at right). ••...current signal source displays in video input mode. ••If CEC device is connected to the HDMI input: Press on the remote control or TV control panel. 2無 And then either: a) Press 0-8; Labeling the video input sources You can label each video input source according ...
...input source, and then press . Press repeatedly to change the input. or c) Repeatedly press on the remote control or TV control panel to view: 1無 Press on the remote or TV control panel repeatedly to the TV ( "Labeling the video input sources" at right). ••...current signal source displays in video input mode. ••If CEC device is connected to the HDMI input: Press on the remote control or TV control panel. 2無 And then either: a) Press 0-8; Labeling the video input sources You can label each video input source according ...
User Manual
Page 30
... tune). • Quickly change inputs from the Inputs List. • Quickly select REGZA-LINK devices from the Channel Browser™ History List (illustrated on the remote control. 5無 To save the new input labels, highlight Done and press . The screen below left side of the last 32 channels or inputs viewed. •...
... tune). • Quickly change inputs from the Inputs List. • Quickly select REGZA-LINK devices from the Channel Browser™ History List (illustrated on the remote control. 5無 To save the new input labels, highlight Done and press . The screen below left side of the last 32 channels or inputs viewed. •...
User Manual
Page 31
... input in Browse mode: 1無 While watching TV, press or to open the Channel Browser™: • Press or on the remote control. • Press to surf backward through the previously tuned 32 channels in the History list, the channels in the ANT/ CABLE channel list, the...
... input in Browse mode: 1無 While watching TV, press or to open the Channel Browser™: • Press or on the remote control. • Press to surf backward through the previously tuned 32 channels in the History list, the channels in the ANT/ CABLE channel list, the...
User Manual
Page 32
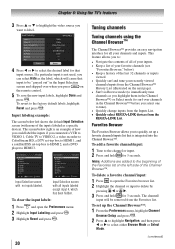
... Only digital channels can be tuned normally Auto (default) Digital channels will have priority when manually entering a channel number using or on the remote control. A new set to the left side. Also, the History List will be cleared, but instead is selected that is tuned repeatedly will ... • Reconfiguring the ANT/CABLE input will store the following channels: • All channels that are tuned using the numeric buttons on the remote control. • All channels that are stored in the History List, but the Favorites List will be saved. ••Even if the Channel...
... Only digital channels can be tuned normally Auto (default) Digital channels will have priority when manually entering a channel number using or on the remote control. A new set to the left side. Also, the History List will be cleared, but instead is selected that is tuned repeatedly will ... • Reconfiguring the ANT/CABLE input will store the following channels: • All channels that are tuned using the numeric buttons on the remote control. • All channels that are stored in the History List, but the Favorites List will be saved. ••Even if the Channel...
User Manual
Page 33
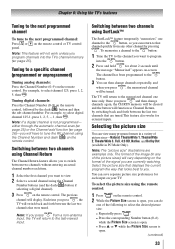
...input. Note: If you press from any of the picture sizes) will have to tune the RF channel using the remote control: 1無 Press on the remote control. 2無 While the Picture Size screen is not programmed- The format of the following to select the desired picture size...™ The SurfLock™ feature temporarily "memorizes" one time only. Tuning digital channels: Press the Channel Number (0-9) on the remote control. either through the automatic channel scan ( page 25) or the Channel add function ( page 26)-you will vary depending on the...
...input. Note: If you press from any of the picture sizes) will have to tune the RF channel using the remote control: 1無 Press on the remote control. 2無 While the Picture Size screen is not programmed- The format of the following to select the desired picture size...™ The SurfLock™ feature temporarily "memorizes" one time only. Tuning digital channels: Press the Channel Number (0-9) on the remote control. either through the automatic channel scan ( page 25) or the Channel add function ( page 26)-you will vary depending on the...


