Owners Manual
Page 1
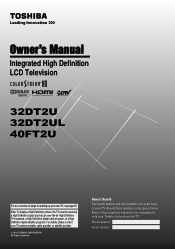
...cable provider, or satellite provider. © 2011 TOSHIBA CORPORATION All Rights Reserved Owner's Record The model number and serial number are on the back of steps for setting up yournewTV, see page10. Refer to these numbers in the spaces below. Owner's Manual Integrated High Definition LCD Television HIGH-DEFINITION TELEVISION 32DT2U... 32DT2UL 40FT2U Foran overview of your Toshiba dealer about this TV. Record these numbers whenever you communicate with your TV. Model...
...cable provider, or satellite provider. © 2011 TOSHIBA CORPORATION All Rights Reserved Owner's Record The model number and serial number are on the back of steps for setting up yournewTV, see page10. Refer to these numbers in the spaces below. Owner's Manual Integrated High Definition LCD Television HIGH-DEFINITION TELEVISION 32DT2U... 32DT2UL 40FT2U Foran overview of your Toshiba dealer about this TV. Record these numbers whenever you communicate with your TV. Model...
Owners Manual
Page 2
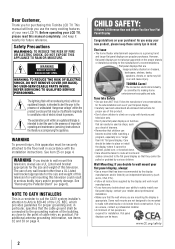
... children. NO USER-SERVICEABLE PARTS INSIDE. WARNING To prevent injury, this television. See "Removing the Pedestal Stand" ( page 6). TOSHIBA Cares! • The consumer electronics industry is intended to alert the user to the presence of uninsulated "dangerous voltage" within the product...allow children to climb on or play with arrowhead symbol, within an equilateral triangle is intended to alert the user to constitute a risk of cable entry as a chest of two people are unsure, contact a professional installer. • A minimum of drawers. • Remember that ...
... children. NO USER-SERVICEABLE PARTS INSIDE. WARNING To prevent injury, this television. See "Removing the Pedestal Stand" ( page 6). TOSHIBA Cares! • The consumer electronics industry is intended to alert the user to the presence of uninsulated "dangerous voltage" within the product...allow children to climb on or play with arrowhead symbol, within an equilateral triangle is intended to alert the user to constitute a risk of cable entry as a chest of two people are unsure, contact a professional installer. • A minimum of drawers. • Remember that ...
Owners Manual
Page 4
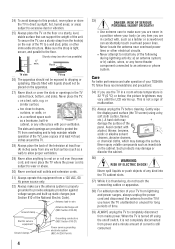
... While it is not completely disconnected from power and a minute amount of current is thundering, do not touch the connecting cables or apparatus. 38) For added protection of your TOSHIBA TV, follow these recommendations and precautions: 34) If you leave the TV unattended or unused for long periods of the...areas subject to drapes, curtains, or walls; Hook TV side TV top 26) The apparatus should not be exposed to dripping or splashing. or b) cables, wires, or any of time. 39) ALWAYS unplug the TV to wear or abuse. 30) Never overload wall outlets and extension cords. 31) Always...
... While it is not completely disconnected from power and a minute amount of current is thundering, do not touch the connecting cables or apparatus. 38) For added protection of your TOSHIBA TV, follow these recommendations and precautions: 34) If you leave the TV unattended or unused for long periods of the...areas subject to drapes, curtains, or walls; Hook TV side TV top 26) The apparatus should not be exposed to dripping or splashing. or b) cables, wires, or any of time. 39) ALWAYS unplug the TV to wear or abuse. 30) Never overload wall outlets and extension cords. 31) Always...
Owners Manual
Page 5
... of the VESA Mounting Pattern show in front of mercury. If these sounds become frequent or continuous, unplug the power cord and contact a Toshiba Authorized Service Provider. 41) DANGER: RISK OF SERIOUS PERSONAL INJURY OR DEATH! Never strike the screen with the wall bracket. 6) After attaching...TV. 3) Remove the screws of the TV, remove the pedestal stand from the sun. Choosing a location for installation. 2) Unplug and remove any cables and/or other hazards. Note: Extreme care should always be regulated due to direct sunlight, such as a quilt or blanket. If you decide ...
... of the VESA Mounting Pattern show in front of mercury. If these sounds become frequent or continuous, unplug the power cord and contact a Toshiba Authorized Service Provider. 41) DANGER: RISK OF SERIOUS PERSONAL INJURY OR DEATH! Never strike the screen with the wall bracket. 6) After attaching...TV. 3) Remove the screws of the TV, remove the pedestal stand from the sun. Choosing a location for installation. 2) Unplug and remove any cables and/or other hazards. Note: Extreme care should always be regulated due to direct sunlight, such as a quilt or blanket. If you decide ...
Owners Manual
Page 8
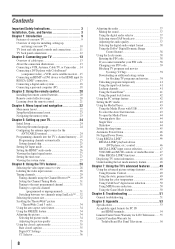
... menu system 23 Chapter 5: Setting up your TV 24 Initial Setup 24 Selecting the menu language 24 Configuring the antenna input source for the ANT/CABLE terminal 24 Programming channels into the TV's channel memory..... 25 Programming channels automatically 25 Setting channel skip 25 Setting AV Input mode 26 Setting the... 53 Specifications 53 Acceptable signal formats for PC IN and HDMI terminals 54 Limited United States Warranty for LCD Televisions....... 55 Limited Canadian Warranty for Toshiba Brand Flat Panel Televisions 56
... menu system 23 Chapter 5: Setting up your TV 24 Initial Setup 24 Selecting the menu language 24 Configuring the antenna input source for the ANT/CABLE terminal 24 Programming channels into the TV's channel memory..... 25 Programming channels automatically 25 Setting channel skip 25 Setting AV Input mode 26 Setting the... 53 Specifications 53 Acceptable signal formats for PC IN and HDMI terminals 54 Limited United States Warranty for LCD Televisions....... 55 Limited Canadian Warranty for Toshiba Brand Flat Panel Televisions 56
Owners Manual
Page 10
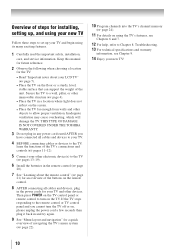
... on the floor or a sturdy, level, stable surface that can support the weight of the unit. THIS TYPE OF DAMAGE IS NOT COVERED UNDER THE TOSHIBA WARRANTY. 3 Do not plug in any power cords until AFTER you cannot turn on the TV. Then press POWER on the TV control panel or... ( page 20). 7 See "Learning about the remote control" ( page 21) for an overview of the buttons on the remote control. 8 AFTER connecting all cables and devices, plug in a location where light does not reflect on the screen. • Place the TV far enough from walls and other objects to...
... on the floor or a sturdy, level, stable surface that can support the weight of the unit. THIS TYPE OF DAMAGE IS NOT COVERED UNDER THE TOSHIBA WARRANTY. 3 Do not plug in any power cords until AFTER you cannot turn on the TV. Then press POWER on the TV control panel or... ( page 20). 7 See "Learning about the remote control" ( page 21) for an overview of the buttons on the remote control. 8 AFTER connecting all cables and devices, plug in a location where light does not reflect on the screen. • Place the TV far enough from walls and other objects to...
Owners Manual
Page 12
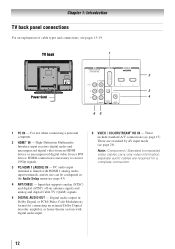
... is necessary to receive 1080p signals. 3無 PC/HDMI 1 (AUDIO) IN - separate audio cables are switched by AV input mode ( page 26). Note: Component / Standard (composite) video cables carry only video information; Input that supports analog (NTSC) and digital (ATSC) off-air antenna ... video from an HDMI device or uncompressed digital video from a DVI device. Chapter 1: Introduction TV back panel connections For an explanation of cable types and connections, see pages 13-19. HDMI connection is shared with digital audio input. 6無 VIDEO / COLORSTREAM® HD IN...
... is necessary to receive 1080p signals. 3無 PC/HDMI 1 (AUDIO) IN - separate audio cables are switched by AV input mode ( page 26). Note: Component / Standard (composite) video cables carry only video information; Input that supports analog (NTSC) and digital (ATSC) off-air antenna ... video from an HDMI device or uncompressed digital video from a DVI device. Chapter 1: Introduction TV back panel connections For an explanation of cable types and connections, see pages 13-19. HDMI connection is shared with digital audio input. 6無 VIDEO / COLORSTREAM® HD IN...

Owners Manual
Page 13
... your TV in several different configurations. Note: HDMI cable provides better picture performance than a standard (composite) video. Coaxial cable (F-type) (F-type) Coaxial cable is Toshiba's brand of component video.) These cables are required for connecting your antenna, cable TV service, and/or cable converter box to the ANT/CABLE input on connecting and using your specific devices, refer...
... your TV in several different configurations. Note: HDMI cable provides better picture performance than a standard (composite) video. Coaxial cable (F-type) (F-type) Coaxial cable is Toshiba's brand of component video.) These cables are required for connecting your antenna, cable TV service, and/or cable converter box to the ANT/CABLE input on connecting and using your specific devices, refer...
Owners Manual
Page 14
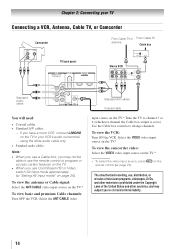
...audio out terminal using the white audio cable only. • Standard audio cables. Use the Cable box controls to your TV Connecting a VCR, Antenna, Cable TV, or Camcorder Camcorder AUDIO OUT L R VIDEO TV back panel From Cable TV or From Cable TV antenna Cable box IN CH 3 CH 4 OUT ...Stereo VCR VIDEO AUDIO L R IN IN from CH 3 ANT CH 4 OUT OUT to L R TV Standard audio cable You will need: • Coaxial cables • Standard A/V cables −− If you use , distribution, or revision of television programs, videotapes, DVDs, and other materials is prohibited...
...audio out terminal using the white audio cable only. • Standard audio cables. Use the Cable box controls to your TV Connecting a VCR, Antenna, Cable TV, or Camcorder Camcorder AUDIO OUT L R VIDEO TV back panel From Cable TV or From Cable TV antenna Cable box IN CH 3 CH 4 OUT ...Stereo VCR VIDEO AUDIO L R IN IN from CH 3 ANT CH 4 OUT OUT to L R TV Standard audio cable You will need: • Coaxial cables • Standard A/V cables −− If you use , distribution, or revision of television programs, videotapes, DVDs, and other materials is prohibited...
Owners Manual
Page 15
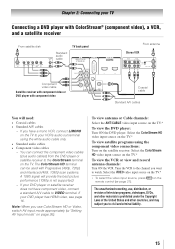
...ColorStream® (component video), a VCR, and a satellite receiver From satellite dish Y PB PR Satellite IN COMPONENT VIDEO S-VIDEO VIDEO OUT OUT Standard audio cable AUDIO OUT L R TV back panel From antenna Stereo VCR VIDEO AUDIO L R IN CH 3 CH 4 OUT L R IN from the DVD player or... DVD player with Progressive (480p, 720p) and Interlaced (480i, 1080i) scan systems. A 1080i signal will need: • Coaxial cables • Standard A/V cables −− If you want to the ColorStream terminal on the TV to civil and criminal liability. 15 Select the VIDEO video input...
...ColorStream® (component video), a VCR, and a satellite receiver From satellite dish Y PB PR Satellite IN COMPONENT VIDEO S-VIDEO VIDEO OUT OUT Standard audio cable AUDIO OUT L R TV back panel From antenna Stereo VCR VIDEO AUDIO L R IN CH 3 CH 4 OUT L R IN from the DVD player or... DVD player with Progressive (480p, 720p) and Interlaced (480i, 1080i) scan systems. A 1080i signal will need: • Coaxial cables • Standard A/V cables −− If you want to the ColorStream terminal on the TV to civil and criminal liability. 15 Select the VIDEO video input...
Owners Manual
Page 16
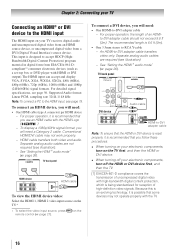
...SVGA, XGA, WXGA, SXGA, 480i (60Hz), 480p (60Hz), 720p (60Hz), 1080i (60Hz) and 1080p (24Hz/60Hz) signal formats. Separate analog audio cables are not required (see illustration). −− See "Setting the HDMI ® audio mode" ( page 26). The recommended length is possible that ...some devices may not work properly. −− HDMI cable transfers both video and audio. To connect an HDMI device, you will need: • One HDMI-to accept HDCP (HighBandwidth Digital-Content Protection...
...SVGA, XGA, WXGA, SXGA, 480i (60Hz), 480p (60Hz), 720p (60Hz), 1080i (60Hz) and 1080p (24Hz/60Hz) signal formats. Separate analog audio cables are not required (see illustration). −− See "Setting the HDMI ® audio mode" ( page 26). The recommended length is possible that ...some devices may not work properly. −− HDMI cable transfers both video and audio. To connect an HDMI device, you will need: • One HDMI-to accept HDCP (HighBandwidth Digital-Content Protection...
Owners Manual
Page 17
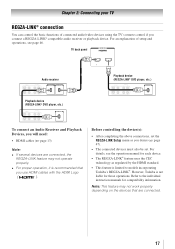
...REGZA-LINK feature may not operate properly. •• For proper operation, it is recommended that you will need: • HDMI cables ( page 13) Note: •• If several devices are connected. 17 TV back panel Audio receiver Playback device (REGZA-...an Audio Receiver and Playback Devices, you use HDMI cables with the HDMI Logo ( ). Refer to models incorporating Toshiba's REGZA-LINK®. Before controlling the device(s): • After completing the above connections, set . However, Toshiba is limited to the individual instruction manuals for those ...
...REGZA-LINK feature may not operate properly. •• For proper operation, it is recommended that you will need: • HDMI cables ( page 13) Note: •• If several devices are connected. 17 TV back panel Audio receiver Playback device (REGZA-...an Audio Receiver and Playback Devices, you use HDMI cables with the HDMI Logo ( ). Refer to models incorporating Toshiba's REGZA-LINK®. Before controlling the device(s): • After completing the above connections, set . However, Toshiba is limited to the individual instruction manuals for those ...
Owners Manual
Page 18
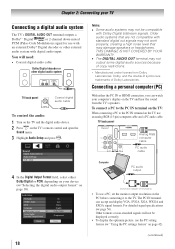
... not be displayed correctly. • To display the optimum picture, use an analog RGB (15-pin) computer cable and a PC audio cable. TV back panel Analog RGB computer cable PC audio cable 4無 In the Digital Output Format field, select either the PC IN or HDMI connection, you can accept...IN terminal on the PC before connecting it to the TV. Other formats or non-standard signals will need: • Coaxial digital audio cable Dolby Digital decoder or other external audio system with standard digital out signals may not work properly, creating a high noise level that may ...
... not be displayed correctly. • To display the optimum picture, use an analog RGB (15-pin) computer cable and a PC audio cable. TV back panel Analog RGB computer cable PC audio cable 4無 In the Digital Output Format field, select either the PC IN or HDMI connection, you can accept...IN terminal on the PC before connecting it to the TV. Other formats or non-standard signals will need: • Coaxial digital audio cable Dolby Digital decoder or other external audio system with standard digital out signals may not work properly, creating a high noise level that may ...

Owners Manual
Page 19
... PC with a DVI terminal to the HDMI terminal on PC hardware and setup ( page 16). Such as a Toshiba PC with an HDMI terminal, use an HDMI-to-DVI adapter cable and analog audio cables. Note: •• The edges of the screen (i.e. Chapter 2: Connecting your TV Note: •• The ... TV back panel (60Hz), 1080i (60Hz), and 1080p (24Hz/60Hz) signal formats. name Pin Signal No. name Pin Signal No. Computer PC audio cable PC audio output HDMI-to-DVI adapter cable The HDMI input can accept and display VGA, SVGA, XGA, WXGA, SXGA, 480i (60Hz), 480p (60Hz), 720p 19
... PC with a DVI terminal to the HDMI terminal on PC hardware and setup ( page 16). Such as a Toshiba PC with an HDMI terminal, use an HDMI-to-DVI adapter cable and analog audio cables. Note: •• The edges of the screen (i.e. Chapter 2: Connecting your TV Note: •• The ... TV back panel (60Hz), 1080i (60Hz), and 1080p (24Hz/60Hz) signal formats. name Pin Signal No. name Pin Signal No. Computer PC audio cable PC audio output HDMI-to-DVI adapter cable The HDMI input can accept and display VGA, SVGA, XGA, WXGA, SXGA, 480i (60Hz), 480p (60Hz), 720p 19

Owners Manual
Page 23
... Tuning Mode Time Zone Signal Meter System Information Option [Opens the Input Configuration menu] [Start Scan] [Scans for new channels on ANT/CABLE] [Opens the Skip / Lock Channel menu] Standard / Auto / Digital Eastern / Newfoundland / Atlantic / Hawaii / Alaska / Pacific / Mountain / Central [Opens the Signal Meter...
... Tuning Mode Time Zone Signal Meter System Information Option [Opens the Input Configuration menu] [Start Scan] [Scans for new channels on ANT/CABLE] [Opens the Skip / Lock Channel menu] Standard / Auto / Digital Eastern / Newfoundland / Atlantic / Hawaii / Alaska / Pacific / Mountain / Central [Opens the Signal Meter...

Owners Manual
Page 24
... 3無 Next, the Location setting window will appear. You can choose from three different languages (English, French, and Spanish) for the ANT/CABLE input on the TV. However if you do not finish the entire Initial Setup process, by pressing Power / prior to select Start Scan and ...continue with . To tune only digital channels, select Digital. Configuring the antenna input source for the ANT/CABLE input on the TV. 5無 To save your original settings, highlight Cancel and press . 3無 Press to your new settings, highlight Done...
... 3無 Next, the Location setting window will appear. You can choose from three different languages (English, French, and Spanish) for the ANT/CABLE input on the TV. However if you do not finish the entire Initial Setup process, by pressing Power / prior to select Start Scan and ...continue with . To tune only digital channels, select Digital. Configuring the antenna input source for the ANT/CABLE input on the TV. 5無 To save your original settings, highlight Cancel and press . 3無 Press to your new settings, highlight Done...
Owners Manual
Page 25
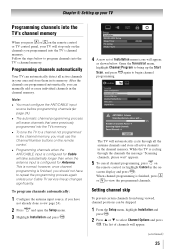
...to program channels into the TV's channel memory. While the TV is normal; Note: •• You must configure the ANT/CABLE input source before programming channels ( page 24). •• The automatic channel programming process will erase channels that were previously ...programmed into the TV's channel memory When you have to repeat the programming process again unless your Cable TV service lineup changes significantly. Setting channel skip To prevent certain channels from being viewed, channel positions can be skipped. 1無...
...to program channels into the TV's channel memory. While the TV is normal; Note: •• You must configure the ANT/CABLE input source before programming channels ( page 24). •• The automatic channel programming process will erase channels that were previously ...programmed into the TV's channel memory When you have to repeat the programming process again unless your Cable TV service lineup changes significantly. Setting channel skip To prevent certain channels from being viewed, channel positions can be skipped. 1無...
Owners Manual
Page 27
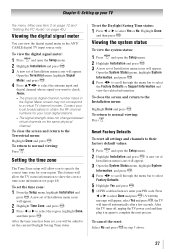
.... Chapter 5: Setting up your local broadcasters to the Installation menu: Highlight Done and press . Note: • The physical digital channel number listed in the ANT/ CABLE digital TV input source only. Open the System Status menu, highlight System Information, and press . 4無 Press tu to scroll through the menu bar to...
.... Chapter 5: Setting up your local broadcasters to the Installation menu: Highlight Done and press . Note: • The physical digital channel number listed in the ANT/ CABLE digital TV input source only. Open the System Status menu, highlight System Information, and press . 4無 Press tu to scroll through the menu bar to...
Owners Manual
Page 28
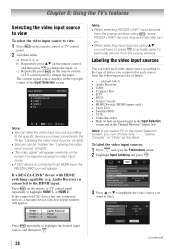
... appear. Note: ••When selecting REGZA-LINK® input sources from the following preset list of labels: • - - (default label) • Audio Receiver • Cable • Compact Disc • DTV • DVD • Game Console • HDMI Switch (HDMI inputs only) • Laser Disc • Satellite/DSS • VCR •...
... appear. Note: ••When selecting REGZA-LINK® input sources from the following preset list of labels: • - - (default label) • Audio Receiver • Cable • Compact Disc • DTV • DVD • Game Console • HDMI Switch (HDMI inputs only) • Laser Disc • Satellite/DSS • VCR •...
Owners Manual
Page 29
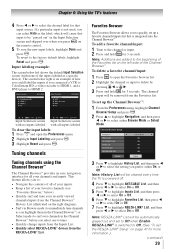
... channel or input. 2無 Press and hold for 3 seconds. Input labeling example: The screen below right is powered off. 4無 Press to highlight ANT/CABLE List, and then press or to select On or Off. 5無 Press to highlight Inputs List, and then press or ...
... channel or input. 2無 Press and hold for 3 seconds. Input labeling example: The screen below right is powered off. 4無 Press to highlight ANT/CABLE List, and then press or to select On or Off. 5無 Press to highlight Inputs List, and then press or ...


