Owners Manual
Page 1
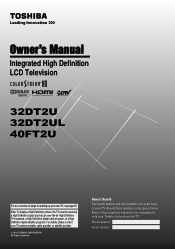
...details, please contact your TV antenna installer, cable provider, or satellite provider. © 2011 TOSHIBA CORPORATION All Rights Reserved Owner's Record The model number and serial number are on the back of steps for setting up yournewTV, see page10. Model number: Serial number: Note: To display a High De&#... Refer to these numbers in the spaces below. Owner's Manual Integrated High Definition LCD Television HIGH-DEFINITION TELEVISION 32DT2U 32DT2UL 40FT2U Foran overview of your Toshiba dealer about this TV. Record these numbers whenever you communicate with your TV.
...details, please contact your TV antenna installer, cable provider, or satellite provider. © 2011 TOSHIBA CORPORATION All Rights Reserved Owner's Record The model number and serial number are on the back of steps for setting up yournewTV, see page10. Model number: Serial number: Note: To display a High De&#... Refer to these numbers in the spaces below. Owner's Manual Integrated High Definition LCD Television HIGH-DEFINITION TELEVISION 32DT2U 32DT2UL 40FT2U Foran overview of your Toshiba dealer about this TV. Record these numbers whenever you communicate with your TV.
Owners Manual
Page 2
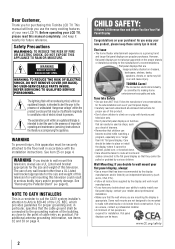
...tips in mind: The Issue • The home theater entertainment experience is appropriate. TOSHIBA Cares! • The consumer electronics industry is intended to alert the user to walls with furniture and television sets. • Don't place flat panel displays on the proper stands or installed ...two people are popular purchases. Follow the manufacturer's recommendations for the safe installation and use of this television for wall mounting this Toshiba LCD TV. Some wall mounts are not designed to be of sufficient magnitude to constitute a risk of electric shock to the ...
...tips in mind: The Issue • The home theater entertainment experience is appropriate. TOSHIBA Cares! • The consumer electronics industry is intended to alert the user to walls with furniture and television sets. • Don't place flat panel displays on the proper stands or installed ...two people are popular purchases. Follow the manufacturer's recommendations for the safe installation and use of this television for wall mounting this Toshiba LCD TV. Some wall mounts are not designed to be of sufficient magnitude to constitute a risk of electric shock to the ...
Owners Manual
Page 8
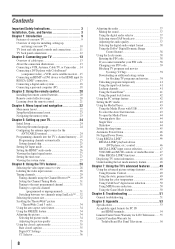
... 41 Locking channels 41 Using the GameTimer 41 Using the panel lock feature 42 Using the PC settings feature 42 Setting the PC Audio 43 Using the Media Player 43 Using the Media Player with USB 43 To ...Understanding the last mode memory feature 48 Chapter 7: Using the TV's advanced features......... 49 Using the advanced picture settings features 49 Using Dynamic Contrast 49 Using the static gamma feature 49 Selecting the color temperature 49 Using CableClear&#... United States Warranty for LCD Televisions....... 55 Limited Canadian Warranty for Toshiba Brand Flat Panel Televisions 56
... 41 Locking channels 41 Using the GameTimer 41 Using the panel lock feature 42 Using the PC settings feature 42 Setting the PC Audio 43 Using the Media Player 43 Using the Media Player with USB 43 To ...Understanding the last mode memory feature 48 Chapter 7: Using the TV's advanced features......... 49 Using the advanced picture settings features 49 Using Dynamic Contrast 49 Using the static gamma feature 49 Selecting the color temperature 49 Using CableClear&#... United States Warranty for LCD Televisions....... 55 Limited Canadian Warranty for Toshiba Brand Flat Panel Televisions 56
Owners Manual
Page 9
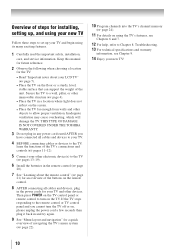
... 46). • Media Player allows you to view your new Toshiba widescreen, integrated HD, LCD TV: • Integrated digital tuning (8VSB ATSC and QAM) eliminates the need for a separate digital converter set-top box (in most cases). • 1366 x 768 output resolution (32DT2U / 32DT2UL). 1920 x 1080 output resoluation (40FT2U). • HDMI® digital...
... 46). • Media Player allows you to view your new Toshiba widescreen, integrated HD, LCD TV: • Integrated digital tuning (8VSB ATSC and QAM) eliminates the need for a separate digital converter set-top box (in most cases). • 1366 x 768 output resolution (32DT2U / 32DT2UL). 1920 x 1080 output resoluation (40FT2U). • HDMI® digital...
Owners Manual
Page 10
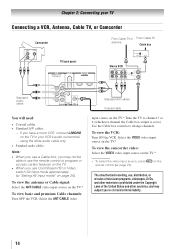
...screen. • Place the TV far enough from walls and other objects to allow proper ventilation. THIS TYPE OF DAMAGE IS NOT COVERED UNDER THE TOSHIBA WARRANTY. 3 Do not plug in any power cords until AFTER you cannot turn on the floor or a sturdy, level, stable surface that can ...support the weight of the unit. Overview of steps for installing, setting up your TV and begin using its many exciting features. 1 Carefully read the important safety, installation, care, and service information. Secure the TV to a...
...screen. • Place the TV far enough from walls and other objects to allow proper ventilation. THIS TYPE OF DAMAGE IS NOT COVERED UNDER THE TOSHIBA WARRANTY. 3 Do not plug in any power cords until AFTER you cannot turn on the floor or a sturdy, level, stable surface that can ...support the weight of the unit. Overview of steps for installing, setting up your TV and begin using its many exciting features. 1 Carefully read the important safety, installation, care, and service information. Secure the TV to a...

Owners Manual
Page 13
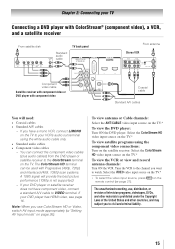
... cables, be purchased from a DVI device to the TV. Standard A/V cables (red/white/yellow) Standard A/V cables (composite video) usually come in sets of three and are typically colorcoded according to use with video devices with Dolby Digital or PCM (pulse-code modulation) digital audio input to the...digital audio and video in this manual are required for a complete connection. 3.5mm Stereo to RCA Y-cable 3.5mm Stereo to RCA Y-Cable is Toshiba's brand of component video.) These cables are for connecting a PC to the TV's PC IN terminal ( page 18). About the connection ...
... cables, be purchased from a DVI device to the TV. Standard A/V cables (red/white/yellow) Standard A/V cables (composite video) usually come in sets of three and are typically colorcoded according to use with video devices with Dolby Digital or PCM (pulse-code modulation) digital audio input to the...digital audio and video in this manual are required for a complete connection. 3.5mm Stereo to RCA Y-cable 3.5mm Stereo to RCA Y-Cable is Toshiba's brand of component video.) These cables are for connecting a PC to the TV's PC IN terminal ( page 18). About the connection ...
Owners Manual
Page 14
...the camcorder video: Select the VIDEO video input source on the The unauthorized recording, use ColorStream HD or Video, switch AV input mode appropriately ("Setting AV Input mode" on the TV.* To view basic and premium Cable channels: Turn OFF the VCR. on the TV.* ** To select the... of the United States and other countries, and may subject you use , distribution, or revision of television programs, videotapes, DVDs, and other materials is set to). To view the VCR: Turn ON the VCR. Chapter 2: Connecting your VCR's audio out terminal using the white audio cable only. • ...
...the camcorder video: Select the VIDEO video input source on the The unauthorized recording, use ColorStream HD or Video, switch AV input mode appropriately ("Setting AV Input mode" on the TV.* To view basic and premium Cable channels: Turn OFF the VCR. on the TV.* ** To select the... of the United States and other countries, and may subject you use , distribution, or revision of television programs, videotapes, DVDs, and other materials is set to). To view the VCR: Turn ON the VCR. Chapter 2: Connecting your VCR's audio out terminal using the white audio cable only. • ...
Owners Manual
Page 15
... video input source, press remote control ( page 21). on the The unauthorized recording, use ColorStream HD or Video, switch AV input mode appropriately ("Setting AV Input mode" on the TV. The ColorStream HD terminal can connect the component video cables (plus audio cables) from the DVD player or satellite...
... video input source, press remote control ( page 21). on the The unauthorized recording, use ColorStream HD or Video, switch AV input mode appropriately ("Setting AV Input mode" on the TV. The ColorStream HD terminal can connect the component video cables (plus audio cables) from the DVD player or satellite...
Owners Manual
Page 16
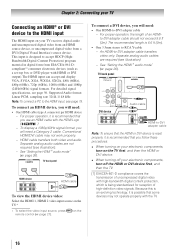
... audio and uncompressed digital video from an HDMI source device, or uncompressed digital video from EIA/CEA-861-Dcompliant[1] consumer electronic devices (such as a set-top box or DVD player with the HDMI Logo ( ). −− To display a 1080p/60Hz signal format, you will need a Category ... form from a DVI (Digital Visual Interface) source device. Separate analog audio cables are required (see illustration). −− See "Setting the HDMI ® audio mode" ( page 26). Separate analog audio cables are not required (see illustration). −− See...
... audio and uncompressed digital video from an HDMI source device, or uncompressed digital video from EIA/CEA-861-Dcompliant[1] consumer electronic devices (such as a set-top box or DVD player with the HDMI Logo ( ). −− To display a 1080p/60Hz signal format, you will need a Category ... form from a DVI (Digital Visual Interface) source device. Separate analog audio cables are required (see illustration). −− See "Setting the HDMI ® audio mode" ( page 26). Separate analog audio cables are not required (see illustration). −− See...
Owners Manual
Page 17
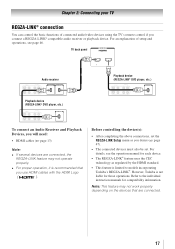
...audio/video devices using the TV's remote control if you desire ( page 47). • The connected devices must also be set the REGZA-LINK Setup menu as regulated by the HDMI standard. • This feature is limited to the individual instruction manuals for compatibility... information. Refer to models incorporating Toshiba's REGZA-LINK®. Chapter 2: Connecting your TV REGZA-LINK® connection You can control the basic functions of setup and operations,...
...audio/video devices using the TV's remote control if you desire ( page 47). • The connected devices must also be set the REGZA-LINK Setup menu as regulated by the HDMI standard. • This feature is limited to the individual instruction manuals for compatibility... information. Refer to models incorporating Toshiba's REGZA-LINK®. Chapter 2: Connecting your TV REGZA-LINK® connection You can control the basic functions of setup and operations,...
Owners Manual
Page 18
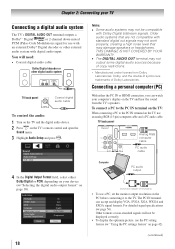
... your device ("Selecting the digital audio output format" on page 38). 18 Computer PC audio output Conversion adapter (if necessary) • To use a PC, set the monitor output resolution on the PC before connecting it to the PC IN terminal on the TV, use the PC... setting feature ( "Using the PC settings feature" on page 42). (continued) You will not be compatible with standard digital out signals may damage speakers or headphones. Other formats or non-standard...
... your device ("Selecting the digital audio output format" on page 38). 18 Computer PC audio output Conversion adapter (if necessary) • To use a PC, set the monitor output resolution on the PC before connecting it to the PC IN terminal on the TV, use the PC... setting feature ( "Using the PC settings feature" on page 42). (continued) You will not be compatible with standard digital out signals may damage speakers or headphones. Other formats or non-standard...
Owners Manual
Page 22
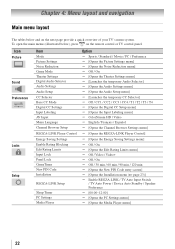
... ColorStream HD / Video English / Français / Español [Opens the Channel Browser Settings menu] [Opens the REGZA-LINK Player Control] [Opens the Energy Saving Settings menu] Off / On [Opens the Edit Rating Limits menu] Off / Video / Video+ ... TV Auto Input Switch / TV Auto Power / Device Auto Standby / Speaker Preference [00:00~12:00] [Opens the PC Settings menu] [Opens the Media Player menu] 22 To open the main menus (illustrated below and on the remote control or TV control panel. ...
... ColorStream HD / Video English / Français / Español [Opens the Channel Browser Settings menu] [Opens the REGZA-LINK Player Control] [Opens the Energy Saving Settings menu] Off / On [Opens the Edit Rating Limits menu] Off / Video / Video+ ... TV Auto Input Switch / TV Auto Power / Device Auto Standby / Speaker Preference [00:00~12:00] [Opens the PC Settings menu] [Opens the Media Player menu] 22 To open the main menus (illustrated below and on the remote control or TV control panel. ...

Owners Manual
Page 23
... or pq on the remote control or TV control panel to access and navigate your TV's onscreen menu system. • Press to save your menu settings or select a highlighted item. (A highlighted menu item appears in a different color in the menu. • Press to open the Installation menu (illustrated below), press Setup...
... or pq on the remote control or TV control panel to access and navigate your TV's onscreen menu system. • Press to save your menu settings or select a highlighted item. (A highlighted menu item appears in a different color in the menu. • Press to open the Installation menu (illustrated below), press Setup...

Owners Manual
Page 24
.... 1無 In the Menu Language field, press t or u to select your preferred language. 2無 Press t or u to select your new settings, highlight Done and press . You can choose from three different languages (English, French, and Spanish) for the ANT/CABLE terminal To configure the ANT/... source: 1無 Press and open the Preferences menu, highlight Menu Language. 2無 Press t or u to select Time Zone Setup and set of menus and messages. Selecting the menu language You can stop the Initial Setup with the Auto Tuning. Open the Terrestrial menu, highlight Input ...
.... 1無 In the Menu Language field, press t or u to select your preferred language. 2無 Press t or u to select your new settings, highlight Done and press . You can choose from three different languages (English, French, and Spanish) for the ANT/CABLE terminal To configure the ANT/... source: 1無 Press and open the Preferences menu, highlight Menu Language. 2無 Press t or u to select Time Zone Setup and set of menus and messages. Selecting the menu language You can stop the Initial Setup with the Auto Tuning. Open the Terrestrial menu, highlight Input ...
Owners Manual
Page 25
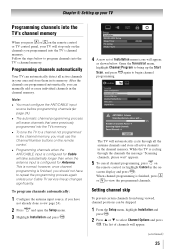
...already done so ( page 24). 2無 Press and open the Setup menu. 3無 Highlight Installation and press . 4無 A new set of channels will stop only on the remote control or TV control panel, your area and store them in the channel memory. Open the Terrestrial...8226; Programming channels when the ANT/CABLE input is configured for Cable will appear, as shown below to select Channel Options and press . Setting channel skip To prevent certain channels from being viewed, channel positions can manually add or erase individual channels in the onscreen display and press...
...already done so ( page 24). 2無 Press and open the Setup menu. 3無 Highlight Installation and press . 4無 A new set of channels will stop only on the remote control or TV control panel, your area and store them in the channel memory. Open the Terrestrial...8226; Programming channels when the ANT/CABLE input is configured for Cable will appear, as shown below to select Channel Options and press . Setting channel skip To prevent certain channels from being viewed, channel positions can manually add or erase individual channels in the onscreen display and press...
Owners Manual
Page 26
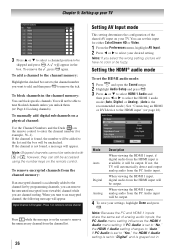
...28961; From the Preferences menu, highlight AV Input. 2無 Press t or u to be unchecked. If PC Audio is set to "Yes," the HDMI 1 Audio setting is set to "No," the HDMI 1 Audio setting changes to "Digital" and is on the remote control. To remove the , press again. Note: Skipped channels cannot be...28961; Press p or q to select HDMI 1 Audio and then press t or u to select the HDMI 1 audio mode (Auto, Digital, or Analog). (Auto is set to "Auto." If the channel is available, it will be accessed using the number keys on the screen to remove the unnecessary channel from the...
...28961; From the Preferences menu, highlight AV Input. 2無 Press t or u to be unchecked. If PC Audio is set to "Yes," the HDMI 1 Audio setting is set to "No," the HDMI 1 Audio setting changes to "Digital" and is on the remote control. To remove the , press again. Note: Skipped channels cannot be...28961; Press p or q to select HDMI 1 Audio and then press t or u to select the HDMI 1 audio mode (Auto, Digital, or Analog). (Auto is set to "Auto." If the channel is available, it will be accessed using the number keys on the screen to remove the unnecessary channel from the...
Owners Manual
Page 27
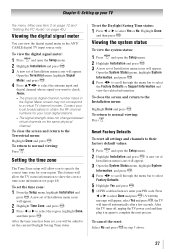
... To view the digital signal meter: 1無 Press and open the Setup menu. 2無 Highlight Installation and press . 3無 A new set of Installation menu icons will appear. Note: • The physical digital channel number listed in again to their factory default values: 1無 Press ...System Status menu, highlight System Information, and press . 4無 Press tu to scroll through the menu bar to normal viewing: Press . To set the Daylight Saving Time status: 1無 Press t or u to obtain the RF channel numbers for your region. Open the Terrestrial menu, ...
... To view the digital signal meter: 1無 Press and open the Setup menu. 2無 Highlight Installation and press . 3無 A new set of Installation menu icons will appear. Note: • The physical digital channel number listed in again to their factory default values: 1無 Press ...System Status menu, highlight System Information, and press . 4無 Press tu to scroll through the menu bar to normal viewing: Press . To set the Daylight Saving Time status: 1無 Press t or u to obtain the RF channel numbers for your region. Open the Terrestrial menu, ...
Owners Manual
Page 29
... select either Browse Mode or Select Mode. 3無 Press to highlight History List, and then press or to select the setting you press on the left shows the default Input Selection screen (with all inputs labeled To clear the input labels: 1無 Press and open the...press . The channel/ input will be removed from the REGZA-LINK® List. Note: REGZA-LINK® List will be automatically grayed out and set the REGZA-LINK® Setup" on the right diagram). • Surf via Browse mode (to immediately tune channels as the label, which will be...
... select either Browse Mode or Select Mode. 3無 Press to highlight History List, and then press or to select the setting you press on the left shows the default Input Selection screen (with all inputs labeled To clear the input labels: 1無 Press and open the...press . The channel/ input will be removed from the REGZA-LINK® List. Note: REGZA-LINK® List will be automatically grayed out and set the REGZA-LINK® Setup" on the right diagram). • Surf via Browse mode (to immediately tune channels as the label, which will be...
Owners Manual
Page 31
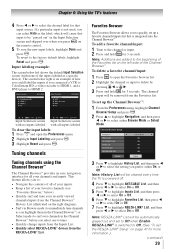
...on the remote control or TV control panel. Mode Standard Auto (default) Digital Description Both analog and digital channels can be tuned To set of Installation menu icons will still be updated automatically when you program channels into the TV's channel memory ( page 25). Note:...the remote control, followed by / , if available Only digital channels can be tuned normally Digital channels will have to choose how tuning will be set to Digital, analog channel 3 will appear. 2無 Open the Terrestrial menu, highlight Channel Tuning Mode, and then press to select...
...on the remote control or TV control panel. Mode Standard Auto (default) Digital Description Both analog and digital channels can be tuned To set of Installation menu icons will still be updated automatically when you program channels into the TV's channel memory ( page 25). Note:...the remote control, followed by / , if available Only digital channels can be tuned normally Digital channels will have to choose how tuning will be set to Digital, analog channel 3 will appear. 2無 Open the Terrestrial menu, highlight Channel Tuning Mode, and then press to select...
Owners Manual
Page 32
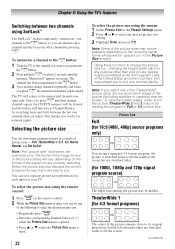
... view the hidden edges, either scroll the picture (TheaterWide 2 and 3 only) or try viewing the program in the Theater Settings menu. 2無 Press or to select the desired picture size setting. 3無 Highlight Done and press . Note: If you . Using these functions to change the picture size (i.e., changing the height...
... view the hidden edges, either scroll the picture (TheaterWide 2 and 3 only) or try viewing the program in the Theater Settings menu. 2無 Press or to select the desired picture size setting. 3無 Highlight Done and press . Note: If you . Using these functions to change the picture size (i.e., changing the height...


