User Guide
Page 3
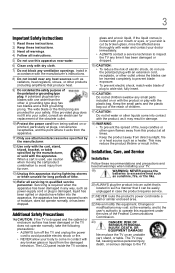
... that is dropped and the cabinet or enclosure surface has been damaged or the TV does not operate normally, take the following precautions: • ALWAYS turn off the TV and unplug the power cord to avoid possible electric shock or fire. • NEVER allow your TV: 19) WARNING: NEVER expose the...
... that is dropped and the cabinet or enclosure surface has been damaged or the TV does not operate normally, take the following precautions: • ALWAYS turn off the TV and unplug the power cord to avoid possible electric shock or fire. • NEVER allow your TV: 19) WARNING: NEVER expose the...
User Guide
Page 5
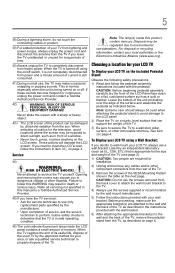
When the TV is turned off using a Wall Bracket: If you decide to wall mount your local authorities or the Electronics Industries Alliance (www.eiae.org). If you need to follow this manual to a Toshiba Authorized Service Provider. 45) If you have the TV serviced: • Ask the service ...the back of the TV as in the table on page 4. If these sounds become frequent or continuous, unplug the power cord and contact a Toshiba Authorized Service Provider. 42) WARNING: RISK OF SERIOUS PERSONAL INJURY OR EQUIPMENT DAMAGE! Service 44) WARNING: RISK OF ELECTRIC SHOCK! Never attempt to...
When the TV is turned off using a Wall Bracket: If you decide to wall mount your local authorities or the Electronics Industries Alliance (www.eiae.org). If you need to follow this manual to a Toshiba Authorized Service Provider. 45) If you have the TV serviced: • Ask the service ...the back of the TV as in the table on page 4. If these sounds become frequent or continuous, unplug the power cord and contact a Toshiba Authorized Service Provider. 42) WARNING: RISK OF SERIOUS PERSONAL INJURY OR EQUIPMENT DAMAGE! Service 44) WARNING: RISK OF ELECTRIC SHOCK! Never attempt to...
User Guide
Page 17
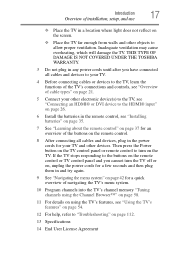
... "Troubleshooting" on page 112. 13 Specifications 14 End User License Agreement Then press the Power button on the TV control panel or remote control to turn the TV off or on, unplug the power cords for a few seconds and then plug them in and try again. 9 See "Navigating the menu system... not reflect on the screen. ❖ Place the TV far enough from walls and other devices. THIS TYPE OF DAMAGE IS NOT COVERED UNDER THE TOSHIBA WARRANTY. 3 Do not plug in any power cords until after you cannot turn on the TV. Inadequate ventilation may cause overheating, which will damage the TV.
... "Troubleshooting" on page 112. 13 Specifications 14 End User License Agreement Then press the Power button on the TV control panel or remote control to turn the TV off or on, unplug the power cords for a few seconds and then plug them in and try again. 9 See "Navigating the menu system... not reflect on the screen. ❖ Place the TV far enough from walls and other devices. THIS TYPE OF DAMAGE IS NOT COVERED UNDER THE TOSHIBA WARRANTY. 3 Do not plug in any power cords until after you cannot turn on the TV. Inadequate ventilation may cause overheating, which will damage the TV.
User Guide
Page 18
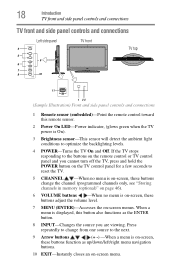
...optional)" on page 46). 6 VOLUME buttons -When no menu is on-screen, these buttons function as the ENTER button. 8 INPUT-Changes the source you cannot turn off the TV, press and hold the POWER button on the TV control panel for a few seconds to reset the TV. 5 CHANNEL -When no menu..., these buttons adjust the volume level. 7 MENU (ENTER)-Accesses the on-screen menus. If the TV stops responding to optimize the backlighting levels. 4 POWER-Turns the TV On and Off. When a menu is On). 3 Brightness sensor-This sensor will detect the ambient light conditions to the buttons on the remote...
...optional)" on page 46). 6 VOLUME buttons -When no menu is on-screen, these buttons function as the ENTER button. 8 INPUT-Changes the source you cannot turn off the TV, press and hold the POWER button on the TV control panel for a few seconds to reset the TV. 5 CHANNEL -When no menu..., these buttons adjust the volume level. 7 MENU (ENTER)-Accesses the on-screen menus. If the TV stops responding to optimize the backlighting levels. 4 POWER-Turns the TV On and Off. When a menu is On). 3 Brightness sensor-This sensor will detect the ambient light conditions to the buttons on the remote...
User Guide
Page 24
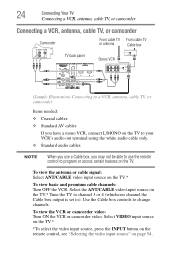
... TV.* Tune the TV to channel 3 or 4 (whichever channel the Cable box output is set to change channels. To view the VCR or camcorder video: Turn ON the VCR or camcorder video. To view the antenna or cable signal: Select ANT/CABLE video input source on page 54. Select VIDEO input... source, press the INPUT button on the remote control, see "Selecting the video input source" on the TV.* To view basic and premium cable channels: Turn OFF the VCR.
... TV.* Tune the TV to channel 3 or 4 (whichever channel the Cable box output is set to change channels. To view the VCR or camcorder video: Turn ON the VCR or camcorder video. To view the antenna or cable signal: Select ANT/CABLE video input source on page 54. Select VIDEO input... source, press the INPUT button on the remote control, see "Selecting the video input source" on the TV.* To view basic and premium cable channels: Turn OFF the VCR.
User Guide
Page 26
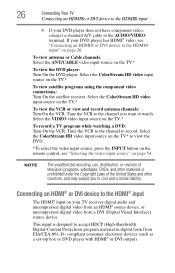
...the ColorStream HD video input source on the TV.* To view the VCR or view and record antenna channels: Turn On the VCR. 26 Connecting Your TV Connecting an HDMI® or DVI device to the HDMI® ... Select the ANT/CABLE video input source on the TV.* To record a TV program while watching a DVD: Turn On the VCR. Select the ColorStream HD video input source on the TV* to view the DVD. *To ... designed to watch. Select the VIDEO video input source on the TV.* To view the DVD player: Turn On the DVD player. If your TV receives digital audio and uncompressed digital video from an HDMI®...
...the ColorStream HD video input source on the TV.* To view the VCR or view and record antenna channels: Turn On the VCR. 26 Connecting Your TV Connecting an HDMI® or DVI device to the HDMI® ... Select the ANT/CABLE video input source on the TV.* To record a TV program while watching a DVD: Turn On the VCR. Select the ColorStream HD video input source on the TV* to view the DVD. *To ... designed to watch. Select the VIDEO video input source on the TV.* To view the DVD player: Turn On the DVD player. If your TV receives digital audio and uncompressed digital video from an HDMI®...
User Guide
Page 28
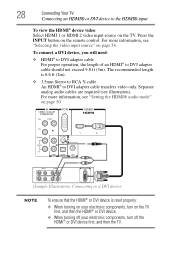
... HDMI® device video: Select HDMI 1 or HDMI 2 video input source on the TV first, and then the HDMI® or DVI device. ❖ When turning off your electronic components, turn off the HDMI® or DVI device first, and then the TV. The recommended length is reset properly: ❖ When... turning on your electronic components, turn on the TV. Press the INPUT button on page 54. 28 Connecting Your TV Connecting an HDMI® or DVI device to a DVI device NOTE ...
... HDMI® device video: Select HDMI 1 or HDMI 2 video input source on the TV first, and then the HDMI® or DVI device. ❖ When turning off your electronic components, turn off the HDMI® or DVI device first, and then the TV. The recommended length is reset properly: ❖ When... turning on your electronic components, turn on the TV. Press the INPUT button on page 54. 28 Connecting Your TV Connecting an HDMI® or DVI device to a DVI device NOTE ...
User Guide
Page 30
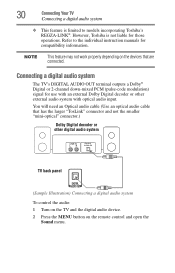
...Dolby Digital decoder or other digital audio system TV back panel (Sample Illustration) Connecting a digital audio system To control the audio: 1 Turn on the TV and the digital audio device. 2 Press the MENU button on the devices that has the larger "TosLink" connector and... not the smaller "mini-optical" connector.) Dolby Digital decoder or other external audio system with optical audio input. Refer to models incorporating Toshiba's REGZA-LINK®. Connecting a digital audio system The TV's DIGITAL AUDIO OUT terminal outputs a Dolby® Digital or 2-channel down-mixed...
...Dolby Digital decoder or other digital audio system TV back panel (Sample Illustration) Connecting a digital audio system To control the audio: 1 Turn on the TV and the digital audio device. 2 Press the MENU button on the devices that has the larger "TosLink" connector and... not the smaller "mini-optical" connector.) Dolby Digital decoder or other external audio system with optical audio input. Refer to models incorporating Toshiba's REGZA-LINK®. Connecting a digital audio system The TV's DIGITAL AUDIO OUT terminal outputs a Dolby® Digital or 2-channel down-mixed...
User Guide
Page 37
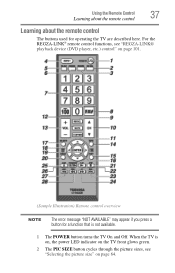
When the TV is not available. 1 The POWER button turns the TV On and Off. For the REGZA-LINK® remote control functions, see "Selecting the picture size" on page 101. (Sample Illustration) Remote control ...
When the TV is not available. 1 The POWER button turns the TV On and Off. For the REGZA-LINK® remote control functions, see "Selecting the picture size" on page 101. (Sample Illustration) Remote control ...

User Guide
Page 38
... sleep timer" on page 76. 13 The VOL + - CAPTION accesses closed captions, see "Using closed captions" on page 73. 12 The MUTE button reduces or turns off the sound, see "Switching between two channels using Channel Return" on page 63. 18 The Arrow buttons ( ) select or adjust programming menus when a menu...
... sleep timer" on page 76. 13 The VOL + - CAPTION accesses closed captions, see "Using closed captions" on page 73. 12 The MUTE button reduces or turns off the sound, see "Switching between two channels using Channel Return" on page 63. 18 The Arrow buttons ( ) select or adjust programming menus when a menu...

User Guide
Page 44
... the entire Initial Setup process and press the POWER button before completing all the steps, the Initial Setup window will appear every time you first turn on or reset the TV, the Initial Setup window will appear. 1 In the Menu Language field, press the ( / arrow) buttons to select your desired time... ENTER button. Then set your preferred language. 2 Press the ( / arrow) buttons to select Time Zone Setup. Chapter 5 Setting up your TV Initial Setup When you turn on the TV. 44
... the entire Initial Setup process and press the POWER button before completing all the steps, the Initial Setup window will appear every time you first turn on or reset the TV, the Initial Setup window will appear. 1 In the Menu Language field, press the ( / arrow) buttons to select your desired time... ENTER button. Then set your preferred language. 2 Press the ( / arrow) buttons to select Time Zone Setup. Chapter 5 Setting up your TV Initial Setup When you turn on the TV. 44
User Guide
Page 53
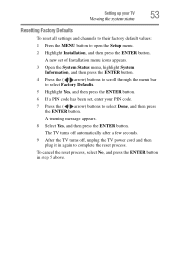
.... To cancel the reset process, select No, and press the ENTER button in again to complete the reset process. The TV turns off automatically after a few seconds. 9 After the TV turns off, unplug the TV power cord and then plug it in step 5 above. Setting up your PIN code. 7 Press the ( / arrow...
.... To cancel the reset process, select No, and press the ENTER button in again to complete the reset process. The TV turns off automatically after a few seconds. 9 After the TV turns off, unplug the TV power cord and then plug it in step 5 above. Setting up your PIN code. 7 Press the ( / arrow...
User Guide
Page 56
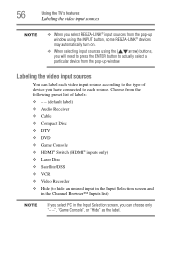
Choose from the pop-up window using the INPUT button, some REGZA-LINK® devices may automatically turn on. ❖ When selecting input sources using the ( / arrow) buttons, you will need to press the ENTER button to actually select a particular device from the ...
Choose from the pop-up window using the INPUT button, some REGZA-LINK® devices may automatically turn on. ❖ When selecting input sources using the ( / arrow) buttons, you will need to press the ENTER button to actually select a particular device from the ...

User Guide
Page 61
...in the list. Once another list has been selected, the Channel Browser™ will open in the last selected list. ❖ If all lists are turned off , the FAV button will have no effect. ❖ Pressing the FAV button will not display the Channel Browser™. NOTE ❖ The Channel...next item in the Channel Browser™. Using the TV's features 61 Tuning channels using the Channel Browser™ 3 Channel or input that is turned off , pressing the BACK CB or NEXT CB arrow buttons or the FAV button will display the Channel Browser™ Favorites list regardless of the...
...in the list. Once another list has been selected, the Channel Browser™ will open in the last selected list. ❖ If all lists are turned off , the FAV button will have no effect. ❖ Pressing the FAV button will not display the Channel Browser™. NOTE ❖ The Channel...next item in the Channel Browser™. Using the TV's features 61 Tuning channels using the Channel Browser™ 3 Channel or input that is turned off , pressing the BACK CB or NEXT CB arrow buttons or the FAV button will display the Channel Browser™ Favorites list regardless of the...
User Guide
Page 62
... various reasons), the TV will not function until you have programed channels into the TV's channel memory, see "ANT/CABLE IN" on page 45 ❖ Turning off the left side. Tuning to the next programmed channel To tune to surf backward through the previously tuned channels/inputs. Press the BACK CB...
... various reasons), the TV will not function until you have programed channels into the TV's channel memory, see "ANT/CABLE IN" on page 45 ❖ Turning off the left side. Tuning to the next programmed channel To tune to surf backward through the previously tuned channels/inputs. Press the BACK CB...

User Guide
Page 69
... button. 3 In the Auto Aspect Ratio field, select On. 4 To save the new settings, highlight Done, and then press the ENTER button. To turn on page 64. To turn off the Auto Aspect ratio feature, Select Off in step 3 above. The adjustment range is from the HDMI 1 or HDMI 2 input. To revert...
... button. 3 In the Auto Aspect Ratio field, select On. 4 To save the new settings, highlight Done, and then press the ENTER button. To turn on page 64. To turn off the Auto Aspect ratio feature, Select Off in step 3 above. The adjustment range is from the HDMI 1 or HDMI 2 input. To revert...
User Guide
Page 74
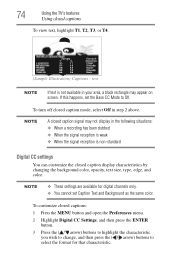
... is non-standard Digital CC settings You can customize the closed caption mode, select Off in your area, a black rectangle may appear on screen. To turn off closed caption display characteristics by changing the background color, opacity, text size, type, edge, and color. NOTE ❖ These settings are available for that...
... is non-standard Digital CC settings You can customize the closed caption mode, select Off in your area, a black rectangle may appear on screen. To turn off closed caption display characteristics by changing the background color, opacity, text size, type, edge, and color. NOTE ❖ These settings are available for that...

User Guide
Page 76
... in the following order: 1/2 Mute, Mute, Volume, 1/2 Mute, etc. (Sample Image) Levels of mute If closed captioned. button to set to partially reduce (1/2 Mute) or turn off (Mute) the sound. NOTE If you press the MUTE button, the mute mode changes in the SOUND menu while Mute is active, Mute is...
... in the following order: 1/2 Mute, Mute, Volume, 1/2 Mute, etc. (Sample Image) Levels of mute If closed captioned. button to set to partially reduce (1/2 Mute) or turn off (Mute) the sound. NOTE If you press the MUTE button, the mute mode changes in the SOUND menu while Mute is active, Mute is...
User Guide
Page 79
To reset the settings to select On. To turn on your device. 4 To save the new settings, highlight Done, and then press the ENTER button. Selecting the optical audio output format You can occur ... in volume that can select the optical audio output format when you connect a Dolby® Digital decoder or other digital audio systems to a commercial. To turn on page 30). Using the TV's features 79 Adjusting the audio Audyssey ABX™ Audyssey ABX™ technology uses sophisticated driver analysis and low frequency...
To reset the settings to select On. To turn on your device. 4 To save the new settings, highlight Done, and then press the ENTER button. Selecting the optical audio output format You can occur ... in volume that can select the optical audio output format when you connect a Dolby® Digital decoder or other digital audio systems to a commercial. To turn on page 30). Using the TV's features 79 Adjusting the audio Audyssey ABX™ Audyssey ABX™ technology uses sophisticated driver analysis and low frequency...
User Guide
Page 99
...Auto Brightness Sensor When the Auto Brightness Sensor Setting is one minute remaining on the sleep timer. To display the time remaining until the TV turns off. 2 Repeatedly press the SLEEP button to increase the time in 10-minute increments, or press the ( / arrow) buttons to increase ... increments (maximum of 12 hours). Using the TV's features 99 Setting the sleep timer Setting the sleep timer You can set the sleep timer to turn on Auto Brightness: 1 From the Preferences menu, highlight Energy Saving Settings and press ENTER. 2 Press the ( / arrow) buttons to select Auto Brightness ...
...Auto Brightness Sensor When the Auto Brightness Sensor Setting is one minute remaining on the sleep timer. To display the time remaining until the TV turns off. 2 Repeatedly press the SLEEP button to increase the time in 10-minute increments, or press the ( / arrow) buttons to increase ... increments (maximum of 12 hours). Using the TV's features 99 Setting the sleep timer Setting the sleep timer You can set the sleep timer to turn on Auto Brightness: 1 From the Preferences menu, highlight Energy Saving Settings and press ENTER. 2 Press the ( / arrow) buttons to select Auto Brightness ...


