User Guide
Page 5
...1) Read and follow the instructions in the instructions provided with a sharp or heavy object. 43) • The LCD screen of this manual to a Toshiba Authorized Service Provider. 45) If you have the TV serviced: • Ask the service technician to use only replacement parts specified by an independent laboratory...wall bracket. 6) After attaching the appropriate bracket(s) to the wall and the back of the TV, remove the pedestal stand from the rear of the TV. 3) Remove the screws of the VESA Mounting Pattern show in death or serious injury. Disposal may be used TV by the wall mount ...
...1) Read and follow the instructions in the instructions provided with a sharp or heavy object. 43) • The LCD screen of this manual to a Toshiba Authorized Service Provider. 45) If you have the TV serviced: • Ask the service technician to use only replacement parts specified by an independent laboratory...wall bracket. 6) After attaching the appropriate bracket(s) to the wall and the back of the TV, remove the pedestal stand from the rear of the TV. 3) Remove the screws of the VESA Mounting Pattern show in death or serious injury. Disposal may be used TV by the wall mount ...
User Guide
Page 6
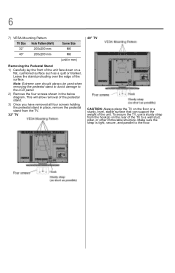
... damage to the floor. Make sure the strap is tight, secure, and parallel to the LCD panel. 2) Remove the four screws shown in place, remove the pedestal stand from the hook(s) on the rear of the surface. This will allow removal of the unit face down on the floor or ...the weight of the unit. 6 7) VESA Mounting Pattern TV Size Hole Pattern (HxV) 32" 200x200 mm 40" 200x200 mm Screw Size M6 M6 (unit in mm) Removing the Pedestal Stand 1) Carefully lay the front of the pedestal stand. 3) Once you have removed all four screws holding the pedestal stand in the below diagram.
... damage to the floor. Make sure the strap is tight, secure, and parallel to the LCD panel. 2) Remove the four screws shown in place, remove the pedestal stand from the hook(s) on the rear of the surface. This will allow removal of the unit face down on the floor or ...the weight of the unit. 6 7) VESA Mounting Pattern TV Size Hole Pattern (HxV) 32" 200x200 mm 40" 200x200 mm Screw Size M6 M6 (unit in mm) Removing the Pedestal Stand 1) Carefully lay the front of the pedestal stand. 3) Once you have removed all four screws holding the pedestal stand in the below diagram.

User Guide
Page 121
...; C) 20 - 80% (no moisture condensation) Supplied accessories ❖ Remote control with two size "AAA" batteries ❖ Resource Guide ❖ Quick Setup Guide ❖ Four screws (for pedestal stand) and hardware Acceptable signal formats for E210U1) Frequency 31.469 kHz 37.879 kHz 48.363 kHz 47.776 kHz 47.712 kHz 63...
...; C) 20 - 80% (no moisture condensation) Supplied accessories ❖ Remote control with two size "AAA" batteries ❖ Resource Guide ❖ Quick Setup Guide ❖ Four screws (for pedestal stand) and hardware Acceptable signal formats for E210U1) Frequency 31.469 kHz 37.879 kHz 48.363 kHz 47.776 kHz 47.712 kHz 63...


