User Guide
Page 5
... Be sure to secure the TV to environmental considerations. If these sounds become frequent or continuous, unplug the power cord and contact a Toshiba Authorized Service Provider. 42) WARNING: RISK OF SERIOUS PERSONAL INJURY OR EQUIPMENT DAMAGE! When the TV reaches the end of its useful life...when the unit is not completely disconnected from the back cover to attach the wall mount bracket to the TV. 4) Always use the screws supplied or recommended by the wall mount manufacturer. 5) Follow the instructions provided with the pedestal. These actions will damage the LCD screen....
... Be sure to secure the TV to environmental considerations. If these sounds become frequent or continuous, unplug the power cord and contact a Toshiba Authorized Service Provider. 42) WARNING: RISK OF SERIOUS PERSONAL INJURY OR EQUIPMENT DAMAGE! When the TV reaches the end of its useful life...when the unit is not completely disconnected from the back cover to attach the wall mount bracket to the TV. 4) Always use the screws supplied or recommended by the wall mount manufacturer. 5) Follow the instructions provided with the pedestal. These actions will damage the LCD screen....
User Guide
Page 6
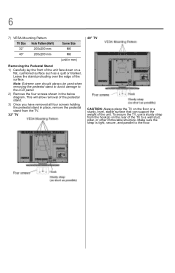
This will allow removal of the pedestal stand. 3) Once you have removed all four screws holding the pedestal stand in place, remove the pedestal stand from the hook(s) on a flat, ... rear of the surface. 6 7) VESA Mounting Pattern TV Size Hole Pattern (HxV) 32" 200x200 mm 40" 200x200 mm Screw Size M6 M6 (unit in mm) Removing the Pedestal Stand 1) Carefully lay the front of the unit. Leave the stand... protruding over the edge of the TV to the LCD panel. 2) Remove the four screws shown in the below diagram. Make sure the strap is tight, secure, and parallel to the floor.
This will allow removal of the pedestal stand. 3) Once you have removed all four screws holding the pedestal stand in place, remove the pedestal stand from the hook(s) on a flat, ... rear of the surface. 6 7) VESA Mounting Pattern TV Size Hole Pattern (HxV) 32" 200x200 mm 40" 200x200 mm Screw Size M6 M6 (unit in mm) Removing the Pedestal Stand 1) Carefully lay the front of the unit. Leave the stand... protruding over the edge of the TV to the LCD panel. 2) Remove the four screws shown in the below diagram. Make sure the strap is tight, secure, and parallel to the floor.

User Guide
Page 121
...º C) 20 - 80% (no moisture condensation) Supplied accessories ❖ Remote control with two size "AAA" batteries ❖ Resource Guide ❖ Quick Setup Guide ❖ Four screws (for pedestal stand) and hardware Acceptable signal formats for E210U1) incorrect display, false format detection, picture position failure, blur, or judder. But this is not...
...º C) 20 - 80% (no moisture condensation) Supplied accessories ❖ Remote control with two size "AAA" batteries ❖ Resource Guide ❖ Quick Setup Guide ❖ Four screws (for pedestal stand) and hardware Acceptable signal formats for E210U1) incorrect display, false format detection, picture position failure, blur, or judder. But this is not...


