
Owners Manual
Page 1
Refer to them whenever you call upon your TOSHIBA dealer regarding this product. OWNER'S MANUAL LCD Color TV 19AV550E 19AV550T 19AV550Y 26AV550E 26AV550T 26AV550Y 26AV600E 26AV600T 26AV600Y ©2009 TOSHIBA CORPORATION All Rights Reserved Owner's Record You will find the model number and serial number on the back of the TV. Model number: Serial number: VX1A001212A0 Record these numbers in the spaces provided below.
Refer to them whenever you call upon your TOSHIBA dealer regarding this product. OWNER'S MANUAL LCD Color TV 19AV550E 19AV550T 19AV550Y 26AV550E 26AV550T 26AV550Y 26AV600E 26AV600T 26AV600Y ©2009 TOSHIBA CORPORATION All Rights Reserved Owner's Record You will find the model number and serial number on the back of the TV. Model number: Serial number: VX1A001212A0 Record these numbers in the spaces provided below.
Owners Manual
Page 3
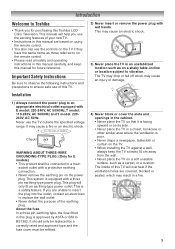
... are covered, blocked or sealed, which may cause an electric shock. 3) Never place the TV in this Toshiba LCD Color Television. Ex. 220-240V AC, 50/60Hz Check! It may result in this TV will only fit an earthing-type power outlet. If you are based on using the ...TYPE PLUG: (Only for E models) • This product shall be connected to replace the wall outlet. • Never defeat the purpose of this TV. This manual will help you for future reference. This is poor. • Never drape a newspaper, tablecloth or curtain on a soft unstable surface, such as a ...
... are covered, blocked or sealed, which may cause an electric shock. 3) Never place the TV in this Toshiba LCD Color Television. Ex. 220-240V AC, 50/60Hz Check! It may result in this TV will only fit an earthing-type power outlet. If you are based on using the ...TYPE PLUG: (Only for E models) • This product shall be connected to replace the wall outlet. • Never defeat the purpose of this TV. This manual will help you for future reference. This is poor. • Never drape a newspaper, tablecloth or curtain on a soft unstable surface, such as a ...
Owners Manual
Page 7
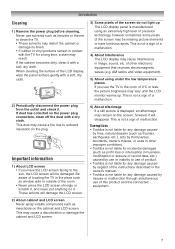
...is not a sign of the screen do not light up . This is not a sign of the LCD display, wipe the panel surface gently with a soft, dry cloth. Never use the TV in the owner's manual. • Toshiba is not liable for a long time, a stain may result. When cleaning the surface of a ...malfunction. 4) About Interference The LCD display may distort the cabinet or damage its finish. • If...
...is not a sign of the screen do not light up . This is not a sign of the LCD display, wipe the panel surface gently with a soft, dry cloth. Never use the TV in the owner's manual. • Toshiba is not liable for a long time, a stain may result. When cleaning the surface of a ...malfunction. 4) About Interference The LCD display may distort the cabinet or damage its finish. • If...
Owners Manual
Page 12
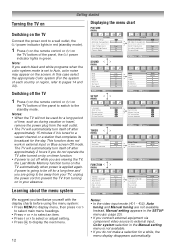
... off for a while, the menu display disappears automatically. If power is tuned to pages 14 and 33). Instead, Manual setting appears in external input or Blue screen Off mode. The TV will automatically turn itself off after approximately 2 hours if you do not make a selection for a long time and .... • Press I or i to select or adjust setting. • Press Q to external input, Color system selection in the Manual setting menu is not available. • If you do not operate the TV after approximately 15 minutes if it is going to be away from the wall outlet. • The...
... off for a while, the menu display disappears automatically. If power is tuned to pages 14 and 33). Instead, Manual setting appears in external input or Blue screen Off mode. The TV will automatically turn itself off after approximately 2 hours if you do not make a selection for a long time and .... • Press I or i to select or adjust setting. • Press Q to external input, Color system selection in the Manual setting menu is not available. • If you do not operate the TV after approximately 15 minutes if it is going to be away from the wall outlet. • The...
Owners Manual
Page 13
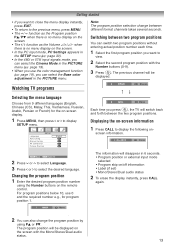
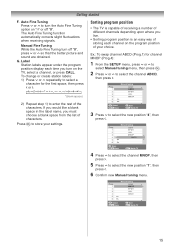
...number each time. 1 Select the first program position you press , the TV will be displayed. SETUP Language Auto tuning Manual tuning AV connection Picture Position English OK OK OK OK MENU Back EXIT Watch TV 2 Press u or U to select Language. 3 Press I / i function... Displaying the on the screen with the Number buttons (0-9). 3 Press . For program positions below 10, use the color management function (- Watching TV programs Selecting the menu language Choose from 9 different languages (English, Chinese (CS), Malay, Thai, Vietnamese, Russian, Arabic, Persian or French...
...number each time. 1 Select the first program position you press , the TV will be displayed. SETUP Language Auto tuning Manual tuning AV connection Picture Position English OK OK OK OK MENU Back EXIT Watch TV 2 Press u or U to select Language. 3 Press I / i function... Displaying the on the screen with the Number buttons (0-9). 3 Press . For program positions below 10, use the color management function (- Watching TV programs Selecting the menu language Choose from 9 different languages (English, Chinese (CS), Malay, Thai, Vietnamese, Russian, Arabic, Persian or French...
Owners Manual
Page 14
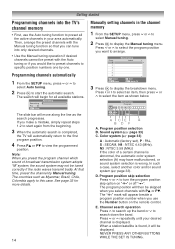
...automatically return to the first program position. 4 Press PB or Pb to search down the band. Manual tuning Program 1 B/G A OK Store MENU Back EXIT Watch TV A CE G BD F A. NEVER PRESS ANY OTHER BUTTONS WHILE THE SET IS TUNING. Program position skip... breakdown menu. Press u or U to select the program position you make a mistake, simply repeat steps 1-2 to display the Manual tuning menu. Prog. 1 2 3 4 5 6 Manual tuning Label OK Select MENU Back Sort EXIT Watch TV 3 Press Q to arrange. Sound system (- page 33) A : Automatic (factory set), P : PAL, S : SECAM...
...automatically return to the first program position. 4 Press PB or Pb to search down the band. Manual tuning Program 1 B/G A OK Store MENU Back EXIT Watch TV A CE G BD F A. NEVER PRESS ANY OTHER BUTTONS WHILE THE SET IS TUNING. Program position skip... breakdown menu. Press u or U to select the program position you make a mistake, simply repeat steps 1-2 to display the Manual tuning menu. Prog. 1 2 3 4 5 6 Manual tuning Label OK Select MENU Back Sort EXIT Watch TV 3 Press Q to arrange. Sound system (- page 33) A : Automatic (factory set), P : PAL, S : SECAM...
Owners Manual
Page 15
... the rest of your settings. Press Q to turn the Auto Fine Tuning option on the program position of the characters. Manual Fine Tuning While the Auto Fine Tuning turn on the TV, select a channel, or press CALL. Ex.: To swap channel ABCD (Prog.1) for the first space, then ...upon where you must choose a blank space from the list of storing each time you turn off "0". Prog. 1 2 3 4 5 6 Manual tuning Label EFGH IJKL MNOP ABCD Store MENU Back EXIT Watch TV 4 Press U to select the channel MNOP, then press i. 5 Press U to select the new position "4", then press I . 6 ...
... the rest of your settings. Press Q to turn the Auto Fine Tuning option on the program position of the characters. Manual Fine Tuning While the Auto Fine Tuning turn on the TV, select a channel, or press CALL. Ex.: To swap channel ABCD (Prog.1) for the first space, then ...upon where you must choose a blank space from the list of storing each time you turn off "0". Prog. 1 2 3 4 5 6 Manual tuning Label EFGH IJKL MNOP ABCD Store MENU Back EXIT Watch TV 4 Press U to select the channel MNOP, then press i. 5 Press U to select the new position "4", then press I . 6 ...
Owners Manual
Page 17
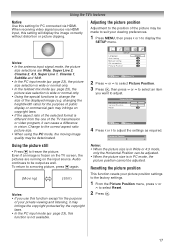
.... Even if an image is frozen on copyright laws. • If the aspect ratio of the selected format is in vision. Using the TV's features Native Use this setting for the purpose of public display or commercial gain may be deteriorated. When receiving video signal source via HDMI. ... infringe the copyright protected by the copyright laws. • In the PC input mode (- SETUP Language Auto tuning Manual tuning AV connection Picture Position English OK OK OK OK MENU Back EXIT Watch TV 2 Press u or U to select Picture Position. 3 Press Q, then press u or U to select an item you want ...
.... Even if an image is frozen on copyright laws. • If the aspect ratio of the selected format is in vision. Using the TV's features Native Use this setting for the purpose of public display or commercial gain may be deteriorated. When receiving video signal source via HDMI. ... infringe the copyright protected by the copyright laws. • In the PC input mode (- SETUP Language Auto tuning Manual tuning AV connection Picture Position English OK OK OK OK MENU Back EXIT Watch TV 2 Press u or U to select Picture Position. 3 Press Q, then press u or U to select an item you want ...
Owners Manual
Page 23
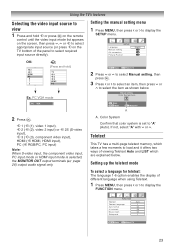
...Selecting the video input source to view 1 Press and hold ) TV 1 2 3 HDMI PC Ex. Manual setting Color System:Auto A OK Store MENU Back EXIT Watch TV A 2 Press Q. PC VGA mode PC VGA MENU Back EXIT Watch TV 2 Press u or U to select Manual setting, then press Q. 3 Press I or i to select ...an item, then press u or U to select required input source directly). FUNCTION Te l e t e x t Teletext language Auto format 4:3 stretch Blue screen Side panel Auto 1 On Off On 1 MENU Back EXIT Watch TV 23 page 26...
...Selecting the video input source to view 1 Press and hold ) TV 1 2 3 HDMI PC Ex. Manual setting Color System:Auto A OK Store MENU Back EXIT Watch TV A 2 Press Q. PC VGA mode PC VGA MENU Back EXIT Watch TV 2 Press u or U to select Manual setting, then press Q. 3 Press I or i to select ...an item, then press u or U to select required input source directly). FUNCTION Te l e t e x t Teletext language Auto format 4:3 stretch Blue screen Side panel Auto 1 On Off On 1 MENU Back EXIT Watch TV 23 page 26...
Owners Manual
Page 26
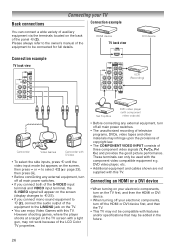
... shown are not supplied with this TV. Please always refer to select o2 (- ...press u or U to the owner's manual of three component video signals (Y, PB/...TV first, and then the HDMI or DVI device. • When turning off your TV... Connection example You can connect a wide variety of auxiliary equipment via the terminals located on the TV.... • You can only be used with S-Video • To select the side inputs, press o until the video input mode list appears on the TV... Box DVD video player (with this TV. page 23), then press Q. ...LCD Color TV properties. Back connections Connecting ...
... shown are not supplied with this TV. Please always refer to select o2 (- ...press u or U to the owner's manual of three component video signals (Y, PB/...TV first, and then the HDMI or DVI device. • When turning off your TV... Connection example You can connect a wide variety of auxiliary equipment via the terminals located on the TV.... • You can only be used with S-Video • To select the side inputs, press o until the video input mode list appears on the TV... Box DVD video player (with this TV. page 23), then press Q. ...LCD Color TV properties. Back connections Connecting ...
Owners Manual
Page 28
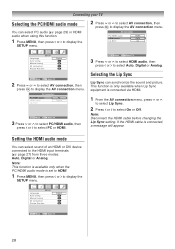
.... 1 Press MENU, then press I or i to display the AV connection menu. SETUP Language Auto tuning Manual tuning AV connection Picture Position English OK OK OK OK MENU Back EXIT Watch TV 28 Note: This function is available only when the PC/HDMI audio mode is connected, a message will appear.... AV connection PC/HDMI audio HDMI audio Lip Sync HDMI Auto On SETUP Language Auto tuning Manual tuning AV connection Picture Position English OK OK OK OK MENU Back EXIT Watch TV 2 Press u or U to select AV connection, then press Q to select Auto, Digital or Analog.
.... 1 Press MENU, then press I or i to display the AV connection menu. SETUP Language Auto tuning Manual tuning AV connection Picture Position English OK OK OK OK MENU Back EXIT Watch TV 28 Note: This function is available only when the PC/HDMI audio mode is connected, a message will appear.... AV connection PC/HDMI audio HDMI audio Lip Sync HDMI Auto On SETUP Language Auto tuning Manual tuning AV connection Picture Position English OK OK OK OK MENU Back EXIT Watch TV 2 Press u or U to select AV connection, then press Q to select Auto, Digital or Analog.

Owners Manual
Page 30
...or if no overscanning) (- page 18, 19). • In the PC input mode, the Manual setting (- page 23) is not displayed. • First press o until the video input mode list appears on the TV, use an HDMI cable (type A connector). no signal is particular, the PC signal may ...; The edges of the screen (e.g. PC Settings Horizontal Position 0 Ver tical Position 0 Clock Phase 0 Sampling Clock 0 Reset OK MENU Back EXIT Watch TV 30 If connecting a PC with an HDMI terminal, use an HDMI-to display the PC Settings menu. Language AV connection PC Settings SETUP English OK...
...or if no overscanning) (- page 18, 19). • In the PC input mode, the Manual setting (- page 23) is not displayed. • First press o until the video input mode list appears on the TV, use an HDMI cable (type A connector). no signal is particular, the PC signal may ...; The edges of the screen (e.g. PC Settings Horizontal Position 0 Ver tical Position 0 Clock Phase 0 Sampling Clock 0 Reset OK MENU Back EXIT Watch TV 30 If connecting a PC with an HDMI terminal, use an HDMI-to display the PC Settings menu. Language AV connection PC Settings SETUP English OK...

Owners Manual
Page 35
Reference section Supplied accessories Owner's manual (1), Remote control (1), Batteries (2), Clip (1) This is used to fix the TV to a fire hazard or dangerous voltages. 35 It may expose you to a wall, pillar, etc. (- page 4). • Design and specifications are subject to change without notice. • Never service or remodel the TV by yourself.
Reference section Supplied accessories Owner's manual (1), Remote control (1), Batteries (2), Clip (1) This is used to fix the TV to a fire hazard or dangerous voltages. 35 It may expose you to a wall, pillar, etc. (- page 4). • Design and specifications are subject to change without notice. • Never service or remodel the TV by yourself.


