
User Manual
Page 3
..., or your skin is dropped and the cabinet or enclosure surface has been damaged or the TV does not operate normally, take the following precautions: • ALWAYS turn off the TV and unplug the power cord to avoid possible electric shock or fire. • NEVER allow... in direct sunlight; Important Safety Instructions 1) Read these instructions. 2) Keep these recommendations and precautions and heed all warnings when installing your TV: 19) WARNING: NEVER expose batteries to operate this equipment under the rules of the Federal Communications Commission. 23) DANGER: RISK OF SERIOUS...
..., or your skin is dropped and the cabinet or enclosure surface has been damaged or the TV does not operate normally, take the following precautions: • ALWAYS turn off the TV and unplug the power cord to avoid possible electric shock or fire. • NEVER allow... in direct sunlight; Important Safety Instructions 1) Read these instructions. 2) Keep these recommendations and precautions and heed all warnings when installing your TV: 19) WARNING: NEVER expose batteries to operate this equipment under the rules of the Federal Communications Commission. 23) DANGER: RISK OF SERIOUS...
User Manual
Page 5
...TV serviced: • Ask the service technician to use the screws supplied or recommended by the wall mount manufacturer. 5) Follow the instructions provided with your wall bracket. This is normal, especially when the unit is being turned on / off . If these sounds become frequent or continuous, unplug the power cord and contact a Toshiba... 44) WARNING: RISK OF ELECTRIC SHOCK! Refer all servicing not specified in this manual to a Toshiba Authorized Service Provider. 45) If you decide to wall mount your LCD TV, always use a UL listed wall bracket appropriate for the size and weight of the LCD...
...TV serviced: • Ask the service technician to use the screws supplied or recommended by the wall mount manufacturer. 5) Follow the instructions provided with your wall bracket. This is normal, especially when the unit is being turned on / off . If these sounds become frequent or continuous, unplug the power cord and contact a Toshiba... 44) WARNING: RISK OF ELECTRIC SHOCK! Refer all servicing not specified in this manual to a Toshiba Authorized Service Provider. 45) If you decide to wall mount your LCD TV, always use a UL listed wall bracket appropriate for the size and weight of the LCD...
User Manual
Page 10
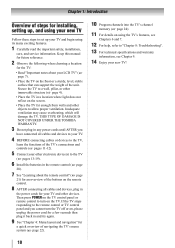
... DAMAGE IS NOT COVERED UNDER THE TOSHIBA WARRANTY. 3 Do not plug in any power cords until AFTER you cannot turn on the remote control. 8 AFTER connecting all cables and devices to your TV. 4 BEFORE connecting cables or devices to the TV, learn the functions of the TV's connections and controls ( pages 11...safety, installation, care, and service information. Then press POWER on the TV control panel or remote control to set up , and using the TV's features, see Chapter 9. 14 Enjoy your new TV Follow these steps to turn the TV off or on, please unplug the power cord for a few seconds then...
... DAMAGE IS NOT COVERED UNDER THE TOSHIBA WARRANTY. 3 Do not plug in any power cords until AFTER you cannot turn on the remote control. 8 AFTER connecting all cables and devices to your TV. 4 BEFORE connecting cables or devices to the TV, learn the functions of the TV's connections and controls ( pages 11...safety, installation, care, and service information. Then press POWER on the TV control panel or remote control to set up , and using the TV's features, see Chapter 9. 14 Enjoy your new TV Follow these steps to turn the TV off or on, please unplug the power cord for a few seconds then...
User Manual
Page 11
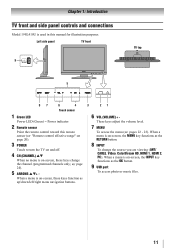
...HD, HDMI 1, HDMI 2, PC). When a menu is used in this remote sensor ( "Remote control effective range" on page 20). 3 POWER Touch to turn the TV on and off. 4 CH (CHANNEL) ST When no menu is on-screen, the MENU key functions as the RETURN button. 8 INPUT To change the ...). When a menu is on -screen, the INPUT key functions as up/down/left/right menu navigation buttons. 6 VOL (VOLUME) + - Left side panel TV front TV top Touch sensor 1 Green LED Power LED (Green) = Power indicator 2 Remote sensor Point the remote control toward this manual for illustration purposes. When a menu...
...HD, HDMI 1, HDMI 2, PC). When a menu is used in this remote sensor ( "Remote control effective range" on page 20). 3 POWER Touch to turn the TV on and off. 4 CH (CHANNEL) ST When no menu is on-screen, the MENU key functions as the RETURN button. 8 INPUT To change the ...). When a menu is on -screen, the INPUT key functions as up/down/left/right menu navigation buttons. 6 VOL (VOLUME) + - Left side panel TV front TV top Touch sensor 1 Green LED Power LED (Green) = Power indicator 2 Remote sensor Point the remote control toward this manual for illustration purposes. When a menu...
User Manual
Page 14
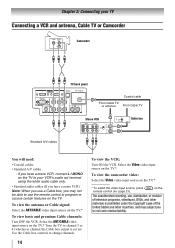
... A/V cables - Use the Cable box controls to change channels. 14 To view the VCR: Turn ON the VCR. on the TV. To view the antenna or Cable signal: Select the ANT/CABLE video input source on the TV.* * To select the video input source, press remote control ( page 21). Select the Video... view the camcorder video: Select the Video video input source on the TV.* To view basic and premium Cable channels: Turn OFF the VCR. Select the ANT/CABLE video input source on the TV.* Tune the TV to channel 3 or 4 (whichever channel the Cable box output is prohibited under the Copyright Laws ...
... A/V cables - Use the Cable box controls to change channels. 14 To view the VCR: Turn ON the VCR. on the TV. To view the antenna or Cable signal: Select the ANT/CABLE video input source on the TV.* * To select the video input source, press remote control ( page 21). Select the Video... view the camcorder video: Select the Video video input source on the TV.* To view basic and premium Cable channels: Turn OFF the VCR. Select the ANT/CABLE video input source on the TV.* Tune the TV to channel 3 or 4 (whichever channel the Cable box output is prohibited under the Copyright Laws ...
User Manual
Page 15
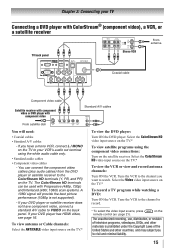
...If you have component video, connect a standard A/V cable to VIDEO on the TV to your VCR's audio out terminal using the component video connections: Turn on the TV.* To view the VCR or view and record antenna channels: Turn ON the VCR. If your DVD player or satellite receiver does not have ...Laws of television programs, videotapes, DVDs, and other materials is not supported). - Select the Video video input source on the TV. on the TV.* To view the DVD player: Turn ON the DVD player. Chapter 2: Connecting your DVD player has HDMI video, see page 16. To view antenna or Cable ...
...If you have component video, connect a standard A/V cable to VIDEO on the TV to your VCR's audio out terminal using the component video connections: Turn on the TV.* To view the VCR or view and record antenna channels: Turn ON the VCR. If your DVD player or satellite receiver does not have ...Laws of television programs, videotapes, DVDs, and other materials is not supported). - Select the Video video input source on the TV. on the TV.* To view the DVD player: Turn ON the DVD player. Chapter 2: Connecting your DVD player has HDMI video, see page 16. To view antenna or Cable ...
User Manual
Page 16
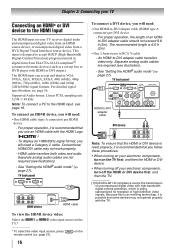
... the HDMI 1 or HDMI 2 video input source on the TV.* * To select the video input source, press remote control ( page 21). 16 on the TV first, and then the HDMI or DVI device. • When turning off your electronic components, turn on the To connect a DVI device, you will need ... input, see illustration). - To connect an HDMI device, you follow these procedures: • When turning on your electronic components, turn off the HDMI or DVI device first, and then the TV. [1] EIA/CEA-861-D compliance covers the transmission of uncompressed digital video with HDMI or DVI output)....
... the HDMI 1 or HDMI 2 video input source on the TV.* * To select the video input source, press remote control ( page 21). 16 on the TV first, and then the HDMI or DVI device. • When turning off your electronic components, turn on the To connect a DVI device, you will need ... input, see illustration). - To connect an HDMI device, you follow these procedures: • When turning on your electronic components, turn off the HDMI or DVI device first, and then the TV. [1] EIA/CEA-861-D compliance covers the transmission of uncompressed digital video with HDMI or DVI output)....
User Manual
Page 18
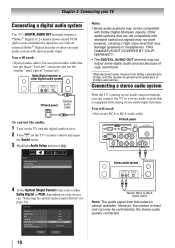
...Optical Output Format Dolby Digital Dynamic Range Control No Auto Stereo English Dolby Digital Compressed Reset Done 18 Stereo RCA to RCA audio cable TV back panel Sound Digital Audio Selector Audio Settings Audio Setup Stereo audio system 4 In the Optical Output Format field, select either Dolby ...PCM (pulse-code modulation) signal for use with an external Dolby® Digital decoder or other digital audio system TV back panel Optical audio cable To control the audio: 1 Turn on the TV and the digital audio device. 2 Press on page 39). Note: • Some audio systems may not ...
...Optical Output Format Dolby Digital Dynamic Range Control No Auto Stereo English Dolby Digital Compressed Reset Done 18 Stereo RCA to RCA audio cable TV back panel Sound Digital Audio Selector Audio Settings Audio Setup Stereo audio system 4 In the Optical Output Format field, select either Dolby ...PCM (pulse-code modulation) signal for use with an external Dolby® Digital decoder or other digital audio system TV back panel Optical audio cable To control the audio: 1 Turn on the TV and the digital audio device. 2 Press on page 39). Note: • Some audio systems may not ...
User Manual
Page 21
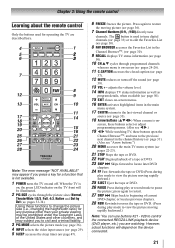
... a key for operating the TV are watching. When the TV is on-screen ( pages 24-26). 11 C.CAPTION accesses the closed caption ( page 37). 12 MUTE reduces or turns off . Press again to ...source ( page 33). 18 Arrow buttons (STWX) When a menu is not available. 1 POWER turns the TV on - press again to restart. 27 SKIP Skips back to beginning of a tape or DVD... page 30). 8 FAV BROWSER accesses the Favorites List in the Channel BrowserTM. ( page 30). 9 RECALL displays TV status information ( page 50). 10 CH ST cycles through the picture sizes: Normal, TheaterWide 1/2/3, Full, 4:3, Native ...
... a key for operating the TV are watching. When the TV is on-screen ( pages 24-26). 11 C.CAPTION accesses the closed caption ( page 37). 12 MUTE reduces or turns off . Press again to ...source ( page 33). 18 Arrow buttons (STWX) When a menu is not available. 1 POWER turns the TV on - press again to restart. 27 SKIP Skips back to beginning of a tape or DVD... page 30). 8 FAV BROWSER accesses the Favorites List in the Channel BrowserTM. ( page 30). 9 RECALL displays TV status information ( page 50). 10 CH ST cycles through the picture sizes: Normal, TheaterWide 1/2/3, Full, 4:3, Native ...
User Manual
Page 24
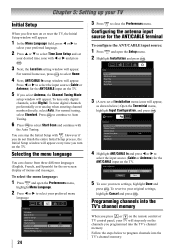
...Player Control 24 Off Auto English 3 Press to program channels into the TV's channel memory When you press or on the remote control or TV control panel, your TV will appear every time you turn on or reset the TV, the Initial Setup window will appear. 1 In the Menu Language field,...LINK Setup Sleep Timer PC Settings Media Player 3 (A new set your desired time zone with . Chapter 5: Setting up your TV Initial Setup When you first turn on the TV. To tune digital channels preferentially over analog when entering channel number directly, select Auto. Press to continue to Auto Tuning. ...
...Player Control 24 Off Auto English 3 Press to program channels into the TV's channel memory When you press or on the remote control or TV control panel, your TV will appear every time you turn on or reset the TV, the Initial Setup window will appear. 1 In the Menu Language field,...LINK Setup Sleep Timer PC Settings Media Player 3 (A new set your desired time zone with . Chapter 5: Setting up your TV Initial Setup When you first turn on the TV. To tune digital channels preferentially over analog when entering channel number directly, select Auto. Press to continue to Auto Tuning. ...
User Manual
Page 28
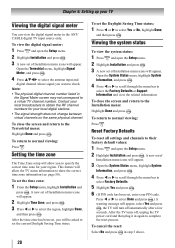
...the screen and return to the Installation menu: Highlight Done and press . This feature will appear. A new set , enter your PIN code. After the TV turns off automatically after a few seconds. To return to normal viewing: Press . Press W or X to select Done and press .) A warning message will ...2 Highlight Installation and press . To set of Installation menu icons will turn off , unplug the TV power cord and then plug it in the ANT/ CABLE digital TV input source only. Chapter 5: Setting up your TV Viewing the digital signal meter You can view the digital signal meter in ...
...the screen and return to the Installation menu: Highlight Done and press . This feature will appear. A new set , enter your PIN code. After the TV turns off automatically after a few seconds. To return to normal viewing: Press . Press W or X to select Done and press .) A warning message will ...2 Highlight Installation and press . To set of Installation menu icons will turn off , unplug the TV power cord and then plug it in the ANT/ CABLE digital TV input source only. Chapter 5: Setting up your TV Viewing the digital signal meter You can view the digital signal meter in ...
User Manual
Page 29
...Input Selection screen, you will have connected to each source, from the popup window using , some REGZA-LINK devices may automatically turn on the remote control and then press to change the input; Preferences CC Selector Base CC Mode Digital CC Settings Input Labeling Channel... then press . HDMI 1 - 1 HDMI 1 - 2 HDMI 1 - 3 Audio Receiver Player Recorder Press repeatedly to view: 1 Press on the remote control or TV control panel to change the input. Note: • When selecting REGZA-LINK input sources from the following preset list of the Input Selection screen. To...
...Input Selection screen, you will have connected to each source, from the popup window using , some REGZA-LINK devices may automatically turn on the remote control and then press to change the input; Preferences CC Selector Base CC Mode Digital CC Settings Input Labeling Channel... then press . HDMI 1 - 1 HDMI 1 - 2 HDMI 1 - 3 Audio Receiver Player Recorder Press repeatedly to view: 1 Press on the remote control or TV control panel to change the input. Note: • When selecting REGZA-LINK input sources from the following preset list of the Input Selection screen. To...

User Manual
Page 31
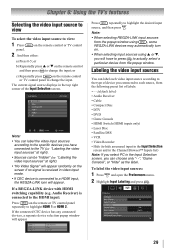
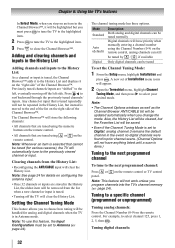
...Current list (History, ANT/CABLE, Inputs, Favorites, or REGZA-LINK) 2 Input type 3 Channel or input currently being viewed 4 Channel or input that is turned off , pressing , , or will open the Channel Browser™ and surf back to a previous item or surf forward to open in the list. 31... or T to select the setting you stop on page 49 for more information.) 8 To save your entries, highlight Done and press . Chapter 6: Using the TV's features 2 Press T to highlight Navigation, and then press W or X to factory defaults, highlight Reset and press . To return to select either On, or...
...Current list (History, ANT/CABLE, Inputs, Favorites, or REGZA-LINK) 2 Input type 3 Channel or input currently being viewed 4 Channel or input that is turned off , pressing , , or will open the Channel Browser™ and surf back to a previous item or surf forward to open in the list. 31... or T to select the setting you stop on page 49 for more information.) 8 To save your entries, highlight Done and press . Chapter 6: Using the TV's features 2 Press T to highlight Navigation, and then press W or X to factory defaults, highlight Reset and press . To return to select either On, or...
User Manual
Page 32
... listed until a scan is in the History List, the oldest item will be highlighted but instead is tuned. • Turning off the left , eventually moving off the TV will appear. 2 Open the Terrestrial menu, highlight Channel Tuning Mode, and then press X to the end of the list...channel number using the Channel Number (0-9) on the remote control. • All channels that cannot be updated automatically when you program channels into the TV's channel memory ( page 24). Adding and clearing channels and inputs in prior channel scans. (Channel Options will be tuned (for details on ...
... listed until a scan is in the History List, the oldest item will be highlighted but instead is tuned. • Turning off the left , eventually moving off the TV will appear. 2 Open the Terrestrial menu, highlight Channel Tuning Mode, and then press X to the end of the list...channel number using the Channel Number (0-9) on the remote control. • All channels that cannot be updated automatically when you program channels into the TV's channel memory ( page 24). Adding and clearing channels and inputs in prior channel scans. (Channel Options will be tuned (for details on ...
User Manual
Page 35
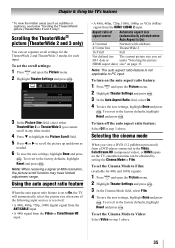
...A 480i, 480p, 720p, 1080i, 1080p, or VGA (60Hz) signal from a DVD player connected to Film: (available for each input. To turn on the TV, smoother motion can set the Cinema Mode to the Video, ColorStream HD (component video), or HDMI inputs on the auto aspect ratio feature: 1 ... at 480i resolution, the picture scroll function may have limited adjustment range. To revert to the factory defaults, highlight Reset and press . To turn off the auto aspect ratio feature: Select Off in step 3 above . To revert to the factory defaults, highlight Reset and press . To...
...A 480i, 480p, 720p, 1080i, 1080p, or VGA (60Hz) signal from a DVD player connected to Film: (available for each input. To turn on the TV, smoother motion can set the Cinema Mode to the Video, ColorStream HD (component video), or HDMI inputs on the auto aspect ratio feature: 1 ... at 480i resolution, the picture scroll function may have limited adjustment range. To revert to the factory defaults, highlight Reset and press . To turn off the auto aspect ratio feature: Select Off in step 3 above . To revert to the factory defaults, highlight Reset and press . To...
User Manual
Page 37
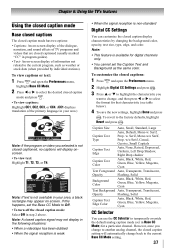
...will automatically change to another analog channel, the closed caption signal may appear on -screen display of the dialogue, narration, and sound effects of TV programs and videos that characteristic (see table below). 4 To save the new settings, highlight Done and press . Note: If text is ... Note: A closed caption setting will display onscreen. • To view text: Highlight T1, T2, T3, or T4. To revert to Off. • To turn off the closed caption mode has two options: • Captions- Note: • This feature is not closed captioned (usually marked "CC" in your area, a ...
...will automatically change to another analog channel, the closed caption signal may appear on -screen display of the dialogue, narration, and sound effects of TV programs and videos that characteristic (see table below). 4 To save the new settings, highlight Done and press . Note: If text is ... Note: A closed caption setting will display onscreen. • To view text: Highlight T1, T2, T3, or T4. To revert to Off. • To turn off the closed caption mode has two options: • Captions- Note: • This feature is not closed captioned (usually marked "CC" in your area, a ...
User Manual
Page 38
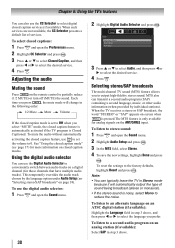
...and open the Sound menu. 38 2 Highlight Digital Audio Selector and press . When the TV receives a stereo or SAP broadcast, the word "STEREO" or "SAP" appears on an...input. Note: • You can typically leave the TV in step 3 above . Chapter 6: Using the TV's features You can also use to set to Off when...for those channels that have multiple audio tracks). Selecting stereo/SAP broadcasts The multi-channel TV sound (MTS) feature allows you prefer. Adjusting the audio Muting the sound Press on ... if the TV program is only available for more information on the remote control to partially...
...and open the Sound menu. 38 2 Highlight Digital Audio Selector and press . When the TV receives a stereo or SAP broadcast, the word "STEREO" or "SAP" appears on an...input. Note: • You can typically leave the TV in step 3 above . Chapter 6: Using the TV's features You can also use to set to Off when...for those channels that have multiple audio tracks). Selecting stereo/SAP broadcasts The multi-channel TV sound (MTS) feature allows you prefer. Adjusting the audio Muting the sound Press on ... if the TV program is only available for more information on the remote control to partially...
User Manual
Page 47
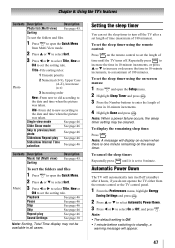
... enter the length of time in 10-minute increments, to set the length of 180 minutes). Note: A message will automatically turn off the TV after 4 hours, if you do not operate the TV either from Multi View mode. 2 Press S or T to select Sort. 3 Press W or X to select Title, New ... in all cases. To set the sorting rule. To display the remaining sleep time: Press . To cancel the sleep timer: Repeatedly press until the TV turns off (standby) after a set the sorting rule. Note: When a power failure occurs, the sleep timer setting may not be cleared. Single view ...
... enter the length of time in 10-minute increments, to set the length of 180 minutes). Note: A message will automatically turn off the TV after 4 hours, if you do not operate the TV either from Multi View mode. 2 Press S or T to select Sort. 3 Press W or X to select Title, New ... in all cases. To set the sorting rule. To display the remaining sleep time: Press . To cancel the sleep timer: Repeatedly press until the TV turns off (standby) after a set the sorting rule. Note: When a power failure occurs, the sleep timer setting may not be cleared. Single view ...
User Manual
Page 48
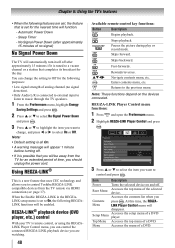
... you want to select On or Off. Fast-forwards. STWX Rewinds/reverses. Navigate contents menu, etc. Returns to control Toshiba REGZA-LINK compatible devices from the TV for the day. Menu Accesses the menu of a DVD player. Stops playback. At this time, the REGZA- Setup ...off after approximately 15 minutes if it is possible that you want to change the setting to On, the following REGZALINK functions will automatically turn itself off . REGZA-LINK Player Control menu functions: 1 Press and open the Preferences menu. 2 Highlight REGZA-LINK Player Control and ...
... you want to select On or Off. Fast-forwards. STWX Rewinds/reverses. Navigate contents menu, etc. Returns to control Toshiba REGZA-LINK compatible devices from the TV for the day. Menu Accesses the menu of a DVD player. Stops playback. At this time, the REGZA- Setup ...off after approximately 15 minutes if it is possible that you want to change the setting to On, the following REGZALINK functions will automatically turn itself off . REGZA-LINK Player Control menu functions: 1 Press and open the Preferences menu. 2 Highlight REGZA-LINK Player Control and ...
User Manual
Page 53
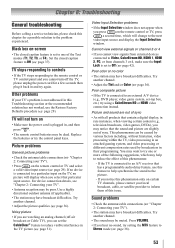
... of sync • As with all products that the sound and picture are watching an analog channel (off-air broadcast or Cable TV), you cannot turn on the remote control or TV, press a second time, which may notice that contain a digital display, in , and then press . • The remote control batteries may be...
... of sync • As with all products that the sound and picture are watching an analog channel (off-air broadcast or Cable TV), you cannot turn on the remote control or TV, press a second time, which may notice that contain a digital display, in , and then press . • The remote control batteries may be...


