
User Manual
Page 61
TI-83 Plus Operating the TI-83 Plus Silver Edition 58 With the TI™ Connect or TI-GRAPH LINK™ software and a TI-GRAPH LINK cable, you can also link the TI-83 Plus to upgrade your PC and then use the TI Connect or TI-GRAPH LINK software and a TI-GRAPH LINK cable to a personal computer. As future software upgrades become available on the TI web site, you can download the software to your TI-83 Plus.
TI-83 Plus Operating the TI-83 Plus Silver Edition 58 With the TI™ Connect or TI-GRAPH LINK™ software and a TI-GRAPH LINK cable, you can also link the TI-83 Plus to upgrade your PC and then use the TI Connect or TI-GRAPH LINK software and a TI-GRAPH LINK cable to a personal computer. As future software upgrades become available on the TI web site, you can download the software to your TI-83 Plus.

User Manual
Page 469
TI-83 Plus Applications 466 Select 2:CBL/CBR to set up the TI-83 Plus to the next menu. An informational screen appears first. 3. Press any key to continue to use a CBL/CBR application, you need a CBL 2/CBL or CBR (as applicable), a TI-83 Plus, and a unit-to-unit link cable. 1. Selecting the CBL/CBR Application To use either of the applications. Press Œ. 2.
TI-83 Plus Applications 466 Select 2:CBL/CBR to set up the TI-83 Plus to the next menu. An informational screen appears first. 3. Press any key to continue to use a CBL/CBR application, you need a CBL 2/CBL or CBR (as applicable), a TI-83 Plus, and a unit-to-unit link cable. 1. Selecting the CBL/CBR Application To use either of the applications. Press Œ. 2.

User Manual
Page 633
..., press 5 to select 1:Receive. Press 1 to select 5:Matrix. The message Waiting... is displayed and the busy indicator is displayed. The AllN SELECT screen is on. 9. TI-83 Plus Communication Link 630 Connect the calculators with the link cable. The MEMORY MANAGEMENT menu is displayed. 5. 4.
..., press 5 to select 1:Receive. Press 1 to select 5:Matrix. The message Waiting... is displayed and the busy indicator is displayed. The AllN SELECT screen is on. 9. TI-83 Plus Communication Link 630 Connect the calculators with the link cable. The MEMORY MANAGEMENT menu is displayed. 5. 4.

User Manual
Page 635
... The TI-83 Plus Silver Edition has a port to connect and communicate with: • Another TI-83 Plus Silver Edition • A TI-83 Plus • A TI-83 • A TI-82 • A TI-73 • A CBL 2/CBL, or a CBR With the TI™ Connect or TI-GRAPH LINK™ software and a TI-GRAPH LINK cable, you can link the TI-83 Plus Silver Edition to communicate with the TI-83 Plus Silver Edition for this purpose. TI-83 Plus Silver Edition LINK...
... The TI-83 Plus Silver Edition has a port to connect and communicate with: • Another TI-83 Plus Silver Edition • A TI-83 Plus • A TI-83 • A TI-82 • A TI-73 • A CBL 2/CBL, or a CBR With the TI™ Connect or TI-GRAPH LINK™ software and a TI-GRAPH LINK cable, you can link the TI-83 Plus Silver Edition to communicate with the TI-83 Plus Silver Edition for this purpose. TI-83 Plus Silver Edition LINK...

User Manual
Page 636
... LINK is built into the other end of the unit-to -unit link cable. The software that also connect to a TI-83 Plus with the unit-to -unit cable into the port. 2. Firmly insert either end of the cable into the TI-83 Plus. (Chapter 14). Linking to the CBL/CBR System The CBL 2/CBL and the CBR are...
... LINK is built into the other end of the unit-to -unit link cable. The software that also connect to a TI-83 Plus with the unit-to -unit cable into the port. 2. Firmly insert either end of the cable into the TI-83 Plus. (Chapter 14). Linking to the CBL/CBR System The CBL 2/CBL and the CBR are...

User Manual
Page 642
To send data to display the RECEIVE menu. 5. On the other unit, press y 8 ~ to an additional TI-83 Plus Silver Edition or a TI-83 Plus: 1. Note: The item(s) you select or deselect TI-83 Plus Communication Link 639 On the sending unit press y 8 and select a data type and items to display the TRANSMIT menu. 4. Press.... 2. Press Í on the sending unit. Press y 8 on the sending unit to SEND. 3. Use a unit-to-unit cable to the receiving unit. 7. Disconnect the link cable only from the receiving unit and connect it to send are pre-selected from the last transmission.
To send data to display the RECEIVE menu. 5. On the other unit, press y 8 ~ to an additional TI-83 Plus Silver Edition or a TI-83 Plus: 1. Note: The item(s) you select or deselect TI-83 Plus Communication Link 639 On the sending unit press y 8 and select a data type and items to display the TRANSMIT menu. 4. Press.... 2. Press Í on the sending unit. Press y 8 on the sending unit to SEND. 3. Use a unit-to-unit cable to the receiving unit. 7. Disconnect the link cable only from the receiving unit and connect it to send are pre-selected from the last transmission.

User Manual
Page 644
...L6 (with up to link the two units together. 2. Sending Lists to a TI-82 The only data type you want to select 1:Transmit and begin transmitting. Use a unit-to-unit cable to 99 elements for a TI-83 Plus list that the receiving unit is set to receive. 3. Press Í on... the sending TI-83 Plus to display the LINK SEND menu. 4. Select the menu of the items you can transmit from a TI-83 to a TI-83 Plus. To send data to be sent...
...L6 (with up to link the two units together. 2. Sending Lists to a TI-82 The only data type you want to select 1:Transmit and begin transmitting. Use a unit-to-unit cable to 99 elements for a TI-83 Plus list that the receiving unit is set to receive. 3. Press Í on... the sending TI-83 Plus to display the LINK SEND menu. 4. Select the menu of the items you can transmit from a TI-83 to a TI-83 Plus. To send data to be sent...

User Manual
Page 645
...cannot perform a memory backup from a TI-83 Plus to a TI-82 or from a TI-83 Plus to a TI-73. TI-83 Plus Communication Link 642 Set the TI-82 to TI82. Press y 8 5 on the sending TI-83 Plus to select 5:Lists to receive. 3. The SELECT screen is set to a TI-83 Plus. Sending to a TI-73 You can send real numbers, ...by the TI-73, you cannot include this symbol in any list names sent to display the LINK TRANSMIT menu. 6. Press ~ to the TI-73. Press Í to transmit. 5. Select each list to select 1:Transmit and begin transmitting. Use a unit-to-unit cable to a TI-82:...
...cannot perform a memory backup from a TI-83 Plus to a TI-82 or from a TI-83 Plus to a TI-73. TI-83 Plus Communication Link 642 Set the TI-82 to TI82. Press y 8 5 on the sending TI-83 Plus to select 5:Lists to receive. 3. The SELECT screen is set to a TI-83 Plus. Sending to a TI-73 You can send real numbers, ...by the TI-73, you cannot include this symbol in any list names sent to display the LINK TRANSMIT menu. 6. Press ~ to the TI-73. Press Í to transmit. 5. Select each list to select 1:Transmit and begin transmitting. Use a unit-to-unit cable to a TI-82:...

User Manual
Page 646
...-unit cable to receive. 3. The SELECT screen is set to receive. 7. Set the TI-73 to link two units together. 2. Press ~ on the sending TI-83 Plus to display the LINK TRANSMIT menu. 6. Confirm that the receiving unit is displayed. 4. TI-83 Plus Communication Link 643 To transmit data to select 2:All-.... Press Í on the sending TI-83 Plus to...
...-unit cable to receive. 3. The SELECT screen is set to receive. 7. Set the TI-73 to link two units together. 2. Press ~ on the sending TI-83 Plus to display the LINK TRANSMIT menu. 6. Confirm that the receiving unit is displayed. 4. TI-83 Plus Communication Link 643 To transmit data to select 2:All-.... Press Í on the sending TI-83 Plus to...

User Manual
Page 653
...cable to display the RECEIVE menu. 4. Press Í on the receiving unit are not overwritten. Backing Up RAM Memory Warning: H:Back Up overwrites the RAM memory and mode settings in the RAM memory of RAM memory and mode settings (no Flash applications or archived items) to another TI-83 Plus Silver Edition...Back Up. The MEMORYBACKUP screen displays. 3. On the receiving unit, press y 8 ~ to link two TI-83 Plus Silver Edition units, or a TI-83 Plus Silver Edition and a TI-83 Plus together. 2. Note: Archived items on the receiving unit. To perform a RAM memory backup: 1. You...
...cable to display the RECEIVE menu. 4. Press Í on the receiving unit are not overwritten. Backing Up RAM Memory Warning: H:Back Up overwrites the RAM memory and mode settings in the RAM memory of RAM memory and mode settings (no Flash applications or archived items) to another TI-83 Plus Silver Edition...Back Up. The MEMORYBACKUP screen displays. 3. On the receiving unit, press y 8 ~ to link two TI-83 Plus Silver Edition units, or a TI-83 Plus Silver Edition and a TI-83 Plus together. 2. Note: Archived items on the receiving unit. To perform a RAM memory backup: 1. You...

User Manual
Page 655
...cable is not set to receive transmission. • You attempt a backup between a TI-73, a TI-82, or a TI-83 and a TI-83 Plus. • You attempt a data transfer from a TI-83 Plus to a TI-83, TI-82, or TI-73 with variables or features not recognized by the TI-83, TI-82, or TI-73. • New variable types and features not recognized by the TI-83, TI-82, or TI... as Archive, UnArchive, SendID, SendOS, Asm(, AsmComp(, and AsmPrgm. • You attempt a data transfer from a TI-83 Plus to a TI-82 with data other than real lists L1 through L6 or without using menu item 5:Lists to the receiving unit...
...cable is not set to receive transmission. • You attempt a backup between a TI-73, a TI-82, or a TI-83 and a TI-83 Plus. • You attempt a data transfer from a TI-83 Plus to a TI-83, TI-82, or TI-73 with variables or features not recognized by the TI-83, TI-82, or TI-73. • New variable types and features not recognized by the TI-83, TI-82, or TI... as Archive, UnArchive, SendID, SendOS, Asm(, AsmComp(, and AsmPrgm. • You attempt a data transfer from a TI-83 Plus to a TI-82 with data other than real lists L1 through L6 or without using menu item 5:Lists to the receiving unit...

User Manual
Page 749
... Xmit ID NOT FOUND ILLEGAL NEST INCREMENT Possible Causes and Suggested Remedies • The TI-83 Plus was unable to transmit an item. Check to see that the cable is firmly connected to both units and that the receiving unit is 0. TI-83 Plus General Information 746 Error Type Error in receive mode. • You pressed É...
... Xmit ID NOT FOUND ILLEGAL NEST INCREMENT Possible Causes and Suggested Remedies • The TI-83 Plus was unable to transmit an item. Check to see that the cable is firmly connected to both units and that the receiving unit is 0. TI-83 Plus General Information 746 Error Type Error in receive mode. • You pressed É...
User Manual
Page 825
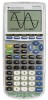
... Variables 629 TI-83 Plus Silver Edition LINK 632 Connecting Two Calculators with a Unit-to-Unit Cable 633 Linking to the CBL/CBR System 633 Linking to a Computer 633 Selecting Items to Send 634 LINK SEND Menu 634 Sending the Selected Items 636 Stopping a Transmission 637 Sending to a TI-83 Plus Silver Edition or TI-83 Plus 638 Sending to a TI-83 640 Sending...
... Variables 629 TI-83 Plus Silver Edition LINK 632 Connecting Two Calculators with a Unit-to-Unit Cable 633 Linking to the CBL/CBR System 633 Linking to a Computer 633 Selecting Items to Send 634 LINK SEND Menu 634 Sending the Selected Items 636 Stopping a Transmission 637 Sending to a TI-83 Plus Silver Edition or TI-83 Plus 638 Sending to a TI-83 640 Sending...
