User Guide
Page 10
..., select the TL-WN851ND. Check with a mounting screw. There will install the TP-LINK Wireless Client Utility (TWCU) and drivers. The Setup Wizard will be a menu including: Install Driver & Utility, Install QSS and User Guide. Remove your PC case and locate an available PCI slot on your computer manufacturer for Windows 2000, Windows XP, Windows Vista and Windows 7. Slide the...
..., select the TL-WN851ND. Check with a mounting screw. There will install the TP-LINK Wireless Client Utility (TWCU) and drivers. The Setup Wizard will be a menu including: Install Driver & Utility, Install QSS and User Guide. Remove your PC case and locate an available PCI slot on your computer manufacturer for Windows 2000, Windows XP, Windows Vista and Windows 7. Slide the...
User Guide
Page 14
Figure 2-9 2.2.3 For Windows Vista 1. Insert the Resource CD into your CD-ROM drive, and the Figure 2-11 will see the screen below, click Finish to complete the installation. TL-WN851ND 300Mbps Wireless N PCI Adapter Figure 2-8 9. After all the steps above, you will appear. To continue, select the TL-WN851ND.There will be a menu including: Install Driver & Utility, Install QSS and User Guide. 8
Figure 2-9 2.2.3 For Windows Vista 1. Insert the Resource CD into your CD-ROM drive, and the Figure 2-11 will see the screen below, click Finish to complete the installation. TL-WN851ND 300Mbps Wireless N PCI Adapter Figure 2-8 9. After all the steps above, you will appear. To continue, select the TL-WN851ND.There will be a menu including: Install Driver & Utility, Install QSS and User Guide. 8
User Guide
Page 17
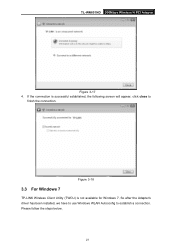
Click Finish to complete the installation. To continue, select the TL-WN851ND.There will appear. Insert the Resource CD into your CD-ROM drive, and the Figure 2-16 will be a menu including: Install Driver & Utility, Install QSS and User Guide. 11 Figure 2-15 2.2.4 For Windows 7 1. TL-WN851ND 300Mbps Wireless N PCI Adapter Figure 2-14 6.
Click Finish to complete the installation. To continue, select the TL-WN851ND.There will appear. Insert the Resource CD into your CD-ROM drive, and the Figure 2-16 will be a menu including: Install Driver & Utility, Install QSS and User Guide. 11 Figure 2-15 2.2.4 For Windows 7 1. TL-WN851ND 300Mbps Wireless N PCI Adapter Figure 2-14 6.
User Guide
Page 31
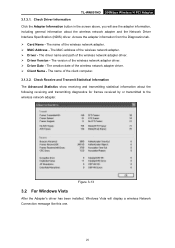
...Statistics show receiving and transmitting statistical information about the wireless network adapter and the Network Driver Interface Specification (NDIS) driver. TL-WN851ND 300Mbps Wireless N PCI Adapter 3.1.3.1. The driver name and path of the wireless network adapter. ¾ MAC Address - The...the adapter information from the Diagnostics tab. ¾ Card Name - Figure 3-13 3.2 For Windows Vista After the Adapter's driver has been installed, Windows Vista will see the adapter information, including general information about the following receiving and transmitting diagnostics ...
...Statistics show receiving and transmitting statistical information about the wireless network adapter and the Network Driver Interface Specification (NDIS) driver. TL-WN851ND 300Mbps Wireless N PCI Adapter 3.1.3.1. The driver name and path of the wireless network adapter. ¾ MAC Address - The...the adapter information from the Diagnostics tab. ¾ Card Name - Figure 3-13 3.2 For Windows Vista After the Adapter's driver has been installed, Windows Vista will see the adapter information, including general information about the following receiving and transmitting diagnostics ...
User Guide
Page 33
TL-WN851ND 300Mbps Wireless N PCI Adapter Figure 3-17 4. Please follow the steps below. 27 Figure 3-18 3.3 For Windows 7 TP-LINK Wireless Client Utility (TWCU) is successful established, the following screen will appear, click close to establish a connection. If the connection is not available for Windows 7. So after the Adapter's driver has been installed, we have to use Windows WLAN Autoconfig to finish the connection.
TL-WN851ND 300Mbps Wireless N PCI Adapter Figure 3-17 4. Please follow the steps below. 27 Figure 3-18 3.3 For Windows 7 TP-LINK Wireless Client Utility (TWCU) is successful established, the following screen will appear, click close to establish a connection. If the connection is not available for Windows 7. So after the Adapter's driver has been installed, we have to use Windows WLAN Autoconfig to finish the connection.


