User Guide
Page 2
TD-8811 External ADSL2+ ROUTER COPYRIGHT & TRADEMARKS Specifications are trademarks or registered trademarks of their respective holders. is a registered trademark of the specifications may be reproduced in any form or by any means or used to change without permission from TP-LINK TECHNOLOGIES CO., LTD. Copyright © 2008 TP-LINK TECHNOLOGIES CO., LTD. All rights reserved. No part of...
TD-8811 External ADSL2+ ROUTER COPYRIGHT & TRADEMARKS Specifications are trademarks or registered trademarks of their respective holders. is a registered trademark of the specifications may be reproduced in any form or by any means or used to change without permission from TP-LINK TECHNOLOGIES CO., LTD. Copyright © 2008 TP-LINK TECHNOLOGIES CO., LTD. All rights reserved. No part of...
User Guide
Page 3
... or television reception, which can radiate radio frequency energy and, if not installed and used in which the receiver is a class B product. FCC STATEMENT TD-8811 External ADSL2+ ROUTER This equipment has been tested and found to comply with the limits for a Class B digital device, pursuant to part 15 of the FCC Rules. This...
... or television reception, which can radiate radio frequency energy and, if not installed and used in which the receiver is a class B product. FCC STATEMENT TD-8811 External ADSL2+ ROUTER This equipment has been tested and found to comply with the limits for a Class B digital device, pursuant to part 15 of the FCC Rules. This...
User Guide
Page 5
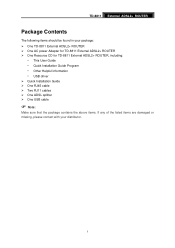
... Contents The following items should be found in your package: ¾ One TD-8811 External ADSL2+ ROUTER ¾ One AC power Adapter for TD-8811 External ADSL2+ ROUTER ¾ One Resource CD for TD-8811 External ADSL2+ ROUTER, including: • This User Guide • Quick Installation Guide Program • Other Helpful Information • USB driver ¾ Quick Installation Guide ¾ One RJ45...
... Contents The following items should be found in your package: ¾ One TD-8811 External ADSL2+ ROUTER ¾ One AC power Adapter for TD-8811 External ADSL2+ ROUTER ¾ One Resource CD for TD-8811 External ADSL2+ ROUTER, including: • This User Guide • Quick Installation Guide Program • Other Helpful Information • USB driver ¾ Quick Installation Guide ¾ One RJ45...
User Guide
Page 6
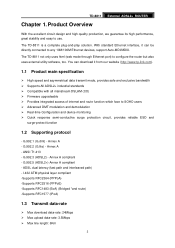
...web mode through Ethernet port) to use. Annex A - ANSI T1.413 - Annex A compliant - TD-8811 External ADSL2+ ROUTER Chapter 1. G.992.3 (ADSL2) - I.432 ATM physical layer compliant -Supports RFC2364 (PPPoA) -Supports RFC2516 (PPPoE) -Supports RFC1483...router but also uses external utility software, too. The TD-8811 is a complete plug-and-play solution. With standard Ethernet interface, it from our website (http://www.tp-link.com). 1.1 Product main specification ¾ High speed and asymmetrical data transmit mode, provides safe and exclusive bandwidth ¾ Supports All ADSL2...
...web mode through Ethernet port) to use. Annex A - ANSI T1.413 - Annex A compliant - TD-8811 External ADSL2+ ROUTER Chapter 1. G.992.3 (ADSL2) - I.432 ATM physical layer compliant -Supports RFC2364 (PPPoA) -Supports RFC2516 (PPPoE) -Supports RFC1483...router but also uses external utility software, too. The TD-8811 is a complete plug-and-play solution. With standard Ethernet interface, it from our website (http://www.tp-link.com). 1.1 Product main specification ¾ High speed and asymmetrical data transmit mode, provides safe and exclusive bandwidth ¾ Supports All ADSL2...
User Guide
Page 7
TD-8811 External ADSL2+ ROUTER 1.4 ATM property ¾ AAL0, AAL5, OAM, RM, and raw cell types supported ¾ Direct hardware support for 4 Receive VCs, with additional RX VCs and TX ...
TD-8811 External ADSL2+ ROUTER 1.4 ATM property ¾ AAL0, AAL5, OAM, RM, and raw cell types supported ¾ Direct hardware support for 4 Receive VCs, with additional RX VCs and TX ...
User Guide
Page 8
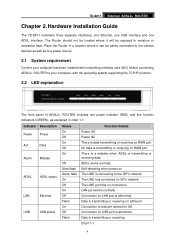
... port Connection to your computer, with the operating system supporting the TCP/IP protocol. 2.2 LED explanation The front panel of ADSL2+ ROUTER includes one ADSL interface. TD-8811 External ADSL2+ ROUTER Chapter 2. Hardware Installation Guide The TD-8811 maintains three separate interfaces, one Ethernet, one USB interface and one power indicator (RED) and five function indicators (GREEN), as...
... port Connection to your computer, with the operating system supporting the TCP/IP protocol. 2.2 LED explanation The front panel of ADSL2+ ROUTER includes one ADSL interface. TD-8811 External ADSL2+ ROUTER Chapter 2. Hardware Installation Guide The TD-8811 maintains three separate interfaces, one Ethernet, one USB interface and one power indicator (RED) and five function indicators (GREEN), as...
User Guide
Page 9
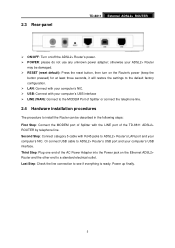
... and your computer's USB interface. Second Step: Connect category 5 cable with the LINE port of the TD-8811 ADSL2+ ROUTER by telephone line. Third Step: Plug one end of Splitter with RJ45 jacks to a standard electrical outlet. otherwise your ADSL2+ Router may be damaged. ¾ RESET (reset default): Press the reset button, then turn on the...
... and your computer's USB interface. Second Step: Connect category 5 cable with the LINE port of the TD-8811 ADSL2+ ROUTER by telephone line. Third Step: Plug one end of Splitter with RJ45 jacks to a standard electrical outlet. otherwise your ADSL2+ Router may be damaged. ¾ RESET (reset default): Press the reset button, then turn on the...
User Guide
Page 11
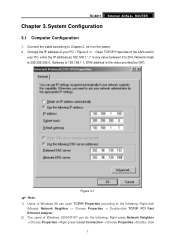
... to 254, Network mask is 255.255.255.0, Gateway is 192.168.1.1, DNS address is the value provided by ISP). System Configuration 3.1 Computer Configuration 1. TD-8811 External ADSL2+ ROUTER Chapter 3. Change the IP address of your PC(Figure 3-1): Open TCP/IP Properties of Windows 2000/NT/XP can open TCP/IP Properties...
... to 254, Network mask is 255.255.255.0, Gateway is 192.168.1.1, DNS address is the value provided by ISP). System Configuration 3.1 Computer Configuration 1. TD-8811 External ADSL2+ ROUTER Chapter 3. Change the IP address of your PC(Figure 3-1): Open TCP/IP Properties of Windows 2000/NT/XP can open TCP/IP Properties...
User Guide
Page 12
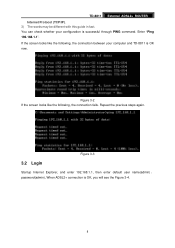
..., the connection fails. TD-8811 External ADSL2+ ROUTER Internet Protocol (TCP/IP). 3) The words may be different with this guide in fact. Figure 3-3 3.2 Login Startup Internet Explorer, and enter 192.168.1.1, then enter default user name(admin) 、 password(admin), When ADSL2+ connection is successful through... PING command. Repeat the previous steps again. You can check whether your computer and TD-8811 is OK now. If the screen looks like the following , the connection...
..., the connection fails. TD-8811 External ADSL2+ ROUTER Internet Protocol (TCP/IP). 3) The words may be different with this guide in fact. Figure 3-3 3.2 Login Startup Internet Explorer, and enter 192.168.1.1, then enter default user name(admin) 、 password(admin), When ADSL2+ connection is successful through... PING command. Repeat the previous steps again. You can check whether your computer and TD-8811 is OK now. If the screen looks like the following , the connection...
User Guide
Page 13
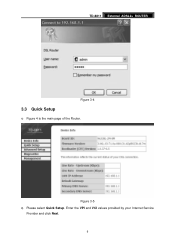
Figure 3-5 2) Please select Quick Setup. TD-8811 External ADSL2+ ROUTER Figure 3-4 3.3 Quick Setup 1) Figure 4 is the main page of the Router. Enter the VPI and VCI values provided by your Internet Service Provider and click Next. 9
Figure 3-5 2) Please select Quick Setup. TD-8811 External ADSL2+ ROUTER Figure 3-4 3.3 Quick Setup 1) Figure 4 is the main page of the Router. Enter the VPI and VCI values provided by your Internet Service Provider and click Next. 9
User Guide
Page 14
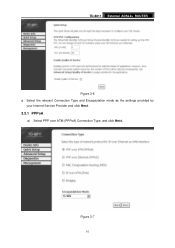
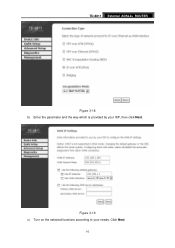
Figure 3-7 10 TD-8811 External ADSL2+ ROUTER Figure 3-6 3) Select the relevant Connection Type and Encapsulation mode as the settings provided by your Internet Service Provider and click Next. 3.3.1 PPPoA a) Select PPP over ATM (PPPoA) Connection Type, and click Next.
Figure 3-7 10 TD-8811 External ADSL2+ ROUTER Figure 3-6 3) Select the relevant Connection Type and Encapsulation mode as the settings provided by your Internet Service Provider and click Next. 3.3.1 PPPoA a) Select PPP over ATM (PPPoA) Connection Type, and click Next.
User Guide
Page 15
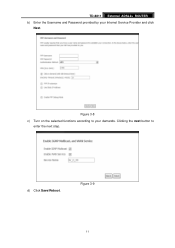
TD-8811 External ADSL2+ ROUTER b) Enter the Username and Password provided by your demands. Figure 3-9 11 d) Click Save/Reboot. Clicking the next button to your Internet Service Provider and click Next. Figure 3-8 c) Turn on the selected functions according to enter the next step.
TD-8811 External ADSL2+ ROUTER b) Enter the Username and Password provided by your demands. Figure 3-9 11 d) Click Save/Reboot. Clicking the next button to your Internet Service Provider and click Next. Figure 3-8 c) Turn on the selected functions according to enter the next step.
User Guide
Page 16
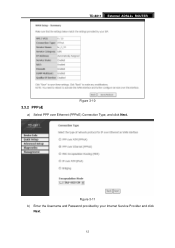
Figure 3-11 b) Enter the Username and Password provided by your Internet Service Provider and click Next. 12 TD-8811 External ADSL2+ ROUTER 3.3.2 PPPoE Figure 3-10 a) Select PPP over Ethernet (PPPoE) Connection Type, and click Next.
Figure 3-11 b) Enter the Username and Password provided by your Internet Service Provider and click Next. 12 TD-8811 External ADSL2+ ROUTER 3.3.2 PPPoE Figure 3-10 a) Select PPP over Ethernet (PPPoE) Connection Type, and click Next.
User Guide
Page 17
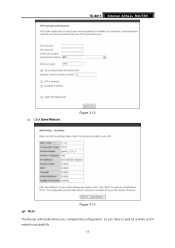
Figure 3-12 ) Note: Figure 3-13 The Router will restart when you complete the configuration, so you have to wait for a while until it restarts successfully. 13 TD-8811 External ADSL2+ ROUTER c) Click Save/Reboot.
Figure 3-12 ) Note: Figure 3-13 The Router will restart when you complete the configuration, so you have to wait for a while until it restarts successfully. 13 TD-8811 External ADSL2+ ROUTER c) Click Save/Reboot.
User Guide
Page 18
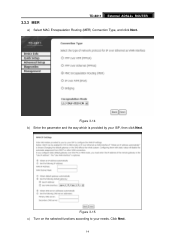
Click Next. 14 Figure 3-14 b) Enter the parameter and the way which is provided by your needs. 3.3.3 MER TD-8811 External ADSL2+ ROUTER a) Select MAC Encapsulation Routing (MER) Connection Type, and click Next. Figure 3-15 c) Turn on the selected functions according to your ISP, then click Next.
Click Next. 14 Figure 3-14 b) Enter the parameter and the way which is provided by your needs. 3.3.3 MER TD-8811 External ADSL2+ ROUTER a) Select MAC Encapsulation Routing (MER) Connection Type, and click Next. Figure 3-15 c) Turn on the selected functions according to your ISP, then click Next.
User Guide
Page 19
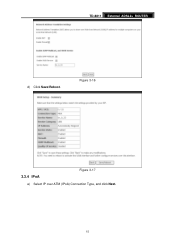
TD-8811 External ADSL2+ ROUTER d) Click Save/Reboot. Figure 3-16 3.3.4 IPoA Figure 3-17 a) Select IP over ATM (IPoA) Connection Type, and click Next. 15
TD-8811 External ADSL2+ ROUTER d) Click Save/Reboot. Figure 3-16 3.3.4 IPoA Figure 3-17 a) Select IP over ATM (IPoA) Connection Type, and click Next. 15
User Guide
Page 20
Figure 3-19 c) Turn on the selected functions according to your ISP, then click Next. Click Next 16 TD-8811 External ADSL2+ ROUTER Figure 3-18 b) Enter the parameter and the way which is provided by your needs.
Figure 3-19 c) Turn on the selected functions according to your ISP, then click Next. Click Next 16 TD-8811 External ADSL2+ ROUTER Figure 3-18 b) Enter the parameter and the way which is provided by your needs.
User Guide
Page 21
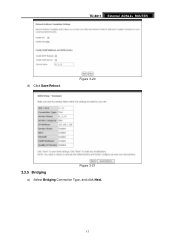
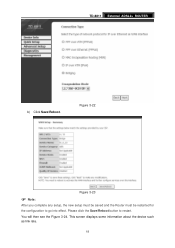
Figure 3-20 3.3.5 Bridging Figure 3-21 a) Select Bridging Connection Type, and click Next. 17 TD-8811 External ADSL2+ ROUTER d) Click Save/Reboot.
Figure 3-20 3.3.5 Bridging Figure 3-21 a) Select Bridging Connection Type, and click Next. 17 TD-8811 External ADSL2+ ROUTER d) Click Save/Reboot.
User Guide
Page 22
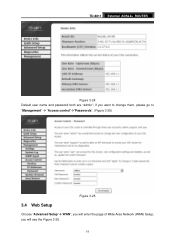
This screen displays some information about the device such as link rate. 18 You will then see the Figure 3-24. TD-8811 External ADSL2+ ROUTER b) Click Save/Reboot. Figure 3-22 Figure 3-23 ) Note: After you complete any setup, the new setup must be saved and the Router must be restarted for the configuration to restart. Please click the Save/Reboot button to go into effect.
This screen displays some information about the device such as link rate. 18 You will then see the Figure 3-24. TD-8811 External ADSL2+ ROUTER b) Click Save/Reboot. Figure 3-22 Figure 3-23 ) Note: After you complete any setup, the new setup must be saved and the Router must be restarted for the configuration to restart. Please click the Save/Reboot button to go into effect.
User Guide
Page 23
if you want to change them, please go to "Management" Æ "Access control"Æ"Passwords". (Figure 3-25) Figure 3-25 3.4 Web Setup Choose "Advanced Setup"Æ"WAN", you will enter the page of Wide Area Network (WAN) Setup, you will see the Figure 3-26. 19 TD-8811 External ADSL2+ ROUTER Figure 3-24 Default user name and password both are "admin";
if you want to change them, please go to "Management" Æ "Access control"Æ"Passwords". (Figure 3-25) Figure 3-25 3.4 Web Setup Choose "Advanced Setup"Æ"WAN", you will enter the page of Wide Area Network (WAN) Setup, you will see the Figure 3-26. 19 TD-8811 External ADSL2+ ROUTER Figure 3-24 Default user name and password both are "admin";


