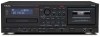
AD-RW900
Page 1
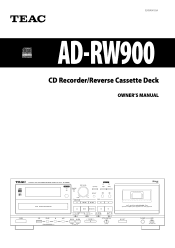
3D0804193A Z AD-RW900 CD Recorder/Reverse Cassette Deck OWNER'S MANUAL
3D0804193A Z AD-RW900 CD Recorder/Reverse Cassette Deck OWNER'S MANUAL
AD-RW900
Page 5
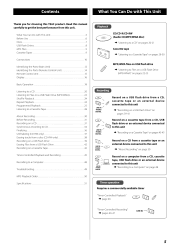
Contents Thank you for choosing this unit. Read this manual carefully to a CD" on a USB Flash Drive (MP3/WMA)...Shuffle Playback...Repeat Playback...Programmed Playback ...Listening to a Cassette Tape...20 22 24 24 25 28 ...What You Can Do with This Unit Playback CD/CD-R/CD-RW (Audio CD/MP3/WMA disc) e "Listening to get the best performance from this TEAC product. What You Can Do with This Unit...5 Before Use ...6 Discs...7 USB Flash Drives...8 MP3 Files...9 Cassette Tapes ...9 Connections ...10 Identifying the Parts (Main Unit...
Contents Thank you for choosing this unit. Read this manual carefully to a CD" on a USB Flash Drive (MP3/WMA)...Shuffle Playback...Repeat Playback...Programmed Playback ...Listening to a Cassette Tape...20 22 24 24 25 28 ...What You Can Do with This Unit Playback CD/CD-R/CD-RW (Audio CD/MP3/WMA disc) e "Listening to get the best performance from this TEAC product. What You Can Do with This Unit...5 Before Use ...6 Discs...7 USB Flash Drives...8 MP3 Files...9 Cassette Tapes ...9 Connections ...10 Identifying the Parts (Main Unit...
AD-RW900
Page 6
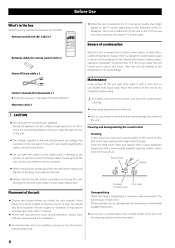
... install the unit carefully. Then the unit will stabilize at high speed. Allow the surface of the unit to dry completely before Owner's manual (this document) x 1 < Keep this manual in a safe place for ventilation. < Do not place the unit on an amplifier, a receiver or any doubt regarding this matter, consult an electrician...
... install the unit carefully. Then the unit will stabilize at high speed. Allow the surface of the unit to dry completely before Owner's manual (this document) x 1 < Keep this manual in a safe place for ventilation. < Do not place the unit on an amplifier, a receiver or any doubt regarding this matter, consult an electrician...
AD-RW900
Page 7
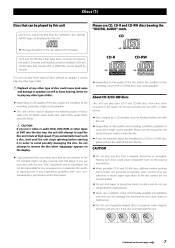
... malfunction. < Do not use such discs with this player. If you use irregularly-shaped discs (octagonal, heart-shaped, business card size, etc.). Please see the manual for any other type of the recording, some discs might not be responsible for the device that you used to avoid possibly damaging the disc... may not be finalized before ejecting it in the audio CD format (CD-DA) and the MP3 or WMA format. < Discs created by this unit, TEAC Corporation and its subsidiaries will attempt to the CD standard might not play back CD-R and CD-RW discs that contain MP3 or WMA files...
... malfunction. < Do not use such discs with this player. If you use irregularly-shaped discs (octagonal, heart-shaped, business card size, etc.). Please see the manual for any other type of the recording, some discs might not be responsible for the device that you used to avoid possibly damaging the disc... may not be finalized before ejecting it in the audio CD format (CD-DA) and the MP3 or WMA format. < Discs created by this unit, TEAC Corporation and its subsidiaries will attempt to the CD standard might not play back CD-R and CD-RW discs that contain MP3 or WMA files...
AD-RW900
Page 28
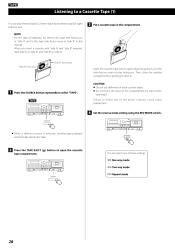
... to the tape side facing away as "side A". "Side B" faces away "Side A" faces you insert a cassette with this unit. ) tapes 3 Put a cassette tape in this manual. Listening to a Cassette Tape (1) You can select one of three settings. When you Insert the cassette tape with its door in. Then, close the cassette...
... to the tape side facing away as "side A". "Side B" faces away "Side A" faces you insert a cassette with this unit. ) tapes 3 Put a cassette tape in this manual. Listening to a Cassette Tape (1) You can select one of three settings. When you Insert the cassette tape with its door in. Then, close the cassette...
AD-RW900
Page 31
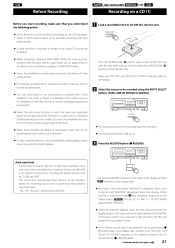
...NO TOC" and "CD-R" (or "CD-RW") indicators light on the display blink. < No button will work while "WAITING" is used, the tracks are added to CD. 3 Press the RECORD button (K RECORD). The red CD RECORD indicator to the right of the digital source ( ) ("FS 44_1K", "FS 48K...the specified level. Finalized CD-RW discs, however, can be unfinalized, erased and re-recorded. < When the auto track function is displayed. This instruction manual describes "silence" as live performances, the sound is cut a moment. < If a disc recorded with another player, noises may occur when the track...
...NO TOC" and "CD-R" (or "CD-RW") indicators light on the display blink. < No button will work while "WAITING" is used, the tracks are added to CD. 3 Press the RECORD button (K RECORD). The red CD RECORD indicator to the right of the digital source ( ) ("FS 44_1K", "FS 48K...the specified level. Finalized CD-RW discs, however, can be unfinalized, erased and re-recorded. < When the auto track function is displayed. This instruction manual describes "silence" as live performances, the sound is cut a moment. < If a disc recorded with another player, noises may occur when the track...
AD-RW900
Page 32
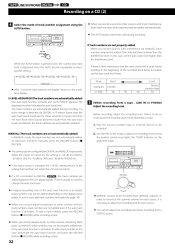
...numbers, track numbers are automatically updated. 5 (When recording from a DIGITAL source. 32 MANUAL (The track numbers are not automatically added) In MANUAL mode, the track numbers are not properly added When you record classical music or other sources containing silent parts via ANALOG, track numbers... may not be properly added even if the auto track function is activated. LINE IN PHONO...
...numbers, track numbers are automatically updated. 5 (When recording from a DIGITAL source. 32 MANUAL (The track numbers are not automatically added) In MANUAL mode, the track numbers are not properly added When you record classical music or other sources containing silent parts via ANALOG, track numbers... may not be properly added even if the auto track function is activated. LINE IN PHONO...
AD-RW900
Page 34
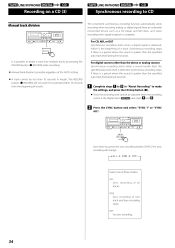
...of three modes. It is possible to divide a track into multiple tracks by pressing the RECORD button (K RECORD) while recording. < Manual track division is possible regardless of the AUTO setting. < A track cannot be adjusted when the recording source is detected. OFF No ...sync recording. 34 LINE IN PHONO LINE IN PHONO Recording on a CD (3) Manual track division Synchronous recording to CD The convenient synchronous recording function automatically starts recording when receiving analog or digital signals from the beginning of...
...of three modes. It is possible to divide a track into multiple tracks by pressing the RECORD button (K RECORD) while recording. < Manual track division is possible regardless of the AUTO setting. < A track cannot be adjusted when the recording source is detected. OFF No ...sync recording. 34 LINE IN PHONO LINE IN PHONO Recording on a CD (3) Manual track division Synchronous recording to CD The convenient synchronous recording function automatically starts recording when receiving analog or digital signals from the beginning of...
AD-RW900
Page 39
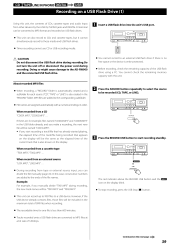
... be the same as the elapsed time of the current track that appears on the display will be converted to the AD-RW900 and the connected USB flash drive. MP3 files are added to an external USB flash drive if there is no free space or the device is write-protected. < Before recording... endings in the "RECORD" folder. Doing so might cause damage to MP3 format and recorded on USB flash drives. < This unit can divide the file manually (page CAUTION Do not disconnect the USB flash drive during recording.Do not turn the unit off or disconnect the power cord during recording.
... be the same as the elapsed time of the current track that appears on the display will be converted to the AD-RW900 and the connected USB flash drive. MP3 files are added to an external USB flash drive if there is no free space or the device is write-protected. < Before recording... endings in the "RECORD" folder. Doing so might cause damage to MP3 format and recorded on USB flash drives. < This unit can divide the file manually (page CAUTION Do not disconnect the USB flash drive during recording.Do not turn the unit off or disconnect the power cord during recording.
AD-RW900
Page 41
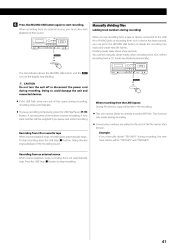
6 Press the RECORD USB button again to stop recording. 41 Manually dividing files (adding track numbers during recording. Example: If you manually divide "T001.MP3" during recording, the new track names will be assigned if you can press the RECORD USB button to ...jacks or recording from an external source When source playback stops, recording does not automatically stop recording, press the USB Stop (H) button. You cannot manually divide tracks when recording from CDs. (When recording from a CD, tracks are recording from an external source, you are divided automatically.) The ...
6 Press the RECORD USB button again to stop recording. 41 Manually dividing files (adding track numbers during recording. Example: If you manually divide "T001.MP3" during recording, the new track names will be assigned if you can press the RECORD USB button to ...jacks or recording from an external source When source playback stops, recording does not automatically stop recording, press the USB Stop (H) button. You cannot manually divide tracks when recording from CDs. (When recording from a CD, tracks are recording from an external source, you are divided automatically.) The ...
AD-RW900
Page 51
...; or higher) Headphone output ... 10 mW/32 Ω Included accessories Remote control (RC-1283) ×1 Remote control batteries (AAA)×2 RCA audio cable ×2 Owner's manual (this document) ×1 Warranty card ×1 Power...
...; or higher) Headphone output ... 10 mW/32 Ω Included accessories Remote control (RC-1283) ×1 Remote control batteries (AAA)×2 RCA audio cable ×2 Owner's manual (this document) ×1 Warranty card ×1 Power...
