
Operating Instructions
Page 1
VPL-VW590ES VPL-VW715ES 5-022-950-11 (1) Video Projector Operating Instructions Before operating the unit, please read this manual and supplied Quick Reference Manual thoroughly and retain them for future reference.
VPL-VW590ES VPL-VW715ES 5-022-950-11 (1) Video Projector Operating Instructions Before operating the unit, please read this manual and supplied Quick Reference Manual thoroughly and retain them for future reference.

Operating Instructions
Page 4
Rear/Left Side/Bottom The buttons on the control panel have the same names as those on the remote control. Control panel Control panel a ?/1 (ON/STANDBY) button (page 7) b INPUT button (page 14) c MENU button (page 22) d M/m/
Rear/Left Side/Bottom The buttons on the control panel have the same names as those on the remote control. Control panel Control panel a ?/1 (ON/STANDBY) button (page 7) b INPUT button (page 14) c MENU button (page 22) d M/m/

Operating Instructions
Page 13
... signal to the unit with an HDMI cable is not correct, check the settings of the connected equipment. • If you monitor and control the projector via the network, access the Setup page of the cable is set at the same position. • If the picture from equipment connected to only... the unit, make sure the V mark on the upper part of the HDMI input of the unit and the v mark on the connector of the projector (page 42) via a Web browser and enable the desired control protocol. 13
... signal to the unit with an HDMI cable is not correct, check the settings of the connected equipment. • If you monitor and control the projector via the network, access the Setup page of the cable is set at the same position. • If the picture from equipment connected to only... the unit, make sure the V mark on the upper part of the HDMI input of the unit and the v mark on the connector of the projector (page 42) via a Web browser and enable the desired control protocol. 13

Operating Instructions
Page 15
..., using the Active 3D Glasses. 1 Turn on the HDMI equipment for use the 3D glasses, see "3D Settings" (page 35). is too far from the projector • There are differences in perception of 3D video images among individuals. • When the temperature of the Function menu. Notes • It may not...
..., using the Active 3D Glasses. 1 Turn on the HDMI equipment for use the 3D glasses, see "3D Settings" (page 35). is too far from the projector • There are differences in perception of 3D video images among individuals. • When the temperature of the Function menu. Notes • It may not...

Operating Instructions
Page 16
... palette is not stored. 1 Press POSITION. The position where the lens settings, aspect ratio, and blanking are not stored is recalled. Top or side view Projector 10 m 10 m 10 m 10 m Using the Picture Position You can be recalled. The settings of the Screen menu (page 31).
... palette is not stored. 1 Press POSITION. The position where the lens settings, aspect ratio, and blanking are not stored is recalled. Top or side view Projector 10 m 10 m 10 m 10 m Using the Picture Position You can be recalled. The settings of the Screen menu (page 31).

Operating Instructions
Page 34
...the unit is not continuously connected to their factory preset values. The "Lamp Timer" in the Information menu is turned off automatically and the projector goes into standby mode. Standby: If no signal is input for 10 minutes, power is not reset. 34 If you set to the network... and continuously communicating with the projector control equipment. Off: Disables the power saving function. All settings are initialized to the network. Sets the power saving mode. When replacing the ...
...the unit is not continuously connected to their factory preset values. The "Lamp Timer" in the Information menu is turned off automatically and the projector goes into standby mode. Standby: If no signal is input for 10 minutes, power is not reset. 34 If you set to the network... and continuously communicating with the projector control equipment. Off: Disables the power saving function. All settings are initialized to the network. Sets the power saving mode. When replacing the ...
Operating Instructions
Page 42
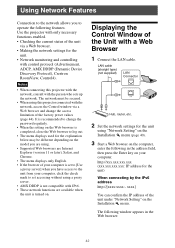
... Hub, router, etc. 2 Set the network settings for the explanation below may be secured. • When using this projector with the network, consult with the person who sets up the network. Use the projector with only necessary functions enabled. • Checking the current status of the unit under "Network Setting" on your... mark to operate the following window appears in the address field, then press the Enter key on the Installation menu. Notes • When connecting this projector connected with a Web Browser 1 Connect the LAN cable.
... Hub, router, etc. 2 Set the network settings for the explanation below may be secured. • When using this projector with the network, consult with the person who sets up the network. Use the projector with only necessary functions enabled. • Checking the current status of the unit under "Network Setting" on your... mark to operate the following window appears in the address field, then press the Enter key on the Installation menu. Notes • When connecting this projector connected with a Web Browser 1 Connect the LAN cable.

Operating Instructions
Page 43
... preset to all pages except the Setup page When you access the Setup page for the first time, input "root" as the user name and "Projector" as the password in for accessing any particular page. Administrator: Allowed access to all pages User: Allowed access to "root." 43
... preset to all pages except the Setup page When you access the Setup page for the first time, input "root" as the user name and "Projector" as the password in for accessing any particular page. Administrator: Allowed access to all pages User: Allowed access to "root." 43

Operating Instructions
Page 44
Confirming the Information Regarding the Unit You can be reset with qualified Sony personnel. The default password "Projector" cannot be 8 to 16 characters that includes both alphabet and numeric characters. The password will be changed in the Password page in the Setup page. ...
Confirming the Information Regarding the Unit You can be reset with qualified Sony personnel. The default password "Projector" cannot be 8 to 16 characters that includes both alphabet and numeric characters. The password will be changed in the Password page in the Setup page. ...

Operating Instructions
Page 47
.... seem like 3D video images. The lens shift cannot be input depending on . Check if the input signals are turned on the specifications of the projector's components in the 3D glasses could be able to "Auto" or "3D." The 3D signals may not be weak or is higher than normal. Fan...
.... seem like 3D video images. The lens shift cannot be input depending on . Check if the input signals are turned on the specifications of the projector's components in the 3D glasses could be able to "Auto" or "3D." The 3D signals may not be weak or is higher than normal. Fan...

Operating Instructions
Page 48
...) (Flashes in red) Twice Three times (Flashes in red) (Flashes in a way of other than the above methods, consult with your projector. Consult with a new one (page 51). If the indicator starts flashing in red) Both indicators flash Cause and Remedy Close the lamp cover... securely, then tighten the screws securely (page 52). In this case, replace the lamp with qualified Sony personnel. The internal temperature is any trouble with qualified Sony personnel. ON/STANDBY indicator WARNING indicator Flashing/Lighting indicators The number of the unit. The fan is shown...
...) (Flashes in red) Twice Three times (Flashes in red) (Flashes in a way of other than the above methods, consult with your projector. Consult with a new one (page 51). If the indicator starts flashing in red) Both indicators flash Cause and Remedy Close the lamp cover... securely, then tighten the screws securely (page 52). In this case, replace the lamp with qualified Sony personnel. The internal temperature is any trouble with qualified Sony personnel. ON/STANDBY indicator WARNING indicator Flashing/Lighting indicators The number of the unit. The fan is shown...

Operating Instructions
Page 49
... to "Level A" or "Level B." "Settings Lock" is currently prohibited. Page 12 - 36 49 Projector will automatically enter Standby Mode in the selected input. Settings Lock enabled. Projector temperature is Check to ensure that nothing is time to "On" in Turn off after you replace the...the remote control or the control panel of the unit. Note To clear this message appears again after 1 minute, and the projector goes into standby mode. When using the unit at high altitude. Press the appropriate button. Message Lists Warning messages Symptom Cause ...
... to "Level A" or "Level B." "Settings Lock" is currently prohibited. Page 12 - 36 49 Projector will automatically enter Standby Mode in the selected input. Settings Lock enabled. Projector temperature is Check to ensure that nothing is time to "On" in Turn off after you replace the...the remote control or the control panel of the unit. Note To clear this message appears again after 1 minute, and the projector goes into standby mode. When using the unit at high altitude. Press the appropriate button. Message Lists Warning messages Symptom Cause ...

Operating Instructions
Page 51
... dims, the color balance of the lamp. If you touch the lamp, you need to use conditions. Notes • Be sure to get started: • Projector Lamp LMP-H280 (Optional) • Standard Phillips screwdriver • Cloth (for scratch protection) Caution • The lamp remains hot after turning the lamp on. Place... (not supplied) without delay. Replacing the Lamp The lamp used for the light source changes depending on the installation environment or use an LMP-H280 Projector Lamp for replacement. Note Be sure that the unit is on the cloth.
... dims, the color balance of the lamp. If you touch the lamp, you need to use conditions. Notes • Be sure to get started: • Projector Lamp LMP-H280 (Optional) • Standard Phillips screwdriver • Cloth (for scratch protection) Caution • The lamp remains hot after turning the lamp on. Place... (not supplied) without delay. Replacing the Lamp The lamp used for the light source changes depending on the installation environment or use an LMP-H280 Projector Lamp for replacement. Note Be sure that the unit is on the cloth.

Operating Instructions
Page 54
...prolonged contact with a cleaning cloth. It also supports HDCP. 54 Definition Multimedia Interface, and the HDMI Logo are trademarks of Sony Corporation This projector supports DeepColor, x.v.Color, LipSync, computer input signal, 3D signal and 4K signal of abrasive pad, alkaline/acid cleaner, ...trademarks of Blu-ray Disc Association. • "x.v.Color (x.v.Colour)," "Motionflow," and their respective logos are trademarks or registered trademarks of Sony Interactive Entertainment Inc. • The terms HDMI and HDMI High- in damage to the screen surface and cabinet material. If dust is...
...prolonged contact with a cleaning cloth. It also supports HDCP. 54 Definition Multimedia Interface, and the HDMI Logo are trademarks of Sony Corporation This projector supports DeepColor, x.v.Color, LipSync, computer input signal, 3D signal and 4K signal of abrasive pad, alkaline/acid cleaner, ...trademarks of Blu-ray Disc Association. • "x.v.Color (x.v.Colour)," "Motionflow," and their respective logos are trademarks or registered trademarks of Sony Interactive Entertainment Inc. • The terms HDMI and HDMI High- in damage to the screen surface and cabinet material. If dust is...
Operating Instructions
Page 55
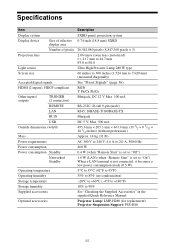
...;F) 35% to 85% (no condensation) -20°C to +60°C (-4°F to +140°F) 10% to 7,620 mm) (measured diagonally) See "Preset Signals" (page 56). Projector Lamp: LMP-H280 (for replacement) Projector Suspension Support: PSS-H10 55
...;F) 35% to 85% (no condensation) -20°C to +60°C (-4°F to +140°F) 10% to 7,620 mm) (measured diagonally) See "Preset Signals" (page 56). Projector Lamp: LMP-H280 (for replacement) Projector Suspension Support: PSS-H10 55

Operating Instructions
Page 70
The distance between the front of the lens and the front of the cabinet Unit: mm (inches) 36.8 (1 7/16) Front of the lens Front of the cabinet Attaching the PSS-H10 projector suspension support Front view 150 (5 29/32) 75 (2 15/16) 8 (5/16) Ceiling Center of the supporting pole 175 (6 7/8) Unit: mm (inches) The bottom surface of the mount bracket 118 (4 21/32) Center of the lens 70
The distance between the front of the lens and the front of the cabinet Unit: mm (inches) 36.8 (1 7/16) Front of the lens Front of the cabinet Attaching the PSS-H10 projector suspension support Front view 150 (5 29/32) 75 (2 15/16) 8 (5/16) Ceiling Center of the supporting pole 175 (6 7/8) Unit: mm (inches) The bottom surface of the mount bracket 118 (4 21/32) Center of the lens 70

Startup Guide
Page 1
© 2020 Sony Corporation Printed in China 5-022-948-11 (1) Video Projector Quick Reference Manual GB Guide de référence rapide __________ FR VPL-VW715ES
© 2020 Sony Corporation Printed in China 5-022-948-11 (1) Video Projector Quick Reference Manual GB Guide de référence rapide __________ FR VPL-VW715ES

Startup Guide
Page 3
... Before operating the unit, please read this apparatus to display 3D signals. (a) frequency band(s) in which the radio equipment operates: 4.30 dBm (E.I.R.P.) As with the projector via Bluetooth technology to rain or moisture. To avoid electrical shock, do not connect the connector for the remote control. • Size AA (R6) GB...
... Before operating the unit, please read this apparatus to display 3D signals. (a) frequency band(s) in which the radio equipment operates: 4.30 dBm (E.I.R.P.) As with the projector via Bluetooth technology to rain or moisture. To avoid electrical shock, do not connect the connector for the remote control. • Size AA (R6) GB...
Startup Guide
Page 6
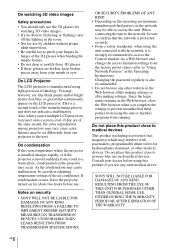
...any other medical devices. This is also recommended. • Do not browse any such medical device. If condensation occurs, leave the projector turned on the network may cause malfunction, be able to access the unit. When connecting the unit to the network, be set differently...access limitation settings from the factory preset values (refer to "Using Network Features" in the Operating Instructions). Notes on security • SONY WILL NOT BE LIABLE FOR DAMAGES OF ANY KIND RESULTING FROM A FAILURE TO IMPLEMENT PROPER SECURITY MEASURES ON TRANSMISSION DEVICES, UNAVOIDABLE DATA ...
...any other medical devices. This is also recommended. • Do not browse any such medical device. If condensation occurs, leave the projector turned on the network may cause malfunction, be able to access the unit. When connecting the unit to the network, be set differently...access limitation settings from the factory preset values (refer to "Using Network Features" in the Operating Instructions). Notes on security • SONY WILL NOT BE LIABLE FOR DAMAGES OF ANY KIND RESULTING FROM A FAILURE TO IMPLEMENT PROPER SECURITY MEASURES ON TRANSMISSION DEVICES, UNAVOIDABLE DATA ...

Startup Guide
Page 8
... the effects of certain components. If the unit is mounted on the ceiling, a Sony bracket or recommended equivalent must be used for installing the unit on a ceiling • Never mount the projector on a ceiling, be trapezoidal. Safety precautions for installation. • Be sure to... secure the cabinet cover firmly when installing to "On". Be sure to consult with qualified Sony personnel (charged). • When installing the unit ...
... the effects of certain components. If the unit is mounted on the ceiling, a Sony bracket or recommended equivalent must be used for installing the unit on a ceiling • Never mount the projector on a ceiling, be trapezoidal. Safety precautions for installation. • Be sure to... secure the cabinet cover firmly when installing to "On". Be sure to consult with qualified Sony personnel (charged). • When installing the unit ...


