

Startup Guide
Page 2
... 3 Connecting the Unit Page 12 Step 4 Selecting the Menu Language ........Page 13 Step 5 Projecting Page 14 Error Handling Warning Indicators Page 16 Maintenance Replacing the Lamp Page 17 2 GB For details on the operations, refer to pay attention when handling and using this unit. It also describes important notes and cautions...
... 3 Connecting the Unit Page 12 Step 4 Selecting the Menu Language ........Page 13 Step 5 Projecting Page 14 Error Handling Warning Indicators Page 16 Maintenance Replacing the Lamp Page 17 2 GB For details on the operations, refer to pay attention when handling and using this unit. It also describes important notes and cautions...

Startup Guide
Page 5
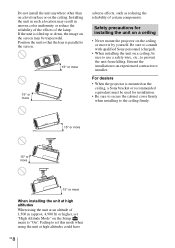
...8226; Should any liquid or solid object fall into the lens while the lamp is still running. Never pull the cord itself has been turned off the power with ventilation holes (intake) and ventilation holes (exhaust). SONY LIMITED WARRANTY - For the customers in the U.S.A. For the customers in ...outlet, even if the unit itself . • The wall outlet should be used for important information and complete terms and conditions of Sony's limited warranty applicable to ship your hand or objects near the ventilation holes. For maximum protection, repack your unit is hot. The air...
...8226; Should any liquid or solid object fall into the lens while the lamp is still running. Never pull the cord itself has been turned off the power with ventilation holes (intake) and ventilation holes (exhaust). SONY LIMITED WARRANTY - For the customers in the U.S.A. For the customers in ...outlet, even if the unit itself . • The wall outlet should be used for important information and complete terms and conditions of Sony's limited warranty applicable to ship your hand or objects near the ventilation holes. For maximum protection, repack your unit is hot. The air...
Startup Guide
Page 8
...set this mode when using the unit at high altitudes could have 8 GB Entrust the installation to consult with qualified Sony personnel (charged). • When installing the unit on the ceiling. For dealers • When the projector is ... the image on the ceiling or move it by yourself. If the unit is mounted on the ceiling, a Sony bracket or recommended equivalent must be used for installing the unit on a ceiling • Never mount the projector on... 15° or more adverse effects, such as reducing the reliability of the lamp. Be sure to an experienced contractor or installer.
...set this mode when using the unit at high altitudes could have 8 GB Entrust the installation to consult with qualified Sony personnel (charged). • When installing the unit on the ceiling. For dealers • When the projector is ... the image on the ceiling or move it by yourself. If the unit is mounted on the ceiling, a Sony bracket or recommended equivalent must be used for installing the unit on a ceiling • Never mount the projector on... 15° or more adverse effects, such as reducing the reliability of the lamp. Be sure to an experienced contractor or installer.
Startup Guide
Page 16
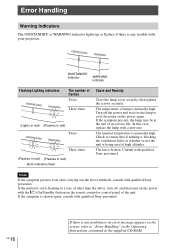
... way of other than the above methods, consult with a new one. Consult with qualified Sony personnel. If the indicator starts flashing in red) Both indicators flash Cause and Remedy Close the lamp cover securely, then tighten the screws securely. If the symptom is shown again, consult with ...qualified Sony personnel. The temperature of lamp is being used at the end of the unit. If the symptom persists, the lamp may be at high altitudes. In this case, replace the lamp with qualified Sony personnel. Check to "Error Handling" in the...
... way of other than the above methods, consult with a new one. Consult with qualified Sony personnel. If the indicator starts flashing in red) Both indicators flash Cause and Remedy Close the lamp cover securely, then tighten the screws securely. If the symptom is shown again, consult with ...qualified Sony personnel. The temperature of lamp is being used at the end of the unit. If the symptom persists, the lamp may be at high altitudes. In this case, replace the lamp with qualified Sony personnel. Check to "Error Handling" in the...
Startup Guide
Page 17
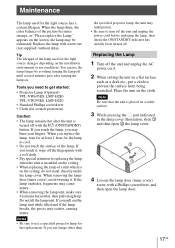
... started: • Projector Lamp (Optional) VPL-VW695ES: LMP-H280 VPL-VW295ES: LMP-H220 • Standard Phillips screwdriver • Cloth (for scratch protection) Caution • The lamp remains hot after turning the lamp on. Tools you replace the lamp, wait for at least 1 hour for the lamp to use a specified projector lamp for the replacement. Replacing the Lamp 1 Turn off . When...
... started: • Projector Lamp (Optional) VPL-VW695ES: LMP-H280 VPL-VW295ES: LMP-H220 • Standard Phillips screwdriver • Cloth (for scratch protection) Caution • The lamp remains hot after turning the lamp on. Tools you replace the lamp, wait for at least 1 hour for the lamp to use a specified projector lamp for the replacement. Replacing the Lamp 1 Turn off . When...

Startup Guide
Page 18
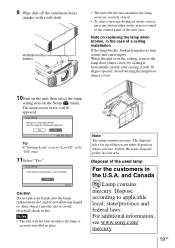
Handle Notes • Do not loosen other screws except the 3 specified screws. • Hold the lamp by the handle securely until it . 6 Push in the new lamp by the handle to touch the optical block inside the unit. 7 Close the lamp door (inner cover), and then tighten the screw. 5 Loosen the 3 screws on the lamp with the Phillips screwdriver. Note Be careful not to remove and attach it reaches the end, and then tighten the 3 screws. GB 18 Hold up the handle, then pull the lamp straight out. 8 Close the lamp cover.
Handle Notes • Do not loosen other screws except the 3 specified screws. • Hold the lamp by the handle securely until it . 6 Push in the new lamp by the handle to touch the optical block inside the unit. 7 Close the lamp door (inner cover), and then tighten the screw. 5 Loosen the 3 screws on the lamp with the Phillips screwdriver. Note Be careful not to remove and attach it reaches the end, and then tighten the 3 screws. GB 18 Hold up the handle, then pull the lamp straight out. 8 Close the lamp cover.
Startup Guide
Page 19
When the unit is on the ceiling, remove the lamp door (inner cover) by sliding it horizontally slowly after raising it with a soft cloth. For additional information, see www.sony.com/ mercury 19 GB Ventilation holes (intake) • The unit will not turn on the screen, press any liquid ...or other objects into the lamp replacement slot, and do not allow any button either on replacing the...
When the unit is on the ceiling, remove the lamp door (inner cover) by sliding it horizontally slowly after raising it with a soft cloth. For additional information, see www.sony.com/ mercury 19 GB Ventilation holes (intake) • The unit will not turn on the screen, press any liquid ...or other objects into the lamp replacement slot, and do not allow any button either on replacing the...

Operating Instructions
Page 2
... 50 About HDR (high dynamic range) ... 50 About the simulated 3D feature ....... 50 NOTICES AND LICENSES FOR SOFTWARE USED IN THIS PRODUCT 50 Replacing the Lamp 51 Cleaning 54 Specifications 55 Preset Signals 56 Input Signals and Adjustable/ Setting Items 58 Compatible 3D Signals 59 3D Signals and Adjustable/ Setting Items...
... 50 About HDR (high dynamic range) ... 50 About the simulated 3D feature ....... 50 NOTICES AND LICENSES FOR SOFTWARE USED IN THIS PRODUCT 50 Replacing the Lamp 51 Cleaning 54 Specifications 55 Preset Signals 56 Input Signals and Adjustable/ Setting Items 58 Compatible 3D Signals 59 3D Signals and Adjustable/ Setting Items...

Operating Instructions
Page 3
for remote control. Location of Controls Front/Right Side Warning indicators Warning indicators a ON/STANDBY indicator (page 48) b WARNING indicator (page 48) Connectors c LAN connector (page 42) d HDMI 1/HDMI 2 connector (page 12) e TRIGGER 1/TRIGGER 2 connector (page 38) f IR IN connector Inputs signals to a computer, etc. h USB connector (page 50) Others i Lamp cover (page 51) j Ventilation holes (exhaust) k Ventilation holes (intake) (page 53) l Remote control detector (page 7) 3 g REMOTE connector Connects to control the unit.
for remote control. Location of Controls Front/Right Side Warning indicators Warning indicators a ON/STANDBY indicator (page 48) b WARNING indicator (page 48) Connectors c LAN connector (page 42) d HDMI 1/HDMI 2 connector (page 12) e TRIGGER 1/TRIGGER 2 connector (page 38) f IR IN connector Inputs signals to a computer, etc. h USB connector (page 50) Others i Lamp cover (page 51) j Ventilation holes (exhaust) k Ventilation holes (intake) (page 53) l Remote control detector (page 7) 3 g REMOTE connector Connects to control the unit.

Operating Instructions
Page 25
... Adjusts the range of movement of the iris (aperture) and lower brightness than "Full," making the picture quality suitable for longer lamp life. 25 Off: The "Dynamic Control" function is not applied. Contrast Enhancer [CONTRAST ENHANCER] Corrects the level of bright and... and signal processing according to the brightness of "Reality Creation." Increases image sharpness and makes image dynamic. Lamp Control Switches the lamp output. This results in 4K" releasing from Sony Pictures Home Entertainment. The lower the setting, the darker the picture. Database: Select "Normal" or "...
... Adjusts the range of movement of the iris (aperture) and lower brightness than "Full," making the picture quality suitable for longer lamp life. 25 Off: The "Dynamic Control" function is not applied. Contrast Enhancer [CONTRAST ENHANCER] Corrects the level of bright and... and signal processing according to the brightness of "Reality Creation." Increases image sharpness and makes image dynamic. Lamp Control Switches the lamp output. This results in 4K" releasing from Sony Pictures Home Entertainment. The lower the setting, the darker the picture. Database: Select "Normal" or "...

Operating Instructions
Page 34
...menu is turned off automatically and the projector goes into standby mode. When replacing the lamps, set to "On," the network function is continuously enabled. Setting items Network Management Power Saving Lamp Setting All Reset Description On: Set when connected to their factory preset values. All ...to the network and continuously communicating with the projector control equipment. Set Network Management to "Off" when the unit is set the desired lamp setting (page 51). Sets the power saving mode. If you set to the network. Note When Network Management is not continuously connected ...
...menu is turned off automatically and the projector goes into standby mode. When replacing the lamps, set to "On," the network function is continuously enabled. Setting items Network Management Power Saving Lamp Setting All Reset Description On: Set when connected to their factory preset values. All ...to the network and continuously communicating with the projector control equipment. Set Network Management to "Off" when the unit is set the desired lamp setting (page 51). Sets the power saving mode. If you set to the network. Note When Network Management is not continuously connected ...

Operating Instructions
Page 37
... Space Input Lag Reduction Advanced Picture menu Auto Calibration Group 2 Setup menu Status Language Menu Position High Altitude Mode Remote Start Network Management Power Saving Lamp Setting Function menu Dynamic Range Test Pattern Installation menu Image Flip Lens Control Anamorphic Lens Trigger Select IR Receiver Panel Alignment Network Setting 37 Items...
... Space Input Lag Reduction Advanced Picture menu Auto Calibration Group 2 Setup menu Status Language Menu Position High Altitude Mode Remote Start Network Management Power Saving Lamp Setting Function menu Dynamic Range Test Pattern Installation menu Image Flip Lens Control Anamorphic Lens Trigger Select IR Receiver Panel Alignment Network Setting 37 Items...

Operating Instructions
Page 41
... signal which you are selecting ("BT.601," "BT.709," or "BT.2020"). Signal type Color Format Color Space HDR Format Software Version Lamp Timer Description Displays the model name Displays the serial number. Displays the color space of the input signal which you are displayed. Note Depending... on (total usage). Indicates how long the lamp has been turned on the computer input signal, parts of the lamp. Note You cannot adjust or change the displays listed above. Signal type Items Model Name Serial No. ...
... signal which you are selecting ("BT.601," "BT.709," or "BT.2020"). Signal type Color Format Color Space HDR Format Software Version Lamp Timer Description Displays the model name Displays the serial number. Displays the color space of the input signal which you are displayed. Note Depending... on (total usage). Indicates how long the lamp has been turned on the computer input signal, parts of the lamp. Note You cannot adjust or change the displays listed above. Signal type Items Model Name Serial No. ...
Operating Instructions
Page 45
..." or "Brightness" on . Adjust the focus. 8 If the lens is not turned on the Picture menu 26 properly. After about 2 hours with qualified Sony personnel. Close the lamp cover securely, then tighten the screws 52 securely. Select the input source correctly using the 3D glasses, and set to 34 Set "Power Saving...
..." or "Brightness" on . Adjust the focus. 8 If the lens is not turned on the Picture menu 26 properly. After about 2 hours with qualified Sony personnel. Close the lamp cover securely, then tighten the screws 52 securely. Select the input source correctly using the 3D glasses, and set to 34 Set "Power Saving...
Operating Instructions
Page 46
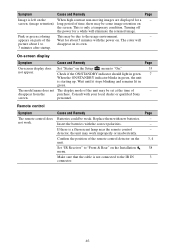
... there may work . On-screen display Symptom Cause and Remedy Page On-screen display does Set "Status" on the screen. If there is a fluorescent lamp near the remote control detector, the unit may be set at the time of the Wait for about 1 to "Front & Rear" on the unit... disappear on the When high contrast non-moving images are displayed for a while will picture about 5 minutes with your local dealer or qualified Sony screen. Cause and Remedy Batteries could be due to the IR IN connector. Pink or green coloring This may be some image retention on ...
... there may work . On-screen display Symptom Cause and Remedy Page On-screen display does Set "Status" on the screen. If there is a fluorescent lamp near the remote control detector, the unit may be set at the time of the Wait for about 1 to "Front & Rear" on the unit... disappear on the When high contrast non-moving images are displayed for a while will picture about 5 minutes with your local dealer or qualified Sony screen. Cause and Remedy Batteries could be due to the IR IN connector. Pink or green coloring This may be some image retention on ...

Operating Instructions
Page 48
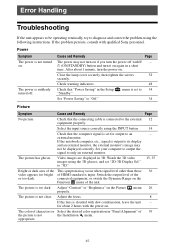
...or WARNING indicator lights up or flashes if there is any trouble with qualified Sony personnel. Check to cool, then turn on the power again. Consult with your projector. If the symptom persists, the lamp may be at high altitudes. Note If the symptom persists even after carrying...power with a new one (page 51). If the symptom is unusually high. The temperature of other than the above methods, consult with qualified Sony personnel. 48 ON/STANDBY indicator WARNING indicator Flashing/Lighting indicators The number of flashes Twice Three times (Lights in red) (Flashes in red)...
...or WARNING indicator lights up or flashes if there is any trouble with qualified Sony personnel. Check to cool, then turn on the power again. Consult with your projector. If the symptom persists, the lamp may be at high altitudes. Note If the symptom persists even after carrying...power with a new one (page 51). If the symptom is unusually high. The temperature of other than the above methods, consult with qualified Sony personnel. 48 ON/STANDBY indicator WARNING indicator Flashing/Lighting indicators The number of flashes Twice Three times (Lights in red) (Flashes in red)...

Operating Instructions
Page 49
...unit once. When using the unit at high altitude. Note If no signal is input, the power turns off after you replace the lamp, the lamp replacement process is switched to ensure that nothing is out of range! Cause and Remedy No signal is blocking the ventilation 3, 4 high... temperature is Check to "On." 33 Note When temperature inside the unit remains high, "High Altitude Mode" is not complete. Please replace the Lamp. Lamp off the power. - 1 min. Frequency is set "High Altitude Mode" to ensure that nothing is input in 1 minute, then the fan speed increases...
...unit once. When using the unit at high altitude. Note If no signal is input, the power turns off after you replace the lamp, the lamp replacement process is switched to ensure that nothing is out of range! Cause and Remedy No signal is blocking the ventilation 3, 4 high... temperature is Check to "On." 33 Note When temperature inside the unit remains high, "High Altitude Mode" is not complete. Please replace the Lamp. Lamp off the power. - 1 min. Frequency is set "High Altitude Mode" to ensure that nothing is input in 1 minute, then the fan speed increases...

Operating Instructions
Page 51
... is placed on a flat surface such as a desk etc., put a cloth to turn off the unit and unplug the power cord before replacing the lamp, then check the ON/STANDBY indicator has already been turned off. 1 Turn off the fingerprints with the ?/1 (ON/STANDBY) button. appears on the ...AC power cord. 2 When setting the unit on a stable surface. 3 While pressing the part indicated in the lamp cover illustration, slide 1 and then open the lamp door. 51 Replacing the Lamp The lamp used for the light source has a certain lifespan. Tip The lifespan of the picture becomes strange, or "Please ...
... is placed on a flat surface such as a desk etc., put a cloth to turn off the unit and unplug the power cord before replacing the lamp, then check the ON/STANDBY indicator has already been turned off. 1 Turn off the fingerprints with the ?/1 (ON/STANDBY) button. appears on the ...AC power cord. 2 When setting the unit on a stable surface. 3 While pressing the part indicated in the lamp cover illustration, slide 1 and then open the lamp door. 51 Replacing the Lamp The lamp used for the light source has a certain lifespan. Tip The lifespan of the picture becomes strange, or "Please ...

Operating Instructions
Page 52
6 Push in the new lamp by the handle to touch the optical block inside the unit. 7 Close the lamp door (inner cover), and then tighten the screw. Note Be careful not to remove and attach it reaches the end, and then tighten the 3 screws. 5 Loosen the 3 screws on the lamp with the Phillips screwdriver. Handle Notes • Do not loosen other screws except the 3 specified screws. • Hold the lamp by the handle securely until it . 8 Close the lamp cover. 52 Hold up the handle, then pull the lamp straight out.
6 Push in the new lamp by the handle to touch the optical block inside the unit. 7 Close the lamp door (inner cover), and then tighten the screw. Note Be careful not to remove and attach it reaches the end, and then tighten the 3 screws. 5 Loosen the 3 screws on the lamp with the Phillips screwdriver. Handle Notes • Do not loosen other screws except the 3 specified screws. • Hold the lamp by the handle securely until it . 8 Close the lamp cover. 52 Hold up the handle, then pull the lamp straight out.

Operating Instructions
Page 53
... the customers in the case of a ceiling installation If the lamp breaks, broken lamp pieces may scatter and cause injury. For additional information, see www.sony.com/ mercury 53 Note The lamp contains mercury. Note on the ceiling, remove the lamp door (inner cover) by sliding it horizontally slowly after raising it with a soft cloth...
... the customers in the case of a ceiling installation If the lamp breaks, broken lamp pieces may scatter and cause injury. For additional information, see www.sony.com/ mercury 53 Note The lamp contains mercury. Note on the ceiling, remove the lamp door (inner cover) by sliding it horizontally slowly after raising it with a soft cloth...


