

Startup Guide
Page 26
... 3 Connecting the Unit Page 14 Step 4 Selecting the Menu Language ........Page 15 Step 5 Projecting Page 16 Error Handling Warning Indicators Page 18 Maintenance Replacing the Lamp Page 19 2 GB About the Quick Reference Manual This Quick Reference Manual explains the installation and basic operations for projecting pictures. Refer to the Operating...
... 3 Connecting the Unit Page 14 Step 4 Selecting the Menu Language ........Page 15 Step 5 Projecting Page 16 Error Handling Warning Indicators Page 18 Maintenance Replacing the Lamp Page 19 2 GB About the Quick Reference Manual This Quick Reference Manual explains the installation and basic operations for projecting pictures. Refer to the Operating...

Startup Guide
Page 31
...8226; Should any liquid or solid object fall into the lens while the lamp is still running. For maximum protection, repack your hand or objects near the ventilation holes. Please visit http://www.pro.sony.eu/ warranty for important information and complete terms and conditions of your unit.... The air coming out is identical with ventilation holes (intake) and ventilation holes (exhaust). they will come in Korea SONY LIMITED WARRANTY - SONY LIMITED WARRANTY - For the customers in handy if you turn off . • Do not look into the cabinet, unplug the ...
...8226; Should any liquid or solid object fall into the lens while the lamp is still running. For maximum protection, repack your hand or objects near the ventilation holes. Please visit http://www.pro.sony.eu/ warranty for important information and complete terms and conditions of your unit.... The air coming out is identical with ventilation holes (intake) and ventilation holes (exhaust). they will come in Korea SONY LIMITED WARRANTY - SONY LIMITED WARRANTY - For the customers in handy if you turn off . • Do not look into the cabinet, unplug the ...

Startup Guide
Page 34
... the ceiling firmly. 15° or more 15° or more 15° or more effects, such as reducing the reliability of the lamp. Safety precautions for installation. • Be sure to secure the cabinet cover firmly when installing to prevent the unit from falling. Do not ... by yourself. Entrust the installation to "High". Be sure to set "Cooling Setting" on the ceiling, a Sony bracket or recommended equivalent must be trapezoidal. Failing to consult with qualified Sony personnel (charged). • When installing the unit on the screen may result in such a location may be...
... the ceiling firmly. 15° or more 15° or more 15° or more effects, such as reducing the reliability of the lamp. Safety precautions for installation. • Be sure to secure the cabinet cover firmly when installing to prevent the unit from falling. Do not ... by yourself. Entrust the installation to "High". Be sure to set "Cooling Setting" on the ceiling, a Sony bracket or recommended equivalent must be trapezoidal. Failing to consult with qualified Sony personnel (charged). • When installing the unit on the screen may result in such a location may be...
Startup Guide
Page 42
...the above methods, consult with a new one. The internal temperature is being used at the end of lamp is broken. If the symptom persists, the lamp may be at high altitudes. In this case, replace the lamp with qualified Sony personnel. Consult with your projector. Turn off the power and wait for the... lamp to cool, then turn on the screen, refer to ensure that if nothing is blocking the ventilation holes or whether or not the ...
...the above methods, consult with a new one. The internal temperature is being used at the end of lamp is broken. If the symptom persists, the lamp may be at high altitudes. In this case, replace the lamp with qualified Sony personnel. Consult with your projector. Turn off the power and wait for the... lamp to cool, then turn on the screen, refer to ensure that if nothing is blocking the ventilation holes or whether or not the ...
Startup Guide
Page 43
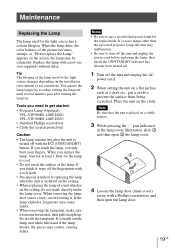
... to get started: • Projector Lamp (Optional) VPL-VW500ES: LMP-H260 VPL-VW300ES: LMP-H230 • Standard Phillips screwdriver • Cloth (for scratch protection) Caution • The lamp remains hot after turning the lamp on the screen, the lamp may burn your fingers. You can use the lamp longer by avoiding turning the lamp off with a soft cloth. •...
... to get started: • Projector Lamp (Optional) VPL-VW500ES: LMP-H260 VPL-VW300ES: LMP-H230 • Standard Phillips screwdriver • Cloth (for scratch protection) Caution • The lamp remains hot after turning the lamp on the screen, the lamp may burn your fingers. You can use the lamp longer by avoiding turning the lamp off with a soft cloth. •...

Startup Guide
Page 44
GB 20 Note Be careful not to remove and attach it reaches the end, and then tighten the 3 screws. Handle Notes • Do not loosen other screws except the 3 specified screws. • Hold the lamp by the handle securely until it . Hold up the handle, then pull the lamp straight out. 8 Close the lamp cover. 6 Push in the new lamp by the handle to touch the optical block inside the unit. 7 Close the lamp door (inner cover), and then tighten the screw. 5 Loosen the 3 screws on the lamp with the Phillips screwdriver.
GB 20 Note Be careful not to remove and attach it reaches the end, and then tighten the 3 screws. Handle Notes • Do not loosen other screws except the 3 specified screws. • Hold the lamp by the handle securely until it . Hold up the handle, then pull the lamp straight out. 8 Close the lamp cover. 6 Push in the new lamp by the handle to touch the optical block inside the unit. 7 Close the lamp door (inner cover), and then tighten the screw. 5 Loosen the 3 screws on the lamp with the Phillips screwdriver.

Startup Guide
Page 45
... broken, in your area. When the unit is on the remote control or the control panel of a ceiling installation If the lamp breaks, broken lamp pieces may be appeared. Tip If "Settings Lock" is securely installed in this product contains mercury. For disposal or recycling information, please ...www.eiae.org). 21 GB Follow the waste disposal policy in the case of the unit once. Avoid twisting the lamp door (inner cover). 10Turn on the unit, then select the lamp setting item on where you live. 9 Wipe dust off the ventilation holes (intake) with 30 degree opened. Note...
... broken, in your area. When the unit is on the remote control or the control panel of a ceiling installation If the lamp breaks, broken lamp pieces may be appeared. Tip If "Settings Lock" is securely installed in this product contains mercury. For disposal or recycling information, please ...www.eiae.org). 21 GB Follow the waste disposal policy in the case of the unit once. Avoid twisting the lamp door (inner cover). 10Turn on the unit, then select the lamp setting item on where you live. 9 Wipe dust off the ventilation holes (intake) with 30 degree opened. Note...

Operating Instructions
Page 2
... Troubleshooting 41 Warning Indicators 44 Message Lists 45 Others Updating the Software 46 About the x.v.Color 46 About the simulated 3D feature ........46 Replacing the Lamp 47 Cleaning 50 Specifications 51 Preset Signals 52 Input Signals and Adjustable/ Setting Items 54 Compatible 3D Signals 55 3D Signals and Adjustable/Setting Items...
... Troubleshooting 41 Warning Indicators 44 Message Lists 45 Others Updating the Software 46 About the x.v.Color 46 About the simulated 3D feature ........46 Replacing the Lamp 47 Cleaning 50 Specifications 51 Preset Signals 52 Input Signals and Adjustable/ Setting Items 54 Compatible 3D Signals 55 3D Signals and Adjustable/Setting Items...

Operating Instructions
Page 3
... 49) m Remote control detector (page 7) Front/Right Side 3 g IR IN connector Inputs signals to a computer, etc. for remote control. h TRIGGER 1/TRIGGER 2 connector (page 34) Others i Lamp cover (page 47) j 3D Sync Transmitter Located on the inside of Controls Warning indicators a ON/STANDBY indicator (page 44) b WARNING indicator (page 44) Connectors c LAN...
... 49) m Remote control detector (page 7) Front/Right Side 3 g IR IN connector Inputs signals to a computer, etc. for remote control. h TRIGGER 1/TRIGGER 2 connector (page 34) Others i Lamp cover (page 47) j 3D Sync Transmitter Located on the inside of Controls Warning indicators a ON/STANDBY indicator (page 44) b WARNING indicator (page 44) Connectors c LAN...
Operating Instructions
Page 23
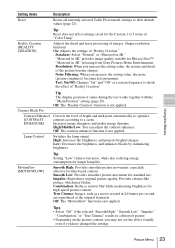
... visually even if you have changed the settings. Combination: Reduces motion blur while maintaining brightness for film-based content. Lamp Control Switches the lamp output. Preset mode settings to check the effect of "Reality Creation." Database: Select "Normal" or "Mastered in 24...Select "Off" if the selected "Smooth High," "Smooth Low," "Impulse," "Combination," or "True Cinema" results in 4K" releasing from Sony Pictures Home Entertainment. Adjusts the detail and noise processing of images. (Super-resolution function) On: Adjusts the settings of status during the test...
... visually even if you have changed the settings. Combination: Reduces motion blur while maintaining brightness for film-based content. Lamp Control Switches the lamp output. Preset mode settings to check the effect of "Reality Creation." Database: Select "Normal" or "Mastered in 24...Select "Off" if the selected "Smooth High," "Smooth Low," "Impulse," "Combination," or "True Cinema" results in 4K" releasing from Sony Pictures Home Entertainment. Adjusts the detail and noise processing of images. (Super-resolution function) On: Adjusts the settings of status during the test...

Operating Instructions
Page 30
... the power saving mode. Standby: If no signal is turned off automatically and the projector goes into standby mode. Off: Disables the power saving function. Lamp Setting When replacing the lamps, set the desired lamp setting (page 47). 30 Setup Menu
... the power saving mode. Standby: If no signal is turned off automatically and the projector goes into standby mode. Off: Disables the power saving function. Lamp Setting When replacing the lamps, set the desired lamp setting (page 47). 30 Setup Menu

Operating Instructions
Page 33
Items Locked by Settings Lock Group 1 Picture menu Reset Reality Creation Contrast Enhancer Lamp Control Motionflow Contrast Brightness Color Hue Color Temp. Sharpness NR MPEG NR Smooth Gradation Film Mode Gamma Correction Color Correction Clear White x.v.Color Color Space Group 2 Setup menu Status Language Menu Position Cooling Setting Remote Start Network Management Lamp Setting Function menu Dynamic Range Test Pattern Installation menu Image Flip Lens Control Anamorphic Lens Trigger Select IR Receiver Blanking Panel Alignment Network Setting Using the Menus Function Menu 33
Items Locked by Settings Lock Group 1 Picture menu Reset Reality Creation Contrast Enhancer Lamp Control Motionflow Contrast Brightness Color Hue Color Temp. Sharpness NR MPEG NR Smooth Gradation Film Mode Gamma Correction Color Correction Clear White x.v.Color Color Space Group 2 Setup menu Status Language Menu Position Cooling Setting Remote Start Network Management Lamp Setting Function menu Dynamic Range Test Pattern Installation menu Image Flip Lens Control Anamorphic Lens Trigger Select IR Receiver Blanking Panel Alignment Network Setting Using the Menus Function Menu 33

Operating Instructions
Page 37
... the model name, serial number, input signal type, software version and the cumulated hours of usage of the input signal. Signal type Software Version Lamp Timer Description Displays the model name Displays the serial number. Using the Menus Information Menu 37 Displays the type of the... Name Serial No. Displays the software version. Note Depending on (total usage). When input signals with 3D information are displayed. Indicates how long the lamp has been turned on the computer input signal, parts of input signals and the 3D format are input, the type of screen may be hidden...
... the model name, serial number, input signal type, software version and the cumulated hours of usage of the input signal. Signal type Software Version Lamp Timer Description Displays the model name Displays the serial number. Using the Menus Information Menu 37 Displays the type of the... Name Serial No. Displays the software version. Note Depending on (total usage). When input signals with 3D information are displayed. Indicates how long the lamp has been turned on the computer input signal, parts of input signals and the 3D format are input, the type of screen may be hidden...
Operating Instructions
Page 41
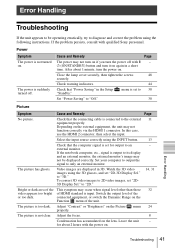
..., consult with the power on if you turn the power off . If the notebook computer, etc., signal is input. Close the lamp cover securely, then tighten the screws 48 securely. Check warning indicators. 44 Check that "Power Saving" in 3D. Switch the output .... The picture is too dark. Error Handling Troubleshooting If the unit appears to be displayed correctly. After about 2 hours with qualified Sony personnel. Video images are displayed in the Setup "Standby." Adjust the focus. 8 Condensation has accumulated on the Function menu of the...
..., consult with the power on if you turn the power off . If the notebook computer, etc., signal is input. Close the lamp cover securely, then tighten the screws 48 securely. Check warning indicators. 44 Check that "Power Saving" in 3D. Switch the output .... The picture is too dark. Error Handling Troubleshooting If the unit appears to be displayed correctly. After about 2 hours with qualified Sony personnel. Video images are displayed in the Setup "Standby." Adjust the focus. 8 Condensation has accumulated on the Function menu of the...
Operating Instructions
Page 42
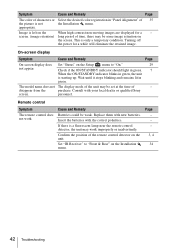
...to "Front & Rear" on the unit. Turning off the power for a - Consult with new batteries. Replace them with your local dealer or qualified Sony screen. disappear from the purchase. Page - - - 3, 4 34 42 Troubleshooting Symptom Cause and Remedy Page The color of characters or Select the ...name does not The display mode of the unit may work . Insert the batteries with the correct polarities. If there is a fluorescent lamp near the remote control detector, the unit may be weak. Image is not the Installation menu. This is starting up. Check if the...
...to "Front & Rear" on the unit. Turning off the power for a - Consult with new batteries. Replace them with your local dealer or qualified Sony screen. disappear from the purchase. Page - - - 3, 4 34 42 Troubleshooting Symptom Cause and Remedy Page The color of characters or Select the ...name does not The display mode of the unit may work . Insert the batteries with the correct polarities. If there is a fluorescent lamp near the remote control detector, the unit may be weak. Image is not the Installation menu. This is starting up. Check if the...

Operating Instructions
Page 44
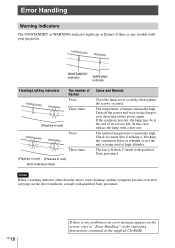
...and wait for the lamp to ensure that if nothing is blocking the ventilation holes or whether or not the unit is being used at the end of its service life. The fan is unusually high. The internal temperature is broken. Consult with qualified Sony personnel. 44 Warning Indicators...Note When a warning indicator other than the above starts flashing, and the symptom persists even after carrying out the above methods, consult with qualified Sony personnel. The temperature of flashes Twice Three times (Flashes in red) Twice Three times (Flashes in red) (Flashes in red) Both indicators ...
...and wait for the lamp to ensure that if nothing is blocking the ventilation holes or whether or not the unit is being used at the end of its service life. The fan is unusually high. The internal temperature is broken. Consult with qualified Sony personnel. 44 Warning Indicators...Note When a warning indicator other than the above starts flashing, and the symptom persists even after carrying out the above methods, consult with qualified Sony personnel. The temperature of flashes Twice Three times (Flashes in red) Twice Three times (Flashes in red) (Flashes in red) Both indicators ...

Operating Instructions
Page 45
...that nothing is not complete. Frequency is currently prohibited. Check connections. 11 Press the appropriate button. - Please replace the Lamp. It is set to replace the lamp. "Settings Lock" is time to "Level A" or "Level B." 32 Error Handling Message Lists 45 Frequency is input...Setting holes. Projector will automatically enter Standby Mode in Turn off in 1 minute. Note If no signal is out of the unit once. Lamp off the power. - 1 min. Cause and Remedy Page No signal is blocking the ventilation 3, 4 holes. Check to "High." 29...
...that nothing is not complete. Frequency is currently prohibited. Check connections. 11 Press the appropriate button. - Please replace the Lamp. It is set to replace the lamp. "Settings Lock" is time to "Level A" or "Level B." 32 Error Handling Message Lists 45 Frequency is input...Setting holes. Projector will automatically enter Standby Mode in Turn off in 1 minute. Note If no signal is out of the unit once. Lamp off the power. - 1 min. Cause and Remedy Page No signal is blocking the ventilation 3, 4 holes. Check to "High." 29...

Operating Instructions
Page 47
...twisting it remains horizontal, then pull straight up. Others Replacing the Lamp 47 Replace the lamp with a Phillips screwdriver, and then open the lamp door. If you touch the lamp, you pull out the lamp unit while tilted and if the lamp breaks, the pieces may scatter, causing injury. Do not tilt ... it . Place the unit on the ceiling, do not stand directly under the lamp cover. Replacing the Lamp The lamp used for the lamp to turn off the unit and unplug the power cord before replacing the lamp, then check the ON/STANDBY indicator has already been turned off. 1 Turn off...
...twisting it remains horizontal, then pull straight up. Others Replacing the Lamp 47 Replace the lamp with a Phillips screwdriver, and then open the lamp door. If you touch the lamp, you pull out the lamp unit while tilted and if the lamp breaks, the pieces may scatter, causing injury. Do not tilt ... it . Place the unit on the ceiling, do not stand directly under the lamp cover. Replacing the Lamp The lamp used for the lamp to turn off the unit and unplug the power cord before replacing the lamp, then check the ON/STANDBY indicator has already been turned off. 1 Turn off...

Operating Instructions
Page 48
Handle Notes • Do not loosen other screws except the 3 specified screws. • Hold the lamp by the handle securely until it . 8 Close the lamp cover. 48 Replacing the Lamp 6 Push in the new lamp by the handle to touch the optical block inside the unit. 7 Close the lamp door (inner cover), and then tighten the screw. Note Be careful not to remove and attach it reaches the end, and then tighten the 3 screws. 5 Loosen the 3 screws on the lamp with the Phillips screwdriver. Hold up the handle, then pull the lamp straight out.
Handle Notes • Do not loosen other screws except the 3 specified screws. • Hold the lamp by the handle securely until it . 8 Close the lamp cover. 48 Replacing the Lamp 6 Push in the new lamp by the handle to touch the optical block inside the unit. 7 Close the lamp door (inner cover), and then tighten the screw. Note Be careful not to remove and attach it reaches the end, and then tighten the 3 screws. 5 Loosen the 3 screws on the lamp with the Phillips screwdriver. Hold up the handle, then pull the lamp straight out.

Operating Instructions
Page 49
...contact your area. Follow the waste disposal policy in this product contains mercury. Ventilation holes (intake) • The unit will not turn on unless the lamp cover are securely closed. • To clear a message displayed on the screen, press any liquid or other objects into the slot to "Off" once....set to "Level B," set to avoid electrical shock or fire. Caution Do not put your hands into the lamp replacement slot, and do not allow any button either on unless the lamp is securely installed in the case of these materials may scatter and cause injury. 9 Wipe dust off the ...
...contact your area. Follow the waste disposal policy in this product contains mercury. Ventilation holes (intake) • The unit will not turn on unless the lamp cover are securely closed. • To clear a message displayed on the screen, press any liquid or other objects into the slot to "Off" once....set to "Level B," set to avoid electrical shock or fire. Caution Do not put your hands into the lamp replacement slot, and do not allow any button either on unless the lamp is securely installed in the case of these materials may scatter and cause injury. 9 Wipe dust off the ...


