
Operating Instructions
Page 7
... avoid lowering the contrast ratio. • Cover any liquid or solid object fall into the lens while the lamp is on. • Do not place your local power supply. • Should any windows that the carpet and wall paper be used for several days. &#... heat build-up After you ever have it is recommended that face the screen with opaque draperies. • It is identical with a soft cloth. On LCD projector The LCD projector is a normal result of your hand or objects near these will damage the cabinet. • Avoid touching the lens. On cleaning • To keep...
... avoid lowering the contrast ratio. • Cover any liquid or solid object fall into the lens while the lamp is on. • Do not place your local power supply. • Should any windows that the carpet and wall paper be used for several days. &#... heat build-up After you ever have it is recommended that face the screen with opaque draperies. • It is identical with a soft cloth. On LCD projector The LCD projector is a normal result of your hand or objects near these will damage the cabinet. • Avoid touching the lens. On cleaning • To keep...
Operating Instructions
Page 8
... DTV, high-definition television, high- These include DRC-MF (Digital Reality Creation Multifunction) (Sony's proprietary high-quality image technology); 3-D Gamma Correction, providing excellent uniformity; Combined with six ...television signals. Wide Screen/DTV/High Definition Television • Wide Screen This projector utilizes a 16:9 aspect ratio LCD panel, allowing seven screen modes (ZOOM, FULL, SUBTITLE, WIDE ZOOM,... contrast ratio. • High-brightness - 1000 ANSI lumens The LCD panel with its new 200W UHP lamp, optical unit and lens achieves a high brightness of 1000 ANSI ...
... DTV, high-definition television, high- These include DRC-MF (Digital Reality Creation Multifunction) (Sony's proprietary high-quality image technology); 3-D Gamma Correction, providing excellent uniformity; Combined with six ...television signals. Wide Screen/DTV/High Definition Television • Wide Screen This projector utilizes a 16:9 aspect ratio LCD panel, allowing seven screen modes (ZOOM, FULL, SUBTITLE, WIDE ZOOM,... contrast ratio. • High-brightness - 1000 ANSI lumens The LCD panel with its new 200W UHP lamp, optical unit and lens achieves a high brightness of 1000 ANSI ...
Operating Instructions
Page 11
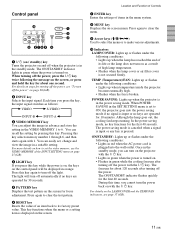
... of Controls 7 ENTER key Enters the settings of an item back to 6. Press again to set , change and view the image in orange. Control panel 0 LAMP/ COVER TEMP/ FAN POWER SAVING ON/ STANDBY MENU PATTERN ENTER RESET LIGHT INPUT VIDEO MEMORY 1 2 3 9 8765 4 1 I / 1 key twice following the message... on the screen. For details on steps for turning off when the projector is turned on the screen for about one second. For more details on how to clear the menu. 9 Arrow keys (M/m/ You can adjust the image...
... of Controls 7 ENTER key Enters the settings of an item back to 6. Press again to set , change and view the image in orange. Control panel 0 LAMP/ COVER TEMP/ FAN POWER SAVING ON/ STANDBY MENU PATTERN ENTER RESET LIGHT INPUT VIDEO MEMORY 1 2 3 9 8765 4 1 I / 1 key twice following the message... on the screen. For details on steps for turning off when the projector is turned on the screen for about one second. For more details on how to clear the menu. 9 Arrow keys (M/m/ You can adjust the image...
Operating Instructions
Page 18
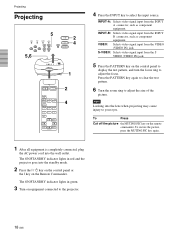
... signal input from the INPUT A connector, such as component equipment. The ON/STANDBY indicator lights in green. 3 Turn on the remote commander. Projecting Projecting 5 LAMP/ COVER TEMP/ FAN POWER SAVING ON/ STANDBY MENU PATTERN ENTER RESET 5,6 LIGHT INPUT VIDEO MEMORY 2 4 1 MUTING PIC INPUT SELECT VIDEO A B S VIDEO...equipment. To Press Cut off the picture the MUTING PIC key on equipment connected to the projector. 18 (GB) The ON/STANDBY indicator lights in red and the projector goes into the wall outlet. To restore the picture, press the MUTING PIC key again. ...
... signal input from the INPUT A connector, such as component equipment. The ON/STANDBY indicator lights in green. 3 Turn on the remote commander. Projecting Projecting 5 LAMP/ COVER TEMP/ FAN POWER SAVING ON/ STANDBY MENU PATTERN ENTER RESET 5,6 LIGHT INPUT VIDEO MEMORY 2 4 1 MUTING PIC INPUT SELECT VIDEO A B S VIDEO...equipment. To Press Cut off the picture the MUTING PIC key on equipment connected to the projector. 18 (GB) The ON/STANDBY indicator lights in red and the projector goes into the wall outlet. To restore the picture, press the MUTING PIC key again. ...
Operating Instructions
Page 27
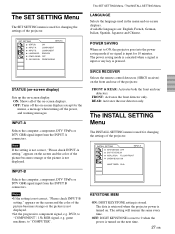
...". FRONT: Activates the front detector only. INSTALL SETTING INPUT-A KEYSTONE MEM: OFF DIGIT KEYSTONE: 01 INSTALLATION: FLOOR-FRONT CINEMA BLACK: ON LAMP TIMER: 234h KEYSTONE MEM ON: DIGIT KEYSTONE setting is not correct, "Please check INPUT-B setting." The setting will remain the same every time..., French, German, Italian, Spanish, Japanese and Chinese. STATUS (on-screen display) Sets up the on the screen and the color of the projector. INPUT-B Selects the computer, component, DTV YPBPR or DTV GBR signal input from the INPUT A connectors. appears on -screen display. FRONT &...
...". FRONT: Activates the front detector only. INSTALL SETTING INPUT-A KEYSTONE MEM: OFF DIGIT KEYSTONE: 01 INSTALLATION: FLOOR-FRONT CINEMA BLACK: ON LAMP TIMER: 234h KEYSTONE MEM ON: DIGIT KEYSTONE setting is not correct, "Please check INPUT-B setting." The setting will remain the same every time..., French, German, Italian, Spanish, Japanese and Chinese. STATUS (on-screen display) Sets up the on the screen and the color of the projector. INPUT-B Selects the computer, component, DTV YPBPR or DTV GBR signal input from the INPUT A connectors. appears on -screen display. FRONT &...

Operating Instructions
Page 32
...176; Avoid using as the unit topples over on its side. Unsuitable Conditions for Installation NotesforInstallation Very dusty Unsuitable Installation Do not install the projector in 1 min." Toppling of the unit Avoid using as a piece of paper. • If you put something in front of the...than 20 degrees. When the internal heat builds up due to the projector. These installation may cause malfunction or damage to the block-up periodically. Lamp off automatically after one minute. • Leave space of the projector. ;Notes for Use Do not do not install the unit in ...
...176; Avoid using as the unit topples over on its side. Unsuitable Conditions for Installation NotesforInstallation Very dusty Unsuitable Installation Do not install the projector in 1 min." Toppling of the unit Avoid using as a piece of paper. • If you put something in front of the...than 20 degrees. When the internal heat builds up due to the projector. These installation may cause malfunction or damage to the block-up periodically. Lamp off automatically after one minute. • Leave space of the projector. ;Notes for Use Do not do not install the unit in ...
Operating Instructions
Page 34
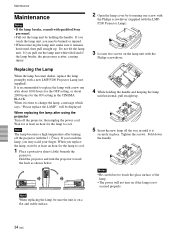
... straight up . Replacing the Lamp When the lamp becomes darker, replace the lamp promptly with qualified Sony personnel. • Pull out the lamp unit by loosening one after about 1000 hours for the OFF setting, or about 2000 hours for the ON setting in place. Hold the projector and turn on the lamp unit with the I / 1 key...
... straight up . Replacing the Lamp When the lamp becomes darker, replace the lamp promptly with qualified Sony personnel. • Pull out the lamp unit by loosening one after about 1000 hours for the OFF setting, or about 2000 hours for the ON setting in place. Hold the projector and turn on the lamp unit with the I / 1 key...
Operating Instructions
Page 35
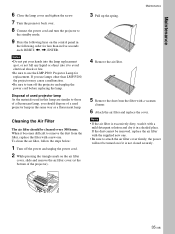
Maintenance 6 Close the lamp cover and tighten the screw. 7 Turn the projector back over. 8 Connect the power cord and turn the projector to the standby mode. 9 Press the following keys on the control panel in the following order for less than in five seconds each: RESET,
Maintenance 6 Close the lamp cover and tighten the screw. 7 Turn the projector back over. 8 Connect the power cord and turn the projector to the standby mode. 9 Press the following keys on the control panel in the following order for less than in five seconds each: RESET,
Operating Instructions
Page 36
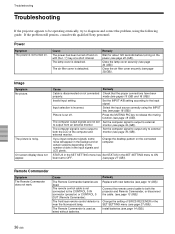
...power has been turned off . Close the lamp cover securely (see page 14 (GB)). 36... according to the CONTROL S IN connector (projector) or CONTROL S OUT (Remote Commander). ...to ON been set to both the projector and Remote Commander, or disconnect the ... Picture is not turned on with qualified Sony personnel. Change the desktop pattern on the...the fluorescent lamp. Input selection is detached. The computer... been properly. The lamp cover is incorrect. Close... and 16 (GB)). Troubleshooting Troubleshooting If the projector appears to be operating erratically, try to output ...
...power has been turned off . Close the lamp cover securely (see page 14 (GB)). 36... according to the CONTROL S IN connector (projector) or CONTROL S OUT (Remote Commander). ...to ON been set to both the projector and Remote Commander, or disconnect the ... Picture is not turned on with qualified Sony personnel. Change the desktop pattern on the...the fluorescent lamp. Input selection is detached. The computer... been properly. The lamp cover is incorrect. Close... and 16 (GB)). Troubleshooting Troubleshooting If the projector appears to be operating erratically, try to output ...
Operating Instructions
Page 37
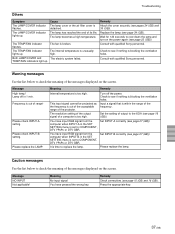
... NO INPUT Not applicable! Remedy Check connections (see page 16 (GB)). The fan is out of range! Both LAMP/COVER and The electric system failed. Consult with qualified Sony personnel. Warning messages Use the list below to the XGA (see page 15 (GB) and 16 (GB)). Frequency...a computer is within the range of output to check the meaning of the projector. Set the setting of the frequency. Please replace the lamp. The LAMP/COVER indicator lights up . Please check INPUT-A setting. Please replace the LAMP. Input a signal that is too high. It is detached. Press the ...
... NO INPUT Not applicable! Remedy Check connections (see page 16 (GB)). The fan is out of range! Both LAMP/COVER and The electric system failed. Consult with qualified Sony personnel. Warning messages Use the list below to the XGA (see page 15 (GB) and 16 (GB)). Frequency...a computer is within the range of output to check the meaning of the projector. Set the setting of the frequency. Please replace the lamp. The LAMP/COVER indicator lights up . Please check INPUT-A setting. Please replace the LAMP. Input a signal that is too high. It is detached. Press the ...
Operating Instructions
Page 39
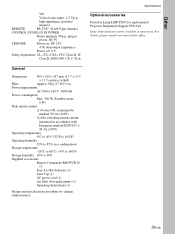
For details, please consult your nearest Sony office. 39 (GB) Other VD: Vertical sync input: 1-5 Vp-p high impedance, positive/ negative REMOTE RS-232C: D-sub 9-pin (female) CONTROL S IN/PLUG IN POWER Stereo ... (13 3/8 × 5 5/8 × 13 1/4 inches) (w/h/d) Mass Approx. 8 kg (17 lb 10 oz) Power requirements AC 100 to change without notice. Specifications Optional accessories Projector Lamp LMP-P200 (for replacement) Projector Suspension Support PSS-610 Some of the items may not be available in accordance with European standard EN55103-1: 24.3A (230V) Operating temperature...
For details, please consult your nearest Sony office. 39 (GB) Other VD: Vertical sync input: 1-5 Vp-p high impedance, positive/ negative REMOTE RS-232C: D-sub 9-pin (female) CONTROL S IN/PLUG IN POWER Stereo ... (13 3/8 × 5 5/8 × 13 1/4 inches) (w/h/d) Mass Approx. 8 kg (17 lb 10 oz) Power requirements AC 100 to change without notice. Specifications Optional accessories Projector Lamp LMP-P200 (for replacement) Projector Suspension Support PSS-610 Some of the items may not be available in accordance with European standard EN55103-1: 24.3A (230V) Operating temperature...
Operating Instructions
Page 42
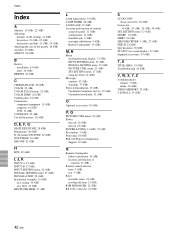
...27 (GB) INSTALLATION 28 (GB) Installation examples 29 (GB) on a ceiling 30 (GB) on a floor 29 (GB) KEYSTONE MEM 27 (GB) Index L Lamp replacement 34 (GB) LAMP TIMER 28 (GB) LANGUAGE 27 (GB) Location and function of controls connector panel 12 (GB) control panel 11 (GB) front/left side 9 (GB) rear... 22 (GB) Power turn off 20 (GB) turn on 18 (GB) POWER SAVING 11 (GB), 27 (GB) Precautions 7 (GB) Projecting 18 (GB) PSS-610 Projector Suspension Support 30 (GB) R Remote Commander battery installation 14 (GB) location and function of controls 13 (GB) Remote control detector front 9 (GB) rear 9 (GB) ...
...27 (GB) INSTALLATION 28 (GB) Installation examples 29 (GB) on a ceiling 30 (GB) on a floor 29 (GB) KEYSTONE MEM 27 (GB) Index L Lamp replacement 34 (GB) LAMP TIMER 28 (GB) LANGUAGE 27 (GB) Location and function of controls connector panel 12 (GB) control panel 11 (GB) front/left side 9 (GB) rear... 22 (GB) Power turn off 20 (GB) turn on 18 (GB) POWER SAVING 11 (GB), 27 (GB) Precautions 7 (GB) Projecting 18 (GB) PSS-610 Projector Suspension Support 30 (GB) R Remote Commander battery installation 14 (GB) location and function of controls 13 (GB) Remote control detector front 9 (GB) rear 9 (GB) ...


