Startup Guide
Page 39
... accept any interference received, including interference that any changes or modifications not expressly approved in this manual could void your authority to Subpart B of part 15 of Sony Corporation, 1-7-1 Konan Minato-ku Tokyo, 108-0075 Japan. For the Customers in the separate ...on European Union legislation shall be shielded in Taiwan only For the State of Conformity Trade Name : SONY Model : VPL-SW536C VPL-SW526C VPL-SW536 VPL-SW526 VPL-SX536 Responsible party : Sony Electronics Inc. As pilhas devem ser armazenadas em local seco e ventilado. Telephone Number: 858-942...
... accept any interference received, including interference that any changes or modifications not expressly approved in this manual could void your authority to Subpart B of part 15 of Sony Corporation, 1-7-1 Konan Minato-ku Tokyo, 108-0075 Japan. For the Customers in the separate ...on European Union legislation shall be shielded in Taiwan only For the State of Conformity Trade Name : SONY Model : VPL-SW536C VPL-SW526C VPL-SW536 VPL-SW526 VPL-SX536 Responsible party : Sony Electronics Inc. As pilhas devem ser armazenadas em local seco e ventilado. Telephone Number: 858-942...

Startup Guide
Page 46
...htm" file on the CD-ROM. When the message "User Account Control" is already installed. USB A-B cable (5m) (1) (VPL-SW536C/ SW526C only) 10 GB Checking the Supplied Accessories Checking the Supplied Accessories RM-PJ8 Remote Commander (1) Lithium battery (CR2025) (1) The... Pen Device (main) (1) (VPL-SW536C/SW526C only) IFU-PN200S Interactive Pen Device (sub) (1) (VPL-SW536C/SW526C only) Size AAA (R03) manganese batteries (4) (VPL-SW536C/SW526C only) Interactive Presentation Utility 2 application (CD-ROM) (1) (VPL-SW536C/SW526C only) Using the CD-ROM Manuals Insert the supplied CD-ROM into...
...htm" file on the CD-ROM. When the message "User Account Control" is already installed. USB A-B cable (5m) (1) (VPL-SW536C/ SW526C only) 10 GB Checking the Supplied Accessories Checking the Supplied Accessories RM-PJ8 Remote Commander (1) Lithium battery (CR2025) (1) The... Pen Device (main) (1) (VPL-SW536C/SW526C only) IFU-PN200S Interactive Pen Device (sub) (1) (VPL-SW536C/SW526C only) Size AAA (R03) manganese batteries (4) (VPL-SW536C/SW526C only) Interactive Presentation Utility 2 application (CD-ROM) (1) (VPL-SW536C/SW526C only) Using the CD-ROM Manuals Insert the supplied CD-ROM into...
Startup Guide
Page 50
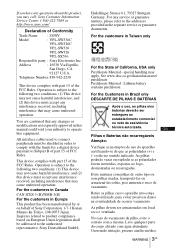
SSID: VPL + MAC address for "Manual" are as follows. Tablet PC/Smartphone USB wireless LAN module IFU-WLM3 (not supplied) Computer Notes • Undesignated USB wireless LAN modules do not work. &#... in Standby mode (Standby Mode: "Low"), or the AC power cord is unplugged from the wall outlet. • When wirelessly connecting a tablet PC/smartphone to "Manual" in the projector's "WLAN Settings". • The factory default settings for LAN Security Method: WEP(64bit) Password: sony1 14 GB Connecting the Projector USB connector...
SSID: VPL + MAC address for "Manual" are as follows. Tablet PC/Smartphone USB wireless LAN module IFU-WLM3 (not supplied) Computer Notes • Undesignated USB wireless LAN modules do not work. &#... in Standby mode (Standby Mode: "Low"), or the AC power cord is unplugged from the wall outlet. • When wirelessly connecting a tablet PC/smartphone to "Manual" in the projector's "WLAN Settings". • The factory default settings for LAN Security Method: WEP(64bit) Password: sony1 14 GB Connecting the Projector USB connector...
Startup Guide
Page 55
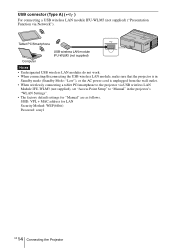
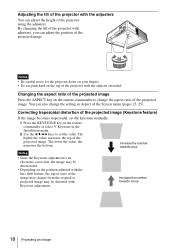
... on the whiteboard or blackboard without using a computer. Correcting trapezoidal distortion of the projected image (Keystone feature) If the image becomes trapezoidal, set the keystone manually. 1 Press the KEYSTONE key on the remote commander. The higher the value, narrower the top of the projected image.
... on the whiteboard or blackboard without using a computer. Correcting trapezoidal distortion of the projected image (Keystone feature) If the image becomes trapezoidal, set the keystone manually. 1 Press the KEYSTONE key on the remote commander. The higher the value, narrower the top of the projected image.

Startup Guide
Page 58
... performed. • If Calibration Auto still does not calibrate properly after reducing the lighting as suggested above, click "Calibration Main" and "Calibration Sub", then calibrate manually. • If you use a screen which is directly exposed to a computer, see "Connecting the Projector". Observe the precautions noted below during the calibration. • Avoid...
... performed. • If Calibration Auto still does not calibrate properly after reducing the lighting as suggested above, click "Calibration Main" and "Calibration Sub", then calibrate manually. • If you use a screen which is directly exposed to a computer, see "Connecting the Projector". Observe the precautions noted below during the calibration. • Avoid...

Startup Guide
Page 59
... you can use the functions of Interactive Presentation Utility 2" for details. See "User's Guide of the toolbar on -screen instructions to computer. Toolbar Calibration Auto/Manual Calibration aligns the points where the pen (Main and Sub) is pointing and where the projector displays the cursor on the screen. a b c a Calibration Auto b Calibration...
... you can use the functions of Interactive Presentation Utility 2" for details. See "User's Guide of the toolbar on -screen instructions to computer. Toolbar Calibration Auto/Manual Calibration aligns the points where the pen (Main and Sub) is pointing and where the projector displays the cursor on the screen. a b c a Calibration Auto b Calibration...

Startup Guide
Page 61
... a b c a Calibration Auto b Calibration Main c Calibration Sub Click "Calibration" to display the pop-up menu, then select [Exit]. 25 Using the Interactive Function GB Calibration Auto/Manual Calibration aligns the points where the pen (Main and Sub) is pointing and where the projector displays the cursor on the screen. The calibration starts...
... a b c a Calibration Auto b Calibration Main c Calibration Sub Click "Calibration" to display the pop-up menu, then select [Exit]. 25 Using the Interactive Function GB Calibration Auto/Manual Calibration aligns the points where the pen (Main and Sub) is pointing and where the projector displays the cursor on the screen. The calibration starts...
Users Guide
Page 1
4-465-082-18 (1) Interactive Presentation Utility 2 User's Guide Before operating the unit, please read this manual thoroughly and retain it for future reference. VPL-SW636C/SW631C VPL-SW635C/SW630C/SW620C VPL-SW536C/SW526C © 2013 Sony Corporation
4-465-082-18 (1) Interactive Presentation Utility 2 User's Guide Before operating the unit, please read this manual thoroughly and retain it for future reference. VPL-SW636C/SW631C VPL-SW635C/SW630C/SW620C VPL-SW536C/SW526C © 2013 Sony Corporation

Users Guide
Page 2
... of Contents For Windows 3 System Requirement 3 Feature 3 Desktop mode 4 Whiteboard mode 6 Dual-user (Dual pen 7 Calibration Auto/Manual 8 Saving calibration data 9 Pen tracking speed adjustment .... 9 Pen detection sensitivity adjustment 9 Management Tools 10 Drawing Tools 12 Assistant Tools...34 For Mac 35 System Requirement 35 Feature 35 Desktop mode 36 Whiteboard mode 37 Dual-user (Dual pen 38 Calibration Auto/Manual .......... 39 Saving calibration data 40 Pen tracking speed adjustment 40 Pen detection sensitivity adjustment 40 Management Tools 41 Drawing Tools 43 ...
... of Contents For Windows 3 System Requirement 3 Feature 3 Desktop mode 4 Whiteboard mode 6 Dual-user (Dual pen 7 Calibration Auto/Manual 8 Saving calibration data 9 Pen tracking speed adjustment .... 9 Pen detection sensitivity adjustment 9 Management Tools 10 Drawing Tools 12 Assistant Tools...34 For Mac 35 System Requirement 35 Feature 35 Desktop mode 36 Whiteboard mode 37 Dual-user (Dual pen 38 Calibration Auto/Manual .......... 39 Saving calibration data 40 Pen tracking speed adjustment 40 Pen detection sensitivity adjustment 40 Management Tools 41 Drawing Tools 43 ...

Users Guide
Page 8
... Auto b Calibration Main c Calibration Sub d Saving calibration data Click "Calibration" to execute the calibration automatically. Calibration Auto/Manual Calibration aligns the points where the pen (Main and Sub) is performed. 8 Calibration Auto/Manual If Calibration Auto does not calibrate properly, try the following methods. • Shield the screen from strong, direct...still does not calibrate properly after reducing the lighting as suggested above, click "Calibration Main" and "Calibration Sub", then calibrate manually. • If you to select "Calibration Auto."
... Auto b Calibration Main c Calibration Sub d Saving calibration data Click "Calibration" to execute the calibration automatically. Calibration Auto/Manual Calibration aligns the points where the pen (Main and Sub) is performed. 8 Calibration Auto/Manual If Calibration Auto does not calibrate properly, try the following methods. • Shield the screen from strong, direct...still does not calibrate properly after reducing the lighting as suggested above, click "Calibration Main" and "Calibration Sub", then calibrate manually. • If you to select "Calibration Auto."

Users Guide
Page 25
... Menu Bar, Toolbars or Floating Tools. 1 2 3 4 5 678 a Dimension Label You can be displayed. can use Ruler to measure objects and to draw a line in a unit manually. You can use Angle Label tool to measure an angle, and modify the magnitude of the angle label is that which is displayed on the...
... Menu Bar, Toolbars or Floating Tools. 1 2 3 4 5 678 a Dimension Label You can be displayed. can use Ruler to measure objects and to draw a line in a unit manually. You can use Angle Label tool to measure an angle, and modify the magnitude of the angle label is that which is displayed on the...

Users Guide
Page 39
"Calibration Auto" allows you use a screen which is not white, Calibration Auto may be inaccurate. The calibration starts automatically. Calibration Auto/Manual 39 a b c d a Calibration Auto b Calibration Main c Calibration Sub d Saving calibration data Click "Calibration" to execute the calibration ...8226; Reduce the ambient light while Calibration Auto is pointing and where the projector displays the cursor on the screen. Calibration Auto/Manual Calibration aligns the points where the pen (Main and Sub) is performed. Main Pen toolbar • If Calibration Auto still does...
"Calibration Auto" allows you use a screen which is not white, Calibration Auto may be inaccurate. The calibration starts automatically. Calibration Auto/Manual 39 a b c d a Calibration Auto b Calibration Main c Calibration Sub d Saving calibration data Click "Calibration" to execute the calibration ...8226; Reduce the ambient light while Calibration Auto is pointing and where the projector displays the cursor on the screen. Calibration Auto/Manual Calibration aligns the points where the pen (Main and Sub) is performed. Main Pen toolbar • If Calibration Auto still does...

Users Guide
Page 54
... the cursor onto the page and click to determine the vertex, click again to measure angles and draw arcs of rotation is displayed in a unit manually. When rotating the ruler, the current angle of a chosen angle. Starts here Ends here Ends here Starts here c Dividers You can also select Arc, Solid...
... the cursor onto the page and click to determine the vertex, click again to measure angles and draw arcs of rotation is displayed in a unit manually. When rotating the ruler, the current angle of a chosen angle. Starts here Ends here Ends here Starts here c Dividers You can also select Arc, Solid...
Operating Instructions
Page 1
4-453-101-14 (1) Data Projector Operating Instructions Before operating the unit, please read this manual and supplied Quick Reference Manual thoroughly and retain it for future reference. VPL-SW536C/SW526C/SW536/SW526 VPL-SX536 Not all models are available in all countries and area. Please check with your local Sony Authorized Dealer. © 2012 Sony Corporation
4-453-101-14 (1) Data Projector Operating Instructions Before operating the unit, please read this manual and supplied Quick Reference Manual thoroughly and retain it for future reference. VPL-SW536C/SW526C/SW536/SW526 VPL-SX536 Not all models are available in all countries and area. Please check with your local Sony Authorized Dealer. © 2012 Sony Corporation
Operating Instructions
Page 9
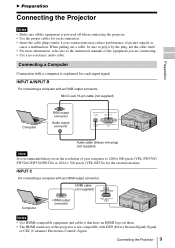
... to grip it by the plug, not the cable itself. • For more information, refer also to 1280 × 800 pixels (VPL-SW536C/ SW526C/SW536/SW526) or 1024 × 768 pixels (VPL-SX536) for the external monitor. Mini D-sub 15-pin cable (not supplied) Preparation Computer RGB output connector Audio output connector Audio... an HDMI logo on them. • The HDMI connector of this projector is recommended that you set the resolution of your computer to the instruction manuals of picture signals or cause a malfunction.
... to grip it by the plug, not the cable itself. • For more information, refer also to 1280 × 800 pixels (VPL-SW536C/ SW526C/SW536/SW526) or 1024 × 768 pixels (VPL-SX536) for the external monitor. Mini D-sub 15-pin cable (not supplied) Preparation Computer RGB output connector Audio output connector Audio... an HDMI logo on them. • The HDMI connector of this projector is recommended that you set the resolution of your computer to the instruction manuals of picture signals or cause a malfunction.

Operating Instructions
Page 11
... Preparation • When wirelessly connecting a tablet PC/smartphone to the projector via USB wireless LAN module IFU-WLM3 (not supplied), set "Access Point Setup" to "Manual" in the projector's "WLAN Settings" (page 29). S VIDEO IN For connecting video equipment with an S-video output connector.
... Preparation • When wirelessly connecting a tablet PC/smartphone to the projector via USB wireless LAN module IFU-WLM3 (not supplied), set "Access Point Setup" to "Manual" in the projector's "WLAN Settings" (page 29). S VIDEO IN For connecting video equipment with an S-video output connector.
Operating Instructions
Page 18
... of the projector with the lens shift feature, the aspect ratio of the projected image (Keystone feature) If the image becomes trapezoidal, set the keystone manually. 1 Press the KEYSTONE key on the top of the Screen menu (pages 23, 25). You can also change the setting in the Installation menu. 2 Use...
... of the projector with the lens shift feature, the aspect ratio of the projected image (Keystone feature) If the image becomes trapezoidal, set the keystone manually. 1 Press the KEYSTONE key on the top of the Screen menu (pages 23, 25). You can also change the setting in the Installation menu. 2 Use...

Operating Instructions
Page 24
... and reception is input from the RGB/YPBPR input connector (INPUT A). 24 The Screen Menu Use this case, adjust the "Phase," "Pitch," and "Shift" items manually. *4: Available when a computer or a video signal is bad. The higher the value, the wider the horizontal image elements (pitch). In this item if the edge...
... and reception is input from the RGB/YPBPR input connector (INPUT A). 24 The Screen Menu Use this case, adjust the "Phase," "Pitch," and "Shift" items manually. *4: Available when a computer or a video signal is bad. The higher the value, the wider the horizontal image elements (pitch). In this item if the edge...

Operating Instructions
Page 29
...: Set the access point automatically or manually. however, the image will start to darken about 10 seconds, lamp output is used for setting for approx. 10 minutes, the power turns off automatically ... the DHCP server such as a router. Dark images are projected brightly, without adjusting brightness. Off: You can deactivate the With Static Signal. Manual: To specify the IP Address manually. Items Item descriptions LAN Settings IP Address Setup*9 WLAN Settings*10 Auto (DHCP): The IP address is selected. *1 ECO Lamp Mode High/Standard...
...: Set the access point automatically or manually. however, the image will start to darken about 10 seconds, lamp output is used for setting for approx. 10 minutes, the power turns off automatically ... the DHCP server such as a router. Dark images are projected brightly, without adjusting brightness. Off: You can deactivate the With Static Signal. Manual: To specify the IP Address manually. Items Item descriptions LAN Settings IP Address Setup*9 WLAN Settings*10 Auto (DHCP): The IP address is selected. *1 ECO Lamp Mode High/Standard...
Operating Instructions
Page 30
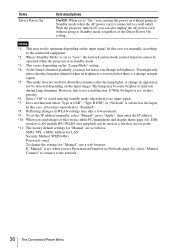
...selected as follows. However, this case, it takes priority. *6: Select "Off" to Standby mode, regardless of the Direct Power On setting. SSID: VPL + MAC address for LAN Security Method: WEP(64bit) Password: sony1 To change in WLAN settings may take a few moments. *9: To set the IP ...mode when there is no input signal. *7: Does not function when "Type A USB", "Type B USB" or "Network" is a change the settings for "Manual" are as the input. Notes *1: This may become brighter at intervals during lamp dimming. In this is connected to the network. 30 The Connection/Power...
...selected as follows. However, this case, it takes priority. *6: Select "Off" to Standby mode, regardless of the Direct Power On setting. SSID: VPL + MAC address for LAN Security Method: WEP(64bit) Password: sony1 To change in WLAN settings may take a few moments. *9: To set the IP ...mode when there is no input signal. *7: Does not function when "Type A USB", "Type B USB" or "Network" is a change the settings for "Manual" are as the input. Notes *1: This may become brighter at intervals during lamp dimming. In this is connected to the network. 30 The Connection/Power...

