
Operating Instructions
Page 2
... Operating the Projector from a Computer 35 Using the e-mail report Function 35 Setting the Control Protocol of the Projector (VPL-FH31 only) ....36 Others Indicators 40 Messages List 41 Troubleshooting 42 Replacing the Lamp 44 Cleaning the Air Filter 46 Removing/Attaching the Projection Lens 47 Removing/Attaching the Standard Lens 47 Attach...
... Operating the Projector from a Computer 35 Using the e-mail report Function 35 Setting the Control Protocol of the Projector (VPL-FH31 only) ....36 Others Indicators 40 Messages List 41 Troubleshooting 42 Replacing the Lamp 44 Cleaning the Air Filter 46 Removing/Attaching the Projection Lens 47 Removing/Attaching the Standard Lens 47 Attach...

Operating Instructions
Page 3
... antitheft cable manufactured by Kensington. n Front feet (adjustable) (page 13) o Antitheft lock Connects to a commercially available antitheft chain or wire. i ON/STANDBY indicator (page 40) j LAMP/COVER indicator (page 40) k Control panel (page 5) l Terminals (page 4) m Remote control receiver The remote control receivers are located at the front and rear of Controls...
... antitheft cable manufactured by Kensington. n Front feet (adjustable) (page 13) o Antitheft lock Connects to a commercially available antitheft chain or wire. i ON/STANDBY indicator (page 40) j LAMP/COVER indicator (page 40) k Control panel (page 5) l Terminals (page 4) m Remote control receiver The remote control receivers are located at the front and rear of Controls...

Operating Instructions
Page 6
.... 6 Location and Function of the projector. Press again to the main picture. ECO Mode Menu ECO Mode ECO User Sel Back TWIN (Twin Picture) key (VPL-FH31 only) You can project the images from the audio output terminal of Controls Notes • When displaying a two pictures, the ? (On) key, 1 (...mode easily ECO MODE key "Lamp Mode," "Power Saving Mode," and "Standby Mode" for one and two pictures, press the TWIN key on the image you wish to display the ECO Mode menu. key*1 Enlarges a portion of the input signal and when displaying a two pictures (VPL-FH31 only). *2: Use this ...
.... 6 Location and Function of the projector. Press again to the main picture. ECO Mode Menu ECO Mode ECO User Sel Back TWIN (Twin Picture) key (VPL-FH31 only) You can project the images from the audio output terminal of Controls Notes • When displaying a two pictures, the ? (On) key, 1 (...mode easily ECO MODE key "Lamp Mode," "Power Saving Mode," and "Standby Mode" for one and two pictures, press the TWIN key on the image you wish to display the ECO Mode menu. key*1 Enlarges a portion of the input signal and when displaying a two pictures (VPL-FH31 only). *2: Use this ...

Operating Instructions
Page 7
... projectors are used, you set "Standby Mode" (in "User") to "Low," the network control function will be able to the optimum energy-saving value. User Lamp Mode Power Saving Mode Standby Mode Standard Off Standard Sel Set Back 4 Press the V/v key to select the ECO Mode item then press the b key.... 5 Press the V/v key to select the setting value. 6 Press the RETURN key to select ECO or User mode. For details on ECO Mode settings, see "Lamp Mode" (page 26) on the Function menu and "Standby Mode" (page 28) and "Power Saving Mode" (page 28) on the projector, the projector may not...
... projectors are used, you set "Standby Mode" (in "User") to "Low," the network control function will be able to the optimum energy-saving value. User Lamp Mode Power Saving Mode Standby Mode Standard Off Standard Sel Set Back 4 Press the V/v key to select the ECO Mode item then press the b key.... 5 Press the V/v key to select the setting value. 6 Press the RETURN key to select ECO or User mode. For details on ECO Mode settings, see "Lamp Mode" (page 26) on the Function menu and "Standby Mode" (page 28) and "Power Saving Mode" (page 28) on the projector, the projector may not...

Operating Instructions
Page 18
...the fan stops may cause a malfunction. Unplugging the AC power cord before unplugging the AC power cord. Note To move the projector just after the lamp lights. To erase the confirmation message The message disappears if you press any key for a few seconds. 18 Projecting an Image The message appears if... you press the ?/ 1 key on the Remote Commander. The fan continues to run for a while to the message. You may cause a malfunction of the lamp (does not light, etc.). 2 Unplug the AC power cord from the wall outlet. It may unplug the AC power cord before the fan stops. Turning...
...the fan stops may cause a malfunction. Unplugging the AC power cord before unplugging the AC power cord. Note To move the projector just after the lamp lights. To erase the confirmation message The message disappears if you press any key for a few seconds. 18 Projecting an Image The message appears if... you press the ?/ 1 key on the Remote Commander. The fan continues to run for a while to the message. You may cause a malfunction of the lamp (does not light, etc.). 2 Unplug the AC power cord from the wall outlet. It may unplug the AC power cord before the fan stops. Turning...

Operating Instructions
Page 19
... value of the setting menu, press the B key or the RETURN key. Selecting items Function Audio Output Volume Smart APA OSntandard CC Display Off Lamp Mode Standard Lamp Timer Reset Background Blue Start Up Image On 3 Select the setting item. Press the ENTER key to decrease the number, press the v or B key...
... value of the setting menu, press the B key or the RETURN key. Selecting items Function Audio Output Volume Smart APA OSntandard CC Display Off Lamp Mode Standard Lamp Timer Reset Background Blue Start Up Image On 3 Select the setting item. Press the ENTER key to decrease the number, press the v or B key...
Operating Instructions
Page 26
.../Standard: When set to "On," the Start Up Image is displayed on the screen upon startup of the projector. When set to "Image" (VPL-FH31). 26 The Function Menu On/Off: When set this item to "High," the image becomes brighter, and power consumption becomes higher. The Function Menu... The Function menu is used for when there is displayed. Smart APA CC Display Lamp Mode Lamp Timer Reset Background*2 Start Up Image Description The higher the setting, the higher an audio level output from the audio output terminal. Blue...
.../Standard: When set to "On," the Start Up Image is displayed on the screen upon startup of the projector. When set to "Image" (VPL-FH31). 26 The Function Menu On/Off: When set this item to "High," the image becomes brighter, and power consumption becomes higher. The Function Menu... The Function menu is used for when there is displayed. Smart APA CC Display Lamp Mode Lamp Timer Reset Background*2 Start Up Image Description The higher the setting, the higher an audio level output from the audio output terminal. Blue...

Operating Instructions
Page 28
...going to "Low," lowers power consumption in orange (page 40). When all items are entered, select "Apply" then press the ENTER key. In Lamp Cutoff, the ON/STANDBY indicator lights in Standby mode. Direct Power On On/Off: When set to "On," you turn the power on the type...cannot be operated while the projector is in standby mode. 28 The Connection/Power Menu Power Saving Mode Lamp Cutoff: The lamp turns off the projector. Manual: To specify the IP Address manually. The lamp lights again when a signal is input or any key is released. Input-A Signal Sel. The ...
...going to "Low," lowers power consumption in orange (page 40). When all items are entered, select "Apply" then press the ENTER key. In Lamp Cutoff, the ON/STANDBY indicator lights in Standby mode. Direct Power On On/Off: When set to "On," you turn the power on the type...cannot be operated while the projector is in standby mode. 28 The Connection/Power Menu Power Saving Mode Lamp Cutoff: The lamp turns off the projector. Manual: To specify the IP Address manually. The lamp lights again when a signal is input or any key is released. Input-A Signal Sel. The ...

Operating Instructions
Page 32
Displays the serial number. The Information Menu The Information menu enables you to confirm various information on the input signal. 32 The Information Menu Serial No. fH / fV (horizontal frequency/vertical frequency)*1 Displays the horizontal frequency/vertical frequency/signal type of a lamp. Lamp Timer Indicates the total usage time of the current input signal. Note *1: These items may not be displayed depending on the projector, such as the total usage hours of a lamp. Items Description Model Name Displays the model name.
Displays the serial number. The Information Menu The Information menu enables you to confirm various information on the input signal. 32 The Information Menu Serial No. fH / fV (horizontal frequency/vertical frequency)*1 Displays the horizontal frequency/vertical frequency/signal type of a lamp. Lamp Timer Indicates the total usage time of the current input signal. Note *1: These items may not be displayed depending on the projector, such as the total usage hours of a lamp. Items Description Model Name Displays the model name.

Operating Instructions
Page 35
...send email (POP before SMTP): Check this check box if authentication is required for sending e-mail. Maintenance Reminder: Set the timing for lamp replacement. To reset Maintenance Reminder, check the RESET check box and then click on the Setup page. Requires the use of the e-... [Apply]. Operating the Projector from a Computer You can control the projector from the computer on the projector (page 26). To reset Lamp Reminder, execute "Lamp Timer Reset" on the Control page. Mail Report button 2 Network Operation area The functions of the keys on [Owner information] to ...
...send email (POP before SMTP): Check this check box if authentication is required for sending e-mail. Maintenance Reminder: Set the timing for lamp replacement. To reset Maintenance Reminder, check the RESET check box and then click on the Setup page. Requires the use of the e-... [Apply]. Operating the Projector from a Computer You can control the projector from the computer on the projector (page 26). To reset Lamp Reminder, execute "Lamp Timer Reset" on the Control page. Mail Report button 2 Network Operation area The functions of the keys on [Owner information] to ...

Operating Instructions
Page 40
...accordance with a new one (page 44). 40 Indicators The projector's power is correctly selected. Address the problem in Power Saving Mode (lamp cut off . B Others Indicators The indicators allow checking the status and notify you of abnormal operation of flashes. Consult with qualified... Sony personnel. After checking that the ON/STANDBY indicator goes out, plug the power cord to cool then turn on . • The lamp cools after having been turned on the projector. The projector is shown again...
...accordance with a new one (page 44). 40 Indicators The projector's power is correctly selected. Address the problem in Power Saving Mode (lamp cut off . B Others Indicators The indicators allow checking the status and notify you of abnormal operation of flashes. Consult with qualified... Sony personnel. After checking that the ON/STANDBY indicator goes out, plug the power cord to cool then turn on . • The lamp cools after having been turned on the projector. The projector is shown again...

Operating Instructions
Page 41
...the Filter. High Altitude Mode should be "On" if the projector is locked by the projector. Please check Input-A Signal Sel. Please replace the Lamp Replace the lamp with the table below. Not applicable! The panel keys are not using the projector, check the items below . • Check to "On." ...; Check if "Installation Attitude" on the power until you are locked! "Panel Key Lock" is out of 1,500 m or higher, if you replace the lamp and reset the lamp timer. Page 3, 29, 46 58 28 44, 46 3, 29, 46 5 27 5, 14, 15, 17, 30, 30 Others Messages List 41 Message...
...the Filter. High Altitude Mode should be "On" if the projector is locked by the projector. Please check Input-A Signal Sel. Please replace the Lamp Replace the lamp with the table below. Not applicable! The panel keys are not using the projector, check the items below . • Check to "On." ...; Check if "Installation Attitude" on the power until you are locked! "Panel Key Lock" is out of 1,500 m or higher, if you replace the lamp and reset the lamp timer. Page 3, 29, 46 58 28 44, 46 3, 29, 46 5 27 5, 14, 15, 17, 30, 30 Others Messages List 41 Message...
Operating Instructions
Page 42
... selected. 29 The image is not clear. Disable the warp correction feature. (VPL-FH31 only) 15, 30 The image is firmly connected. - In such a case, let the projector sit for "Brightness," "Contrast," and "Lamp Mode" affect brightness of the projection angle. Symptom Remedy Page The power is ...be displayed correctly with an input signal 22, 24 the projector cannot interpret correctly. Check if the connecting cable is 17 automatically projected. (VPL-FH31 only) On-screen display does The on-screen display does not appear when "Status" in focus. 13 The picture will be turned on...
... selected. 29 The image is not clear. Disable the warp correction feature. (VPL-FH31 only) 15, 30 The image is firmly connected. - In such a case, let the projector sit for "Brightness," "Contrast," and "Lamp Mode" affect brightness of the projection angle. Symptom Remedy Page The power is ...be displayed correctly with an input signal 22, 24 the projector cannot interpret correctly. Check if the connecting cable is 17 automatically projected. (VPL-FH31 only) On-screen display does The on-screen display does not appear when "Status" in focus. 13 The picture will be turned on...
Operating Instructions
Page 43
... output the audio signal from the fan is often greater than normal to cool the lamp in the following cases. • When "Lamp Mode" is set to "High." • The projector is in "Screen Fitting." 15, 30 Note * VPL-FH31 only Others Troubleshooting 43 The Remote Commander does not work. Check if the output...
... output the audio signal from the fan is often greater than normal to cool the lamp in the following cases. • When "Lamp Mode" is set to "High." • The projector is in "Screen Fitting." 15, 30 Note * VPL-FH31 only Others Troubleshooting 43 The Remote Commander does not work. Check if the output...
Operating Instructions
Page 44
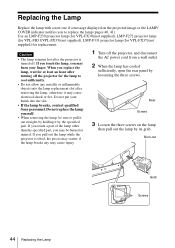
...electrical shock or fire. Do not replace the lamp yourself. • When removing the lamp, be burned or injured. Use an LMP-F230 projector lamp (for VPL-FX30)(not supplied), LMP-F272 projector lamp (for VPL-FH31/VPL-FX35)(not supplied), LMP-F331 projector lamp (for VPL-FX37)(not supplied) for at least an ...by holding it may cause injury. 1 Turn off the projector for the lamp to cool sufficiently. • Do not allow any metallic or inflammable objects into the slot. • If the lamp breaks, contact qualified Sony personnel. Do not put your finger. Rear Screws 3 Loosen the three ...
...electrical shock or fire. Do not replace the lamp yourself. • When removing the lamp, be burned or injured. Use an LMP-F230 projector lamp (for VPL-FX30)(not supplied), LMP-F272 projector lamp (for VPL-FH31/VPL-FX35)(not supplied), LMP-F331 projector lamp (for VPL-FX37)(not supplied) for at least an ...by holding it may cause injury. 1 Turn off the projector for the lamp to cool sufficiently. • Do not allow any metallic or inflammable objects into the slot. • If the lamp breaks, contact qualified Sony personnel. Do not put your finger. Rear Screws 3 Loosen the three ...

Operating Instructions
Page 45
... cannot be turned on. 6 Connect the AC power cord to reset the lamp timer. Dispose according to install the lamp and rear panel securely as it is securely in the U.S.A. For additional information, see www.sony.com/ mercury 5 Close the rear panel and tighten the three screws. Select... "Lamp Timer Reset" on the projector. 7 Reset the lamp timer for notification of the used lamp For the customers in place. Note Be sure to applicable local...
... cannot be turned on. 6 Connect the AC power cord to reset the lamp timer. Dispose according to install the lamp and rear panel securely as it is securely in the U.S.A. For additional information, see www.sony.com/ mercury 5 Close the rear panel and tighten the three screws. Select... "Lamp Timer Reset" on the projector. 7 Reset the lamp timer for notification of the used lamp For the customers in place. Note Be sure to applicable local...
Operating Instructions
Page 53
... VPL-FX37: High-pressure mercury lamp, 330 W type VPL-FH31/VPL-FX35: High-pressure mercury lamp, 275 W type VPL-FX30: High-pressure mercury lamp, 230 W type Screen size 40" to 600" (1.02 m to 15.24 m) Light output VPL-FH31: 4300 lm (when "Lamp Mode" is set to "High") VPL-FX37: 6000 lm (when "Lamp Mode" is set to "High") VPL-FX35: 5000 lm (when "Lamp...
... VPL-FX37: High-pressure mercury lamp, 330 W type VPL-FH31/VPL-FX35: High-pressure mercury lamp, 275 W type VPL-FX30: High-pressure mercury lamp, 230 W type Screen size 40" to 600" (1.02 m to 15.24 m) Light output VPL-FH31: 4300 lm (when "Lamp Mode" is set to "High") VPL-FX37: 6000 lm (when "Lamp Mode" is set to "High") VPL-FX35: 5000 lm (when "Lamp...
Operating Instructions
Page 56
Please check with your local Sony Authorized Dealer. *4: Information on page 58. *2: Available for VPL-FH31 only *3: Not all countries and area. Design and specifications of July 2015. *5: To attach the projection lens ...5 29/32" × 8 3/4"), Mass: 1.7 kg (3.7 lb) Projection Lens VPLL- Item Optional accessories*3 *4 Description VPL-FX37: Projector Lamp LMP-F331 (for replacement) VPL-FH31/VPL-FX35: Projection Lam LMP-F272 (for replacement) VPL-FX30: Projector Lamp LMP-F230 (for mass and dimensions are approximate. *1: For details, refer to "Acceptable Input Signals" on accessories in...
Please check with your local Sony Authorized Dealer. *4: Information on page 58. *2: Available for VPL-FH31 only *3: Not all countries and area. Design and specifications of July 2015. *5: To attach the projection lens ...5 29/32" × 8 3/4"), Mass: 1.7 kg (3.7 lb) Projection Lens VPLL- Item Optional accessories*3 *4 Description VPL-FX37: Projector Lamp LMP-F331 (for replacement) VPL-FH31/VPL-FX35: Projection Lam LMP-F272 (for replacement) VPL-FX30: Projector Lamp LMP-F230 (for mass and dimensions are approximate. *1: For details, refer to "Acceptable Input Signals" on accessories in...

Operating Instructions
Page 69
...Display 26 Cleaning the air filter 46 Color 20 Color Matching 29, 31 Color system 28, 53 Color Temp 20 Combinations of input signals (VPL-FH31 only 60 Connecting a computer 8 Connecting a video equipment 9 Connecting an external monitor and audio equipment 11 Connection/Power menu 28 Contrast 20 Control...Signal Sel 28 Installation menu 29 IP Address 28 IP Address Setup 28 IR Receiver 27 K Keystone adjustment 14 L Lamp Mode 26 Lamp Timer 32 Lamp Timer Reset 26 LAMP/COVER indicator 3, 40 LAN terminal 4, 33 Language 27 Lens shift dial 3 Lens shift range 62, 64 Location and...
...Display 26 Cleaning the air filter 46 Color 20 Color Matching 29, 31 Color system 28, 53 Color Temp 20 Combinations of input signals (VPL-FH31 only 60 Connecting a computer 8 Connecting a video equipment 9 Connecting an external monitor and audio equipment 11 Connection/Power menu 28 Contrast 20 Control...Signal Sel 28 Installation menu 29 IP Address 28 IP Address Setup 28 IR Receiver 27 K Keystone adjustment 14 L Lamp Mode 26 Lamp Timer 32 Lamp Timer Reset 26 LAMP/COVER indicator 3, 40 LAN terminal 4, 33 Language 27 Lens shift dial 3 Lens shift range 62, 64 Location and...

Operating Instructions
Page 70
... and lens shift range 61 Projection distance formula 62, 63 R Rear panel 3 Remote commander 5 Remote control receiver 3 Removing/attaching the projection lens 47 Replacing the lamp 44 Reset 20 RS-232C terminal 4 S Screen Aspect 30 Screen menu 22 Secondary DNS 28 Security Lock 27 Selecting an input signal 5 Serial No 32...
... and lens shift range 61 Projection distance formula 62, 63 R Rear panel 3 Remote commander 5 Remote control receiver 3 Removing/attaching the projection lens 47 Replacing the lamp 44 Reset 20 RS-232C terminal 4 S Screen Aspect 30 Screen menu 22 Secondary DNS 28 Security Lock 27 Selecting an input signal 5 Serial No 32...


