Operating Instructions
Page 1
4-689-816-12 (1) Data Projector Operating Instructions Before operating the unit, please read this manual and supplied Quick Reference Manual thoroughly and retain it for future reference. VPL-EW578/EW575/EW455/EW435 VPL-EX575/EX570/EX455/EX450/EX435/EX430 Not all models are available in all countries and area. Please check with your local Sony Authorized Dealer. © 2016 Sony Corporation
4-689-816-12 (1) Data Projector Operating Instructions Before operating the unit, please read this manual and supplied Quick Reference Manual thoroughly and retain it for future reference. VPL-EW578/EW575/EW455/EW435 VPL-EX575/EX570/EX455/EX450/EX435/EX430 Not all models are available in all countries and area. Please check with your local Sony Authorized Dealer. © 2016 Sony Corporation
Operating Instructions
Page 9
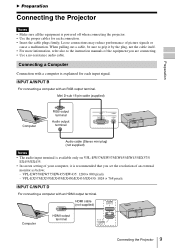
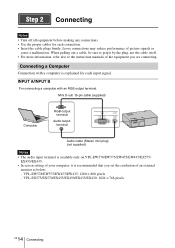
... Audio output terminal Audio cable (Stereo mini plug) (not supplied) Notes • The audio input terminal is available only on VPL-EW578/EW575/EW455/EW435/EX575/ EX455/EX435. • In screen setting of your computer, it by the plug, not the cable itself. • For... with an HDMI output terminal. Connecting a Computer Connection with a computer is recommended that you are connecting. • Use a no-resistance audio cable. VPL-EX575/EX570/EX455/EX450/EX435/EX430: 1024 × 768 pixels INPUT C/INPUT D For connecting a computer with an RGB output terminal. When pulling out a cable...
... Audio output terminal Audio cable (Stereo mini plug) (not supplied) Notes • The audio input terminal is available only on VPL-EW578/EW575/EW455/EW435/EX575/ EX455/EX435. • In screen setting of your computer, it by the plug, not the cable itself. • For... with an HDMI output terminal. Connecting a Computer Connection with a computer is recommended that you are connecting. • Use a no-resistance audio cable. VPL-EX575/EX570/EX455/EX450/EX435/EX430: 1024 × 768 pixels INPUT C/INPUT D For connecting a computer with an RGB output terminal. When pulling out a cable...
Operating Instructions
Page 19
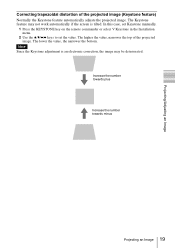
In this case, set Keystone manually. 1 Press the KEYSTONE key on the remote commander or select V Keystone in the Installation menu. 2 Use the V/v/B/b keys to set the value. Increase the number ...
In this case, set Keystone manually. 1 Press the KEYSTONE key on the remote commander or select V Keystone in the Installation menu. 2 Use the V/v/B/b keys to set the value. Increase the number ...

Operating Instructions
Page 26
Use this case, adjust the "Phase," "Pitch," and "Shift" items manually. *4: Available when a computer or a video signal is input from the RGB input terminal (INPUT A/INPUT B). *3: If the projected image includes large amount of black portion ...
Use this case, adjust the "Phase," "Pitch," and "Shift" items manually. *4: Available when a computer or a video signal is input from the RGB input terminal (INPUT A/INPUT B). *3: If the projected image includes large amount of black portion ...
Operating Instructions
Page 31
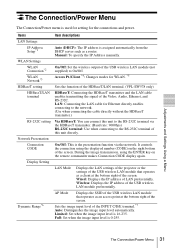
...Audio, Ethernet, and RS-232C. Access Pt./Client *4: Changes modes for WLAN. *5 HDBaseT setting Sets the function of the HDBaseT/LAN terminal. (VPL-EW578 only) HDBaseT/LAN terminal HDBaseT: Connecting the HDBaseT transmitter and the LAN cable enables transmitting the signal of the USB wireless LAN module (not...as an access point at the bottom right of the screen. Limited: Set when the image input level is 0-255. Manual: To specify the IP Address manually. Display Setting LAN Mode Displays the LAN settings of the projector or the settings of the USB wireless LAN module that operates...
...Audio, Ethernet, and RS-232C. Access Pt./Client *4: Changes modes for WLAN. *5 HDBaseT setting Sets the function of the HDBaseT/LAN terminal. (VPL-EW578 only) HDBaseT/LAN terminal HDBaseT: Connecting the HDBaseT transmitter and the LAN cable enables transmitting the signal of the USB wireless LAN module (not...as an access point at the bottom right of the screen. Limited: Set when the image input level is 0-255. Manual: To specify the IP Address manually. Display Setting LAN Mode Displays the LAN settings of the projector or the settings of the USB wireless LAN module that operates...
Operating Instructions
Page 32
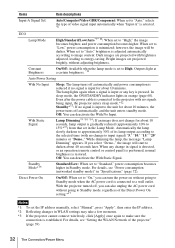
... automatically according to High. When any key is input or any change in Standby mode. Direct Power On On/Off: When set the IP address manually, select "Manual", press "Apply", then enter the IP address. *2: Reflecting changes in "Specifications" (page 72). Constant Brightness On/Off: Available when the lamp mode is input...
... automatically according to High. When any key is input or any change in Standby mode. Direct Power On On/Off: When set the IP address manually, select "Manual", press "Apply", then enter the IP address. *2: Reflecting changes in "Specifications" (page 72). Constant Brightness On/Off: Available when the lamp mode is input...
Operating Instructions
Page 33
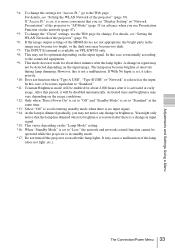
... off the projector soon after the lamp lights. Activated time and brightness may vary depending on VPL-EW578 only. *8: This may not be disabled automatically. The Connection/Power Menu 33 If With No Input is set manually according to the connected equipment. *9: This mode does not work for about 2,000 hours after...
... off the projector soon after the lamp lights. Activated time and brightness may vary depending on VPL-EW578 only. *8: This may not be disabled automatically. The Connection/Power Menu 33 If With No Input is set manually according to the connected equipment. *9: This mode does not work for about 2,000 hours after...

Operating Instructions
Page 34
Auto/Manual*2: The higher the value, the narrower the top of "Image Flip." The lower the value, the narrower the bottom. If you press the ENTER button ...
Auto/Manual*2: The higher the value, the narrower the top of "Image Flip." The lower the value, the narrower the bottom. If you press the ENTER button ...

Operating Instructions
Page 39
... projector. Entered values will not be applied unless you click on [View], the contents of the e-mail report. Specify an IP address: Set the network manually. -IP Address: Input the IP address of the projector. -Subnet Mask: Input the subnet mask of the projector. -Default Gateway: Input the default gateway of...
... projector. Entered values will not be applied unless you click on [View], the contents of the e-mail report. Specify an IP address: Set the network manually. -IP Address: Input the IP address of the projector. -Subnet Mask: Input the subnet mask of the projector. -Default Gateway: Input the default gateway of...

Operating Instructions
Page 40
...-WLM3 (not supplied) is necessary. 1 Click the [WLAN Setting] to WPA2-PSK (AES). The factory setting of USB wireless LAN module. The factory setting is "VPL + the MAC address of the LAN." 40 Using Network Features Channel Setting: Select the channel of the access point according to "Access Point" (page 40.... Set the items for security method of the access point if "WLAN Network" is set as an access point. Key: Input the password for WLAN manually.
...-WLM3 (not supplied) is necessary. 1 Click the [WLAN Setting] to WPA2-PSK (AES). The factory setting of USB wireless LAN module. The factory setting is "VPL + the MAC address of the LAN." 40 Using Network Features Channel Setting: Select the channel of the access point according to "Access Point" (page 40.... Set the items for security method of the access point if "WLAN Network" is set as an access point. Key: Input the password for WLAN manually.

Operating Instructions
Page 41
... the projector tries to connect to). 3-(b) Connection Status: Displays the connecting status between the access point and projector. Specify an IP address: Set the network manually. -IP Address: Input the IP address of the projector. -Subnet Mask: Input the subnet mask of the projector. -Default Gateway: Input the default gateway of...
... the projector tries to connect to). 3-(b) Connection Status: Displays the connecting status between the access point and projector. Specify an IP address: Set the network manually. -IP Address: Input the IP address of the projector. -Subnet Mask: Input the subnet mask of the projector. -Default Gateway: Input the default gateway of...

Operating Instructions
Page 63
.... The images become trapezoidal because of image does not appear. When the "V Keystone" is running. Set your computer to output to "Manual," the keystone feature does not work properly. Check if the input source is correctly selected. 16 Check if the picture is muted by ...on. The image may not work automatically. When the "Control Key Lock" is installed on the projector. Set "V Keystone" to "Auto" or "Manual" to set for the applications. 47, 54 The computer cannot • Check "LAN Settings" of the projector. 31 connect to diagnose the problem, ...
.... The images become trapezoidal because of image does not appear. When the "V Keystone" is running. Set your computer to output to "Manual," the keystone feature does not work properly. Check if the input source is correctly selected. 16 Check if the picture is muted by ...on. The image may not work automatically. When the "Control Key Lock" is installed on the projector. Set "V Keystone" to "Auto" or "Manual" to set for the applications. 47, 54 The computer cannot • Check "LAN Settings" of the projector. 31 connect to diagnose the problem, ...
Operating Instructions
Page 69
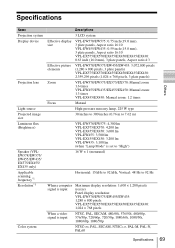
..., 3 plate panels) Zoom VPL-EW578/EW575/EX575/EX570: Manual zoom 1.6 times VPL-EW455/EW435/EX455/EX450: Manual zoom: 1.3 times VPL-EX435/EX430: Manual zoom: 1.2 times Focus Manual High-pressure mercury lamp, 225 W type 30 inches to 300 inches (0.76 m to 7.62 m) VPL-EW578/EW575: 4,300 lm VPL-EX575/EX570: 4,200 lm VPL-EX455/EX450: 3,600 lm VPL-EW455: 3,500 lm VPL-EX435/EX430: 3,200...
..., 3 plate panels) Zoom VPL-EW578/EW575/EX575/EX570: Manual zoom 1.6 times VPL-EW455/EW435/EX455/EX450: Manual zoom: 1.3 times VPL-EX435/EX430: Manual zoom: 1.2 times Focus Manual High-pressure mercury lamp, 225 W type 30 inches to 300 inches (0.76 m to 7.62 m) VPL-EW578/EW575: 4,300 lm VPL-EX575/EX570: 4,200 lm VPL-EX455/EX450: 3,600 lm VPL-EW455: 3,500 lm VPL-EX435/EX430: 3,200...
Operating Instructions
Page 73
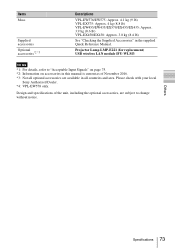
Please check with your local Sony Authorized Dealer. *4: VPL-EW578 only. Others Specifications 73 Design and specifications of November 2016. *3: Not all countries and area. Items Mass Supplied accessories Optional accessories*2 *3 Descriptions VPL-EW578/EW575: Approx. 4.1 kg (9 lb) VPL-EX575: Approx. 4 kg (8.8 lb) VPL-EW455/EW435/EX570/EX455/EX435: Approx. 3.9 kg (8.6 lb) VPL-EX450/EX430: Approx. 3.8 kg (8.4 lb...
Please check with your local Sony Authorized Dealer. *4: VPL-EW578 only. Others Specifications 73 Design and specifications of November 2016. *3: Not all countries and area. Items Mass Supplied accessories Optional accessories*2 *3 Descriptions VPL-EW578/EW575: Approx. 4.1 kg (9 lb) VPL-EX575: Approx. 4 kg (8.8 lb) VPL-EW455/EW435/EX570/EX455/EX435: Approx. 3.9 kg (8.6 lb) VPL-EX450/EX430: Approx. 3.8 kg (8.4 lb...

Operating Instructions
Page 98
In this manual, ™ and ® marks are trademarks or registered trademarks of their respective holders. in the United States and/or other trademarks and registered trademarks are ...
In this manual, ™ and ® marks are trademarks or registered trademarks of their respective holders. in the United States and/or other trademarks and registered trademarks are ...

Quick Reference Manual
Page 28
...Page 16 Indicators Page 21 Replacing the Lamp Page 23 Cleaning the Air Filter Page 25 2 GB About the Quick Reference Manual For details on the operations, refer to "Indicators," "Cleaning the Air Filter," and "Replacing the Lamp," as necessary. About the Quick Reference... Manual This Quick Reference Manual explains the basic operations for projecting pictures. It also describes important notes and cautions to which you have to pay attention when ...
...Page 16 Indicators Page 21 Replacing the Lamp Page 23 Cleaning the Air Filter Page 25 2 GB About the Quick Reference Manual For details on the operations, refer to "Indicators," "Cleaning the Air Filter," and "Replacing the Lamp," as necessary. About the Quick Reference... Manual This Quick Reference Manual explains the basic operations for projecting pictures. It also describes important notes and cautions to which you have to pay attention when ...
Quick Reference Manual
Page 29
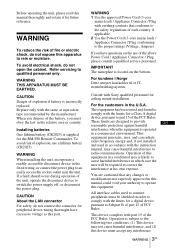
... when the equipment is subject to the following two conditions: (1) This device may cause harmful interference to comply with the instruction manual, may not cause harmful interference, and (2) this device must obey the law in a residential area is incorrectly replaced. If ...to rain or moisture. These limits are cautioned that conforms to the proper ratings (Voltage, Ampere). This device complies with Sony qualified personnel for future reference. Replace only with earthing-contacts that any interference 3 WARNING GB If you dispose of the FCC...
... when the equipment is subject to the following two conditions: (1) This device may cause harmful interference to comply with the instruction manual, may not cause harmful interference, and (2) this device must obey the law in a residential area is incorrectly replaced. If ...to rain or moisture. These limits are cautioned that conforms to the proper ratings (Voltage, Ampere). This device complies with Sony qualified personnel for future reference. Replace only with earthing-contacts that any interference 3 WARNING GB If you dispose of the FCC...

Quick Reference Manual
Page 37
..."Allow" or "Yes." 4 Follow the on a computer with a stick as shown in the CD- Quick Reference Manual (this manual) (1) Operating Instructions (CD-ROM) (1) Projector Station for your Sony dealer or Sony service counter. You can purchase a new one from the Adobe website. 1 Open the index.html file in the ... Before using the remote commander, remove the insulation film. AC power cord (1) Mini D-sub 15 pin cable (1.8 m) (1) (1-970-584-11/Sony) Note If you have lost or damaged the CD-ROM, you want to read on -screen instructions to install the software. Step 1 Preparing Checking...
..."Allow" or "Yes." 4 Follow the on a computer with a stick as shown in the CD- Quick Reference Manual (this manual) (1) Operating Instructions (CD-ROM) (1) Projector Station for your Sony dealer or Sony service counter. You can purchase a new one from the Adobe website. 1 Open the index.html file in the ... Before using the remote commander, remove the insulation film. AC power cord (1) Mini D-sub 15 pin cable (1.8 m) (1) (1-970-584-11/Sony) Note If you have lost or damaged the CD-ROM, you want to read on -screen instructions to install the software. Step 1 Preparing Checking...
Quick Reference Manual
Page 40
... terminal Audio cable (Stereo mini plug) (not supplied) Notes • The audio input terminal is available only on VPL-EW578/EW575/EW455/EW435/EX575/ EX455/EX435. • In screen setting of your computer, it by the plug, not the cable itself. ...manuals of the equipment you set the resolution of picture signals or cause a malfunction. Loose connections may reduce performance of an external monitor as below; - INPUT A/INPUT B For connecting a computer with a computer is recommended that you are connecting. Connecting a Computer Connection with an RGB output terminal. VPL-EX575...
... terminal Audio cable (Stereo mini plug) (not supplied) Notes • The audio input terminal is available only on VPL-EW578/EW575/EW455/EW435/EX575/ EX455/EX435. • In screen setting of your computer, it by the plug, not the cable itself. ...manuals of the equipment you set the resolution of picture signals or cause a malfunction. Loose connections may reduce performance of an external monitor as below; - INPUT A/INPUT B For connecting a computer with a computer is recommended that you are connecting. Connecting a Computer Connection with an RGB output terminal. VPL-EX575...

