

Operating Instructions
Page 1
4-275-591-13 (1) Data Projector Operating Instructions Before operating the unit, please read this manual and supplied Quick Reference Manual thoroughly and retain it for future reference. VPL-EW130 © 2011 Sony Corporation
4-275-591-13 (1) Data Projector Operating Instructions Before operating the unit, please read this manual and supplied Quick Reference Manual thoroughly and retain it for future reference. VPL-EW130 © 2011 Sony Corporation
Operating Instructions
Page 2
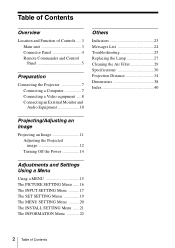
Table of Contents Overview Location and Function of Controls .... 3 Main unit 3 Connector Panel 4 Remote Commander and Control Panel 5 Preparation Connecting the Projector 7 Connecting a Computer 7 Connecting a Video equipment .... 8 Connecting an External Monitor and Audio Equipment 10 Others Indicators 23 Messages List 24 Troubleshooting 25 Replacing the Lamp 27 ...
Table of Contents Overview Location and Function of Controls .... 3 Main unit 3 Connector Panel 4 Remote Commander and Control Panel 5 Preparation Connecting the Projector 7 Connecting a Computer 7 Connecting a Video equipment .... 8 Connecting an External Monitor and Audio Equipment 10 Others Indicators 23 Messages List 24 Troubleshooting 25 Replacing the Lamp 27 ...

Operating Instructions
Page 5
APA (Auto Pixel Alignment) key* Note * Use this projector. key*1 Enlarges a portion of Controls 5 Press the RESET key to change the enlargement ratio. e Using various functions during projecting D ZOOM (Digital Zoom) +/- key repeatedly to ... or the D ZOOM - Control Panel 1 23 36 d Adjusting the image (page 12) ASPECT key KEYSTONE key PATTERN key This function is not provided in this projector.
APA (Auto Pixel Alignment) key* Note * Use this projector. key*1 Enlarges a portion of Controls 5 Press the RESET key to change the enlargement ratio. e Using various functions during projecting D ZOOM (Digital Zoom) +/- key repeatedly to ... or the D ZOOM - Control Panel 1 23 36 d Adjusting the image (page 12) ASPECT key KEYSTONE key PATTERN key This function is not provided in this projector.

Operating Instructions
Page 6
... appear. FREEZE key*2 Pauses a projected image. f Setting the energy-saving mode easily ECO MODE key Energy-saving mode can control the projector becomes. • Make sure that nothing obstructs the infrared beam between the Remote Commander and the remote control detector on the SET SETTING ...operation • Direct the Remote Commander toward the remote control detector. • The shorter the distance between the Remote Commander and the projector is, the wider the angle within which the Remote Commander can be used depending on the resolution of "Lamp Mode," "Power Saving Mode...
... appear. FREEZE key*2 Pauses a projected image. f Setting the energy-saving mode easily ECO MODE key Energy-saving mode can control the projector becomes. • Make sure that nothing obstructs the infrared beam between the Remote Commander and the remote control detector on the SET SETTING ...operation • Direct the Remote Commander toward the remote control detector. • The shorter the distance between the Remote Commander and the projector is, the wider the angle within which the Remote Commander can be used depending on the resolution of "Lamp Mode," "Power Saving Mode...

Operating Instructions
Page 7
...with an RGB output connector. INPUT A For connecting a computer with a computer is explained for each connection. • Insert the cable plugs firmly; Connecting the Projector 7 Loose connections may reduce performance of the equipment you are connecting. • Use a no-resistance audio cable. When pulling out a cable, be sure to... that you set the resolution of your computer to the instruction manuals of picture signals or cause a malfunction. Preparation B Preparation Connecting the Projector Notes • Make sure all the equipment is powered off when connecting the...
...with an RGB output connector. INPUT A For connecting a computer with a computer is explained for each connection. • Insert the cable plugs firmly; Connecting the Projector 7 Loose connections may reduce performance of the equipment you are connecting. • Use a no-resistance audio cable. When pulling out a cable, be sure to... that you set the resolution of your computer to the instruction manuals of picture signals or cause a malfunction. Preparation B Preparation Connecting the Projector Notes • Make sure all the equipment is powered off when connecting the...

Operating Instructions
Page 8
... output connector Audio cable (Phono plug × 2) (not supplied) INPUT A For connecting video equipment with a video output connector. stereo mini plug) (not supplied) 8 Connecting the Projector Component - VIDEO IN For connecting video equipment with a YPBPR output connector. Connecting a Video equipment Connections with a VHS video deck, DVD player, or BD player are...
... output connector Audio cable (Phono plug × 2) (not supplied) INPUT A For connecting video equipment with a video output connector. stereo mini plug) (not supplied) 8 Connecting the Projector Component - VIDEO IN For connecting video equipment with a YPBPR output connector. Connecting a Video equipment Connections with a VHS video deck, DVD player, or BD player are...

Operating Instructions
Page 9
DVI-D output connector HDMI-DVI-D cable (not supplied) Computer Video equipment HDMI output connector HDMI cable (not supplied) Notes • Use HDMI-compatible equipment and cable(s) that have an HDMI logo on them. • The HDMI connector of this projector is not compatible with an HDMI output connector. INPUT B For connecting video equipment with DSD (Direct Stream Digital) Signal or CEC (Consumer Electronics Control) Signal. Preparation Connecting the Projector 9
DVI-D output connector HDMI-DVI-D cable (not supplied) Computer Video equipment HDMI output connector HDMI cable (not supplied) Notes • Use HDMI-compatible equipment and cable(s) that have an HDMI logo on them. • The HDMI connector of this projector is not compatible with an HDMI output connector. INPUT B For connecting video equipment with DSD (Direct Stream Digital) Signal or CEC (Consumer Electronics Control) Signal. Preparation Connecting the Projector 9

Operating Instructions
Page 10
.... Connecting an External Monitor and Audio Equipment OUTPUT Projected images and input audio can be heard from the YPBPR input connector (INPUT A). 10 Connecting the Projector
.... Connecting an External Monitor and Audio Equipment OUTPUT Projected images and input audio can be heard from the YPBPR input connector (INPUT A). 10 Connecting the Projector

Operating Instructions
Page 11
... input signal switches. Press the INPUT key repeatedly to select an image to be projected. 6 Switch your computer to output to the projector varies, depending on the connected equipment. 5 Select the input source. Projecting an Image 11 How to switch the computer to output to external display by ...changing your computer's setting. Install the projector so that the projected image fits the screen size. Each time you press the INPUT key on the distance between the...
... input signal switches. Press the INPUT key repeatedly to select an image to be projected. 6 Switch your computer to output to the projector varies, depending on the connected equipment. 5 Select the input source. Projecting an Image 11 How to switch the computer to output to external display by ...changing your computer's setting. Install the projector so that the projected image fits the screen size. Each time you press the INPUT key on the distance between the...

Operating Instructions
Page 12
By changing the slope of the projector with the adjuster extended. It may cause malfunction. 12 Projecting an Image Notes • Be careful not to let the projector down on your fingers. • Do not push hard on the top of the projector with adjusters, you can adjust the height of the projector using the adjusters. Adjusting the Projected image Focus Size (Zoom) Position Adjuster adjustment button Adjusting the tilt of the projector with the adjusters You can adjust the position of the projected image.
By changing the slope of the projector with the adjuster extended. It may cause malfunction. 12 Projecting an Image Notes • Be careful not to let the projector down on your fingers. • Do not push hard on the top of the projector with adjusters, you can adjust the height of the projector using the adjusters. Adjusting the Projected image Focus Size (Zoom) Position Adjuster adjustment button Adjusting the tilt of the projector with the adjusters You can adjust the position of the projected image.

Operating Instructions
Page 17
... setting, the wider the horizontal image elements (pitch). When the computer signal is input from the YPBPR input connector (INPUT A). *3: • Note that if the projector is used for profit or for each input signal. Adjustments and Settings Using a Menu The INPUT SETTING Menu For adjusting the size, position, and aspect...
... setting, the wider the horizontal image elements (pitch). When the computer signal is input from the YPBPR input connector (INPUT A). *3: • Note that if the projector is used for profit or for each input signal. Adjustments and Settings Using a Menu The INPUT SETTING Menu For adjusting the size, position, and aspect...
Operating Instructions
Page 19
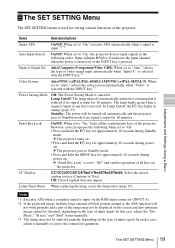
... The lamp lights again when a signal is input or any key is input.*1 *2 Auto Input Search On/Off: When set to "On," the projector detects input signals in orange (page 23). Input-A Signal Sel. However, you can operate the following order: Input-A/Input-B/Video. It indicates the input ...channel when the power is turned on the type of the projector. c "Panel Key Lock" is pressed. In this case, adjust the "Dot Phase," "H size," and "Shift" items manually. *3: The image may not ...
... The lamp lights again when a signal is input or any key is input.*1 *2 Auto Input Search On/Off: When set to "On," the projector detects input signals in orange (page 23). Input-A Signal Sel. However, you can operate the following order: Input-A/Input-B/Video. It indicates the input ...channel when the power is turned on the type of the projector. c "Panel Key Lock" is pressed. In this case, adjust the "Dot Phase," "H size," and "Shift" items manually. *3: The image may not ...

Operating Instructions
Page 20
... the operations by using the menu or the Remote Commander. Top Left/Bottom Left/Center/Top Right/Bottom Right: Selects the display position of the projector. 20 The MENU SETTING Menu Off: Turn off the power, and warning messages. The MENU SETTING Menu The MENU SETTING menu is displayed on the...
... the operations by using the menu or the Remote Commander. Top Left/Bottom Left/Center/Top Right/Bottom Right: Selects the display position of the projector. 20 The MENU SETTING Menu Off: Turn off the power, and warning messages. The MENU SETTING Menu The MENU SETTING menu is displayed on the...
Operating Instructions
Page 21
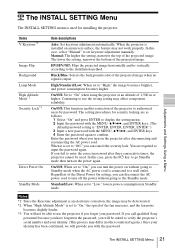
... Flip Background Lamp Mode High Altitude Mode*2 Security Lock*3 Direct Power On Standby Mode Item descriptions Auto: Set keystone adjustment automatically. When the projector is input. In this case, press the ?/1 key to the installation method. Black/Blue: Selects the background color of the projected image when...and your password. Enter the password when you turn off the power without going to the Standby mode. If you call qualified Sony personnel because you have forgotten the password, you will be asked to "Low," lowers power consumption in other countries/regions.) Once...
... Flip Background Lamp Mode High Altitude Mode*2 Security Lock*3 Direct Power On Standby Mode Item descriptions Auto: Set keystone adjustment automatically. When the projector is input. In this case, press the ?/1 key to the installation method. Black/Blue: Selects the background color of the projected image when...and your password. Enter the password when you turn off the power without going to the Standby mode. If you call qualified Sony personnel because you have forgotten the password, you will be asked to "Low," lowers power consumption in other countries/regions.) Once...

Operating Instructions
Page 22
... current input signal. Items Model Name Serial No. Indicates the total usage time of a lamp. Note *1: These items may not be displayed depending on the projector, such as the total usage hours of a lamp. The INFORMATION Menu The INFORMATION menu enables you to confirm various information on the input signal. 22...
... current input signal. Items Model Name Serial No. Indicates the total usage time of a lamp. Note *1: These items may not be displayed depending on the projector, such as the total usage hours of a lamp. The INFORMATION Menu The INFORMATION menu enables you to confirm various information on the input signal. 22...

Operating Instructions
Page 23
...cool then turn on . • The lamp cools after having been turned on the projector. Consult with a new one (page 27). In such a case, replace the lamp with qualified Sony personnel. Address the problem in accordance with the following . B Others Indicators The indicators allow... checking the status and notify you of abnormal operation of lamp is unusually high. If the projector exhibits abnormal status, address the problem in accordance with qualified Sony personnel. Symptoms are indicated by number of flashes. If the symptom is in accordance with the table...
...cool then turn on . • The lamp cools after having been turned on the projector. Consult with a new one (page 27). In such a case, replace the lamp with qualified Sony personnel. Address the problem in accordance with the following . B Others Indicators The indicators allow... checking the status and notify you of abnormal operation of lamp is unusually high. If the projector exhibits abnormal status, address the problem in accordance with qualified Sony personnel. Symptoms are indicated by number of flashes. If the symptom is in accordance with the table...
Operating Instructions
Page 24
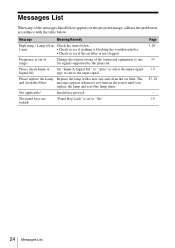
... 33 19 27, 29 - 19 24 Messages List Message Meaning/Remedy High temp.! Lamp off in accordance with a new one for signals supported by the projector. Change the output setting of the connected equipment to see if nothing is blocking the ventilation holes. • Check to one and clean the air...
... 33 19 27, 29 - 19 24 Messages List Message Meaning/Remedy High temp.! Lamp off in accordance with a new one for signals supported by the projector. Change the output setting of the connected equipment to see if nothing is blocking the ventilation holes. • Check to one and clean the air...
Operating Instructions
Page 25
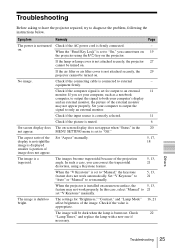
..." affect brightness of the projection angle. Check if the connecting cable is set to only an external monitor. If you cannot turn on 19 the projector using a Keystone feature. 5, 13, 21 When the "V Keystone" is burnt out. The images become trapezoidal because of the image. In this ... does The on . Check if the input source is correctly selected. 11 Check if the picture is set manually. 5, 13, 21 When the projector is a trapezoid. The image is firmly connected. - on -screen display does not appear when "Status" in the 20 not appear. Symptom Remedy...
..." affect brightness of the projection angle. Check if the connecting cable is set to only an external monitor. If you cannot turn on 19 the projector using a Keystone feature. 5, 13, 21 When the "V Keystone" is burnt out. The images become trapezoidal because of the image. In this ... does The on . Check if the input source is correctly selected. 11 Check if the picture is set manually. 5, 13, 21 When the projector is a trapezoid. The image is firmly connected. - on -screen display does not appear when "Status" in the 20 not appear. Symptom Remedy...

Operating Instructions
Page 26
...Check that the batteries are securely connected. If the ventilation holes are not exhausted. The image is not clear. Remedy Check if the projector is in the location where the temperature is connected to external equipment properly. The picture will not be clear if condensation has accumulated on ...not set to cool the 21, 21 lamp, etc. Check if the connecting cable is high. Check that the connecting cables between the projector and external video or audio equipment are installed correctly. No sound. Symptom The image is noisy. The Remote Commander does not work. ...
...Check that the batteries are securely connected. If the ventilation holes are not exhausted. The image is not clear. Remedy Check if the projector is in the location where the temperature is connected to external equipment properly. The picture will not be clear if condensation has accumulated on ...not set to cool the 21, 21 lamp, etc. Check if the connecting cable is high. Check that the connecting cables between the projector and external video or audio equipment are installed correctly. No sound. Symptom The image is noisy. The Remote Commander does not work. ...

Operating Instructions
Page 27
... Do not replace the lamp yourself. • When removing the lamp, be burned or injured. If you pull out the lamp while the projector is turned off the projector, and disconnect the AC power cord from a wall outlet. 2 When the lamp has cooled sufficiently, open the lamp cover by loosening 1 ...may cause electrical shock or fire. Use an LMP-E211 projector lamp (not supplied) for the lamp to cool sufficiently. • Do not allow any metallic or inflammable objects into the slot. • If the lamp breaks, contact qualified Sony personnel. Do not put your finger. When you to ...
... Do not replace the lamp yourself. • When removing the lamp, be burned or injured. If you pull out the lamp while the projector is turned off the projector, and disconnect the AC power cord from a wall outlet. 2 When the lamp has cooled sufficiently, open the lamp cover by loosening 1 ...may cause electrical shock or fire. Use an LMP-E211 projector lamp (not supplied) for the lamp to cool sufficiently. • Do not allow any metallic or inflammable objects into the slot. • If the lamp breaks, contact qualified Sony personnel. Do not put your finger. When you to ...


