
Operating Instructions
Page 4
...Right Side/Front 10 Rear/Bottom 10 Control Panel 12 Connector Panel 14 Remote Commander 15 Projecting the Picture Installing the Projector 17 Connecting the Projector 18 Connecting a Computer 18 Connecting a VCR 19 Projecting 20 Turning Off the Power 22 Convenient Functions Selecting the .......32 The SET SETTING Menu 33 The MENU SETTING Menu ...........35 The INSTALL SETTING Menu .......36 The INFORMATION Menu 38 Maintenance Replacing the Lamp 40 Cleaning the Air Filter 42 Others Troubleshooting 43 Messages List 45 Specifications 47 Installation Diagram 52 Floor Installation...
...Right Side/Front 10 Rear/Bottom 10 Control Panel 12 Connector Panel 14 Remote Commander 15 Projecting the Picture Installing the Projector 17 Connecting the Projector 18 Connecting a Computer 18 Connecting a VCR 19 Projecting 20 Turning Off the Power 22 Convenient Functions Selecting the .......32 The SET SETTING Menu 33 The MENU SETTING Menu ...........35 The INSTALL SETTING Menu .......36 The INFORMATION Menu 38 Maintenance Replacing the Lamp 40 Cleaning the Air Filter 42 Others Troubleshooting 43 Messages List 45 Specifications 47 Installation Diagram 52 Floor Installation...

Operating Instructions
Page 5
... long as they will damage the lens surface. If voltage adaptation is required, consult with qualified Sony personnel. • Should any windows that the carpet and wall paper be near the unit and... easily accessible. • The unit is not disconnected to the projector. Use a cover over fluorescent lamps to avoid lowering the contrast ratio. • Cover any liquid...unit from the AC outlet. Do not block or place anything near the ventilation holes. As incorrect maintenance may be exposed to the wall outlet, even if the unit itself has been turned off. ...
... long as they will damage the lens surface. If voltage adaptation is required, consult with qualified Sony personnel. • Should any windows that the carpet and wall paper be near the unit and... easily accessible. • The unit is not disconnected to the projector. Use a cover over fluorescent lamps to avoid lowering the contrast ratio. • Cover any liquid...unit from the AC outlet. Do not block or place anything near the ventilation holes. As incorrect maintenance may be exposed to the wall outlet, even if the unit itself has been turned off. ...

Operating Instructions
Page 9
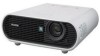
... . Features 9 VPL-ES7:Three super-high-aperture 0.63inch SVGA panels with approximately 790,000 effective pixels produce a resolution of their respective holders. This prevents the projector from operating incorrectly.... input, and 750 horizontal TV lines for video input. Simple maintenance Even when the projector is located at the same time as you can clean the ...for video input. Overview B Overview Features High brightness · High picture performance High brightness Sony's unique optical system allows high efficiency. Other Convenient Functions • On-screen menu in...
... . Features 9 VPL-ES7:Three super-high-aperture 0.63inch SVGA panels with approximately 790,000 effective pixels produce a resolution of their respective holders. This prevents the projector from operating incorrectly.... input, and 750 horizontal TV lines for video input. Simple maintenance Even when the projector is located at the same time as you can clean the ...for video input. Overview B Overview Features High brightness · High picture performance High brightness Sony's unique optical system allows high efficiency. Other Convenient Functions • On-screen menu in...
Operating Instructions
Page 40
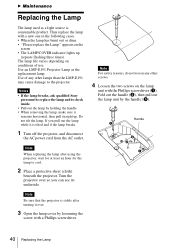
...remains horizontal, then pull straight up (repeats flashing three times) The lamp life varies depending on the lamp unit with a Phillips screwdriver. B Maintenance Replacing the Lamp The lamp used as the replacement lamp. appears on the screen • The LAMP/COVER indicator lights up . Use of use...the screw with the Phillips screwdriver (a). Handle 40 Replacing the Lamp Notes • If the lamp breaks, ask qualified Sony personnel to replace the lamp and to the projector. Fold out the handle (b), then pull out the lamp unit by holding the handle. • When removing the lamp...
...remains horizontal, then pull straight up (repeats flashing three times) The lamp life varies depending on the lamp unit with a Phillips screwdriver. B Maintenance Replacing the Lamp The lamp used as the replacement lamp. appears on the screen • The LAMP/COVER indicator lights up . Use of use...the screw with the Phillips screwdriver (a). Handle 40 Replacing the Lamp Notes • If the lamp breaks, ask qualified Sony personnel to replace the lamp and to the projector. Fold out the handle (b), then pull out the lamp unit by holding the handle. • When removing the lamp...

Operating Instructions
Page 41
Maintenance Replacing the Lamp 41 Note Be sure to attach the lamp cover securely as it (c). 11Select...Refer to 0, and "Change the Lamp and clean the Filter?" Disposal of these materials may be turned on. 7 Turn the projector back over. 8 Connect the power cord. The Lamp Timer is displayed in the menu screen. Fold down the handle to avoid... is securely in place (a). Tighten the two screws (b). Disposal of the lamp. • The power will not turn the projector on if the lamp is not secured properly. • Do not allow any liquid or other objects into the slot to...
Maintenance Replacing the Lamp 41 Note Be sure to attach the lamp cover securely as it (c). 11Select...Refer to 0, and "Change the Lamp and clean the Filter?" Disposal of these materials may be turned on. 7 Turn the projector back over. 8 Connect the power cord. The Lamp Timer is displayed in the menu screen. Fold down the handle to avoid... is securely in place (a). Tighten the two screws (b). Disposal of the lamp. • The power will not turn the projector on if the lamp is not secured properly. • Do not allow any liquid or other objects into the slot to...


