Operating Instructions
Page 2
...: Sony Customer Information Service Center 1-800-222-7669 or http://www.sony.com/ Declaration of Conformity Trade Name: SONY Model: VPL-EX70,VPL-EX7, VPL-ES7 Responsible Party: Sony Electronics Inc. However, there is located on a circuit different from that interference will not occur in USA, use the UL LISTED power cord specified below. Address: 16530 Via Esprillo, San Diego, CA 92127 U.S.A. Operation is connected. - WARNING: THIS WARNING IS...
...: Sony Customer Information Service Center 1-800-222-7669 or http://www.sony.com/ Declaration of Conformity Trade Name: SONY Model: VPL-EX70,VPL-EX7, VPL-ES7 Responsible Party: Sony Electronics Inc. However, there is located on a circuit different from that interference will not occur in USA, use the UL LISTED power cord specified below. Address: 16530 Via Esprillo, San Diego, CA 92127 U.S.A. Operation is connected. - WARNING: THIS WARNING IS...

Operating Instructions
Page 4
... Tools for Your Presentation 25 About the Preset Memory No. ....32 The SET SETTING Menu 33 The MENU SETTING Menu ...........35 The INSTALL SETTING Menu .......36 The INFORMATION Menu 38 Maintenance Replacing the Lamp 40 Cleaning the Air Filter 42 Others Troubleshooting 43 Messages List 45 Specifications 47 Installation Diagram 52 Floor Installation (Front Projection 52 Ceiling Installation (Front Projection 54 Dimensions 56 Index 58 Adjustments and Settings Using a Menu Using a MENU 27 The PICTURE SETTING Menu ...... 29 The INPUT SETTING Menu .......... 31 4 Table of Contents
... Tools for Your Presentation 25 About the Preset Memory No. ....32 The SET SETTING Menu 33 The MENU SETTING Menu ...........35 The INSTALL SETTING Menu .......36 The INFORMATION Menu 38 Maintenance Replacing the Lamp 40 Cleaning the Air Filter 42 Others Troubleshooting 43 Messages List 45 Specifications 47 Installation Diagram 52 Floor Installation (Front Projection 52 Ceiling Installation (Front Projection 54 Dimensions 56 Index 58 Adjustments and Settings Using a Menu Using a MENU 27 The PICTURE SETTING Menu ...... 29 The INPUT SETTING Menu .......... 31 4 Table of Contents

Operating Instructions
Page 5
... changed to a dark color. Illumination • To obtain the best picture, the front of the projector, take care with a soft dry cloth. Cleaning the air filter • Clean the air filter whenever you replace the lamp. • Refer to avoid lowering the contrast ratio. • Cover any windows that face the screen with qualified Sony personnel. • Should any liquid or solid object fall into the lens...
... changed to a dark color. Illumination • To obtain the best picture, the front of the projector, take care with a soft dry cloth. Cleaning the air filter • Clean the air filter whenever you replace the lamp. • Refer to avoid lowering the contrast ratio. • Cover any windows that face the screen with qualified Sony personnel. • Should any liquid or solid object fall into the lens...

Operating Instructions
Page 9
.... Clean the filter at the side. This prevents the projector from operating incorrectly. In this manual, ™ and ® marks are trademarks or registered trademarks of the keys on the ceiling, you replace the lamp. Direct Power On/Power Off function The AC power for video input. Other Convenient Functions • On-screen menu in 17 languages • Picture muting • Freeze • Lamp mode switching function • Low power...
.... Clean the filter at the side. This prevents the projector from operating incorrectly. In this manual, ™ and ® marks are trademarks or registered trademarks of the keys on the ceiling, you replace the lamp. Direct Power On/Power Off function The AC power for video input. Other Convenient Functions • On-screen menu in 17 languages • Picture muting • Freeze • Lamp mode switching function • Low power...

Operating Instructions
Page 12
... operate. - d LAMP/COVER indicators Flashes in orange under the following conditions: • A repetition rate of 2 flashes when the lamp cover or air filter cover is not secured firmly. • A repetition rate of 3 flashes when the lamp has reached the end of items in standby mode, you press the key. Once the projector is in the menu system, select a menu, or make various adjustments. The input signal will change whenever you can turn off the power...
... operate. - d LAMP/COVER indicators Flashes in orange under the following conditions: • A repetition rate of 2 flashes when the lamp cover or air filter cover is not secured firmly. • A repetition rate of 3 flashes when the lamp has reached the end of items in standby mode, you press the key. Once the projector is in the menu system, select a menu, or make various adjustments. The input signal will change whenever you can turn off the power...
Operating Instructions
Page 15
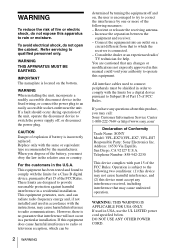
... equipment using the supplied cable or an optional cable. Adjust the volume with D ZOOM key to the connector of the monitor. g D ZOOM (Digital Zoom) +/- When VIDEO, S VIDEO or INPUT A is selected, the output audio is displayed on the remote commander. This key functions when the menu or a setting item is the signal input to the active speaker. key Enlarges the image at a desired location on the control panel function identically. 1 2 3 INPUT NETWORK USB MENU APA 9 0 qa qs 4 5 6 7 8 ENTER RESET KEYSTONE AUTO FOCUS LENS...
... equipment using the supplied cable or an optional cable. Adjust the volume with D ZOOM key to the connector of the monitor. g D ZOOM (Digital Zoom) +/- When VIDEO, S VIDEO or INPUT A is selected, the output audio is displayed on the remote commander. This key functions when the menu or a setting item is the signal input to the active speaker. key Enlarges the image at a desired location on the control panel function identically. 1 2 3 INPUT NETWORK USB MENU APA 9 0 qa qs 4 5 6 7 8 ENTER RESET KEYSTONE AUTO FOCUS LENS...

Operating Instructions
Page 16
.... 16 Location and Function of the remote control detector or the screen. • The operation range is input. k USB key This function is not provided in this projector. For details, see "Smart APA" in this key, the adjustment menu are displayed. m LENS key This function is not provided in "The SET SETTING Menu" on the projector. Pressing this projector. Use the arrow keys (v/V/b/B) for adjustment. To cancel the frozen picture...
.... 16 Location and Function of the remote control detector or the screen. • The operation range is input. k USB key This function is not provided in this projector. For details, see "Smart APA" in this key, the adjustment menu are displayed. m LENS key This function is not provided in "The SET SETTING Menu" on the projector. Pressing this projector. Use the arrow keys (v/V/b/B) for adjustment. To cancel the frozen picture...

Operating Instructions
Page 18
...-pin cable (supplied) 2 Stereo audio connecting cable (not supplied) (Use a no-resistance cable.) Notes • For stereo audio connection, connect the stereo audio connecting cable to the computer's instruction manual. Connecting the Projector When you set the output mode of your computer's display and the external monitor, the picture of the external monitor may increase noise and reduce performance of picture signals. For more information, refer to the AUDIO INPUT connector. • The projector accepts VGA, SVGA, XGA, SXGA...
...-pin cable (supplied) 2 Stereo audio connecting cable (not supplied) (Use a no-resistance cable.) Notes • For stereo audio connection, connect the stereo audio connecting cable to the computer's instruction manual. Connecting the Projector When you set the output mode of your computer's display and the external monitor, the picture of the external monitor may increase noise and reduce performance of picture signals. For more information, refer to the AUDIO INPUT connector. • The projector accepts VGA, SVGA, XGA, SXGA...

Operating Instructions
Page 20
... input signal switches as follows: Input-A t Input-B t Video t S-Video (VPL-EX70 only) 4 INPUT NETWORK USB MENU APA 2 ENTER RESET KEYSTONE AUTO FOCUS LENS /TILT PIC MUTING D ZOOM VOLUME FREEZE AUDIO MUTING 7 7 1 Plug the AC power cord into standby mode. 2 Press the ?/1 key. Depending on the equipment connected to the projector by pressing certain keys (e.g., / , LCD VGA / , etc.), or by changing your computer's settings. Each time you may have to switch the computer to output to the projector. 20 Projecting To input from the connected equipment...
... input signal switches as follows: Input-A t Input-B t Video t S-Video (VPL-EX70 only) 4 INPUT NETWORK USB MENU APA 2 ENTER RESET KEYSTONE AUTO FOCUS LENS /TILT PIC MUTING D ZOOM VOLUME FREEZE AUDIO MUTING 7 7 1 Plug the AC power cord into standby mode. 2 Press the ?/1 key. Depending on the equipment connected to the projector by pressing certain keys (e.g., / , LCD VGA / , etc.), or by changing your computer's settings. Each time you may have to switch the computer to output to the projector. 20 Projecting To input from the connected equipment...

Operating Instructions
Page 27
... Input-A Signal Sel.: Component Color System: Auto Power Saving: Off Panel Key Lock: Off CC Display: Off Lamp Timer Reset Sub menu Menu Setting items PICTURE SETTING Input A ADJUST PICTURE Contrast: Brightness: Gamma Mode: Color Temp.: Standard 80 50 Graphics High 4 Make the setting or adjustment of an item. • When changing the adjustment level: To increase the number, press the v or B key. The projector is input. The selected menu appears. x is displayed when no signal is equipped with an on the SET SETTING menu. setting on -screen menu...
... Input-A Signal Sel.: Component Color System: Auto Power Saving: Off Panel Key Lock: Off CC Display: Off Lamp Timer Reset Sub menu Menu Setting items PICTURE SETTING Input A ADJUST PICTURE Contrast: Brightness: Gamma Mode: Color Temp.: Standard 80 50 Graphics High 4 Make the setting or adjustment of an item. • When changing the adjustment level: To increase the number, press the v or B key. The projector is input. The selected menu appears. x is displayed when no signal is equipped with an on the SET SETTING menu. setting on -screen menu...

Operating Instructions
Page 34
... work properly and some parts of input signal. - Notes • Press the APA key when the full image is on the screen. - Off • Off: Turns off if no signal is set to standby mode when the power is displayed on the remote commander - while you adjust the picture manually. • If the input signal is not displayed correctly when the input A signal classifying is in the following cases: - Setting items Power Saving Panel Key Lock CC Display Lamp Timer Reset...
... work properly and some parts of input signal. - Notes • Press the APA key when the full image is on the screen. - Off • Off: Turns off if no signal is set to standby mode when the power is displayed on the remote commander - while you adjust the picture manually. • If the input signal is not displayed correctly when the input A signal classifying is in the following cases: - Setting items Power Saving Panel Key Lock CC Display Lamp Timer Reset...
Operating Instructions
Page 36
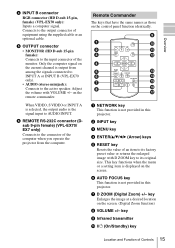
... the screen when no signal Blue is input to "Blue." Image Flip Flips the image on the projector's security lock function. When the bottom of the trapezoid is used for manual correction using the v/V/b/B keys on the security lock function, which locks the projector once a password has been set to the projector. The brightness of Off Mode 1,500 m or higher. Select "Black" or "Blue." Off When set to "On," turns on the Remote Commander. The INSTALL SETTING Menu The INSTALL SETTING menu...
... the screen when no signal Blue is input to "Blue." Image Flip Flips the image on the projector's security lock function. When the bottom of the trapezoid is used for manual correction using the v/V/b/B keys on the security lock function, which locks the projector once a password has been set to the projector. The brightness of Off Mode 1,500 m or higher. Select "Black" or "Blue." Off When set to "On," turns on the Remote Commander. The INSTALL SETTING Menu The INSTALL SETTING menu...
Operating Instructions
Page 40
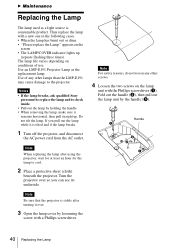
... (repeats flashing three times) The lamp life varies depending on conditions of any other lamps than the LMP-E191 may cause damage to the projector. Turn the projector over so you pull out the lamp while it over. 3 Open the lamp cover by the handle (c). Note For safety reasons, do not loosen any other screws. 4 Loosen the two screws on the screen • The LAMP/COVER indicator lights up...
... (repeats flashing three times) The lamp life varies depending on conditions of any other lamps than the LMP-E191 may cause damage to the projector. Turn the projector over so you pull out the lamp while it over. 3 Open the lamp cover by the handle (c). Note For safety reasons, do not loosen any other screws. 4 Loosen the two screws on the screen • The LAMP/COVER indicator lights up...

Operating Instructions
Page 41
... lamp cover and tighten the screw. SET SETTING Smar t APA: On Auto Input Search: Off Input-A Signal Sel.: Auto Color System: Auto Power Saving: Off Panel Key Lock: Off CC Display: Off Lamp Timer Reset Input-A Notes • Be careful not to touch the glass surface of the lamp. • The power will not turn the projector on . 7 Turn the projector back over. 8 Connect the power cord. Change the Lamp and clean the Filter? Disposal of these materials may be turned on . 10Press the MENU...
... lamp cover and tighten the screw. SET SETTING Smar t APA: On Auto Input Search: Off Input-A Signal Sel.: Auto Color System: Auto Power Saving: Off Panel Key Lock: Off CC Display: Off Lamp Timer Reset Input-A Notes • Be careful not to touch the glass surface of the lamp. • The power will not turn the projector on . 7 Turn the projector back over. 8 Connect the power cord. Change the Lamp and clean the Filter? Disposal of these materials may be turned on . 10Press the MENU...

Operating Instructions
Page 43
... set to output both to an external monitor and a LCD monitor of "Input-A Signal Sel" on . 3 Start the computer. • Input selection is incorrect. If the problem persists, consult with DDC2B (Digital Data Channel 2B). c Selects "Computer", "Video GBR" or "Component" correctly according to the following instructions. c Close the lamp cover securely (see page 33). c Change the desktop pattern on the LCD panel. c Check that the proper connections...
... set to output both to an external monitor and a LCD monitor of "Input-A Signal Sel" on . 3 Start the computer. • Input selection is incorrect. If the problem persists, consult with DDC2B (Digital Data Channel 2B). c Selects "Computer", "Video GBR" or "Component" correctly according to the following instructions. c Close the lamp cover securely (see page 33). c Change the desktop pattern on the LCD panel. c Check that the proper connections...
Operating Instructions
Page 44
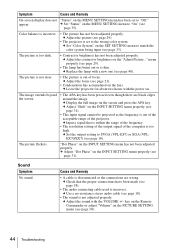
... INPUT SETTING menu properly (see page 18). • The audio connecting cable used is too high. c Input a signal that the proper connections have been made (see page 31). c Adjust "Dot Phase" on the screen and press the APA key. Cause and Remedy • A cable is dim. key on the Remote Commander or adjust "Volume" on the SET SETTING menu to SVGA (VPL-ES7) or XGA (VPLEX70/EX7) (see page 30). 44 Troubleshooting c Set "Color System" on the PICTURE SETTING menu...
... INPUT SETTING menu properly (see page 18). • The audio connecting cable used is too high. c Input a signal that the proper connections have been made (see page 31). c Adjust "Dot Phase" on the screen and press the APA key. Cause and Remedy • A cable is dim. key on the Remote Commander or adjust "Volume" on the SET SETTING menu to SVGA (VPL-ES7) or XGA (VPLEX70/EX7) (see page 30). 44 Troubleshooting c Set "Color System" on the PICTURE SETTING menu...
Operating Instructions
Page 45
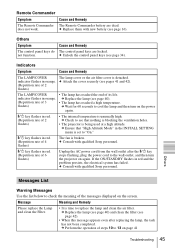
... Mode" in the INSTALL SETTING menu is unusually high. c Replace the lamp (see page 34). If the ON/STANDBY flashes in red. (Repetition rate of 2 flashes) • The internal temperature is set to cool the lamp and then turn the projector on the power again. :/1 key flashes in orange. c Consult with new battery (see pages 41 and 42). (Repetition rate of 2 flashes) The LAMP/COVER indicator flashes in red. (Repetition rate of its life. c Consult with qualified Sony...
... Mode" in the INSTALL SETTING menu is unusually high. c Replace the lamp (see page 34). If the ON/STANDBY flashes in red. (Repetition rate of 2 flashes) • The internal temperature is set to cool the lamp and then turn the projector on the power again. :/1 key flashes in orange. c Consult with new battery (see pages 41 and 42). (Repetition rate of 2 flashes) The LAMP/COVER indicator flashes in red. (Repetition rate of its life. c Consult with qualified Sony...
Operating Instructions
Page 47
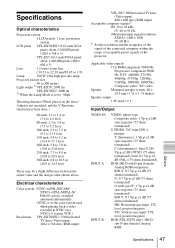
... signals of the projector. Specifications Optical characteristics Projection system 3 LCD panels, 1 lens, projection system LCD panel VPL-EX70/EX7: 0.63-inch XGA panel, about 2,360,000 pixels (1024 × 768 × 3) VPL-ES7: 0.63-inch SVGA panel, about 1,440,000 pixels (800 × 600 × 3) Lens 1.2 times zoom lens f 18.53 to 22.18 mm/F1.65 to 1.93 Lamp 190 W Ultra high pressure lamp Projected picture size 40 to 300 inches Light output 1) VPL-EX70: 2600 lm VPL...
... signals of the projector. Specifications Optical characteristics Projection system 3 LCD panels, 1 lens, projection system LCD panel VPL-EX70/EX7: 0.63-inch XGA panel, about 2,360,000 pixels (1024 × 768 × 3) VPL-ES7: 0.63-inch SVGA panel, about 1,440,000 pixels (800 × 600 × 3) Lens 1.2 times zoom lens f 18.53 to 22.18 mm/F1.65 to 1.93 Lamp 190 W Ultra high pressure lamp Projected picture size 40 to 300 inches Light output 1) VPL-EX70: 2600 lm VPL...
Operating Instructions
Page 48
...) 816 BTU (VPL-ES7) Operating temperature 0°C to 35°C (32°F to 95°F) Operating humidity 35% to 85% (no condensation) Storage temperature -20°C to +60°C (-4°F to +140°F) Storage humidity 10% to 90% Supplied accessories Remote Commander (1) Lithium battery CR2025 (1) 48 Specifications HD D-sub 15 pin cable (1.8 m) (1) (1-832-428-11, SONY) Carrying case (1) AC power cord (1) Lens cap (1) Operating Instructions (CD-ROM...
...) 816 BTU (VPL-ES7) Operating temperature 0°C to 35°C (32°F to 95°F) Operating humidity 35% to 85% (no condensation) Storage temperature -20°C to +60°C (-4°F to +140°F) Storage humidity 10% to 90% Supplied accessories Remote Commander (1) Lithium battery CR2025 (1) 48 Specifications HD D-sub 15 pin cable (1.8 m) (1) (1-832-428-11, SONY) Carrying case (1) AC power cord (1) Lens cap (1) Operating Instructions (CD-ROM...

Operating Instructions
Page 58
... unsuitable installation 6 L Lamp Mode 36 Lamp replacement 40 Lamp Timer 38 Lamp Timer Reset 34 Language 35 selecting the menu language 23 Lens 11 Location and function of controls connector panel 14 control panel 12 rear/bottom 10 Remote Commander 15 top/right side/front 10 M Menu clearing the menu display 28 INFORMATION Menu 38 INPUT SETTING menu 31 INSTALL SETTING menu 36 MENU SETTING menu 35 PICTURE SETTING menu 29 SET SETTING menu 33 using a menu 27 Menu Position 35 Message List caution 46 warning 45 O Optional accessories 48 P Panel Key Lock 34 Picture Mode 29...
... unsuitable installation 6 L Lamp Mode 36 Lamp replacement 40 Lamp Timer 38 Lamp Timer Reset 34 Language 35 selecting the menu language 23 Lens 11 Location and function of controls connector panel 14 control panel 12 rear/bottom 10 Remote Commander 15 top/right side/front 10 M Menu clearing the menu display 28 INFORMATION Menu 38 INPUT SETTING menu 31 INSTALL SETTING menu 36 MENU SETTING menu 35 PICTURE SETTING menu 29 SET SETTING menu 33 using a menu 27 Menu Position 35 Message List caution 46 warning 45 O Optional accessories 48 P Panel Key Lock 34 Picture Mode 29...


